¶ Accessories settings
Accessories section allow to add, edit and remove accessories, locate and relocate in the rooms. Before adding accessories, we recommend to add rooms.
¶ HDL Buspro/G4
Please, find below, examples for every supported type of accessory. Do not forget save all changes and restart Pyxis.
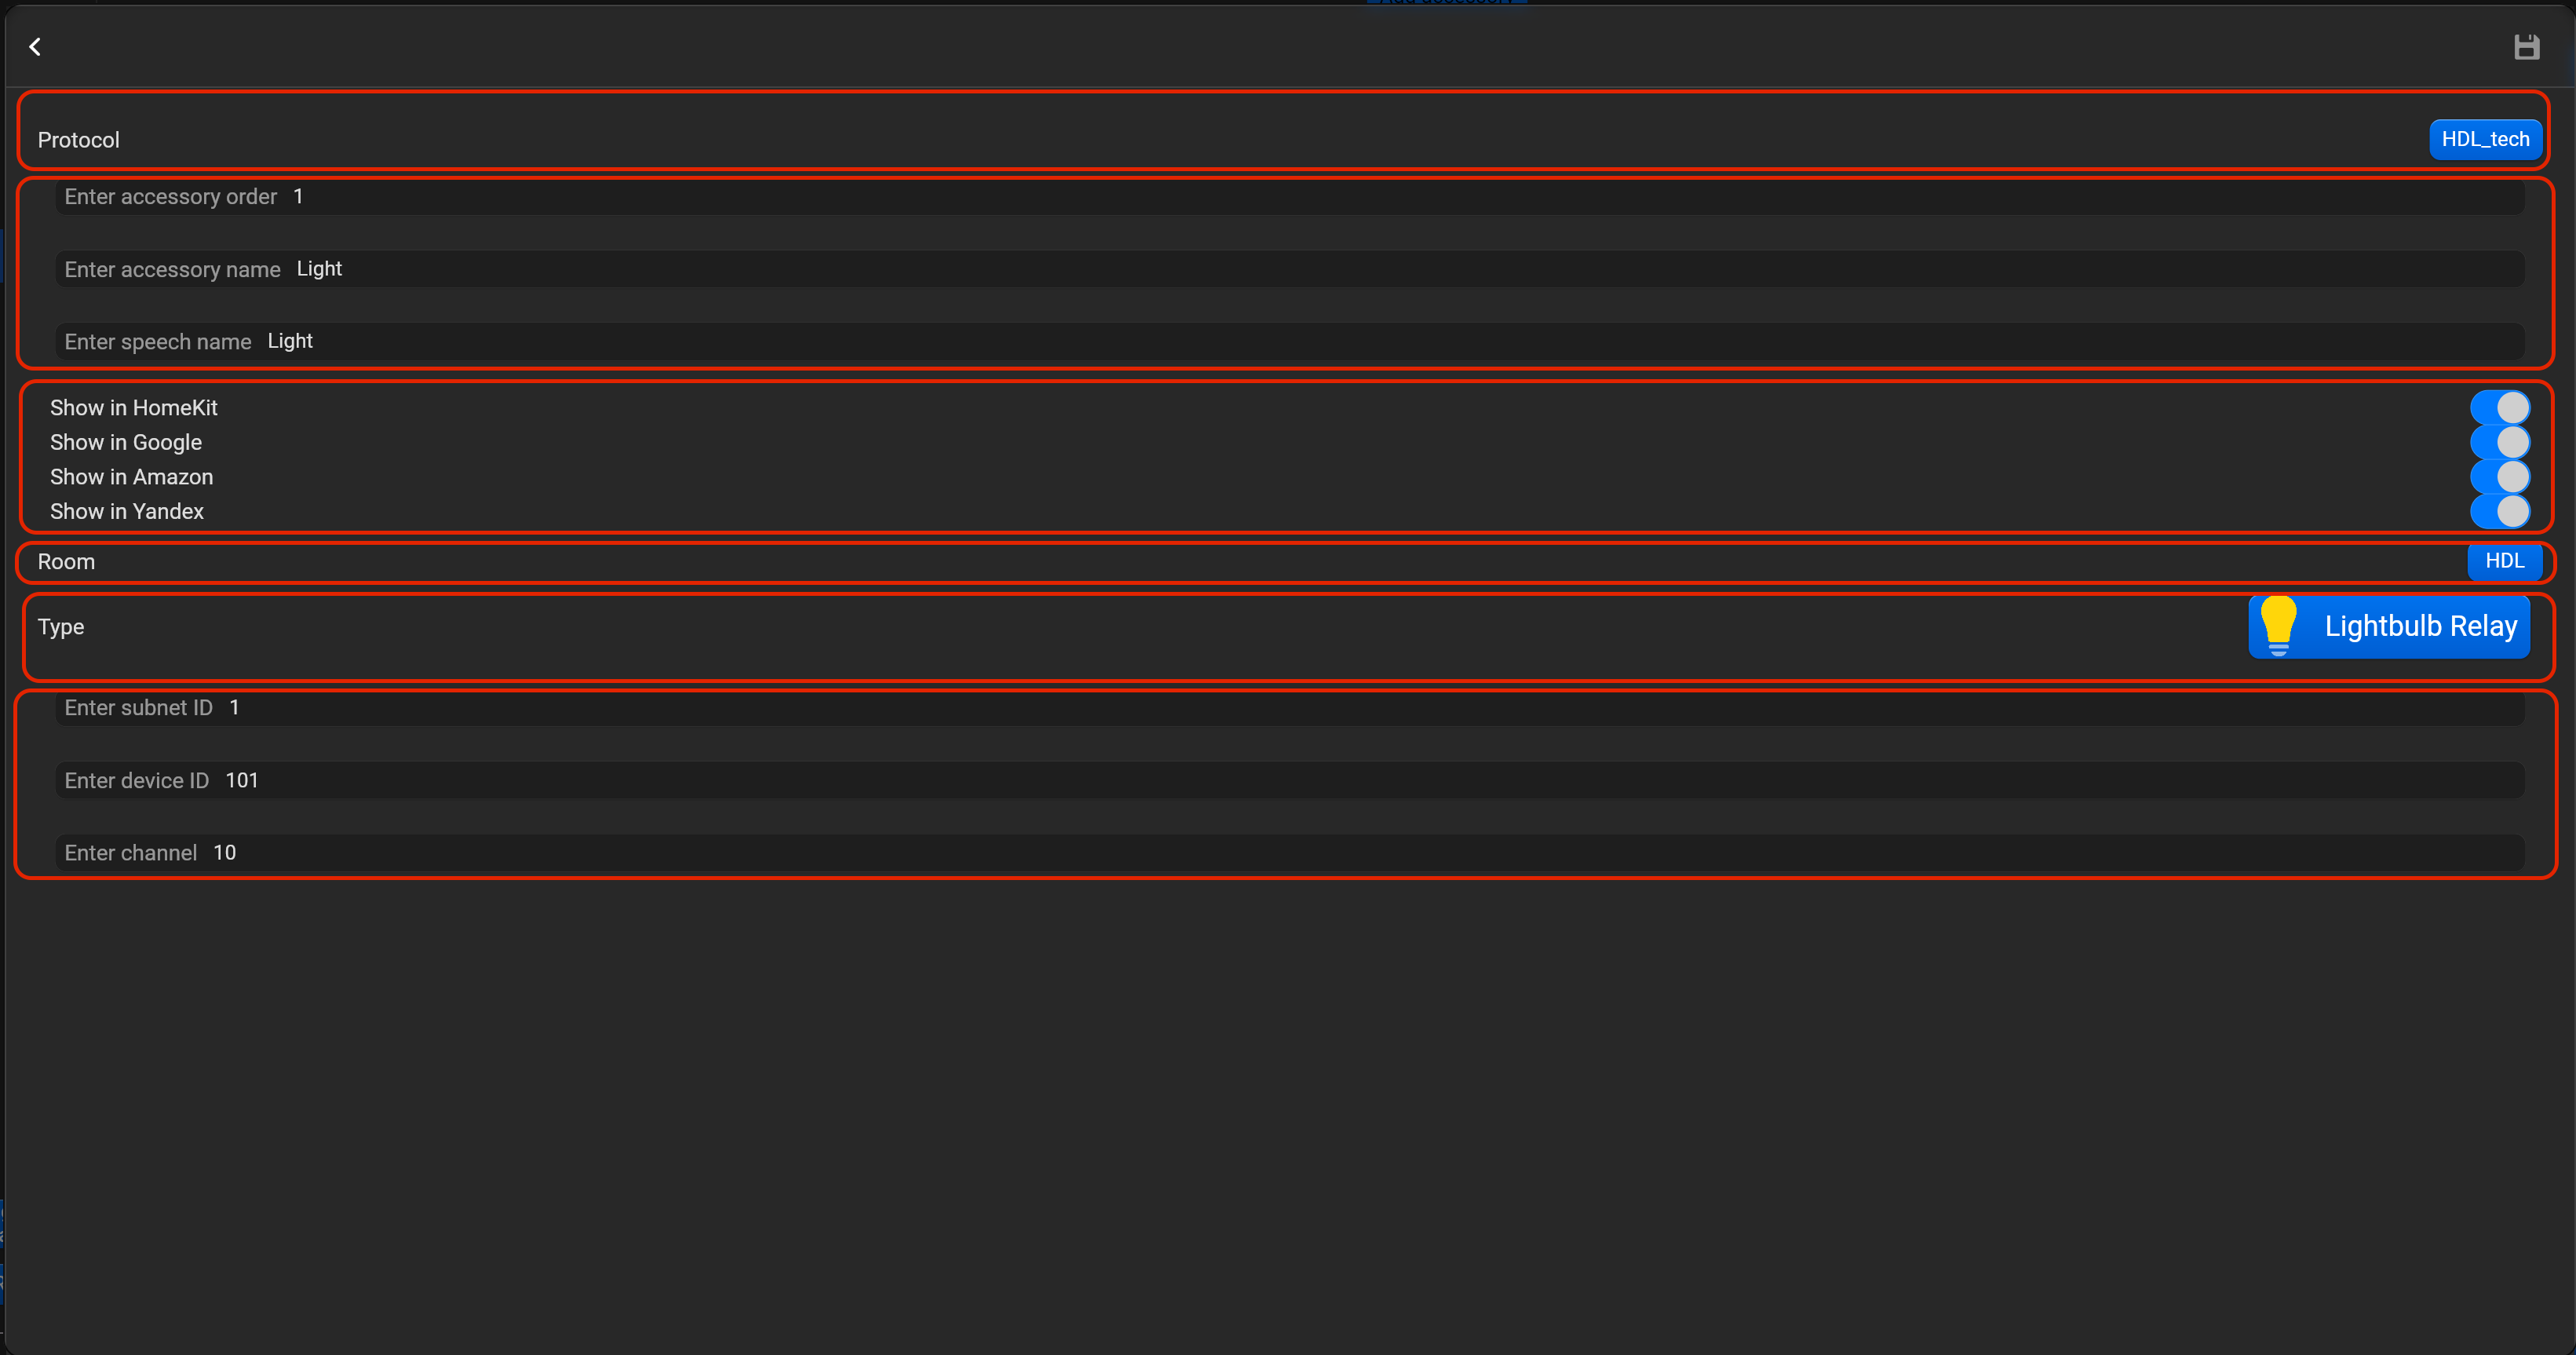
¶ Lightbulb relay
- select the protocol in the drop-down list,
- put the accessory order (affects the location of the accessory in Pyxis app),
- put name of the accessory and for the voice assistants,
- select voice assistants, where the accessory should be displayed,
- select the room, where the accessory will be located,
- select the type of accessory (Lightbulb relay),
- put subnet ID, device ID and channel.
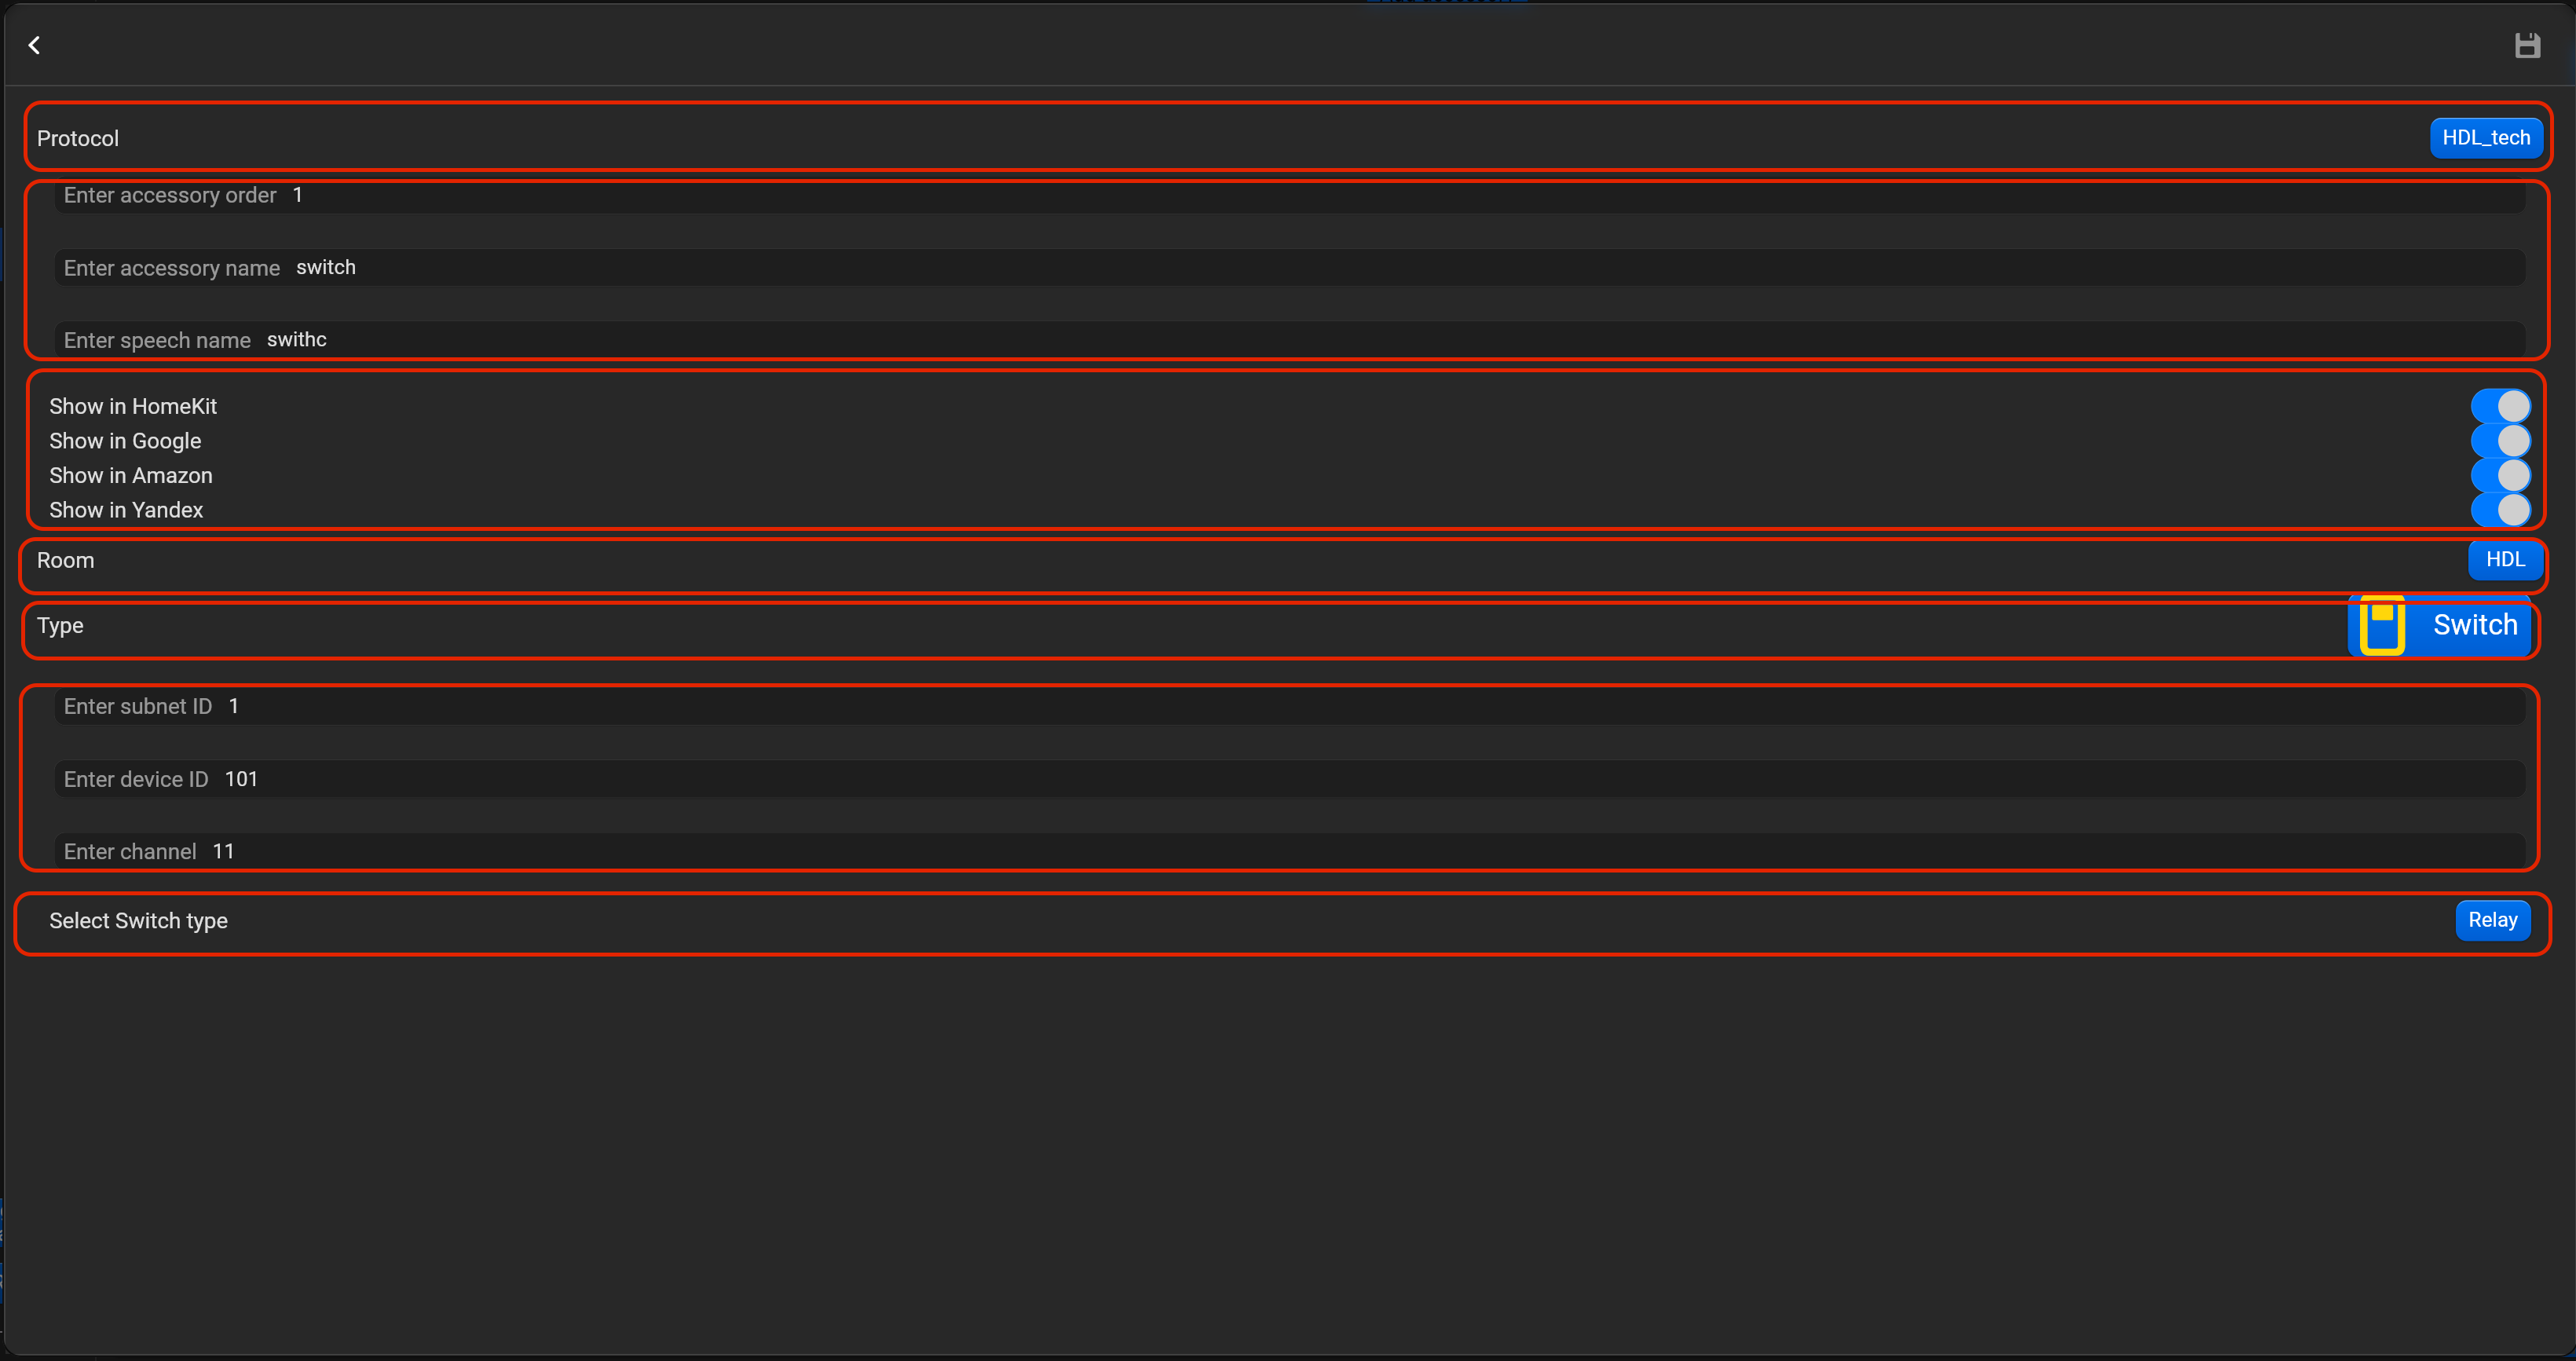
¶ Switch
- select the protocol in the drop-down list,
- put the accessory order (affects the location of the accessory in Pyxis app),
- put name of the accessory and for the voice assistants,
- select voice assistants, where the accessory should be displayed,
- select the room, where the accessory will be located,
- select the type of accessory (Switch),
- put subnet ID, device ID and channel.
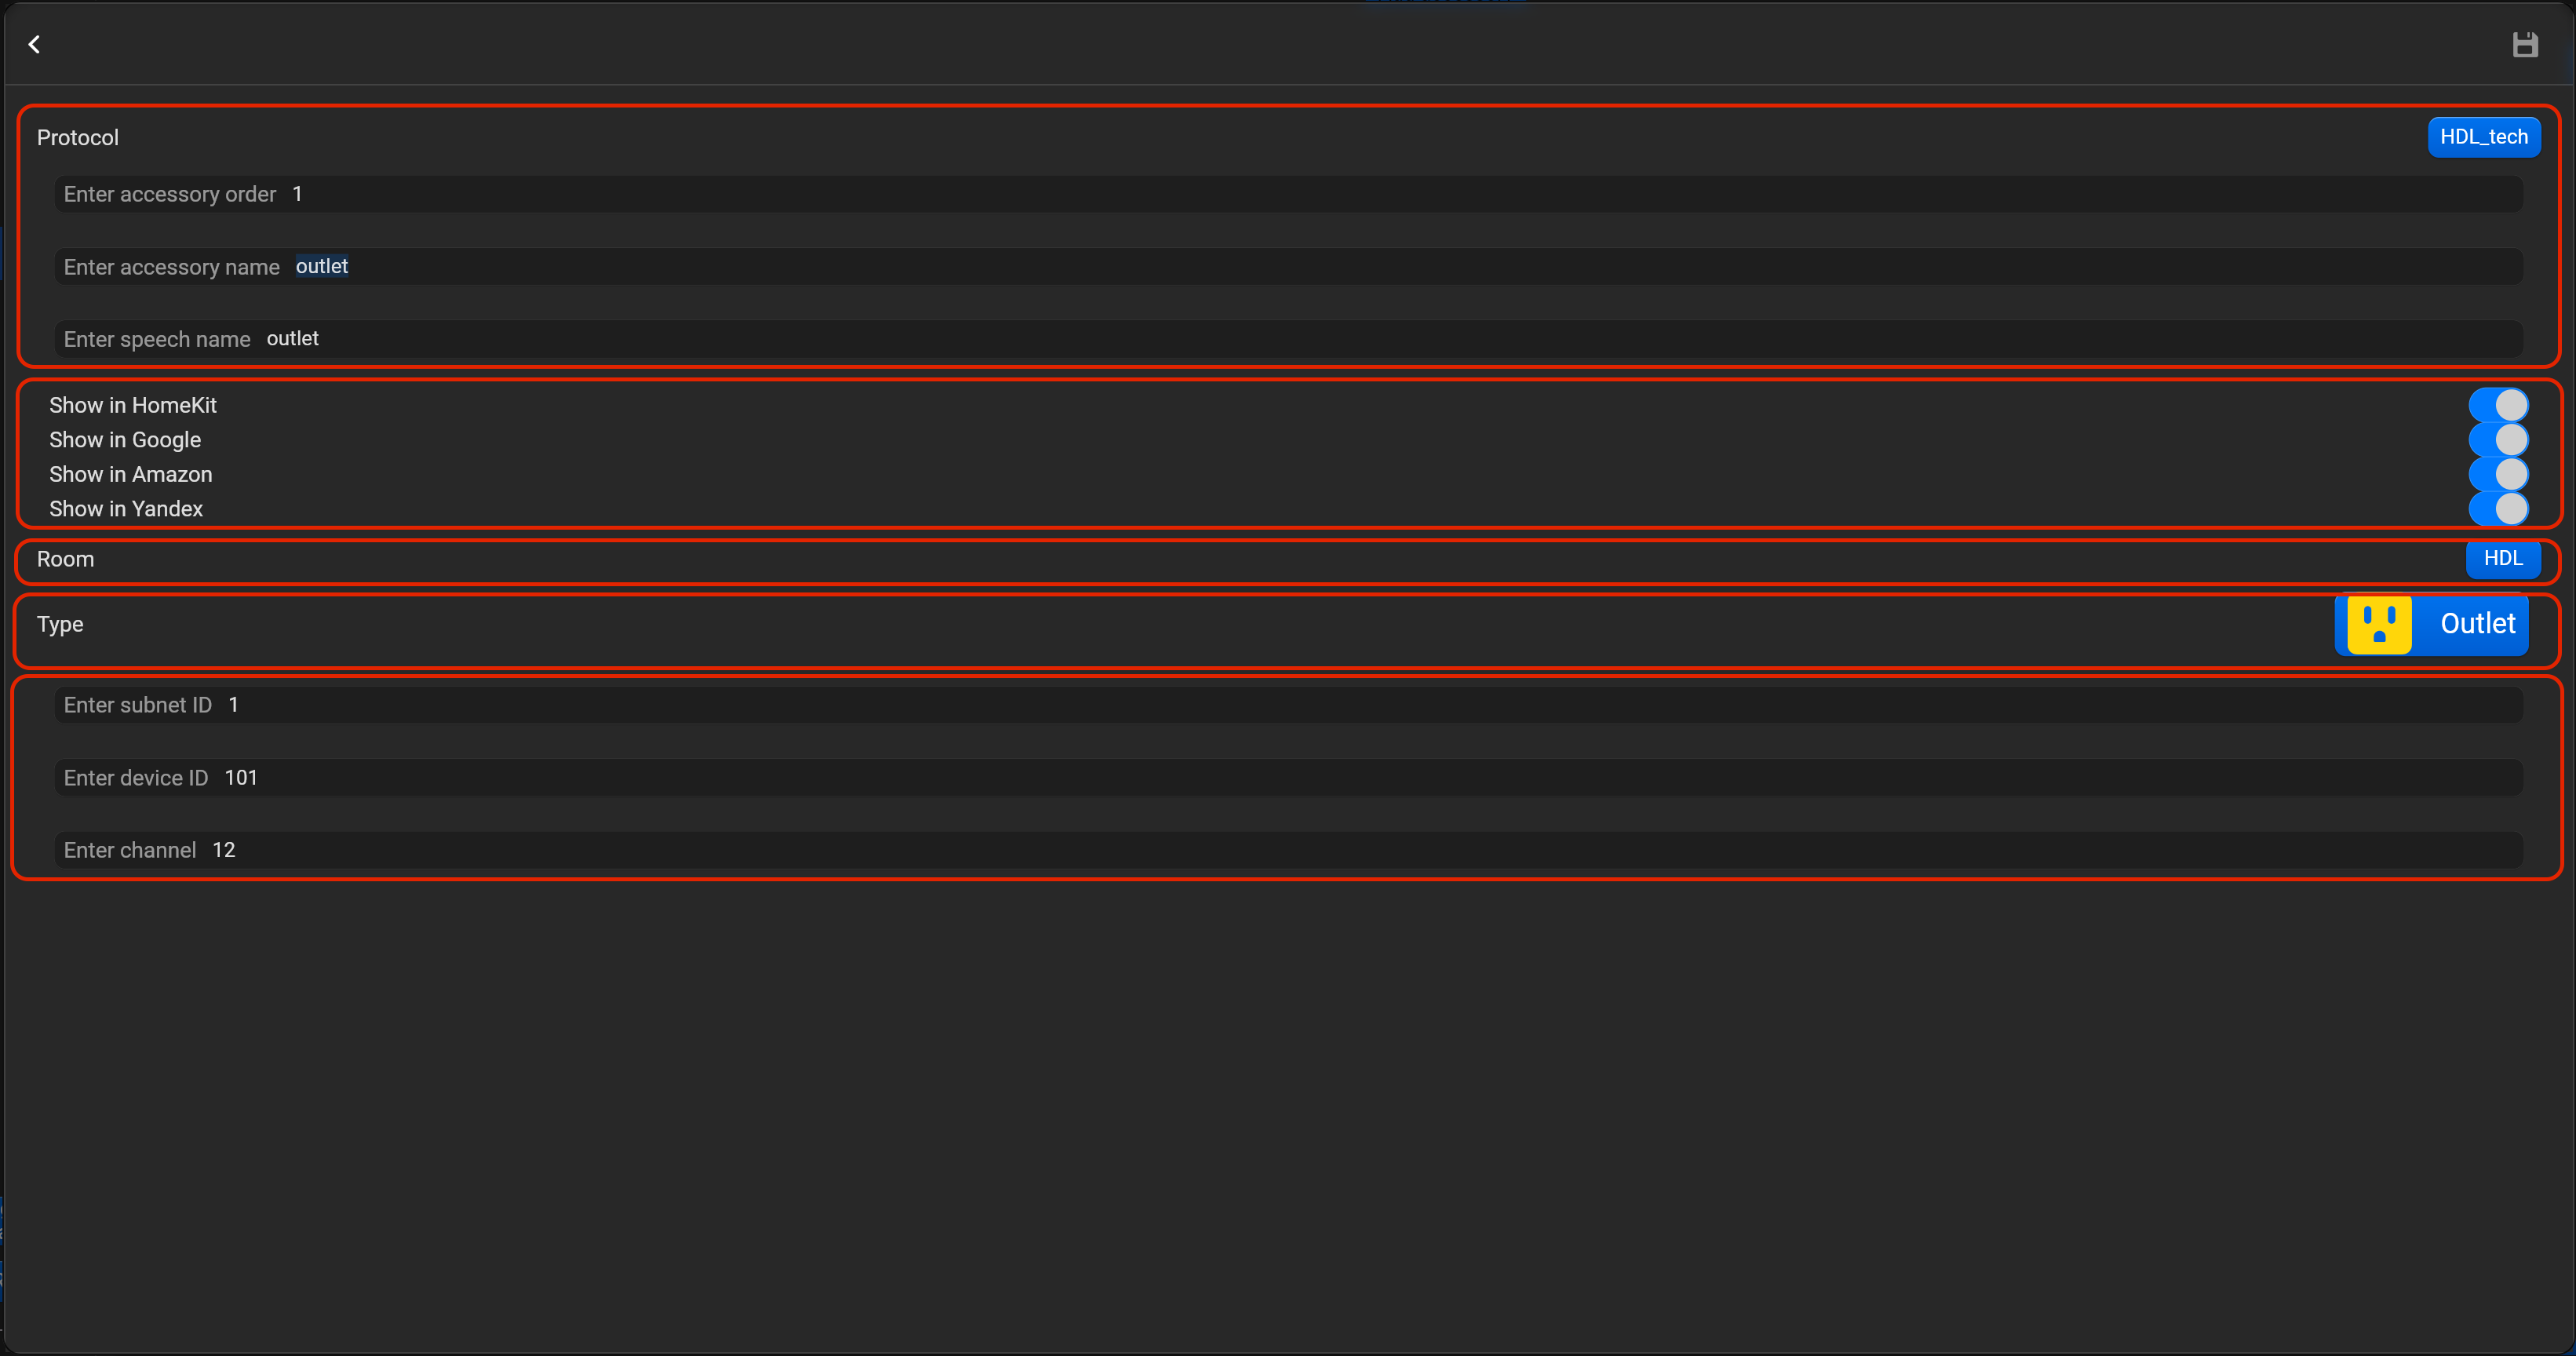
¶ Outlet
- select the protocol in the drop-down list,
- put the accessory order (affects the location of the accessory in Pyxis app),
- put name of the accessory and for the voice assistants,
- select voice assistants, where the accessory should be displayed,
- select the room, where the accessory will be located,
- select the type of accessory (Outlet),
- put subnet ID, device ID and channel.
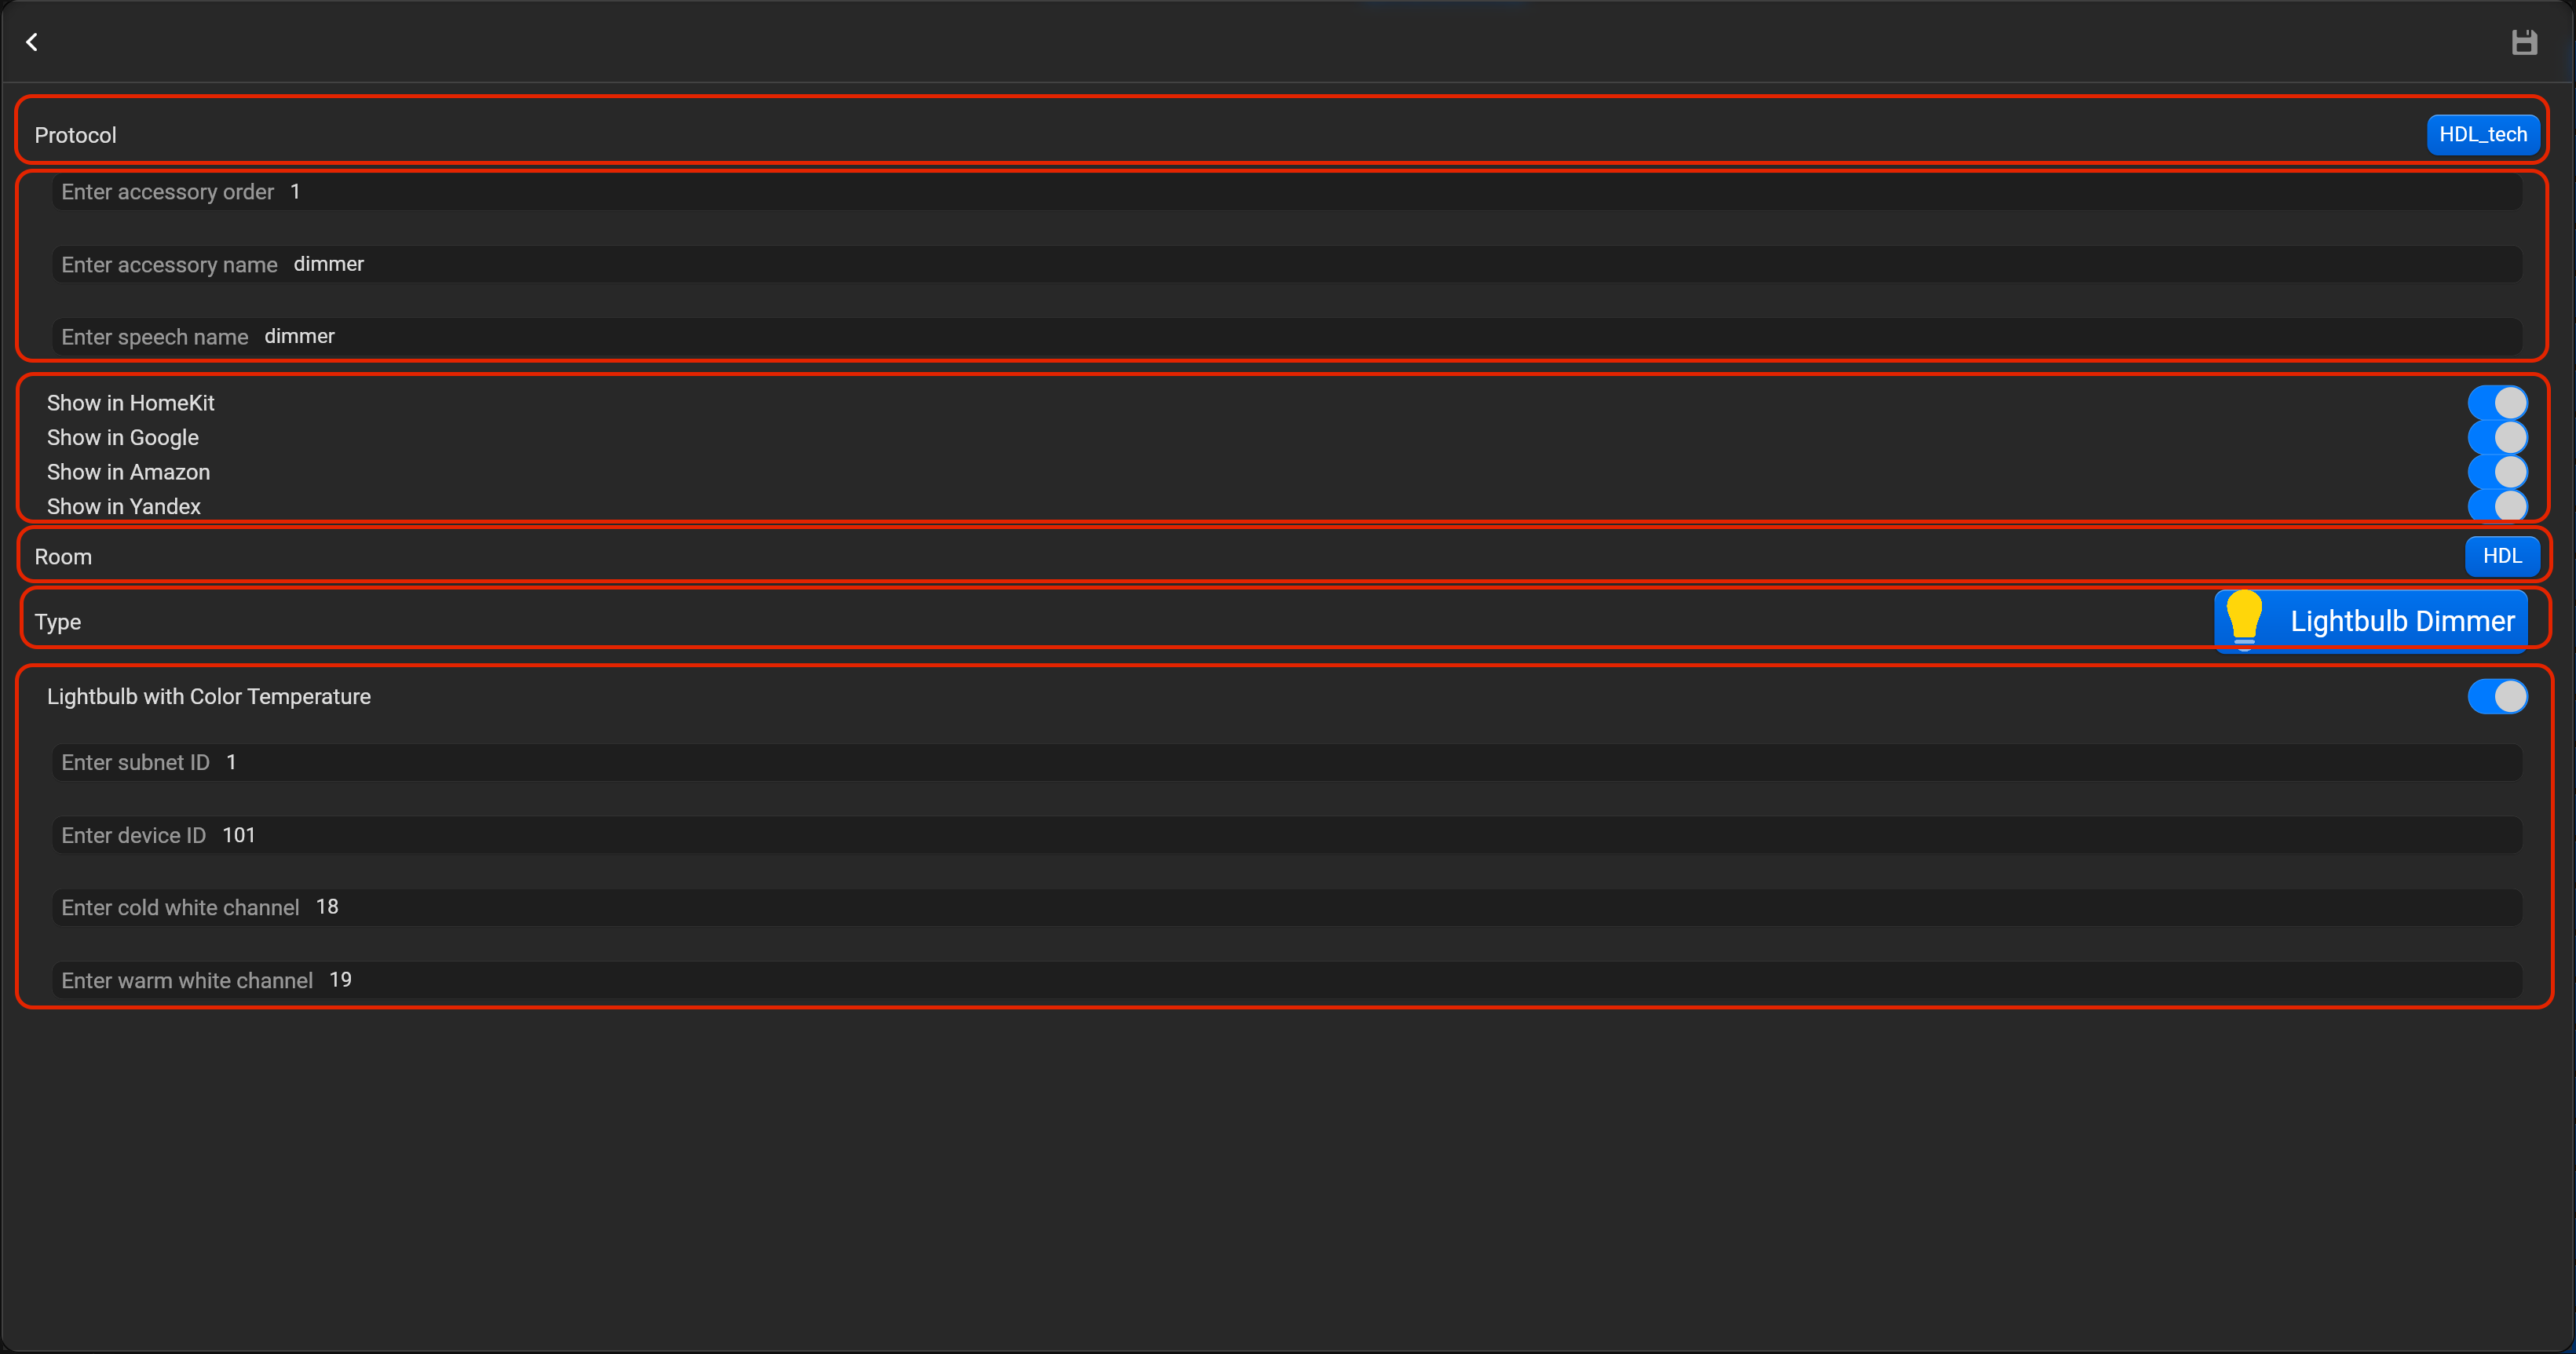
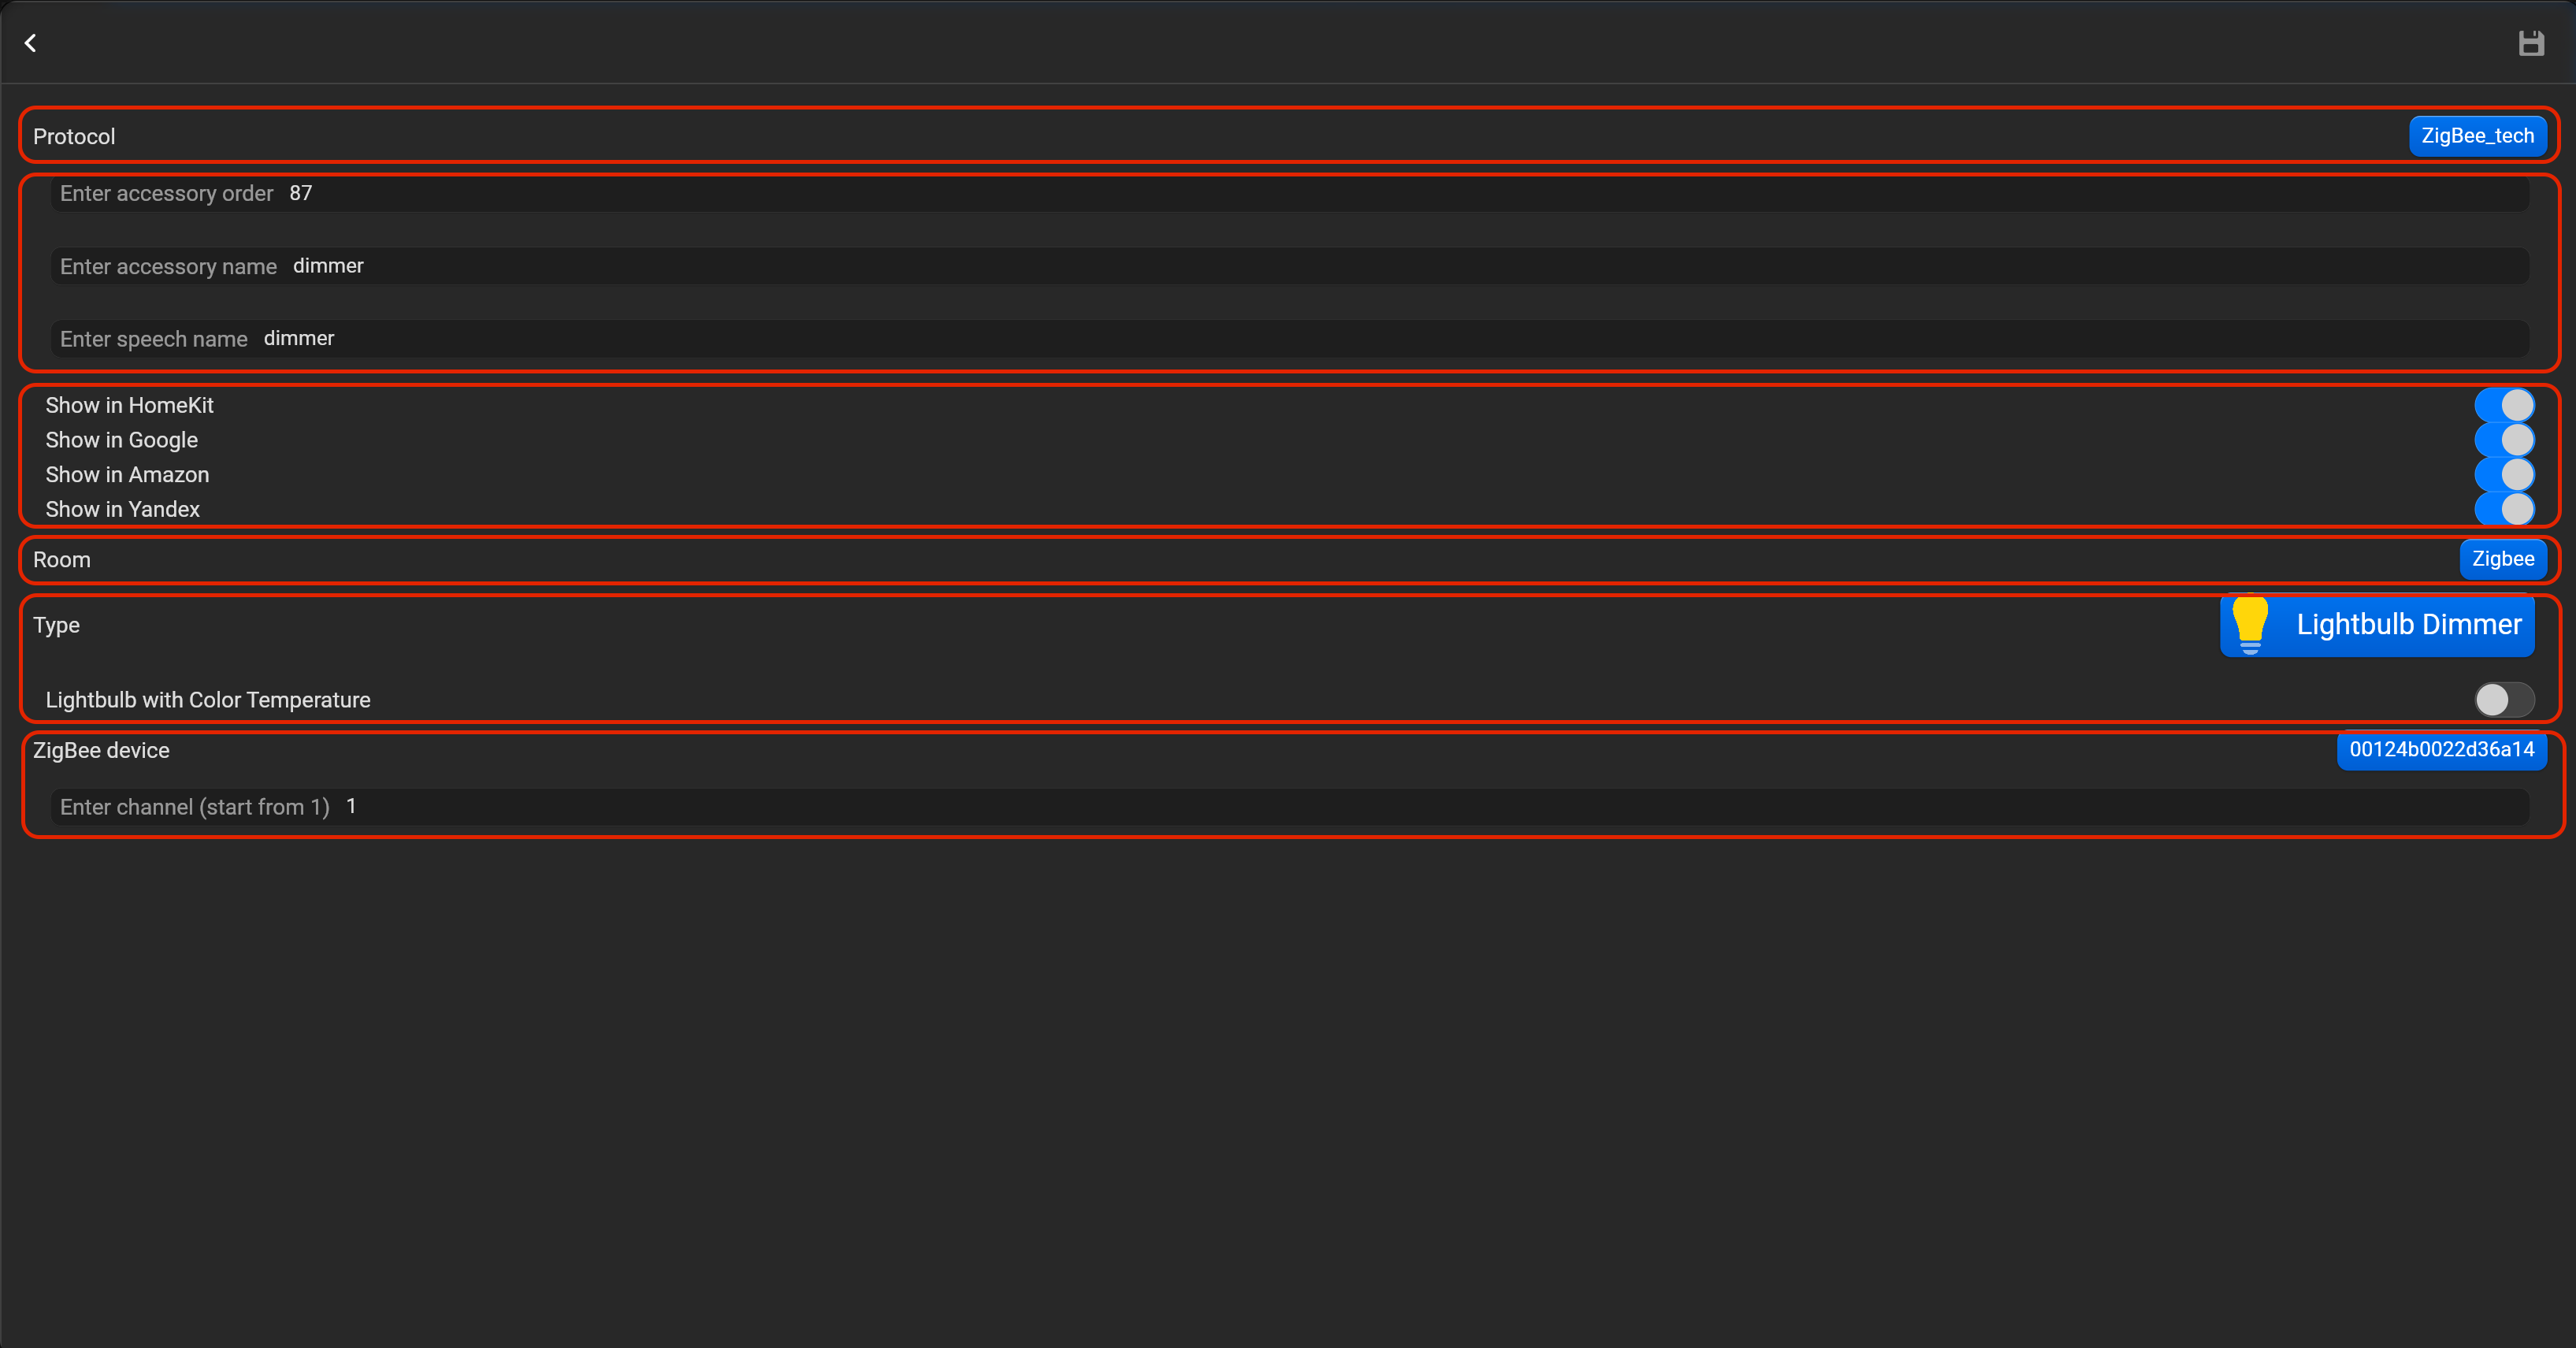
¶ Lightbulb dimmer
- select the protocol in the drop-down list,
- put the accessory order (affects the location of the accessory in Pyxis app),
- put name of the accessory and for the voice assistants,
- select voice assistants, where the accessory should be displayed,
- select the room, where the accessory will be located,
- select the type of accessory (Lightbulb dimmer),
- put subnet ID, device ID and channel.
- if you select an option Lightbulb dimmer with color temperature, you need to put channels for cold and warm white.
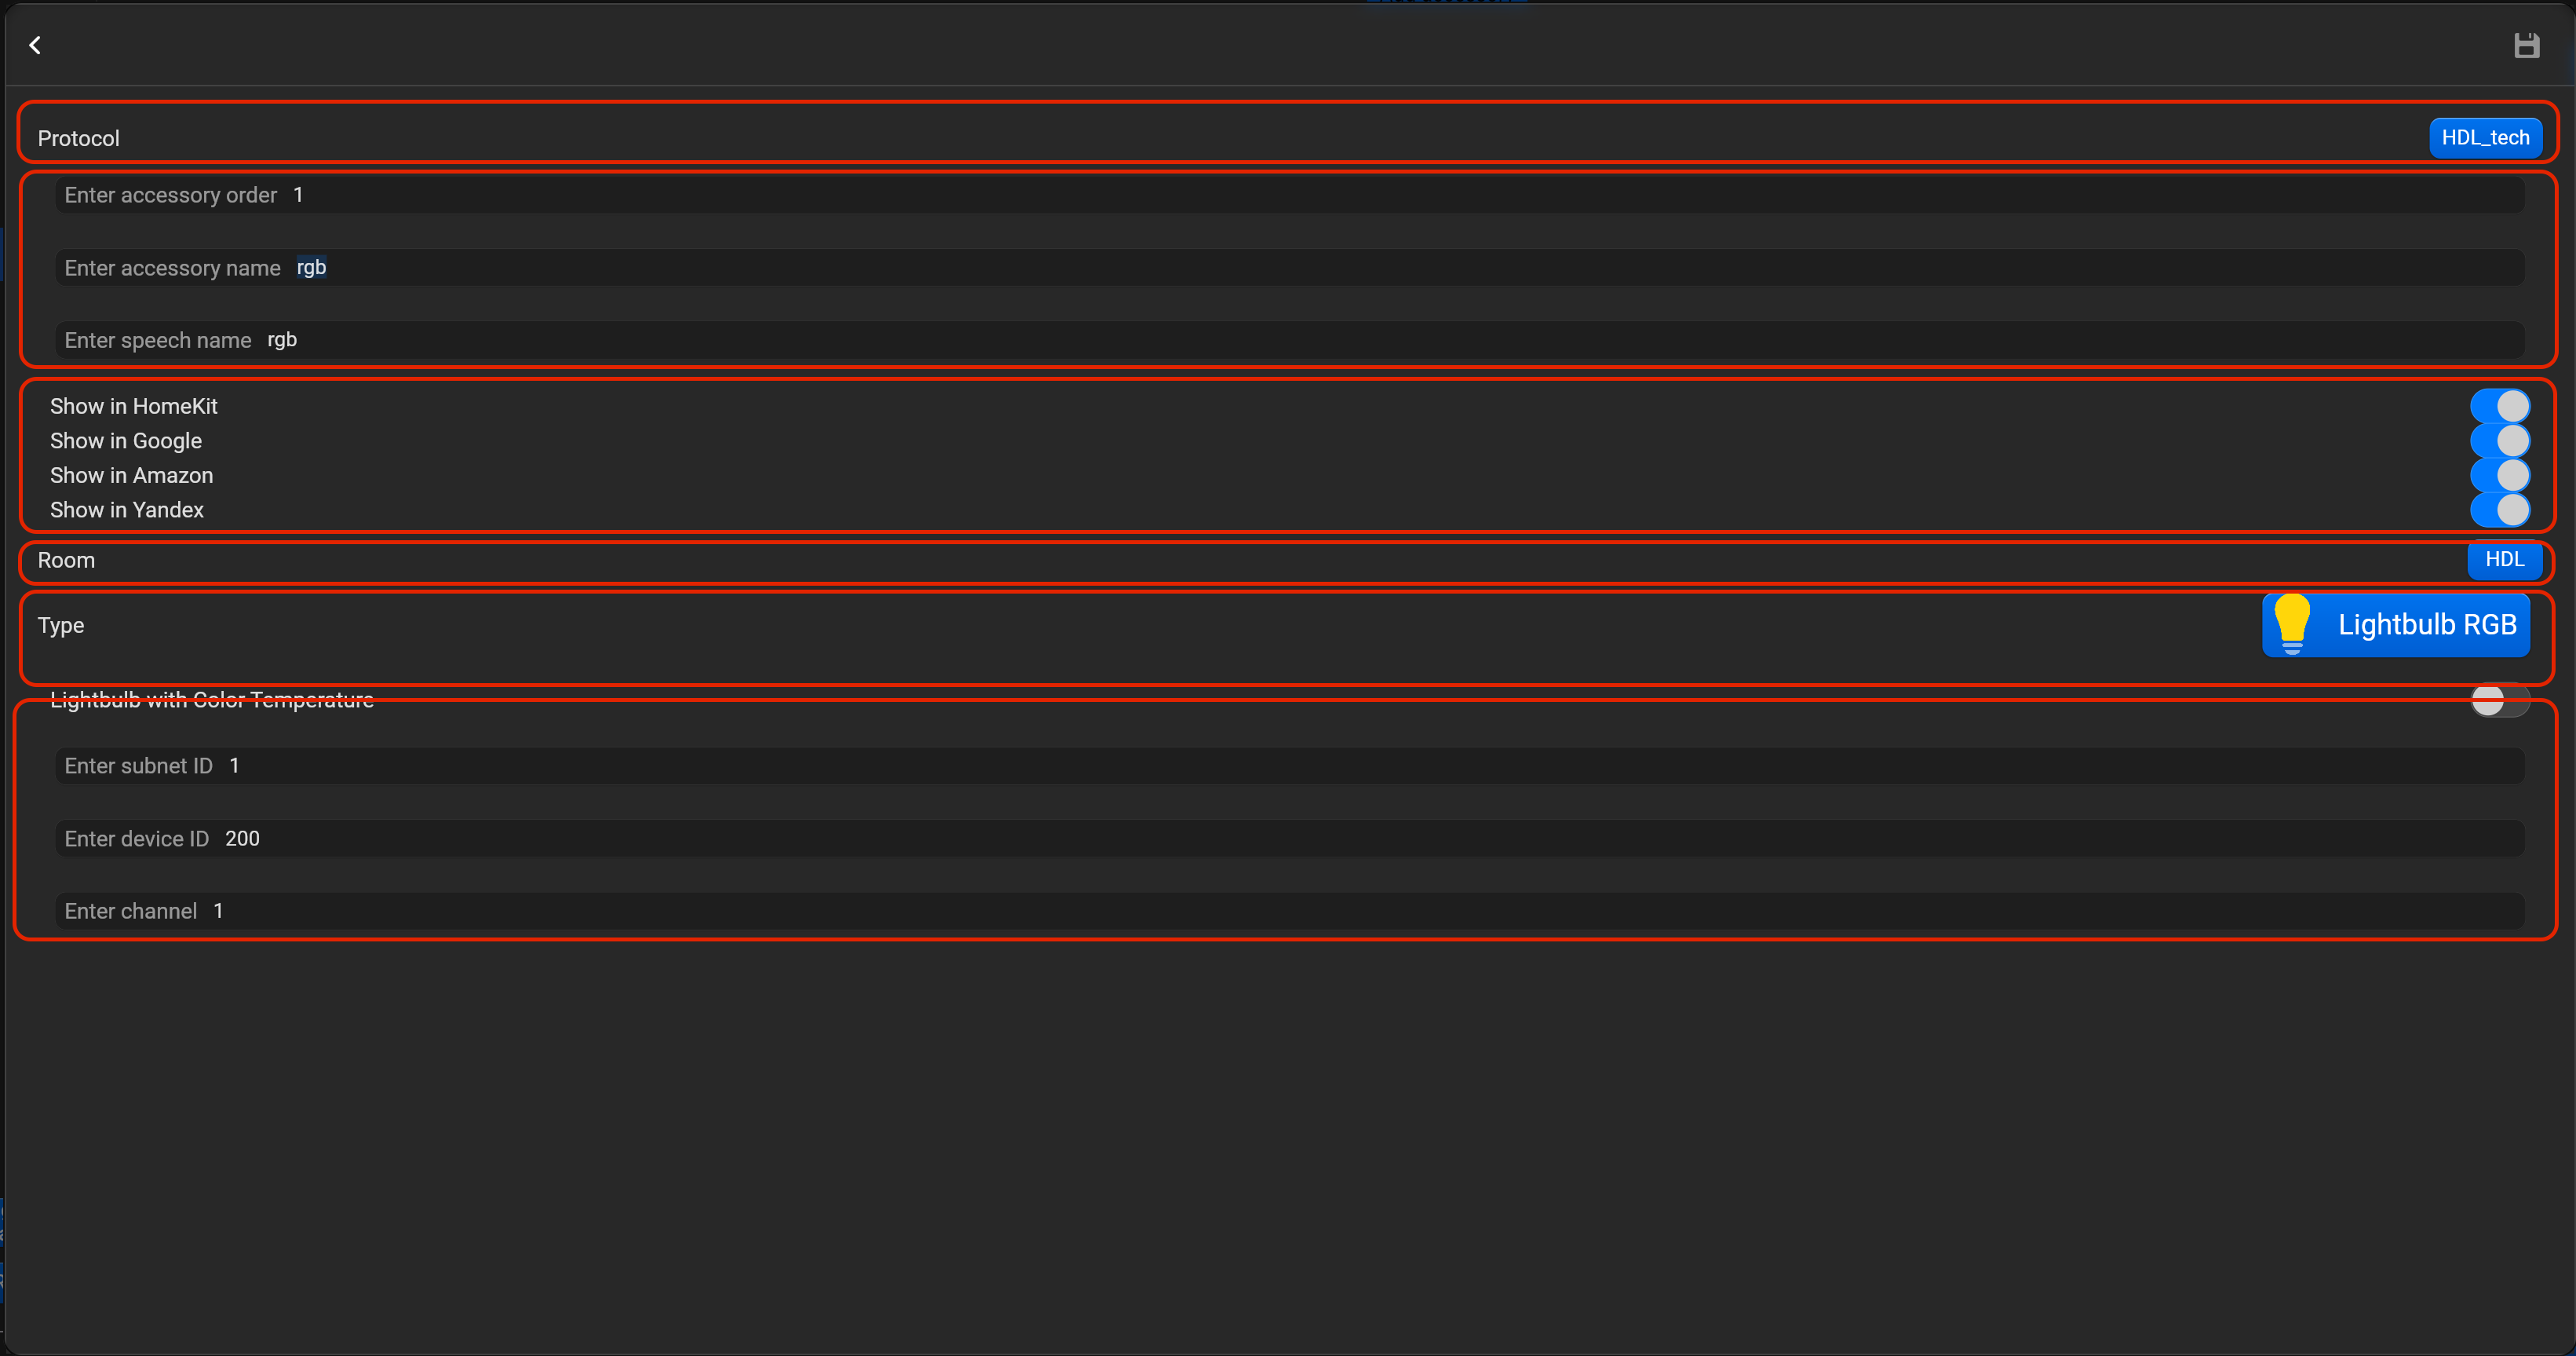
¶ Lightbulb RGB
- select the protocol in the drop-down list,
- put the accessory order (affects the location of the accessory in Pyxis app),
- put name of the accessory and for the voice assistants,
- select voice assistants, where the accessory should be displayed,
- select the room, where the accessory will be located,
- select the type of accessory (Lightbulb RGB),
- put subnet ID, device ID and channel (channel is for red color).
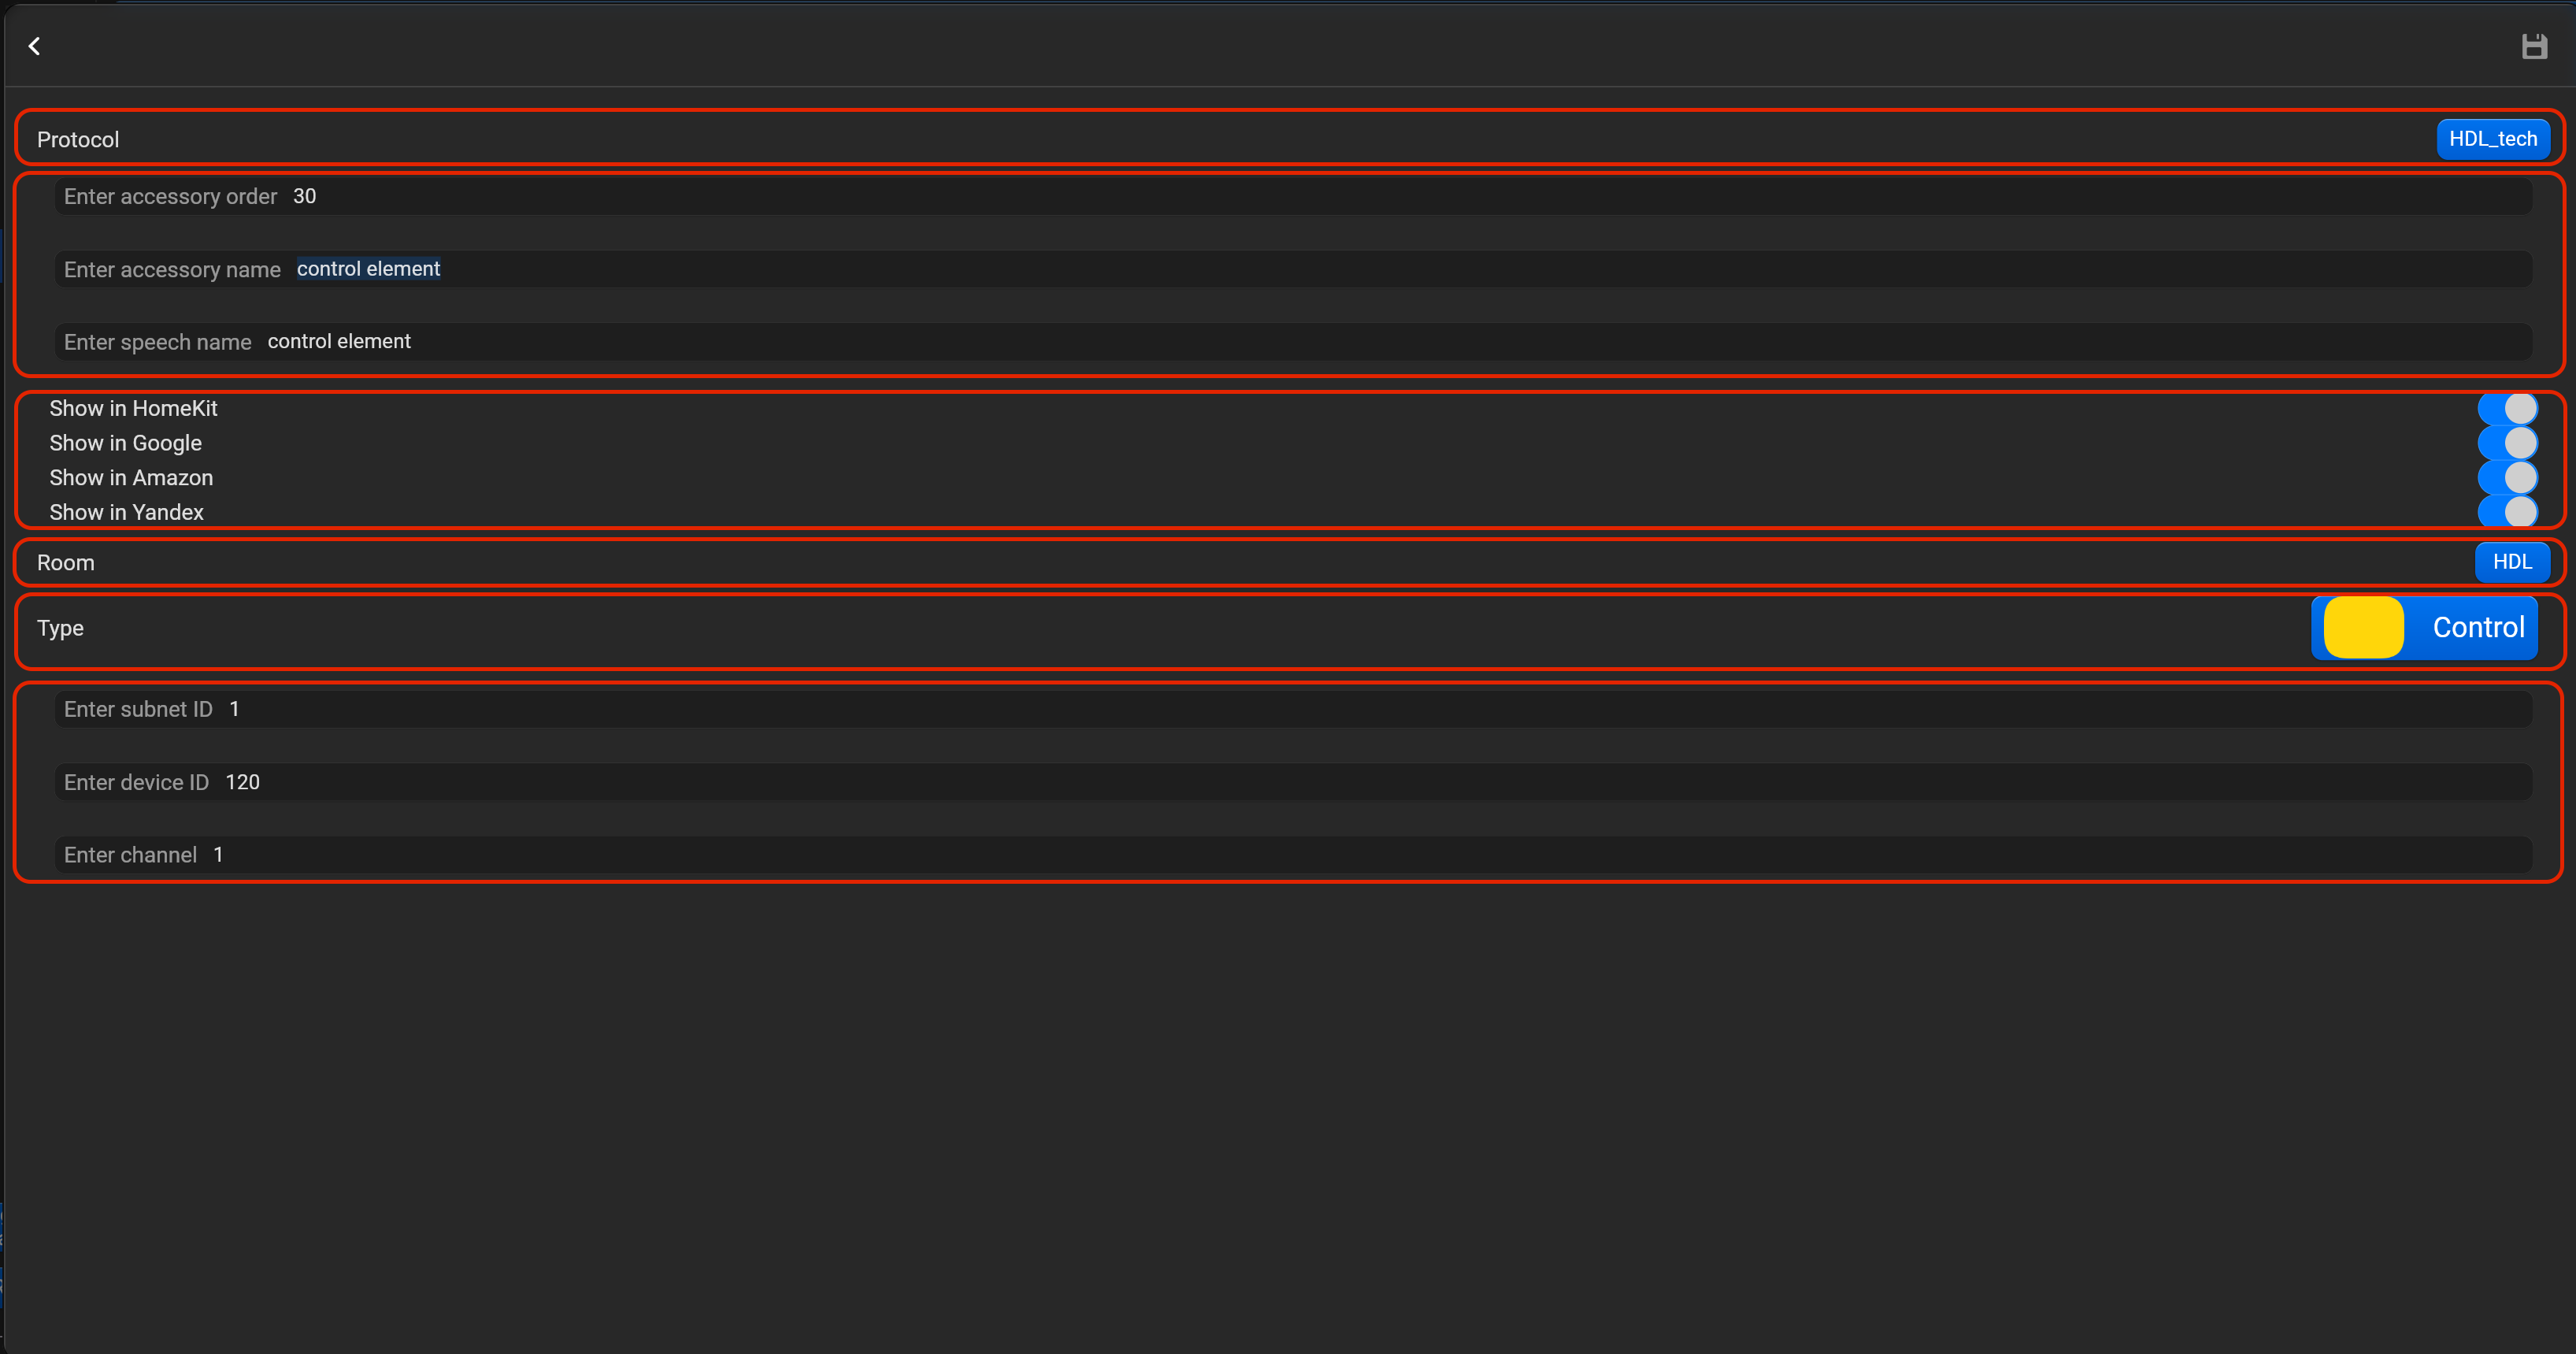
¶ Control
This accessory is simulate HDL Buspro switch buttons.
- select the protocol in the drop-down list,
- put the accessory order (affects the location of the accessory in Pyxis app),
- put name of the accessory and for the voice assistants,
- select voice assistants, where the accessory should be displayed,
- select the room, where the accessory will be located,
- select the type of accessory (Control),
- put subnet ID, device ID and channel.
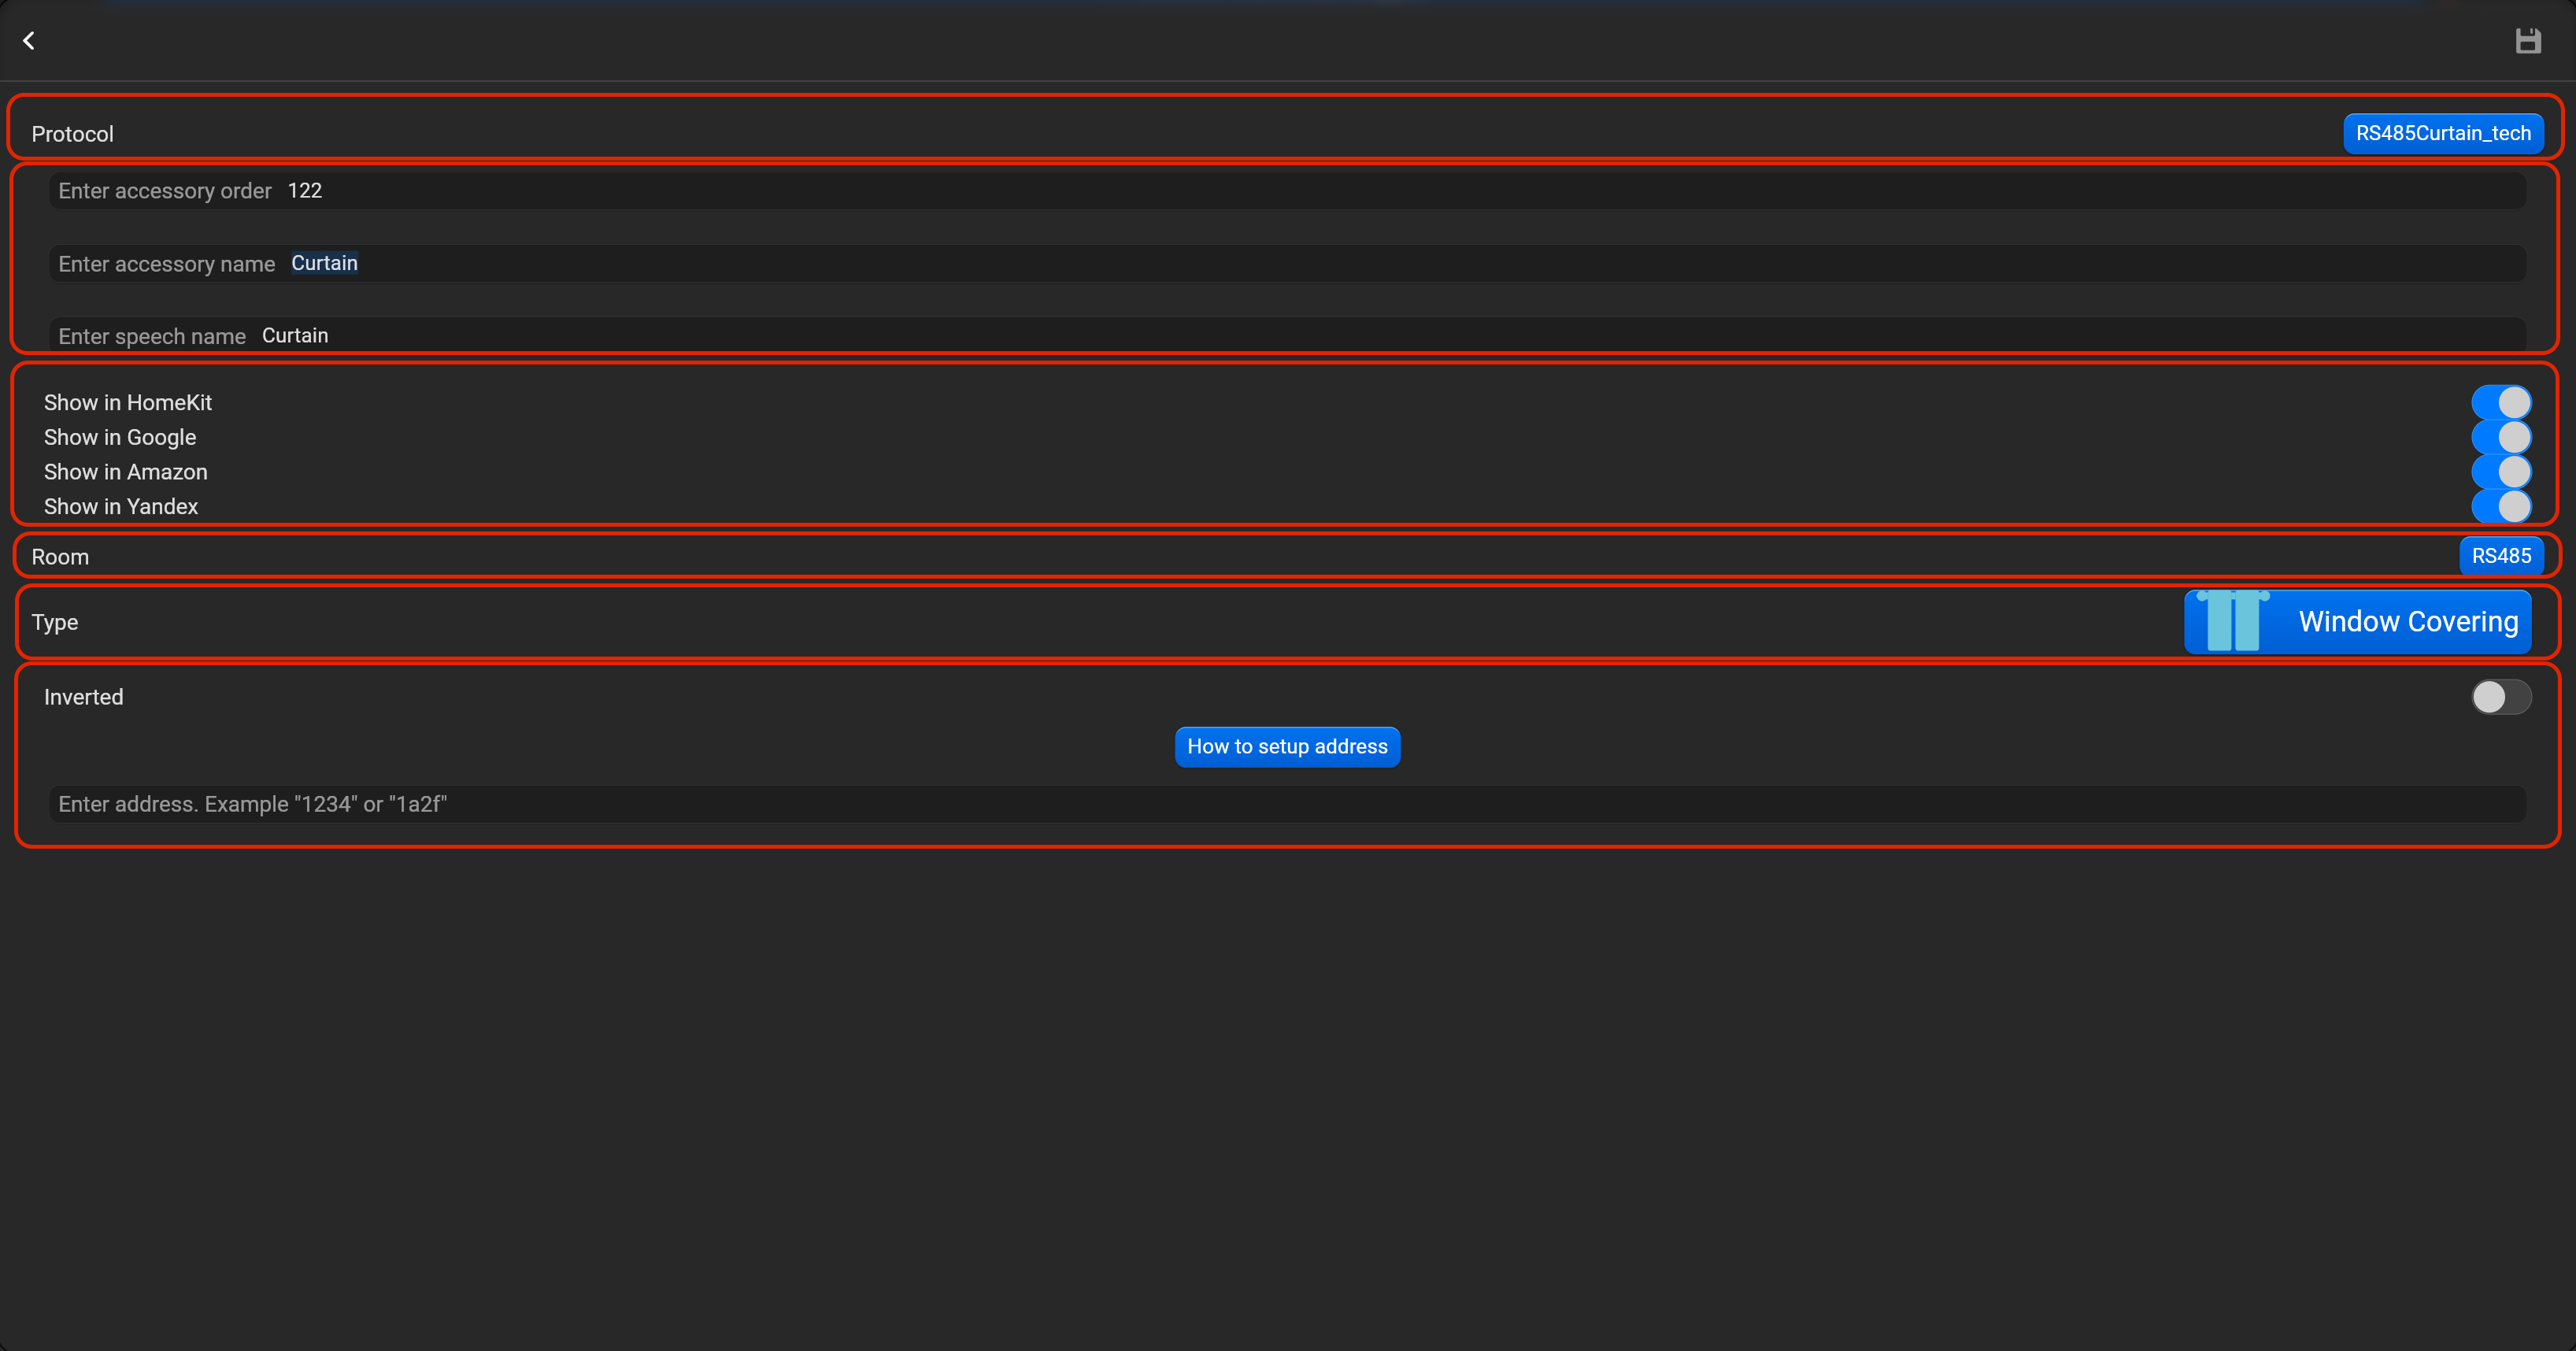
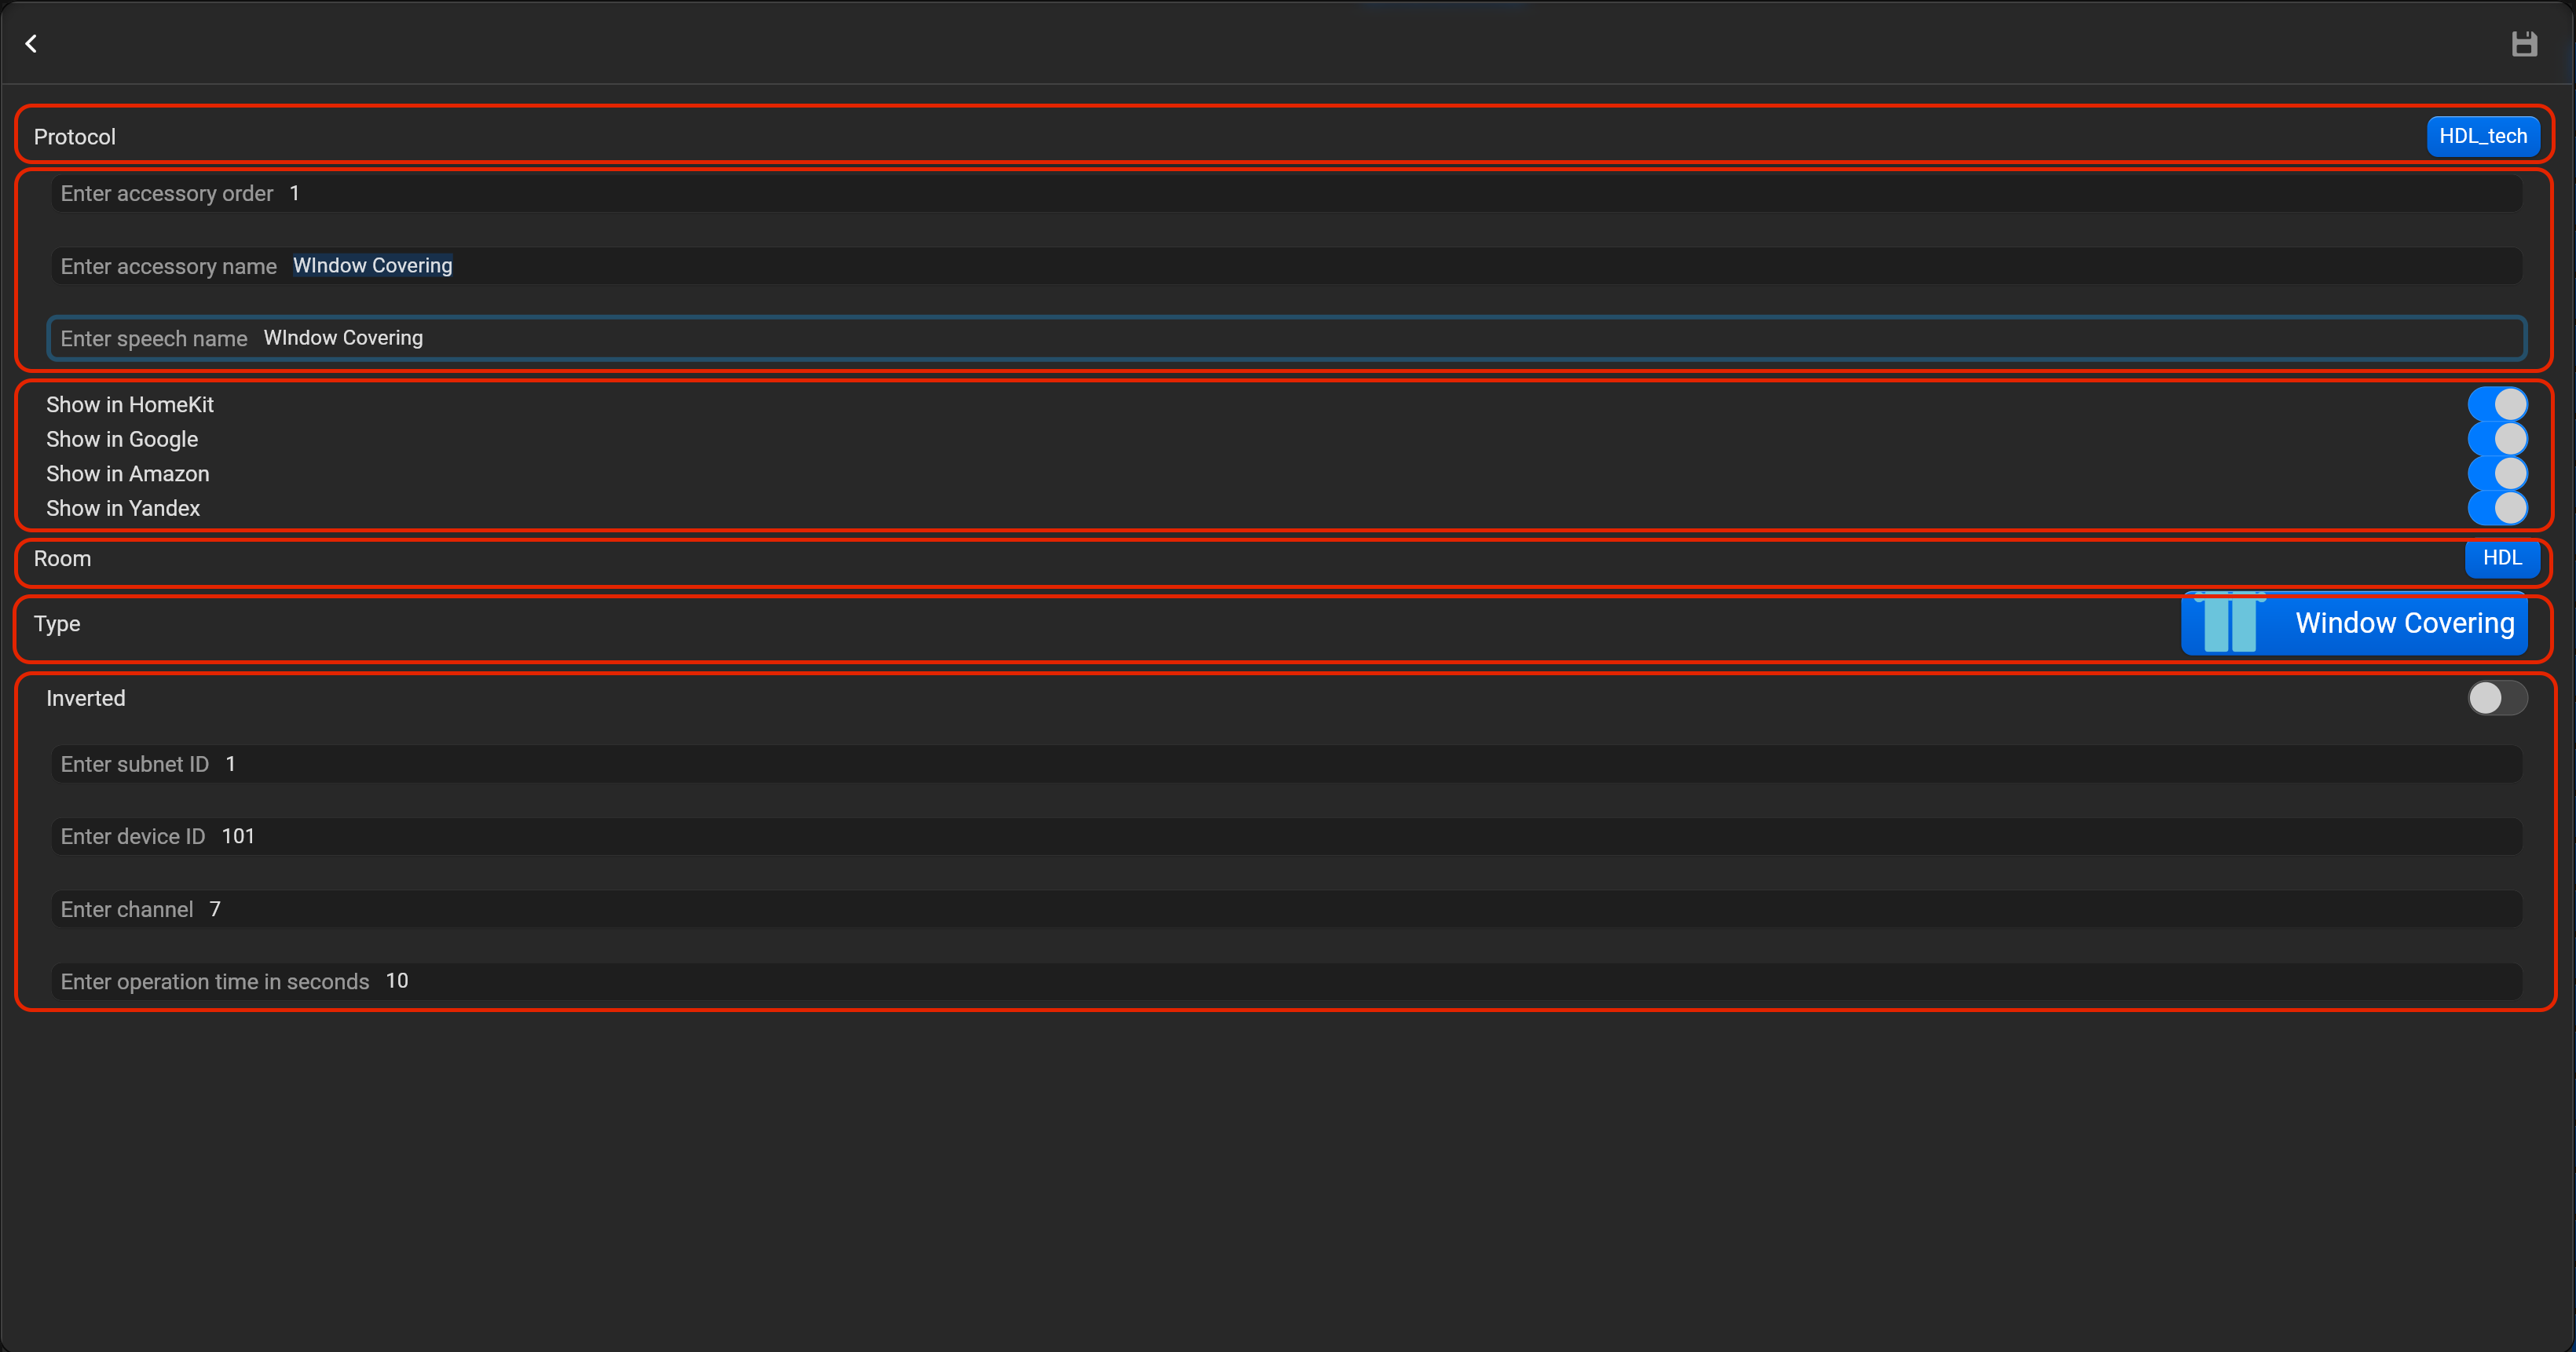
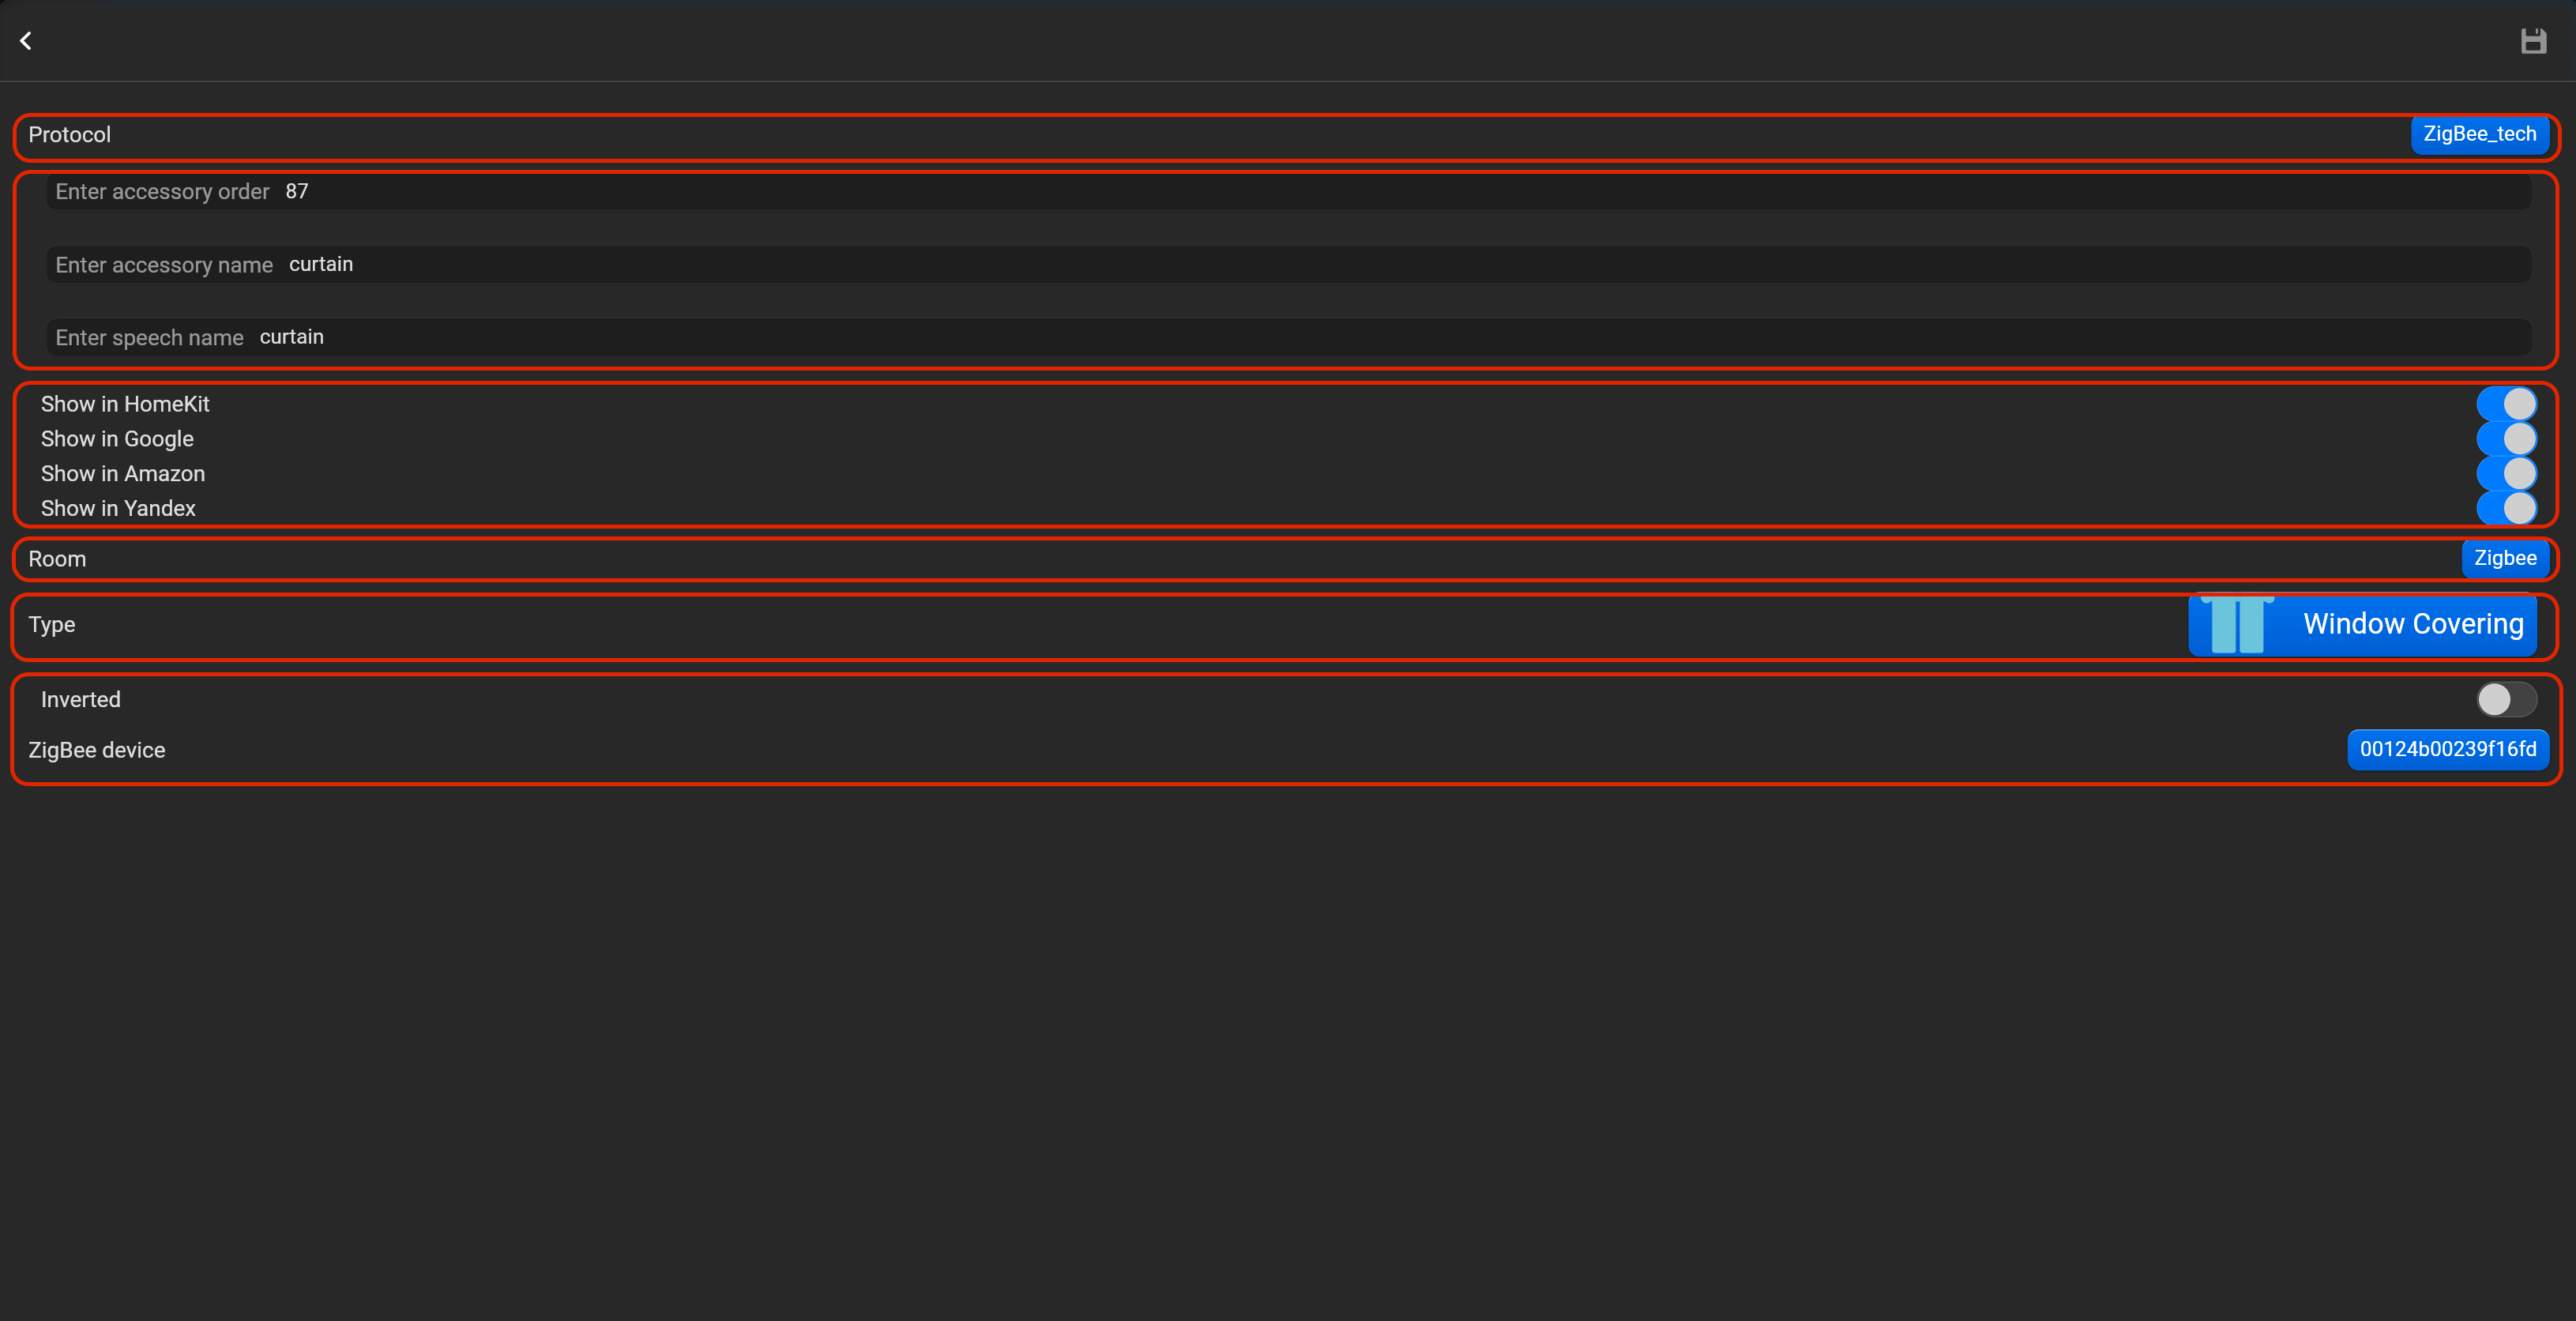
¶ Window covering
- select the protocol in the drop-down list,
- put the accessory order (affects the location of the accessory in Pyxis app),
- put name of the accessory and for the voice assistants,
- select voice assistants, where the accessory should be displayed,
- select the room, where the accessory will be located,
- select the type of accessory (Window covering),
- put subnet ID, device ID, channel and operations time in seconds. You can invert direction for this accessory.
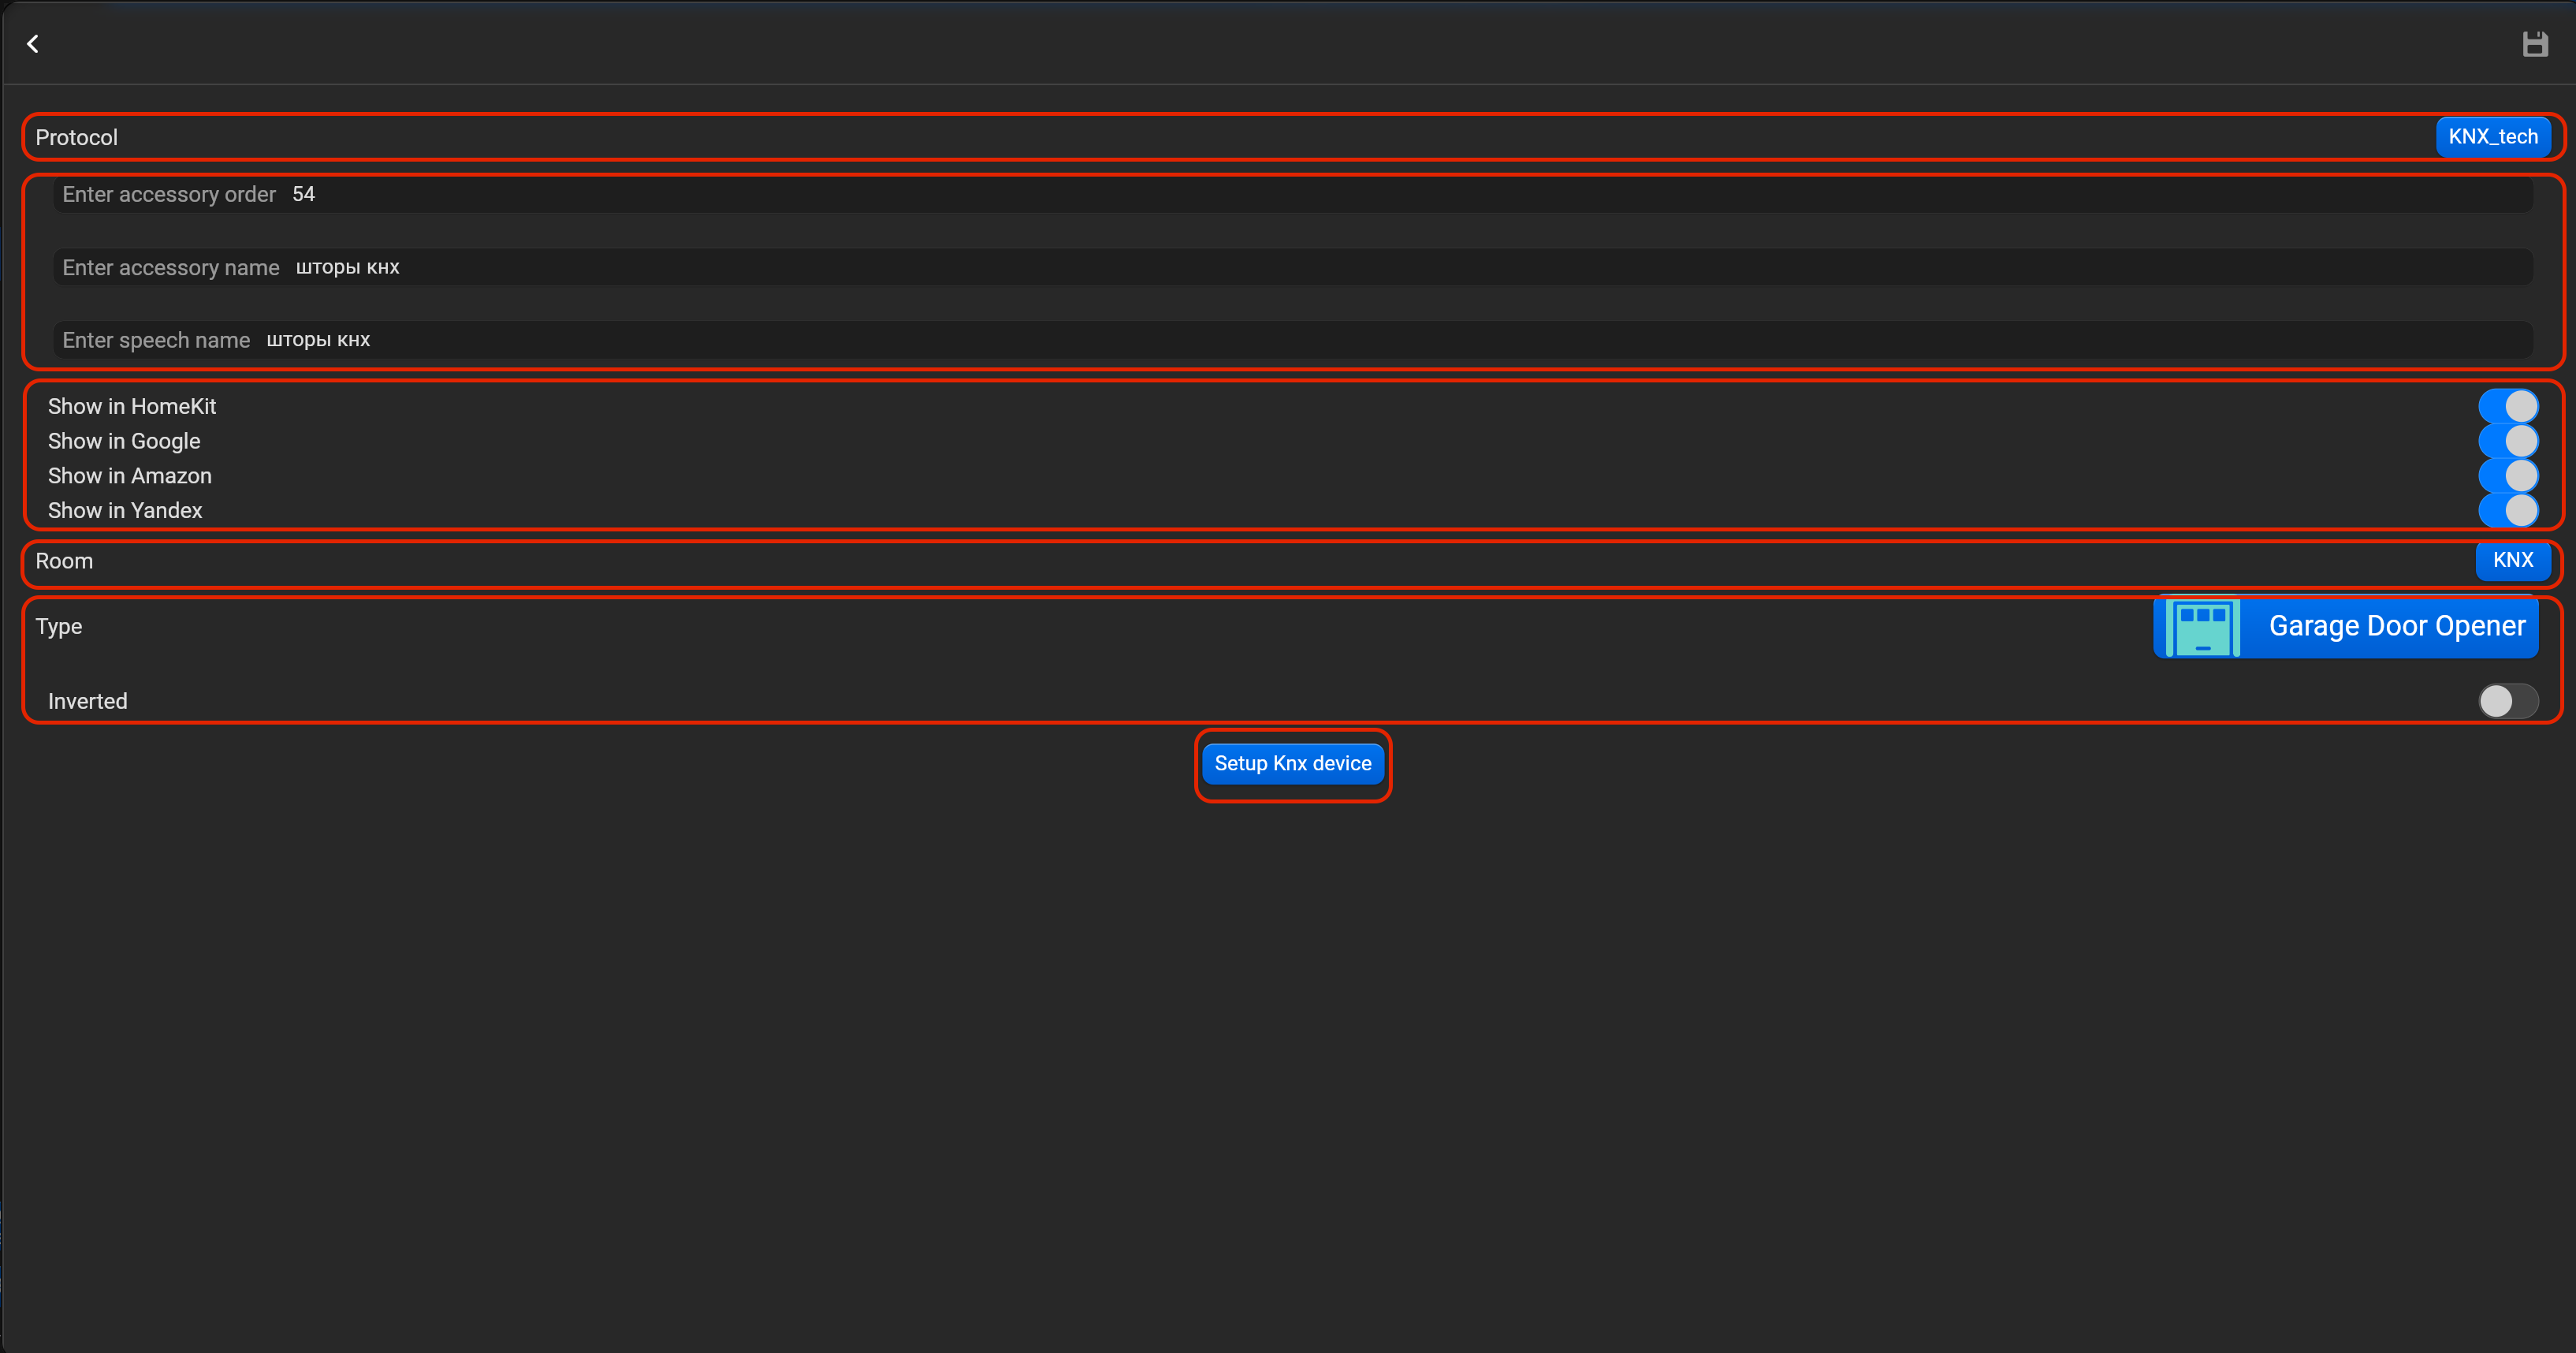
¶ Garage door
- select the protocol in the drop-down list,
- put the accessory order (affects the location of the accessory in Pyxis app),
- put name of the accessory and for the voice assistants,
- select voice assistants, where the accessory should be displayed,
- select the room, where the accessory will be located,
- select the type of accessory (Garage door),
- put subnet ID, device ID, channel and operations time in seconds. You can invert direction for this accessory.

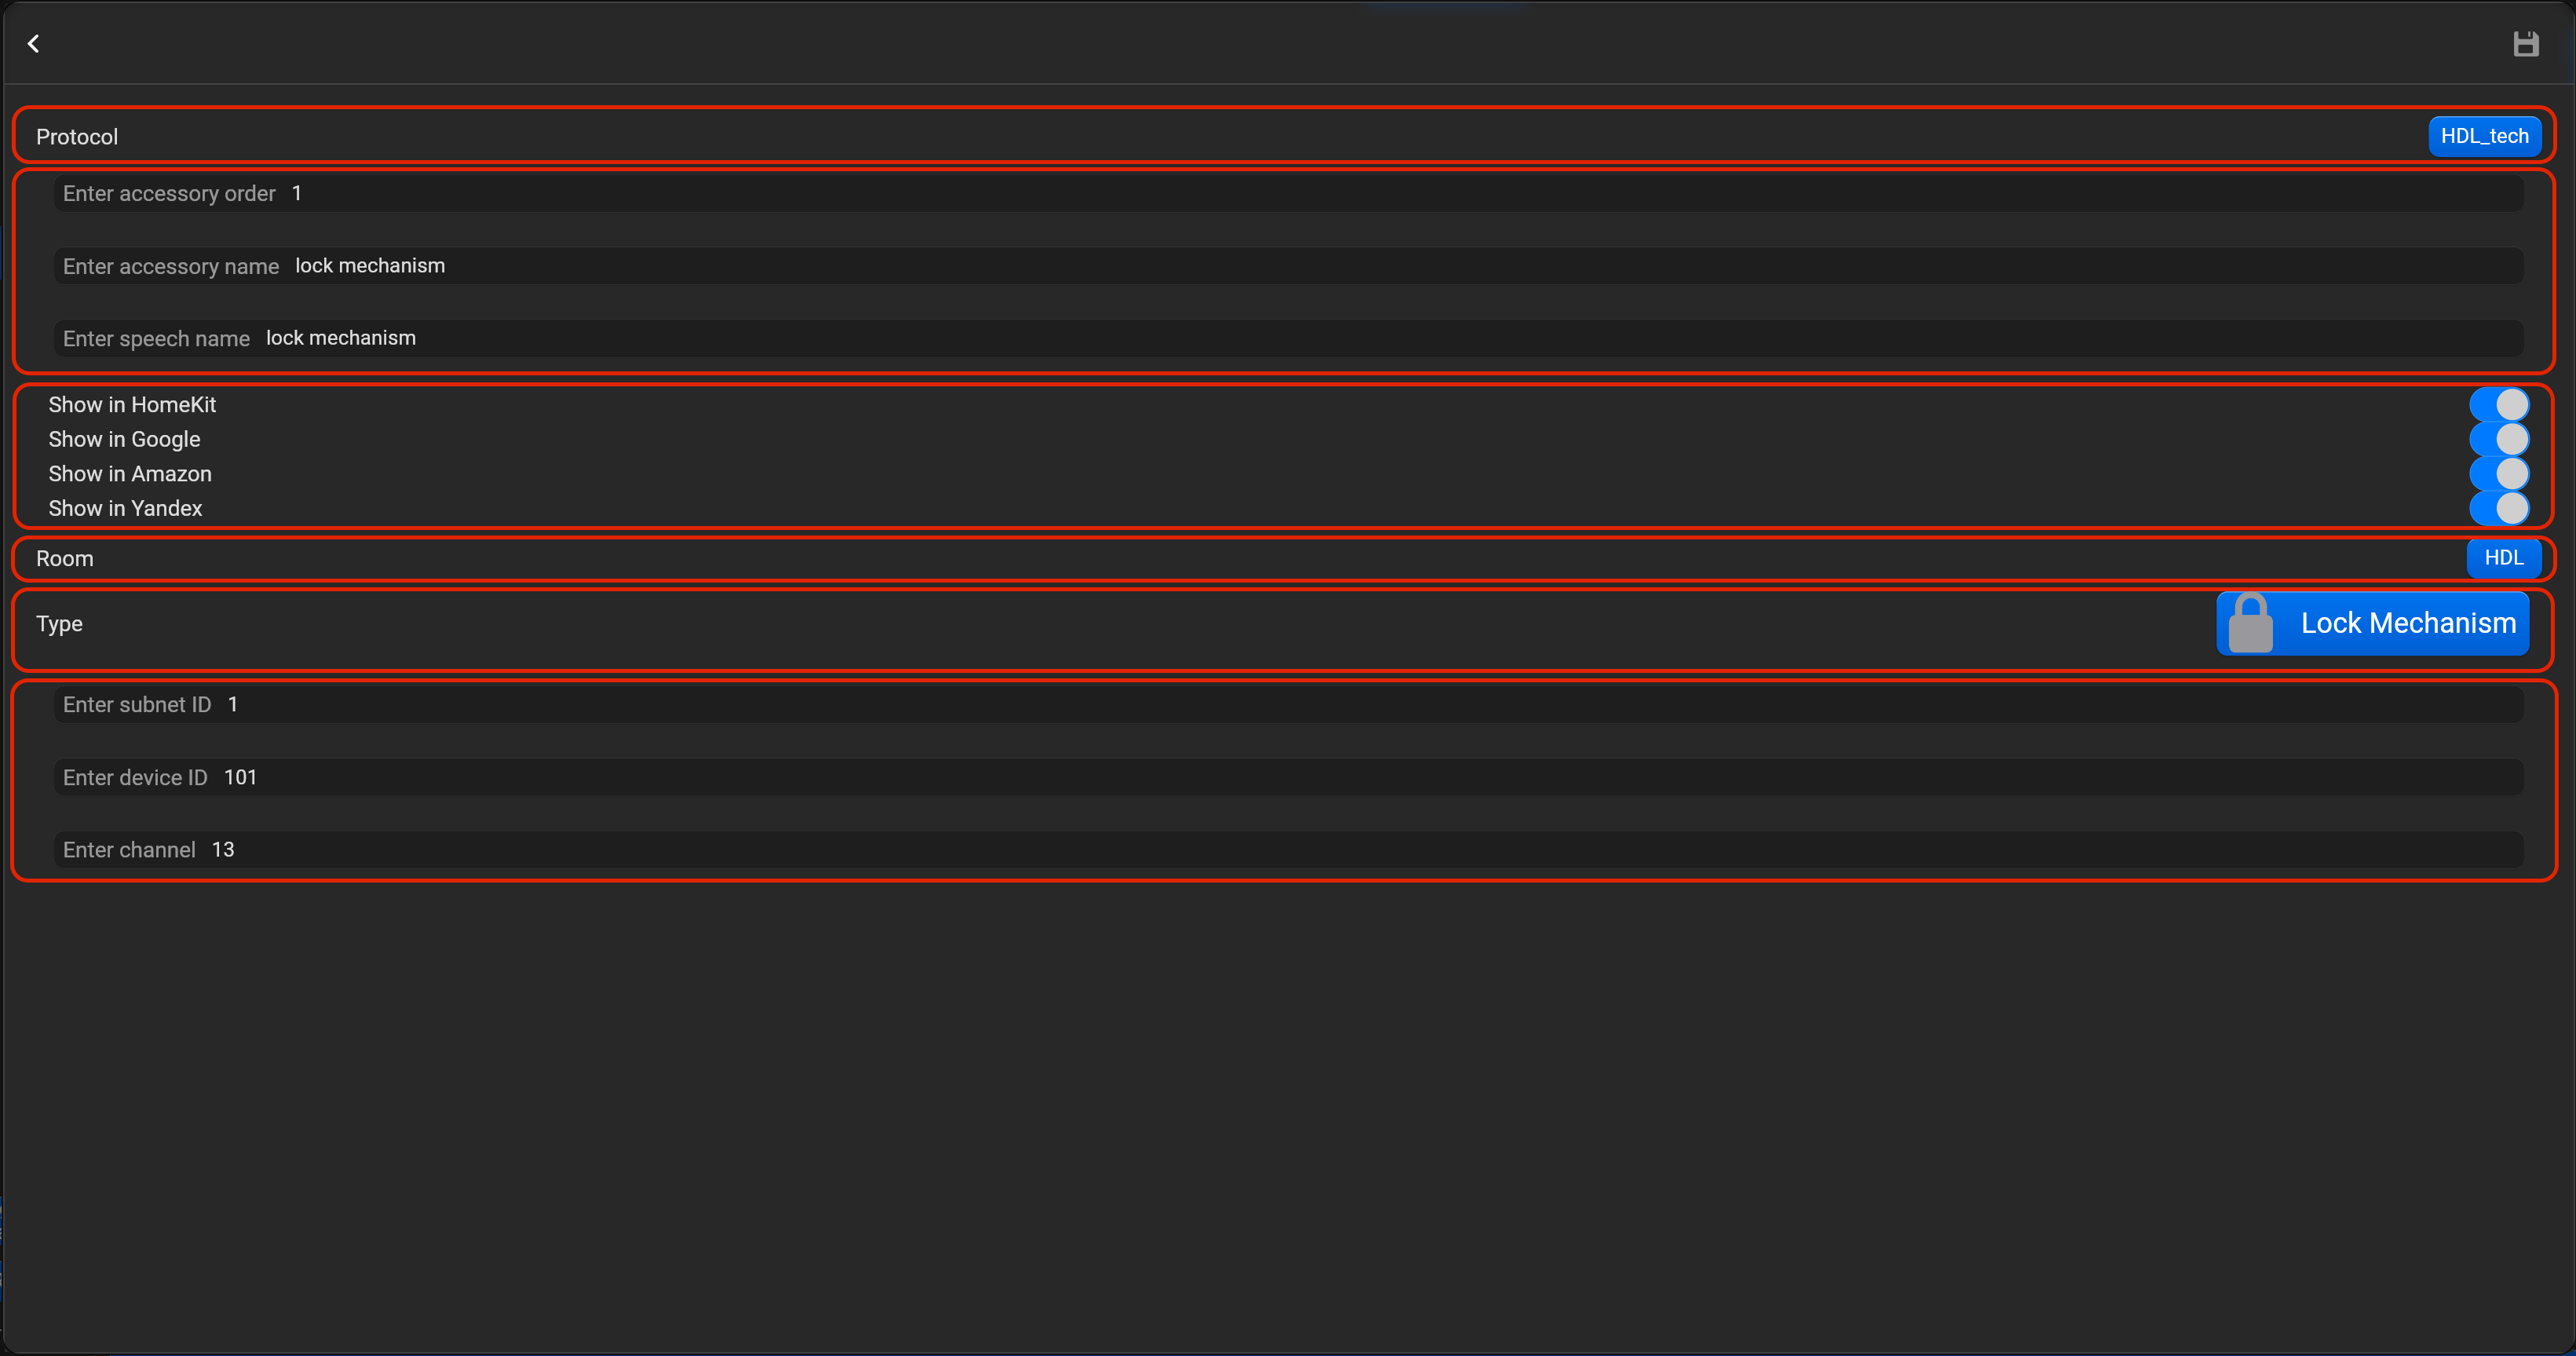
¶ Lock mechanism
- select the protocol in the drop-down list,
- put the accessory order (affects the location of the accessory in Pyxis app),
- put name of the accessory and for the voice assistants,
- select voice assistants, where the accessory should be displayed,
- select the room, where the accessory will be located,
- select the type of accessory (Lock mechanism),
- put subnet ID, device ID and channel.
¶ Thermostat
- select the protocol in the drop-down list,
- put the accessory order (affects the location of the accessory in Pyxis app),
- put name of the accessory and for the voice assistants,
- select voice assistants, where the accessory should be displayed,
- select the room, where the accessory will be located,
- select the type of accessory (Thermostat),
- put subnet ID, device ID, channel, thermostat type (DLP/MPTL, Enviro, HVAC, Granite/Tile) and enable/disable Fan control. Thermostat type “HVAC”, allow to control HVAC module directly.

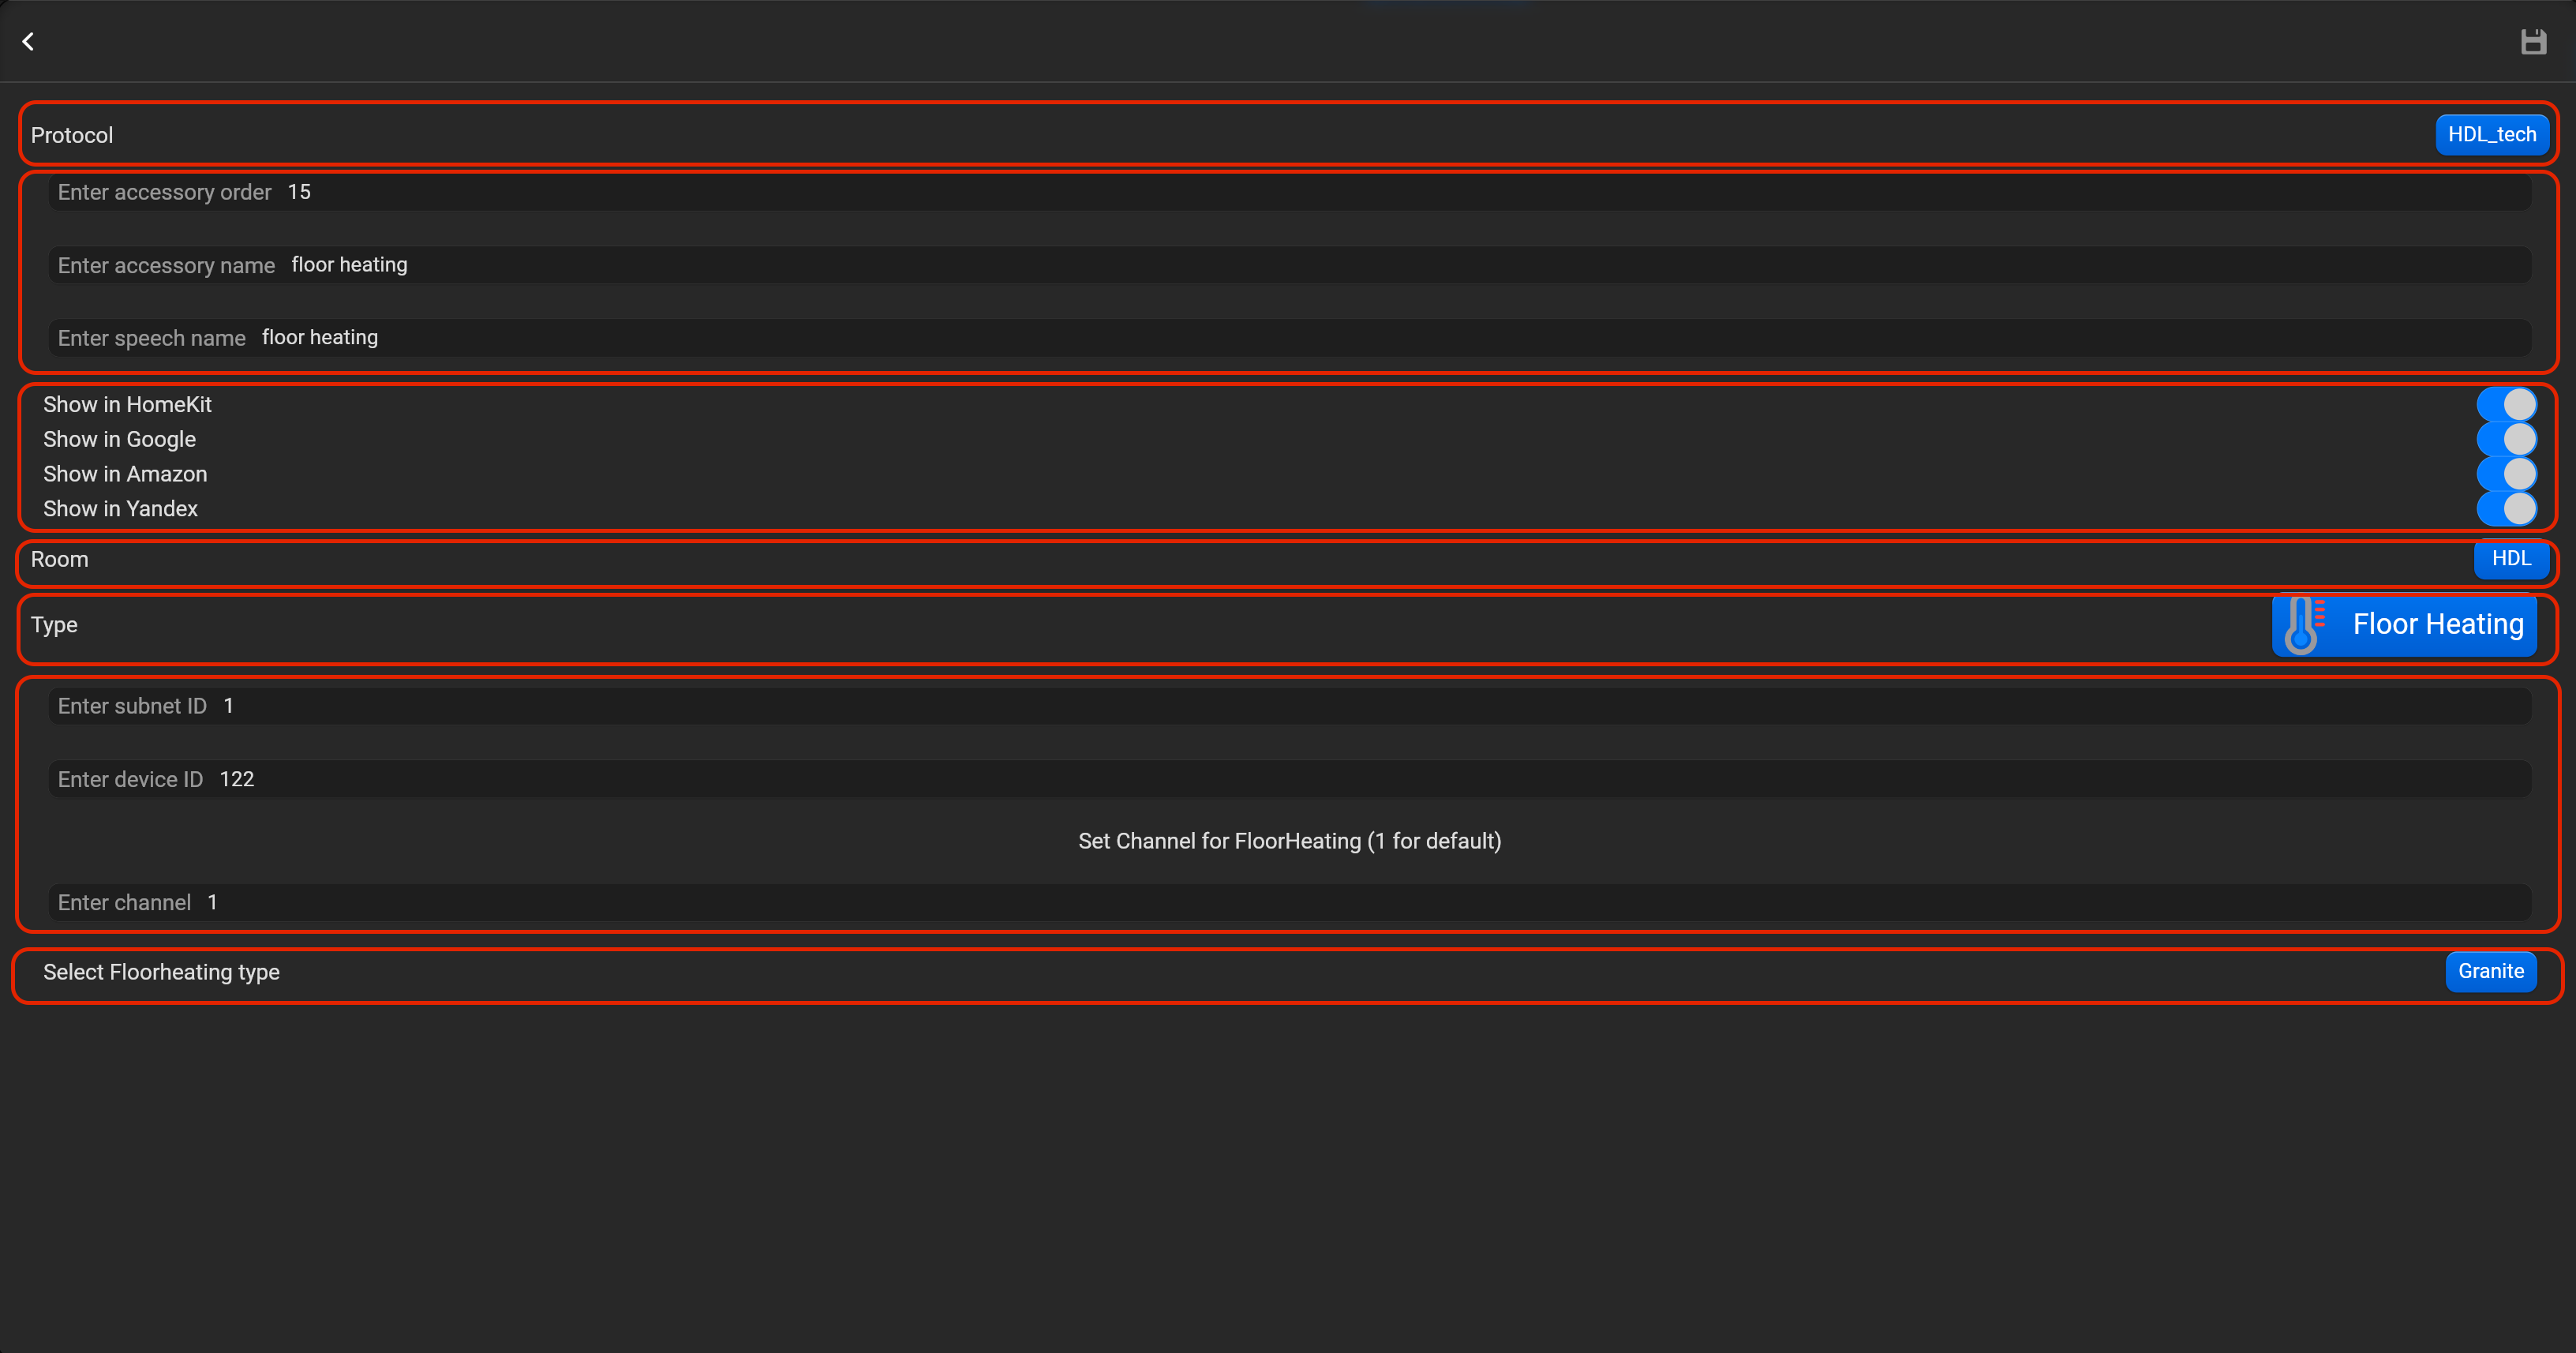
¶ Floor Heating
- select the protocol in the drop-down list,
- put the accessory order (affects the location of the accessory in Pyxis app),
- put name of the accessory and for the voice assistants,
- select voice assistants, where the accessory should be displayed,
- select the room, where the accessory will be located,
- select the type of accessory (Floor heating),
- put subnet ID, device ID, channel and floor heating type (DLP/Enviro/MPTL, Granite,Tile, Floor Heating module). Type "Floor Heating module", allow to control Floor Heating module directly.
¶ Temperature sensor
- select the protocol in the drop-down list,
- put the accessory order (affects the location of the accessory in Pyxis app),
- put name of the accessory and for the voice assistants,
- select voice assistants, where the accessory should be displayed,
- select the room, where the accessory will be located,
- select the type of accessory (Temperature sensor),
- put subnet ID, device ID and channel.

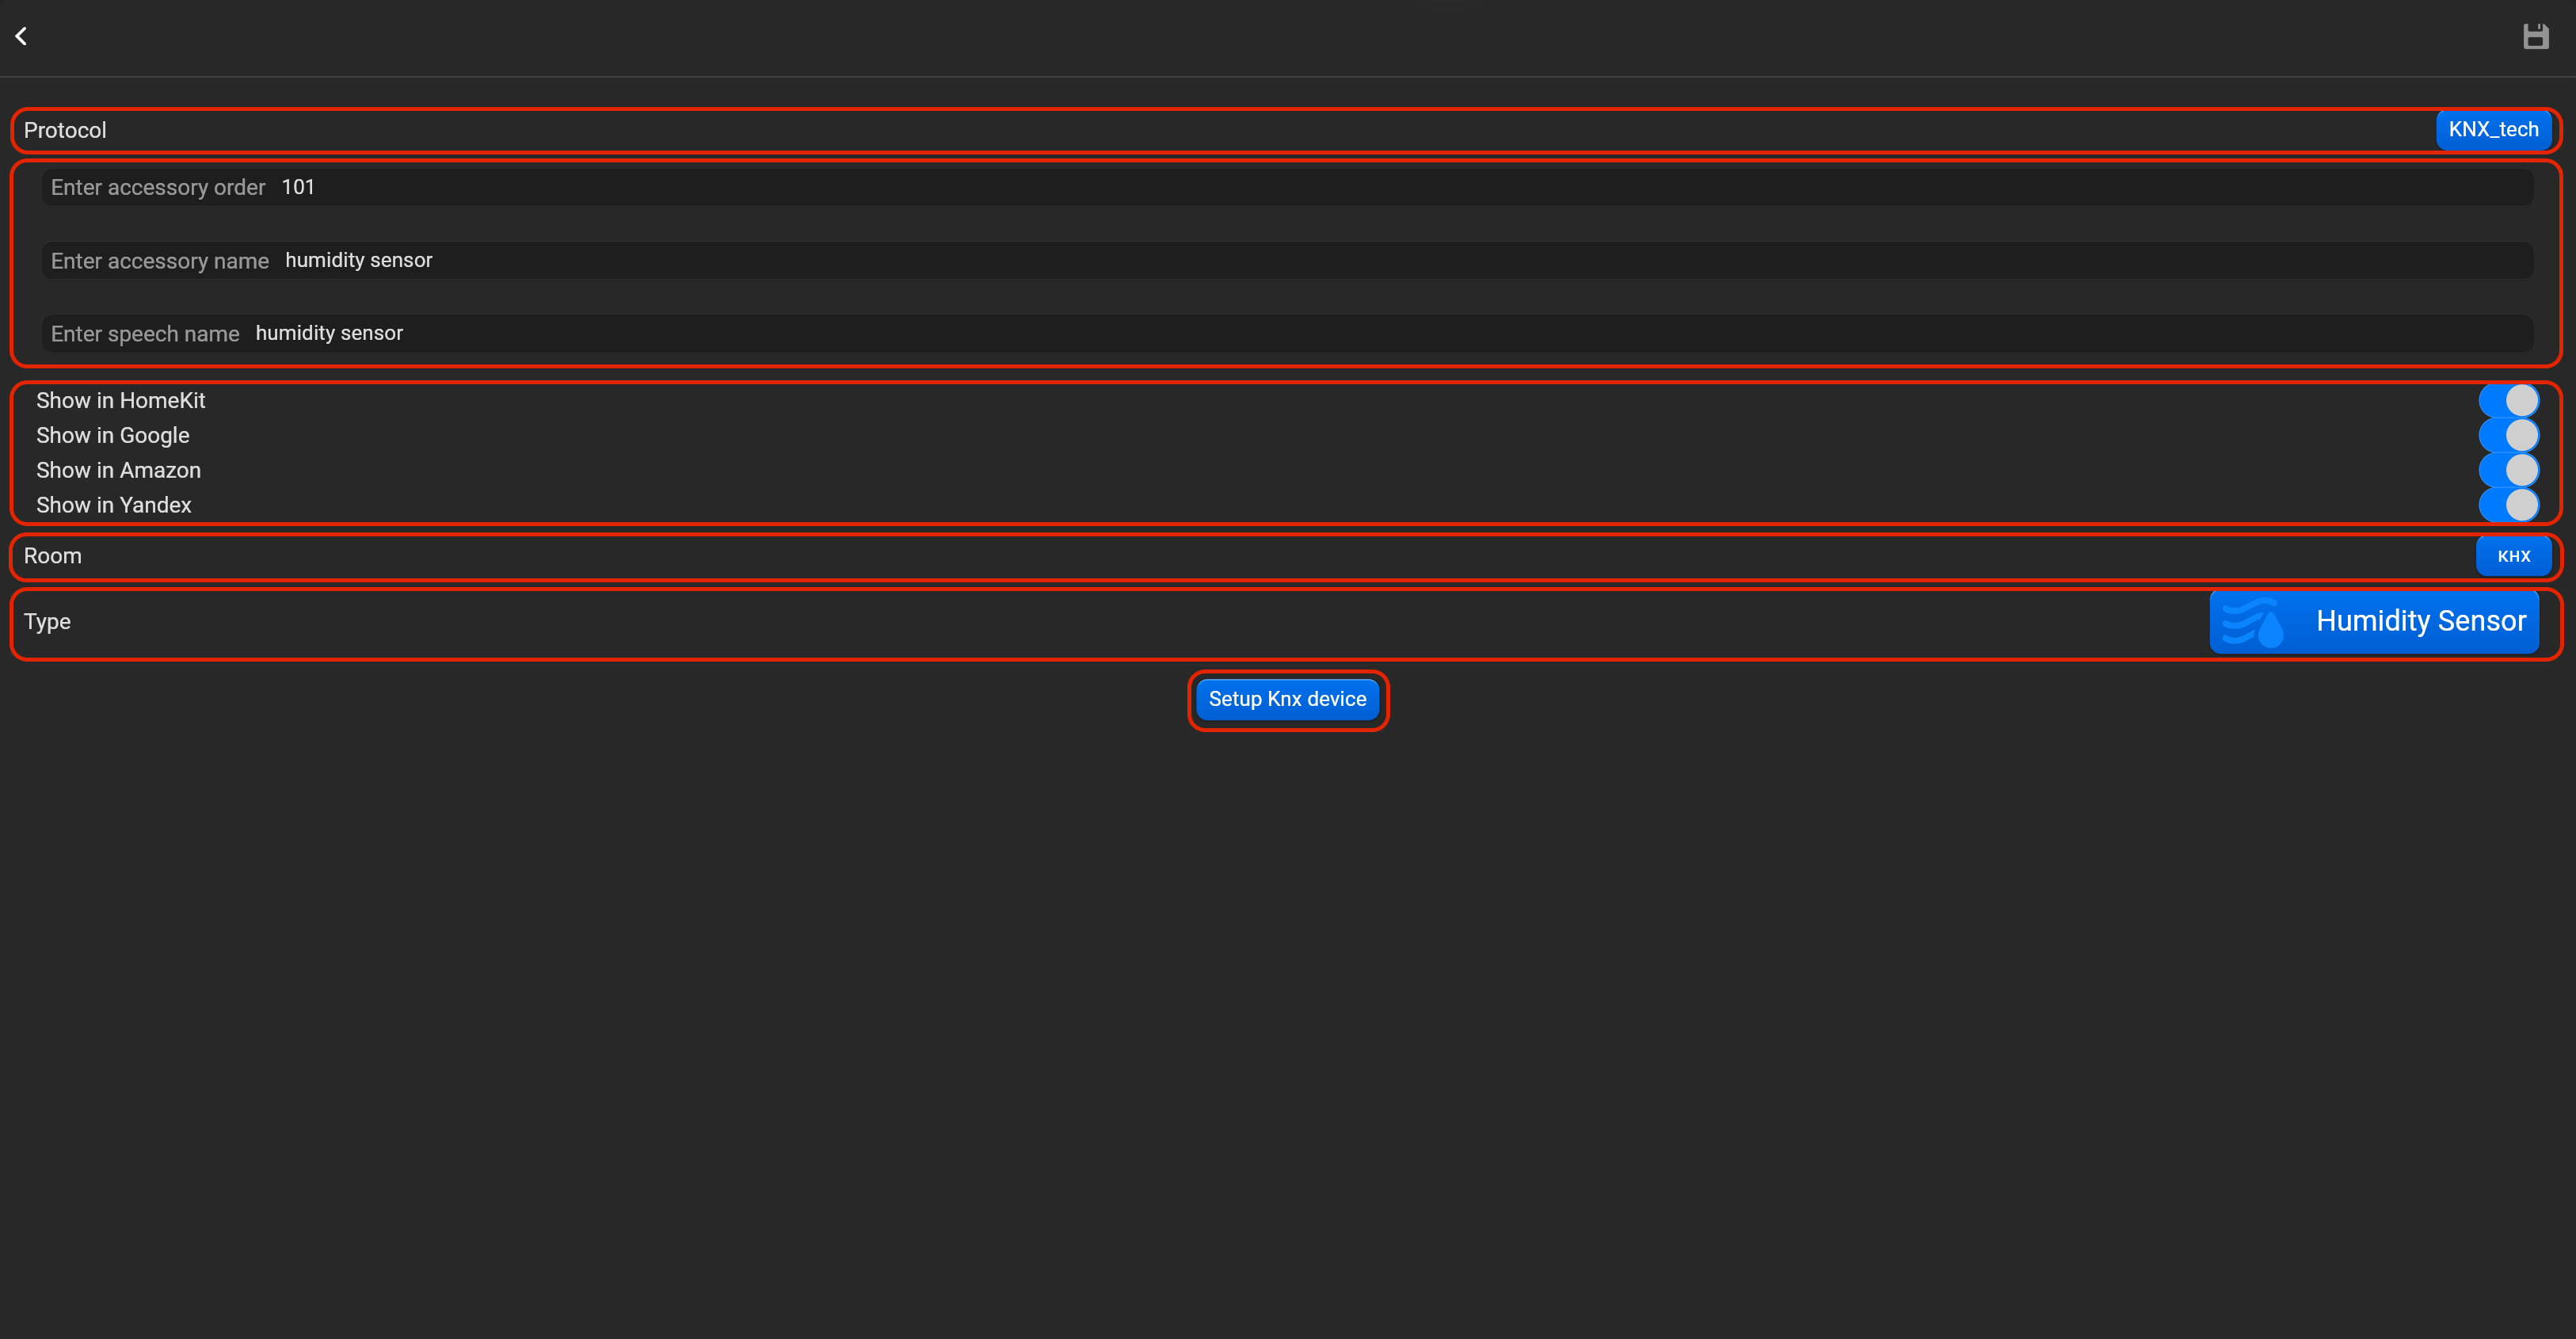
¶ Humidity sensor
- select the protocol in the drop-down list,
- put the accessory order (affects the location of the accessory in Pyxis app),
- put name of the accessory and for the voice assistants,
- select voice assistants, where the accessory should be displayed,
- select the room, where the accessory will be located,
- select the type of accessory (Humidity sensor),
- put subnet ID, device ID and channel.

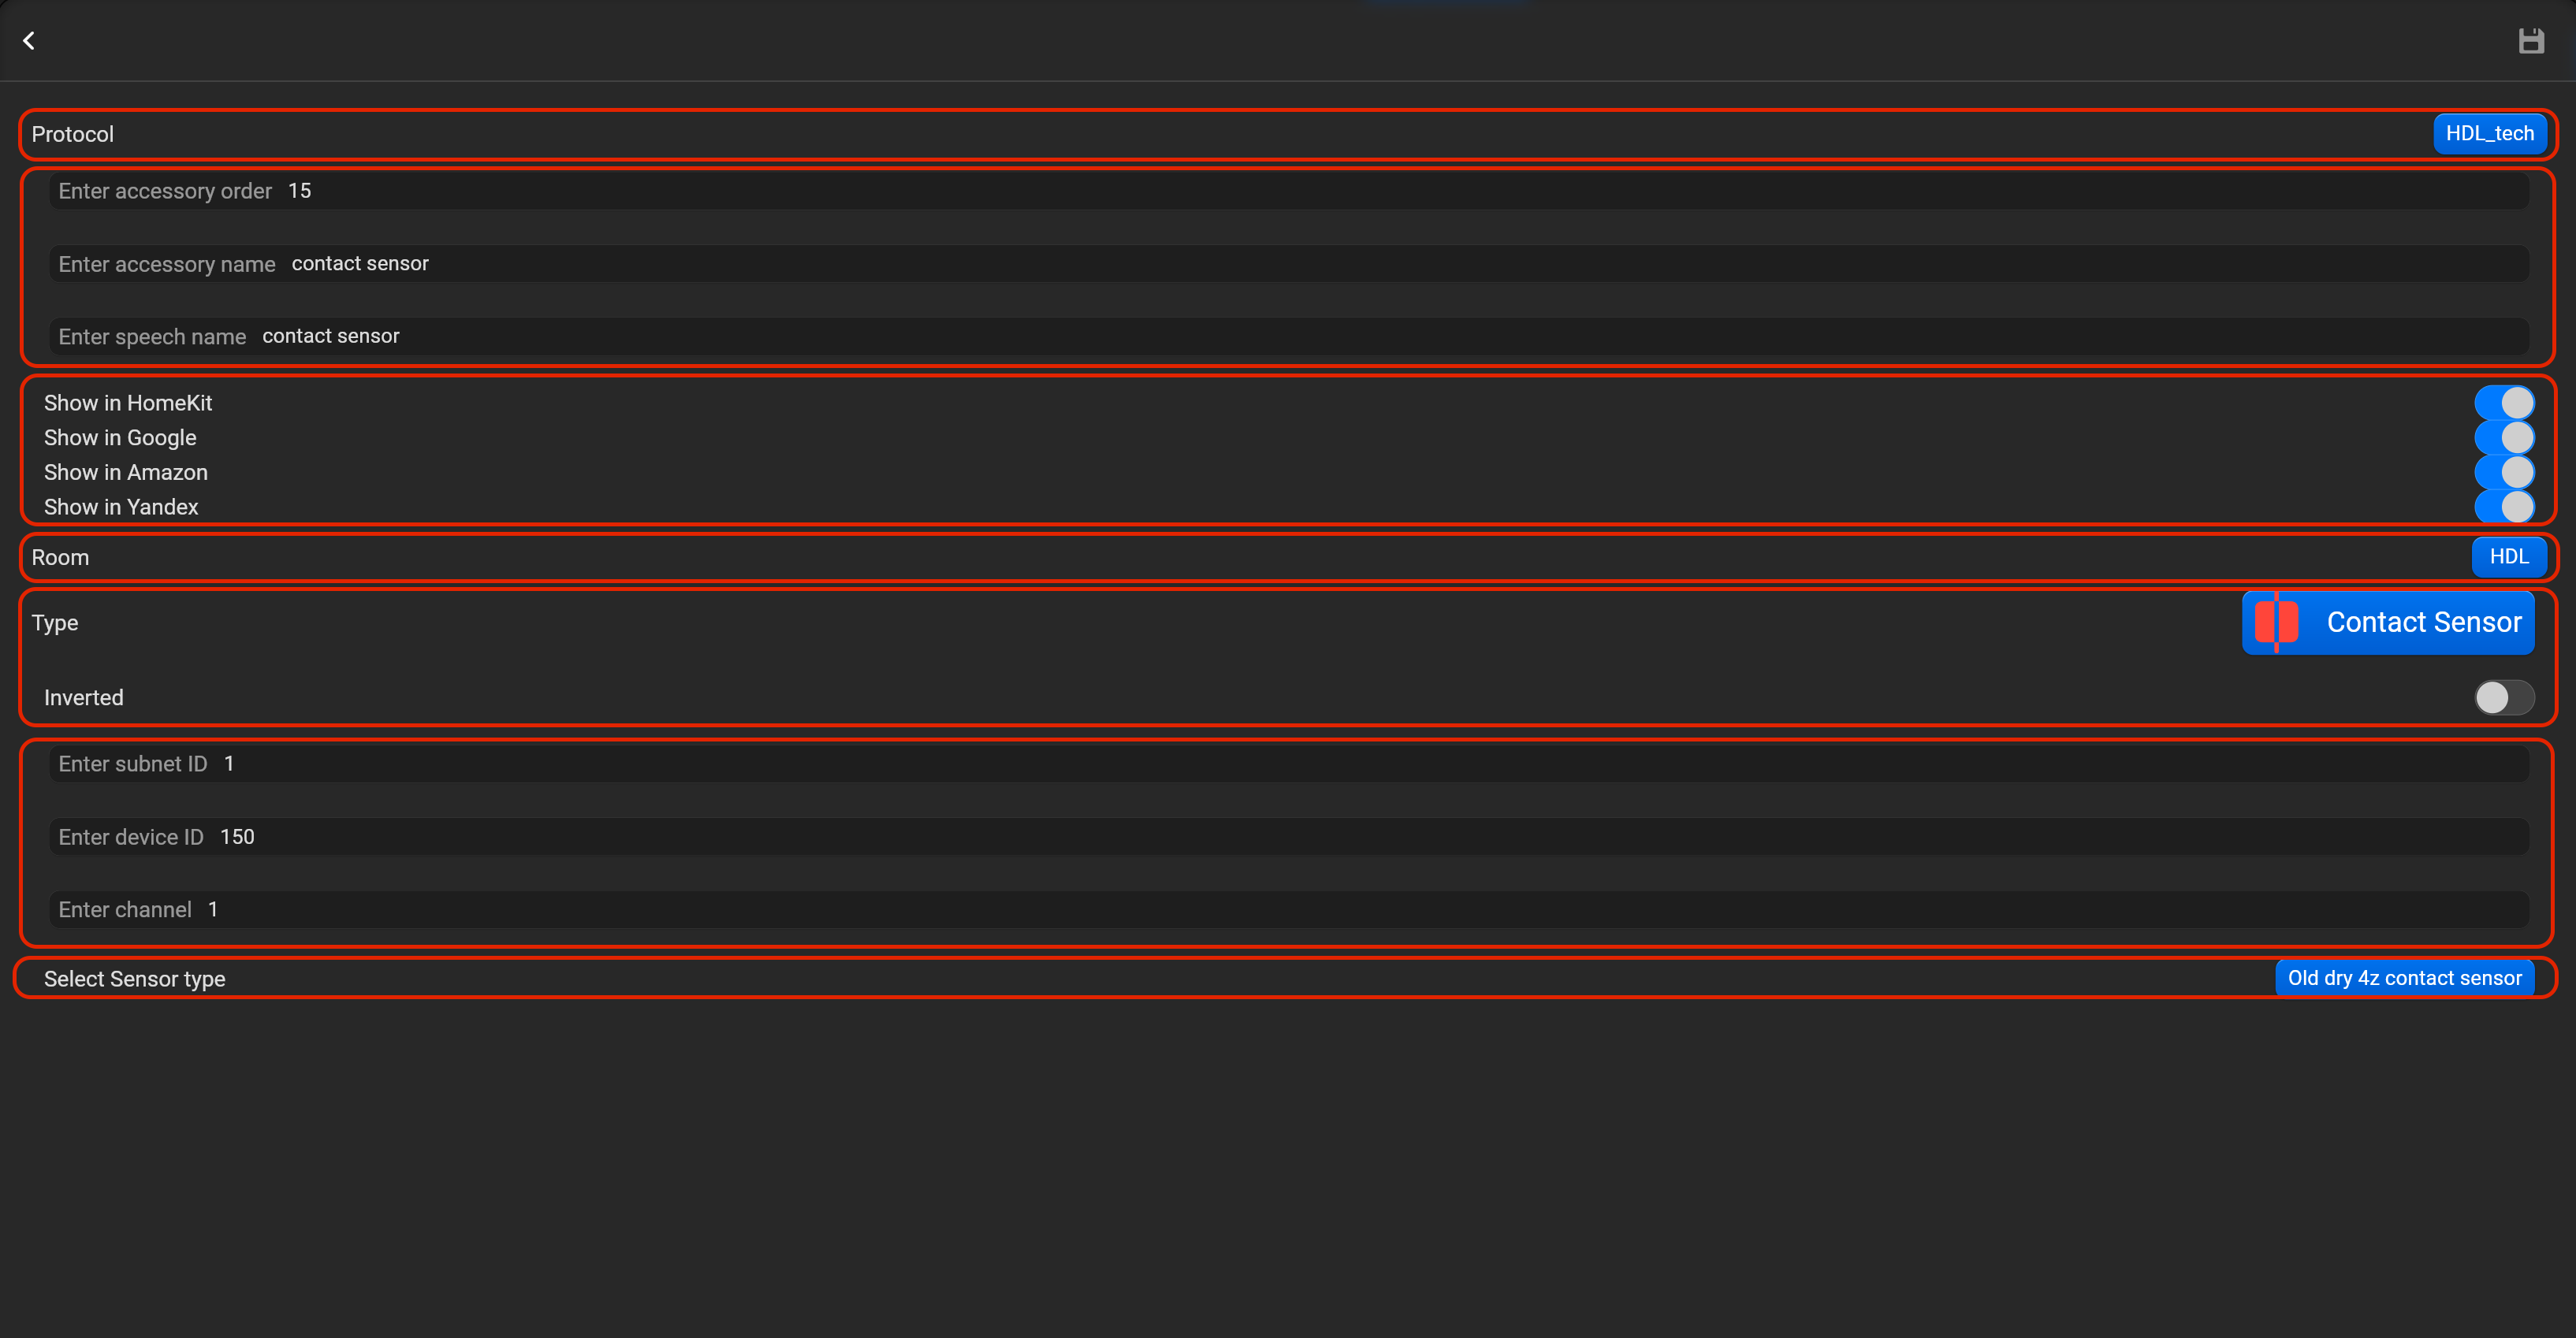
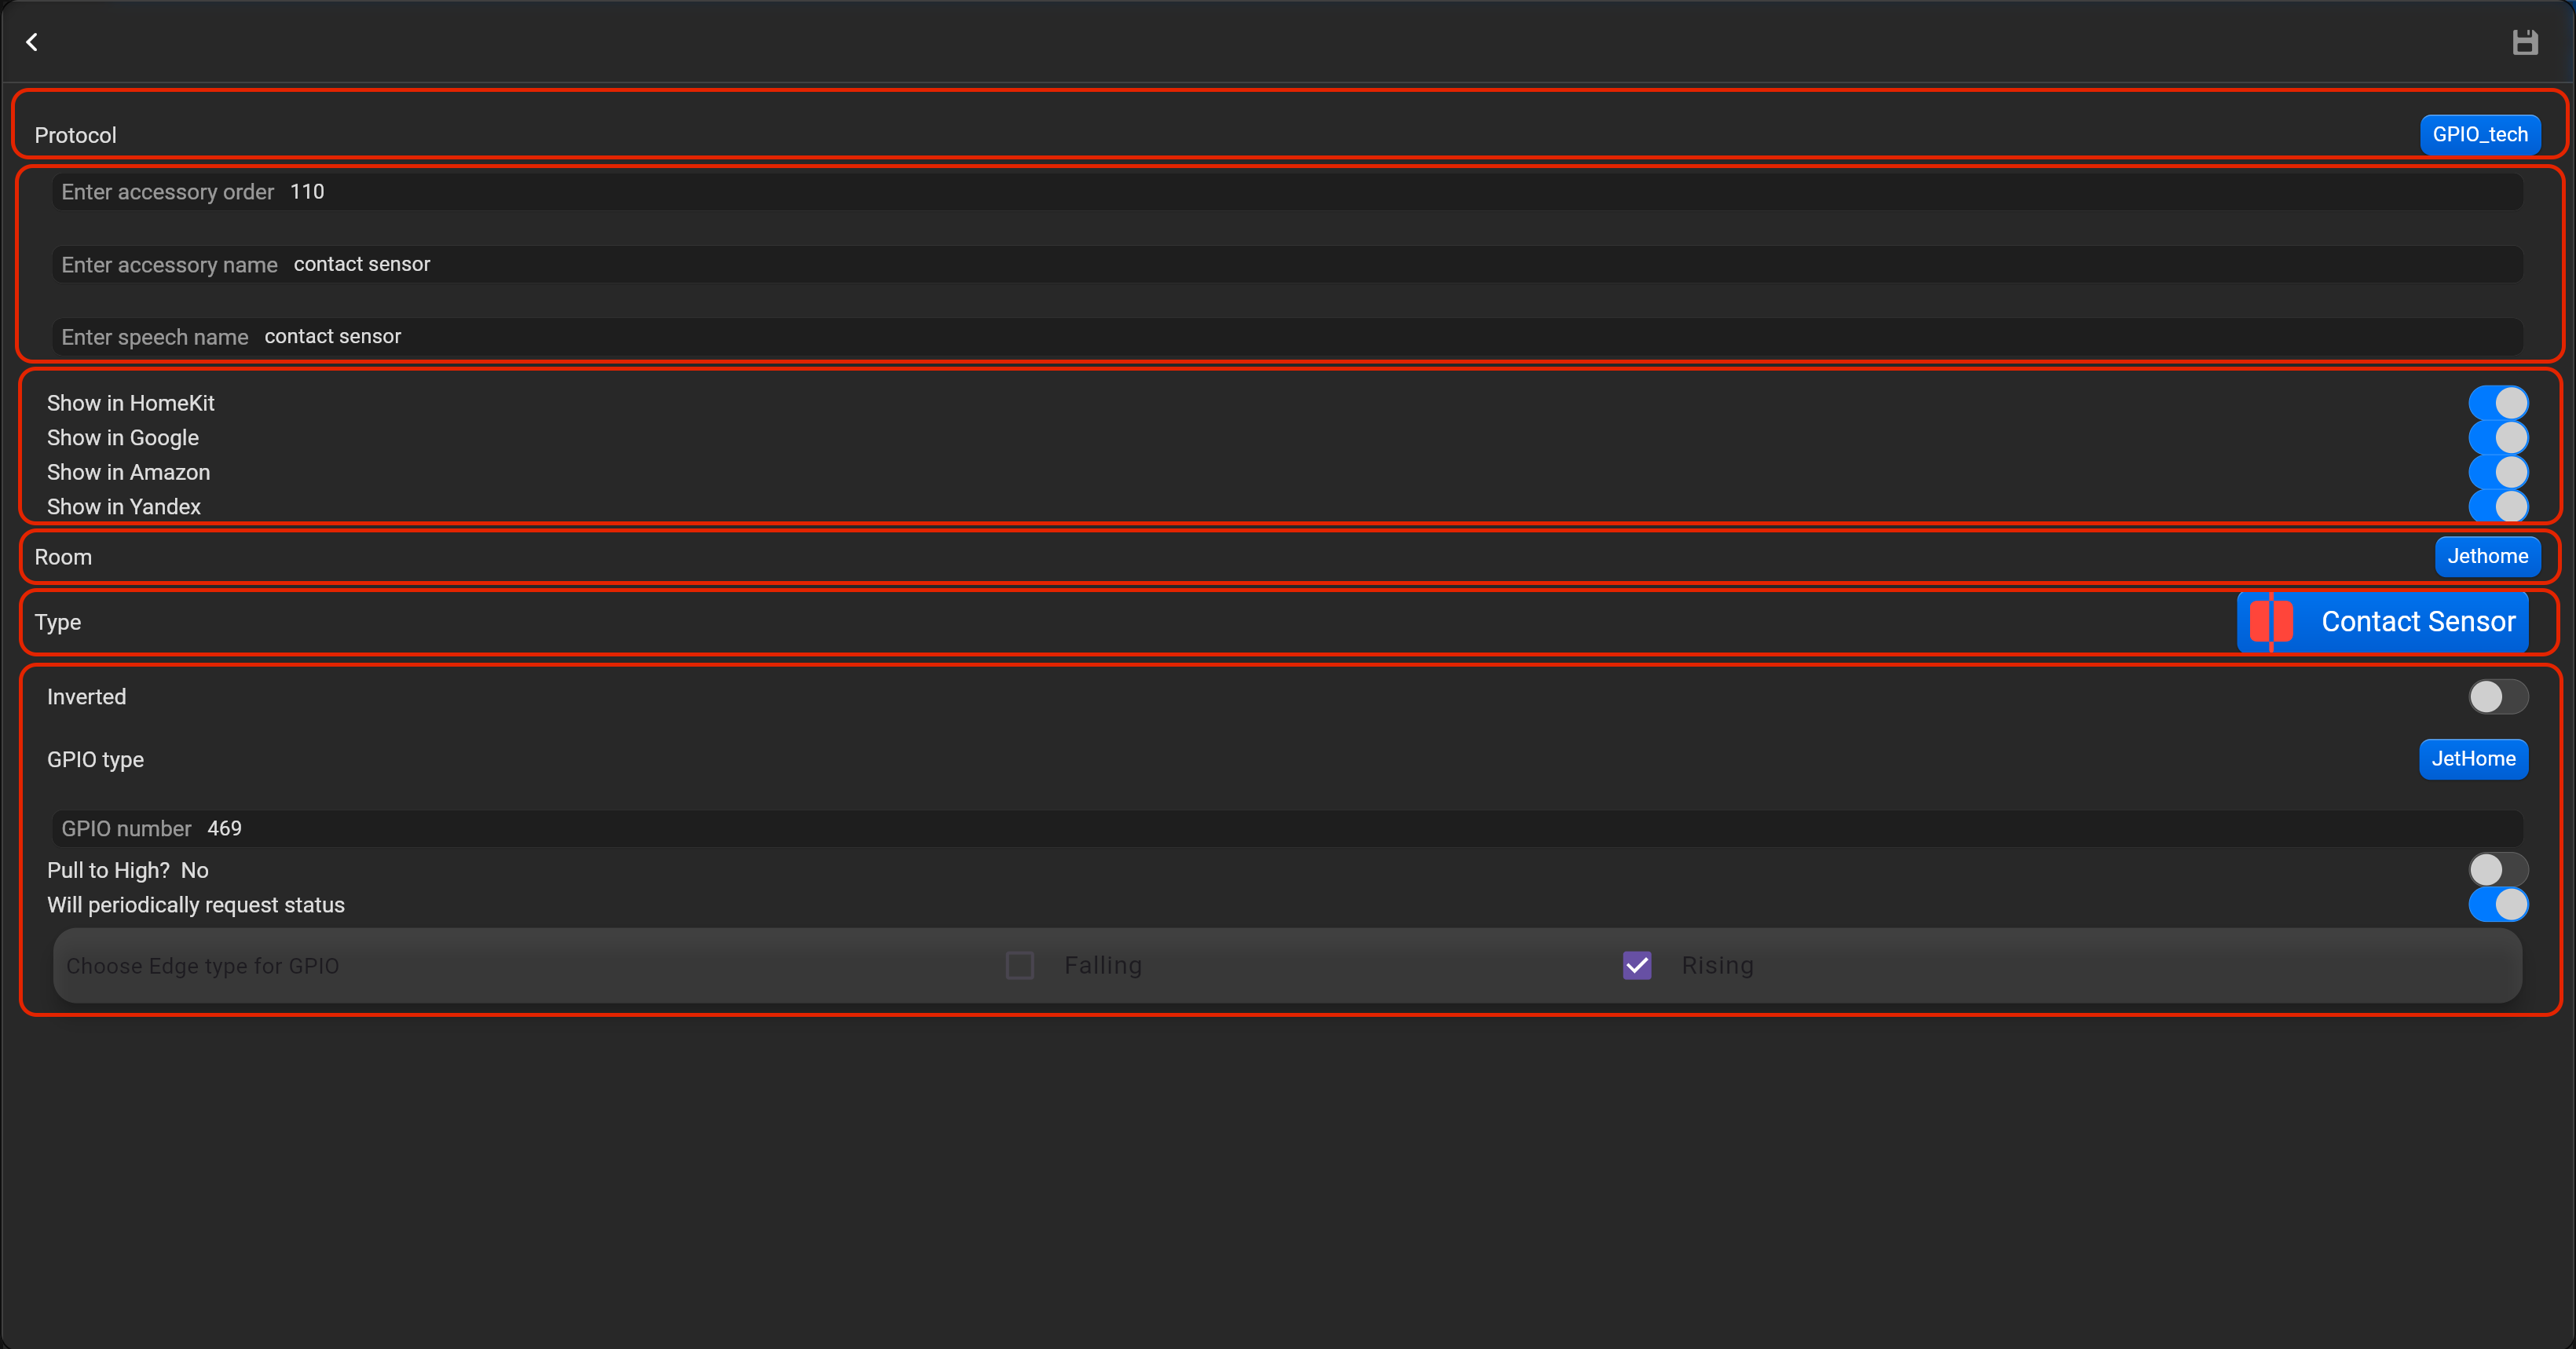
¶ Contact sensor
- select the protocol in the drop-down list,
- put the accessory order (affects the location of the accessory in Pyxis app),
- put name of the accessory and for the voice assistants,
- select voice assistants, where the accessory should be displayed,
- select the room, where the accessory will be located,
- select the type of accessory (Contact sensor),
- put subnet ID, device ID, channel and sensor type (Old 4Z or new module). You can invert value of this accessory.
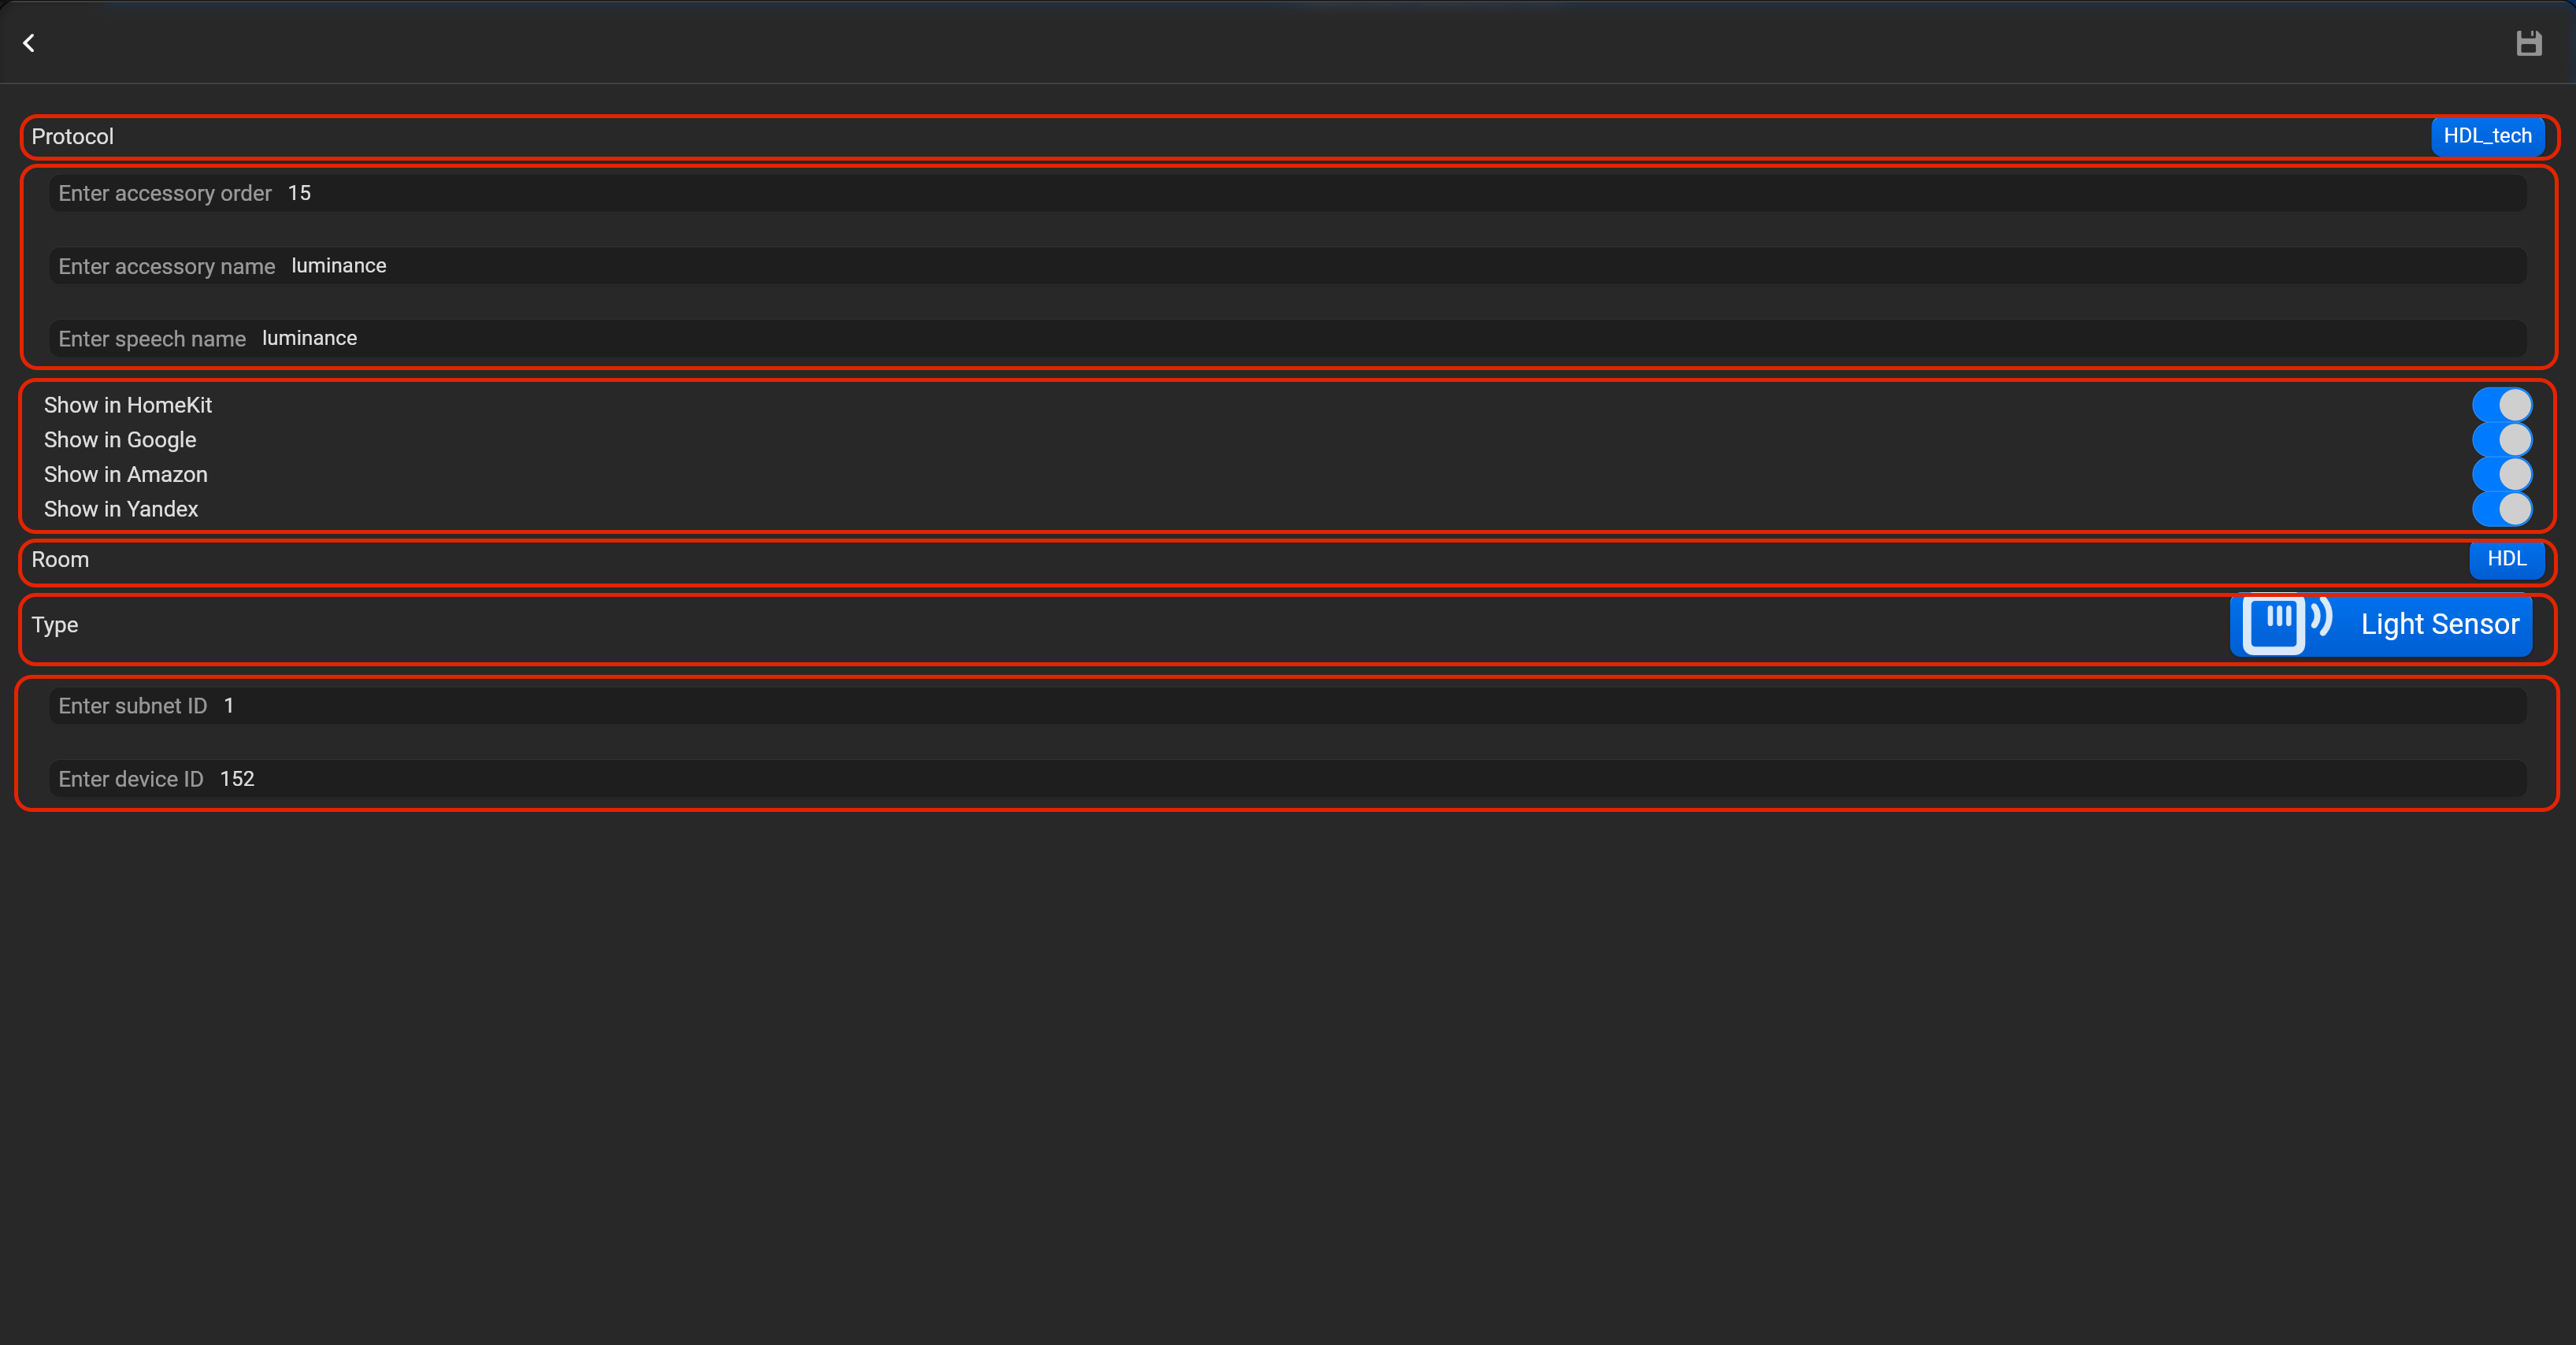
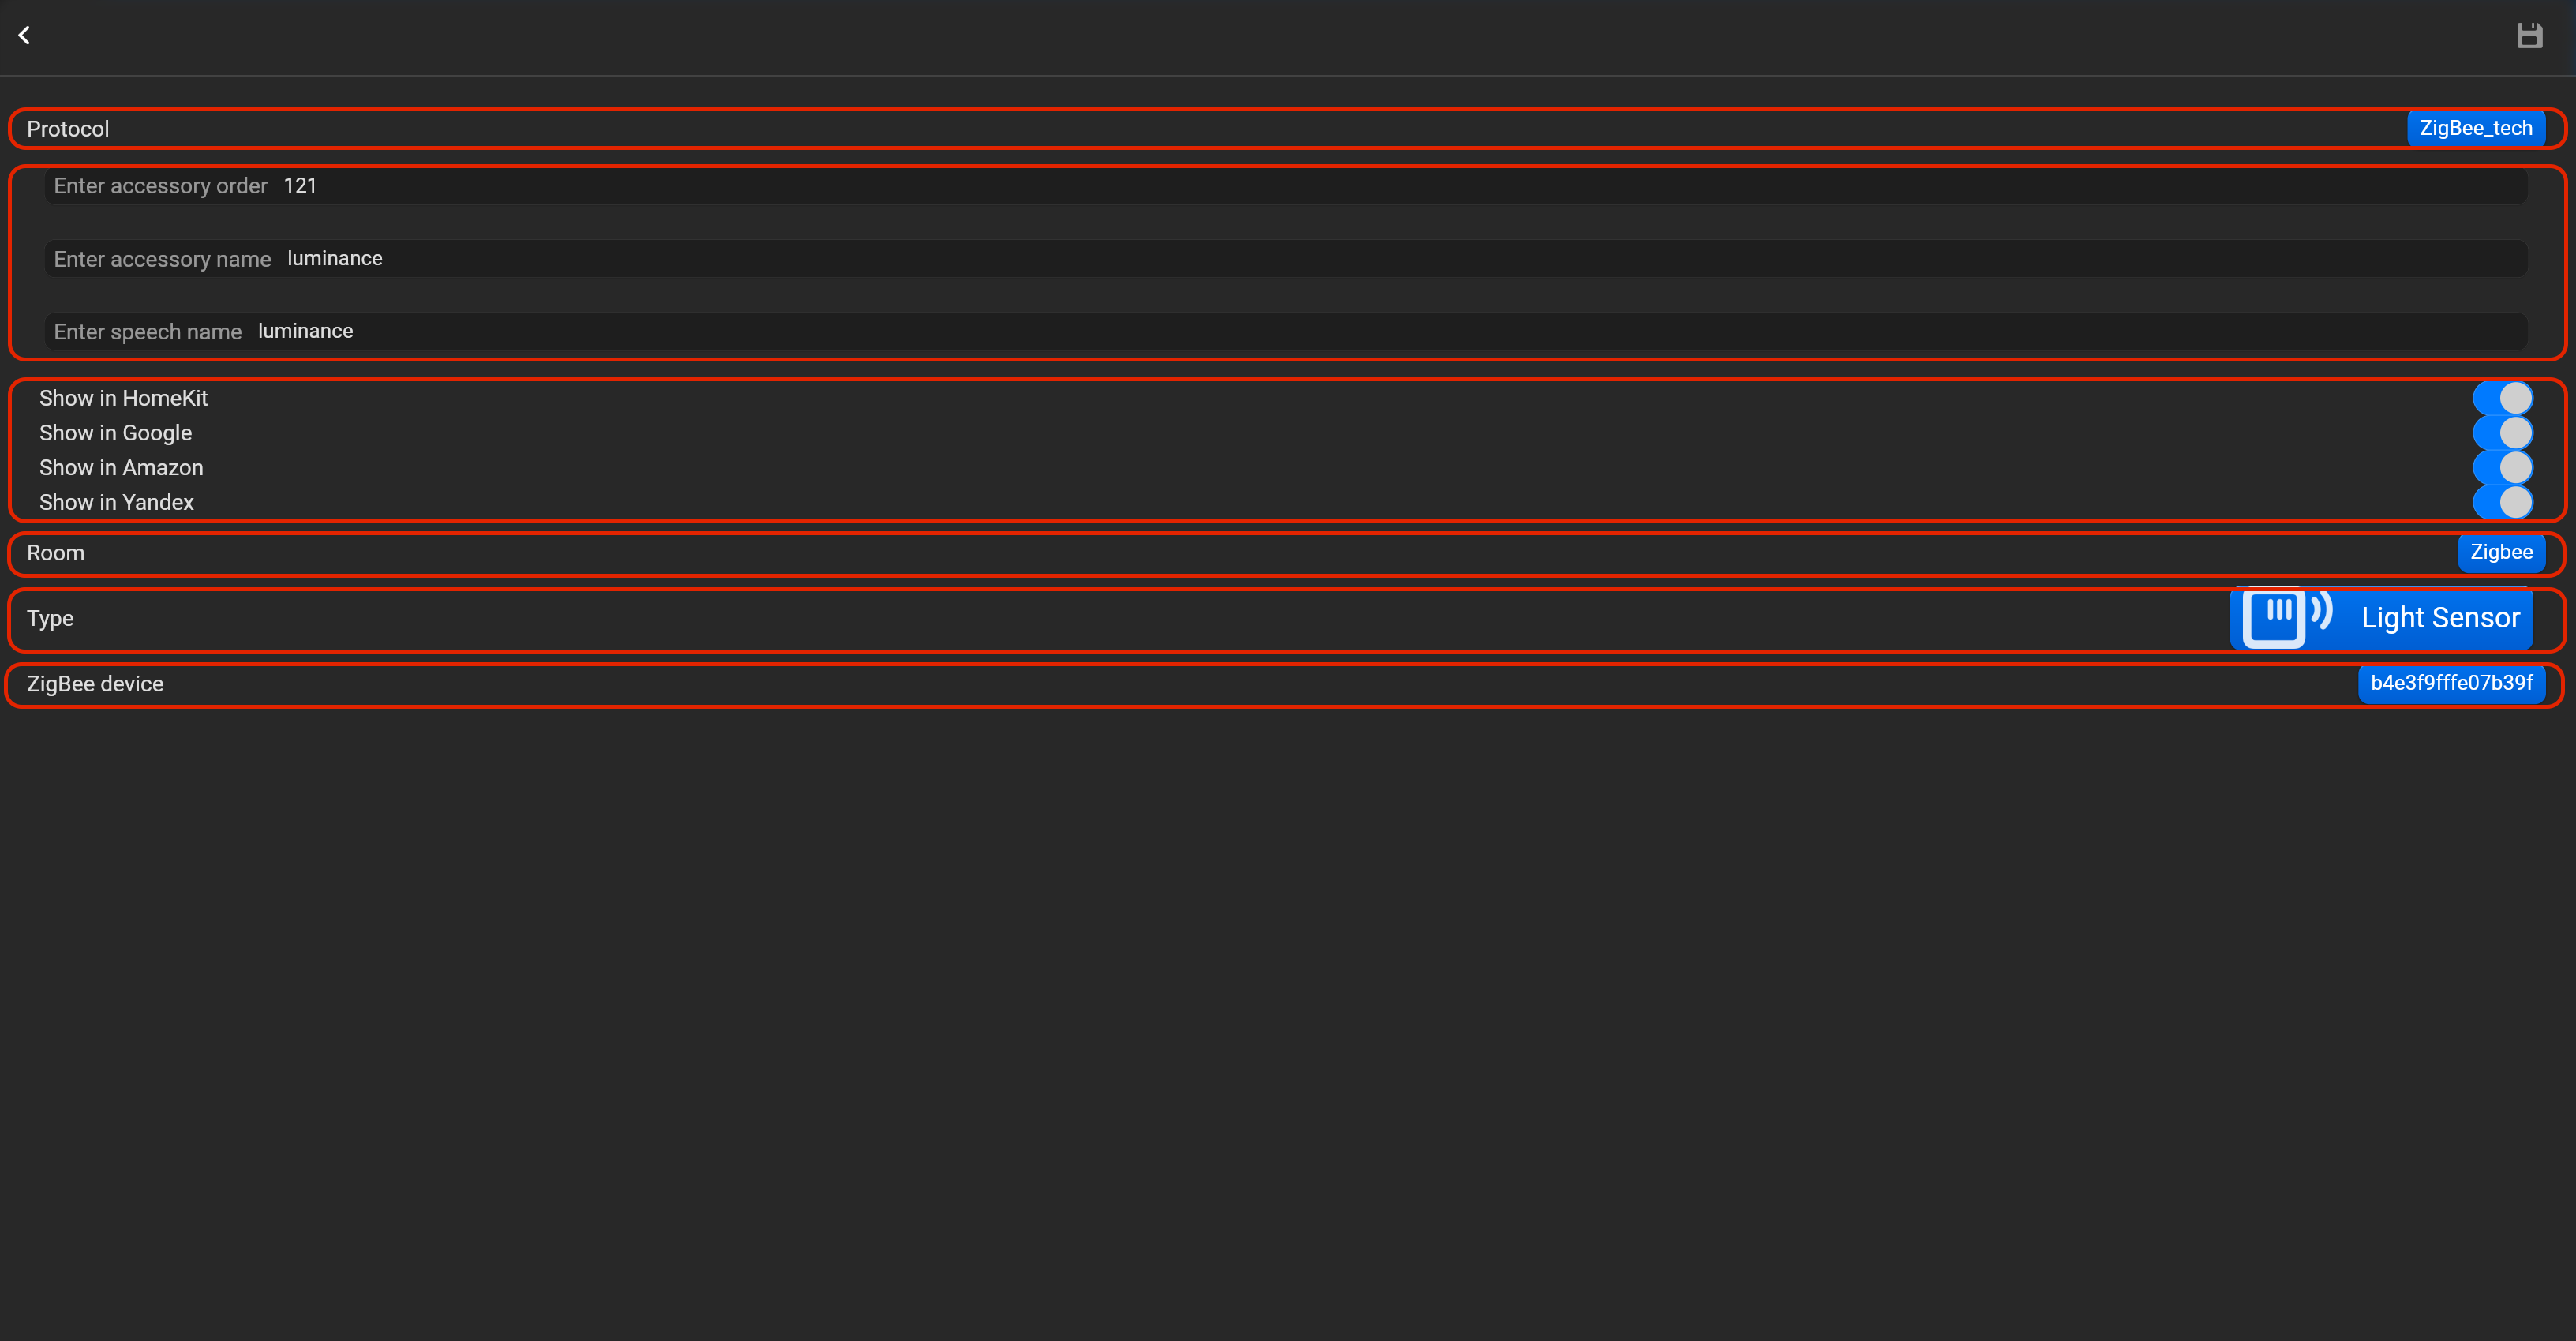
¶ Light sensor
- select the protocol in the drop-down list,
- put the accessory order (affects the location of the accessory in Pyxis app),
- put name of the accessory and for the voice assistants,
- select voice assistants, where the accessory should be displayed,
- select the room, where the accessory will be located,
- select the type of accessory (Light sensor),
- put subnet ID, device ID and channel.
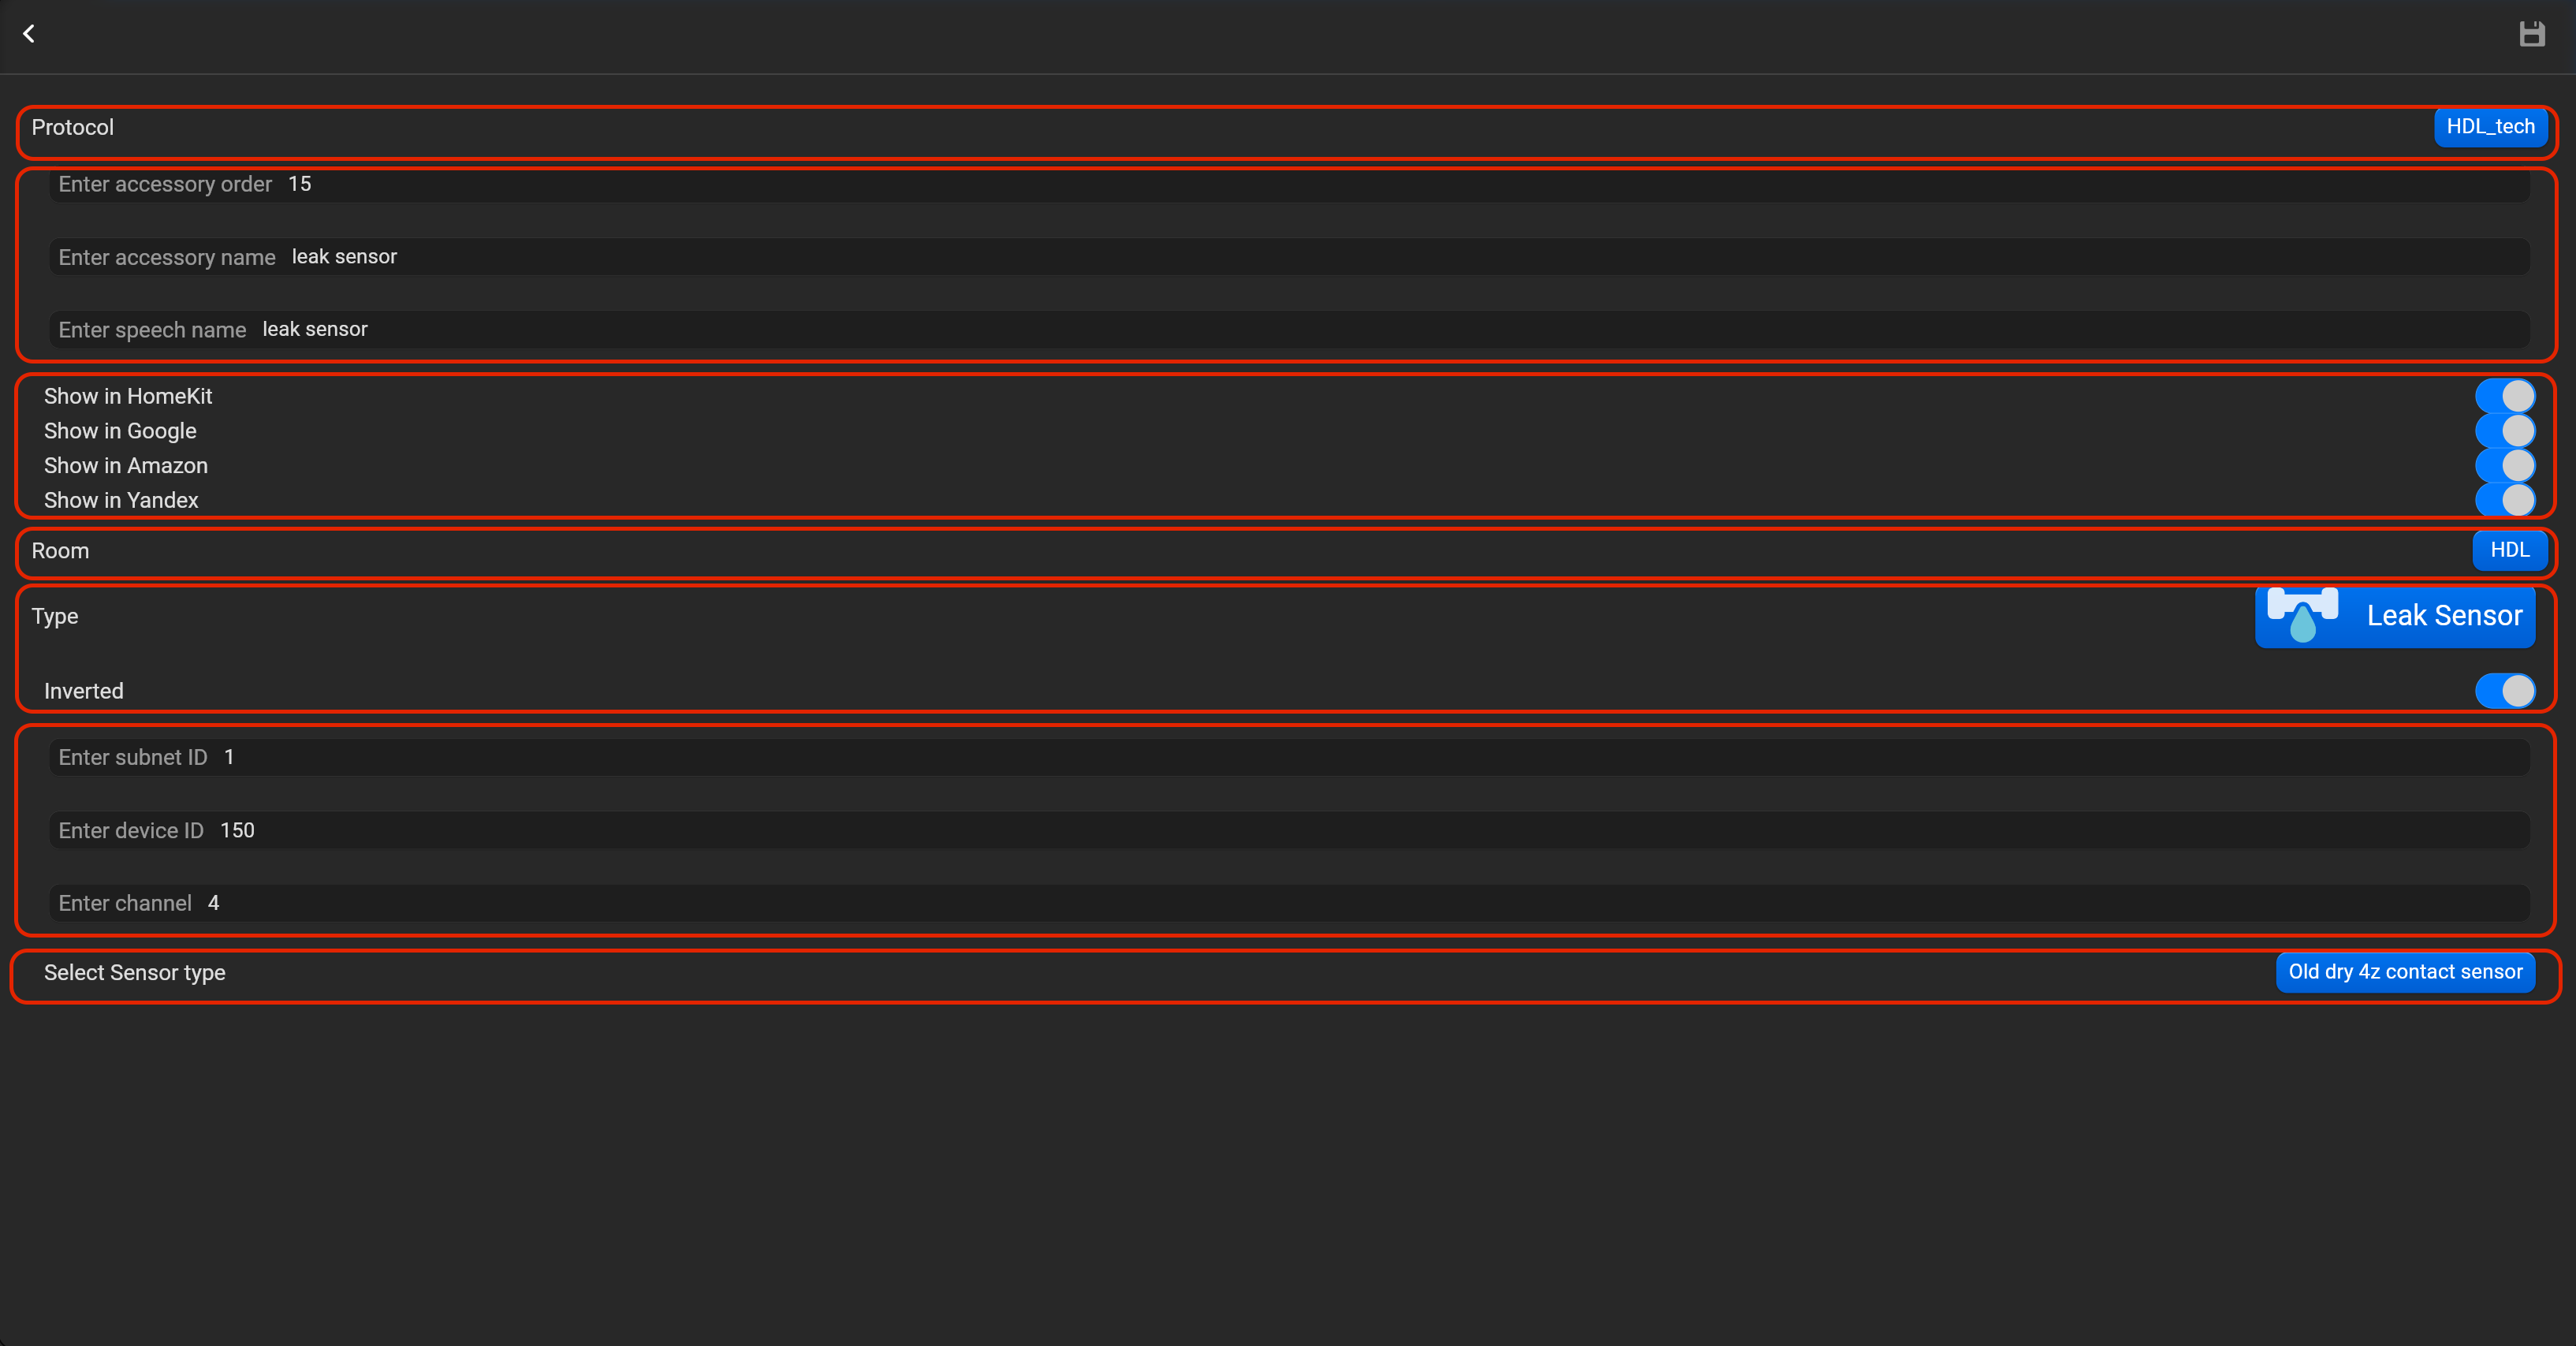
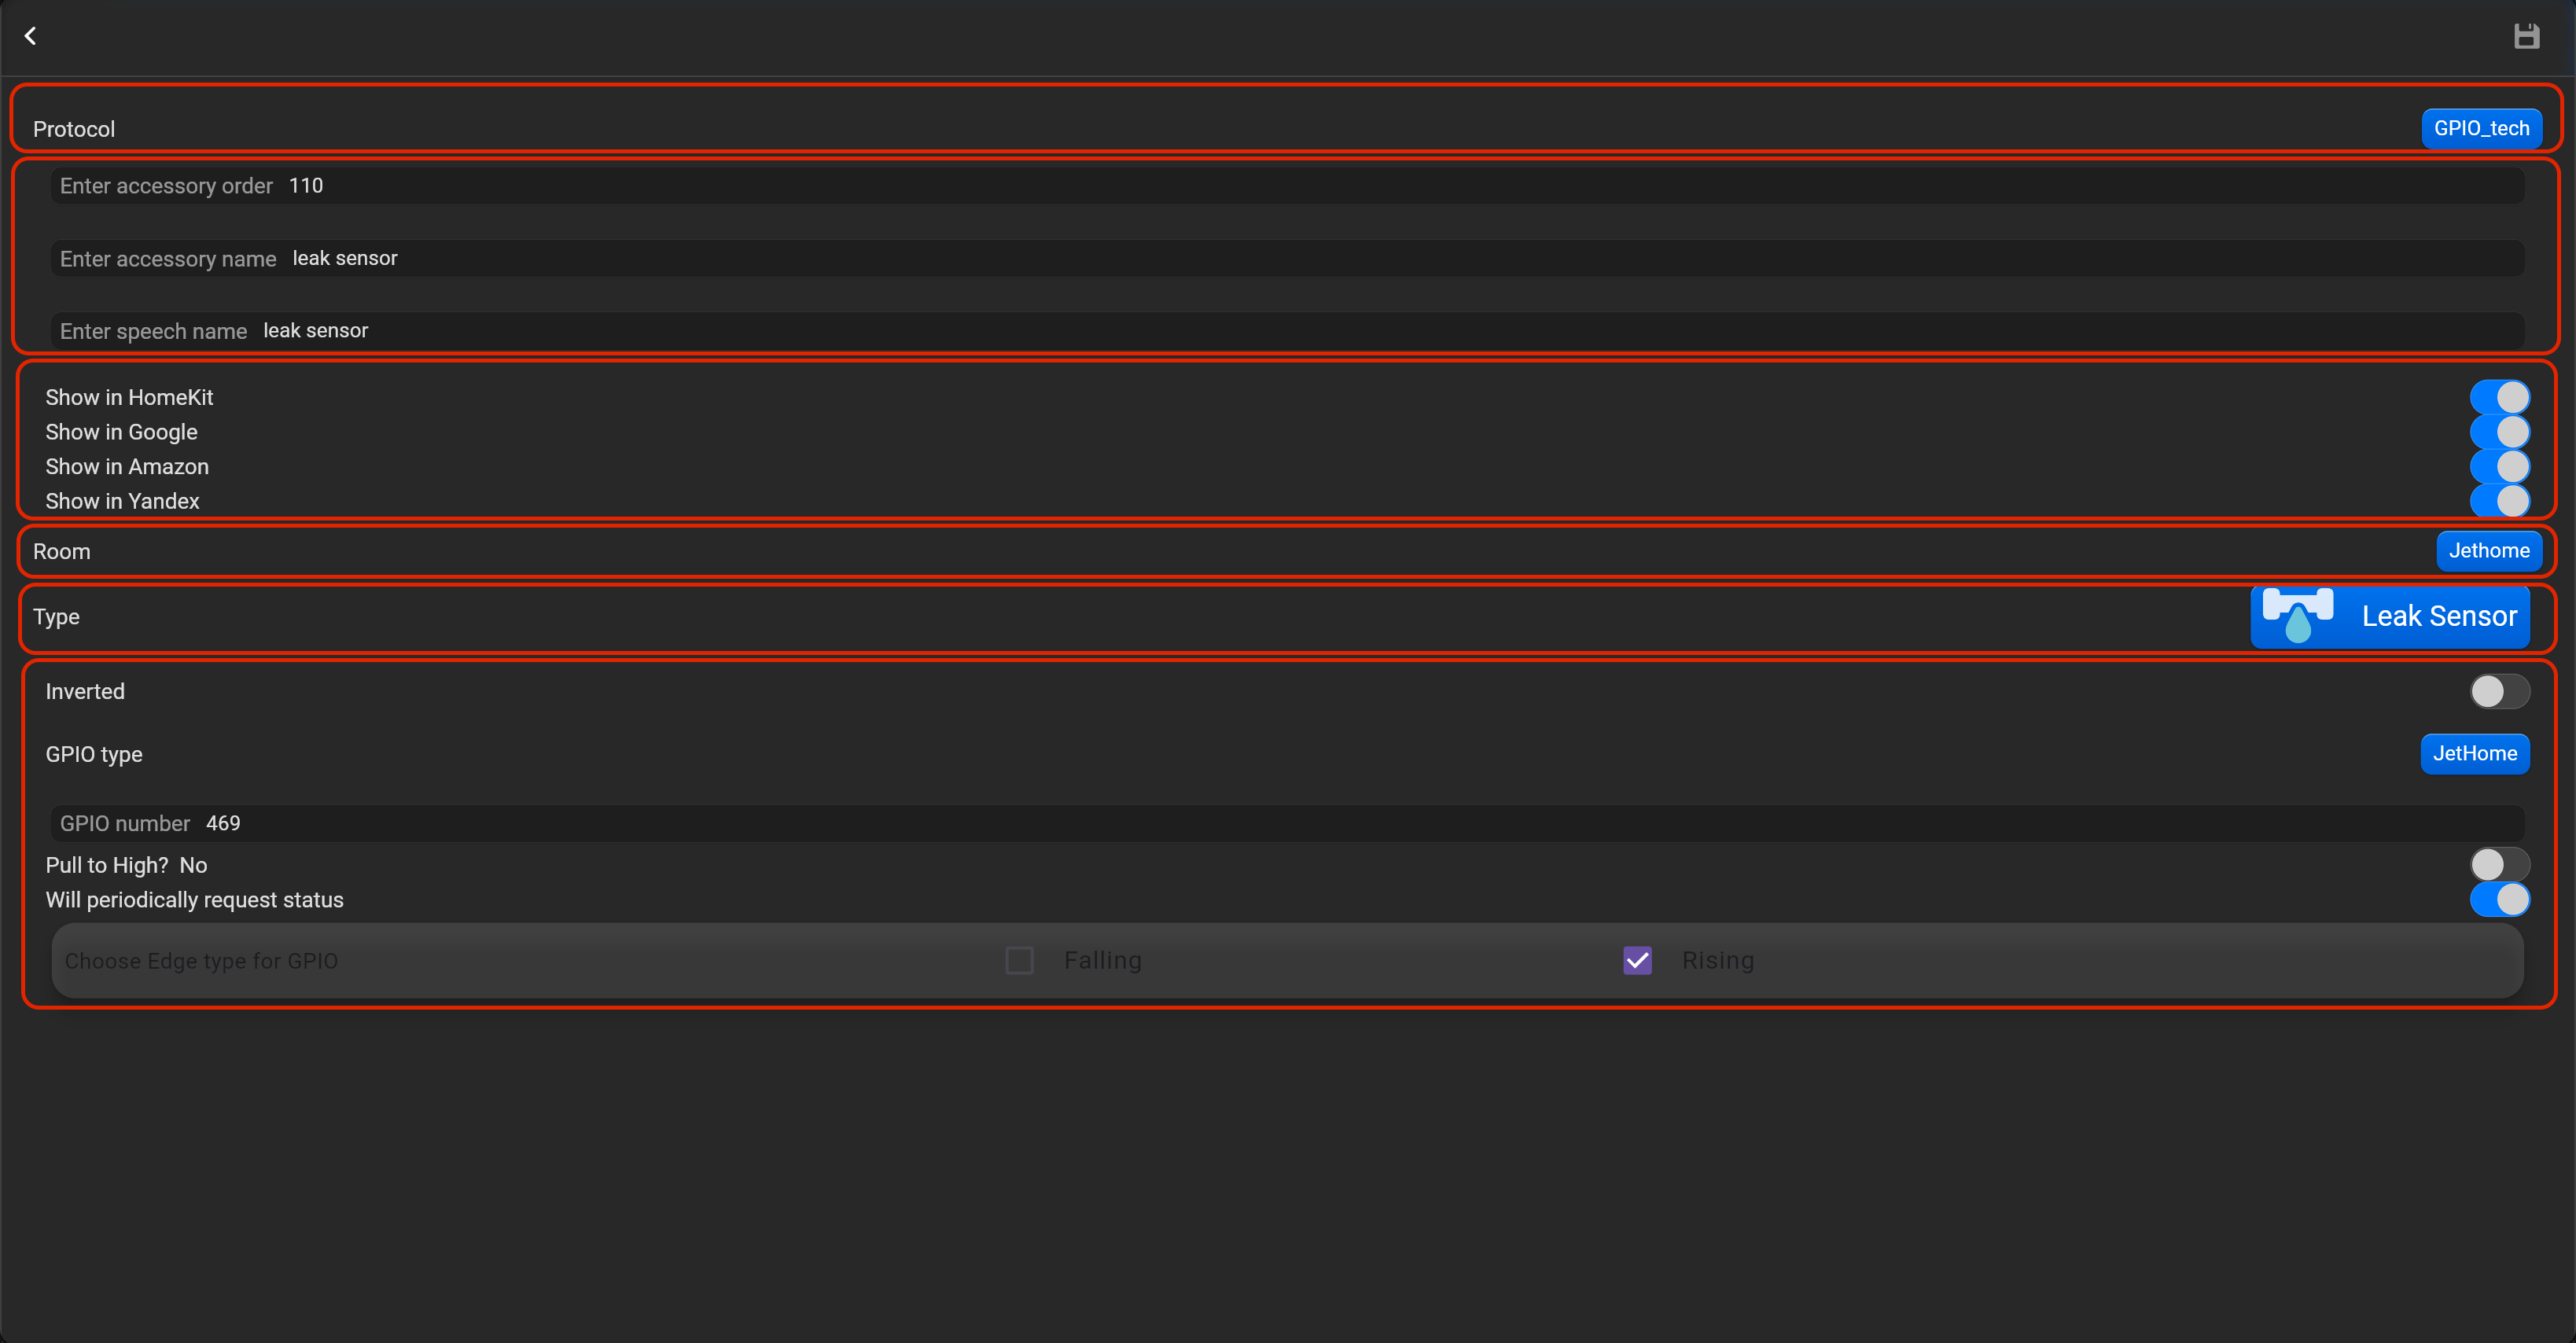
¶ Leak sensor
- select the protocol in the drop-down list,
- put the accessory order (affects the location of the accessory in Pyxis app),
- put name of the accessory and for the voice assistants,
- select voice assistants, where the accessory should be displayed,
- select the room, where the accessory will be located,
- select the type of accessory (Leak sensor),
- put subnet ID, device ID, channel and sensor type (Old 4Z or new module). You can invert value of this accessory.
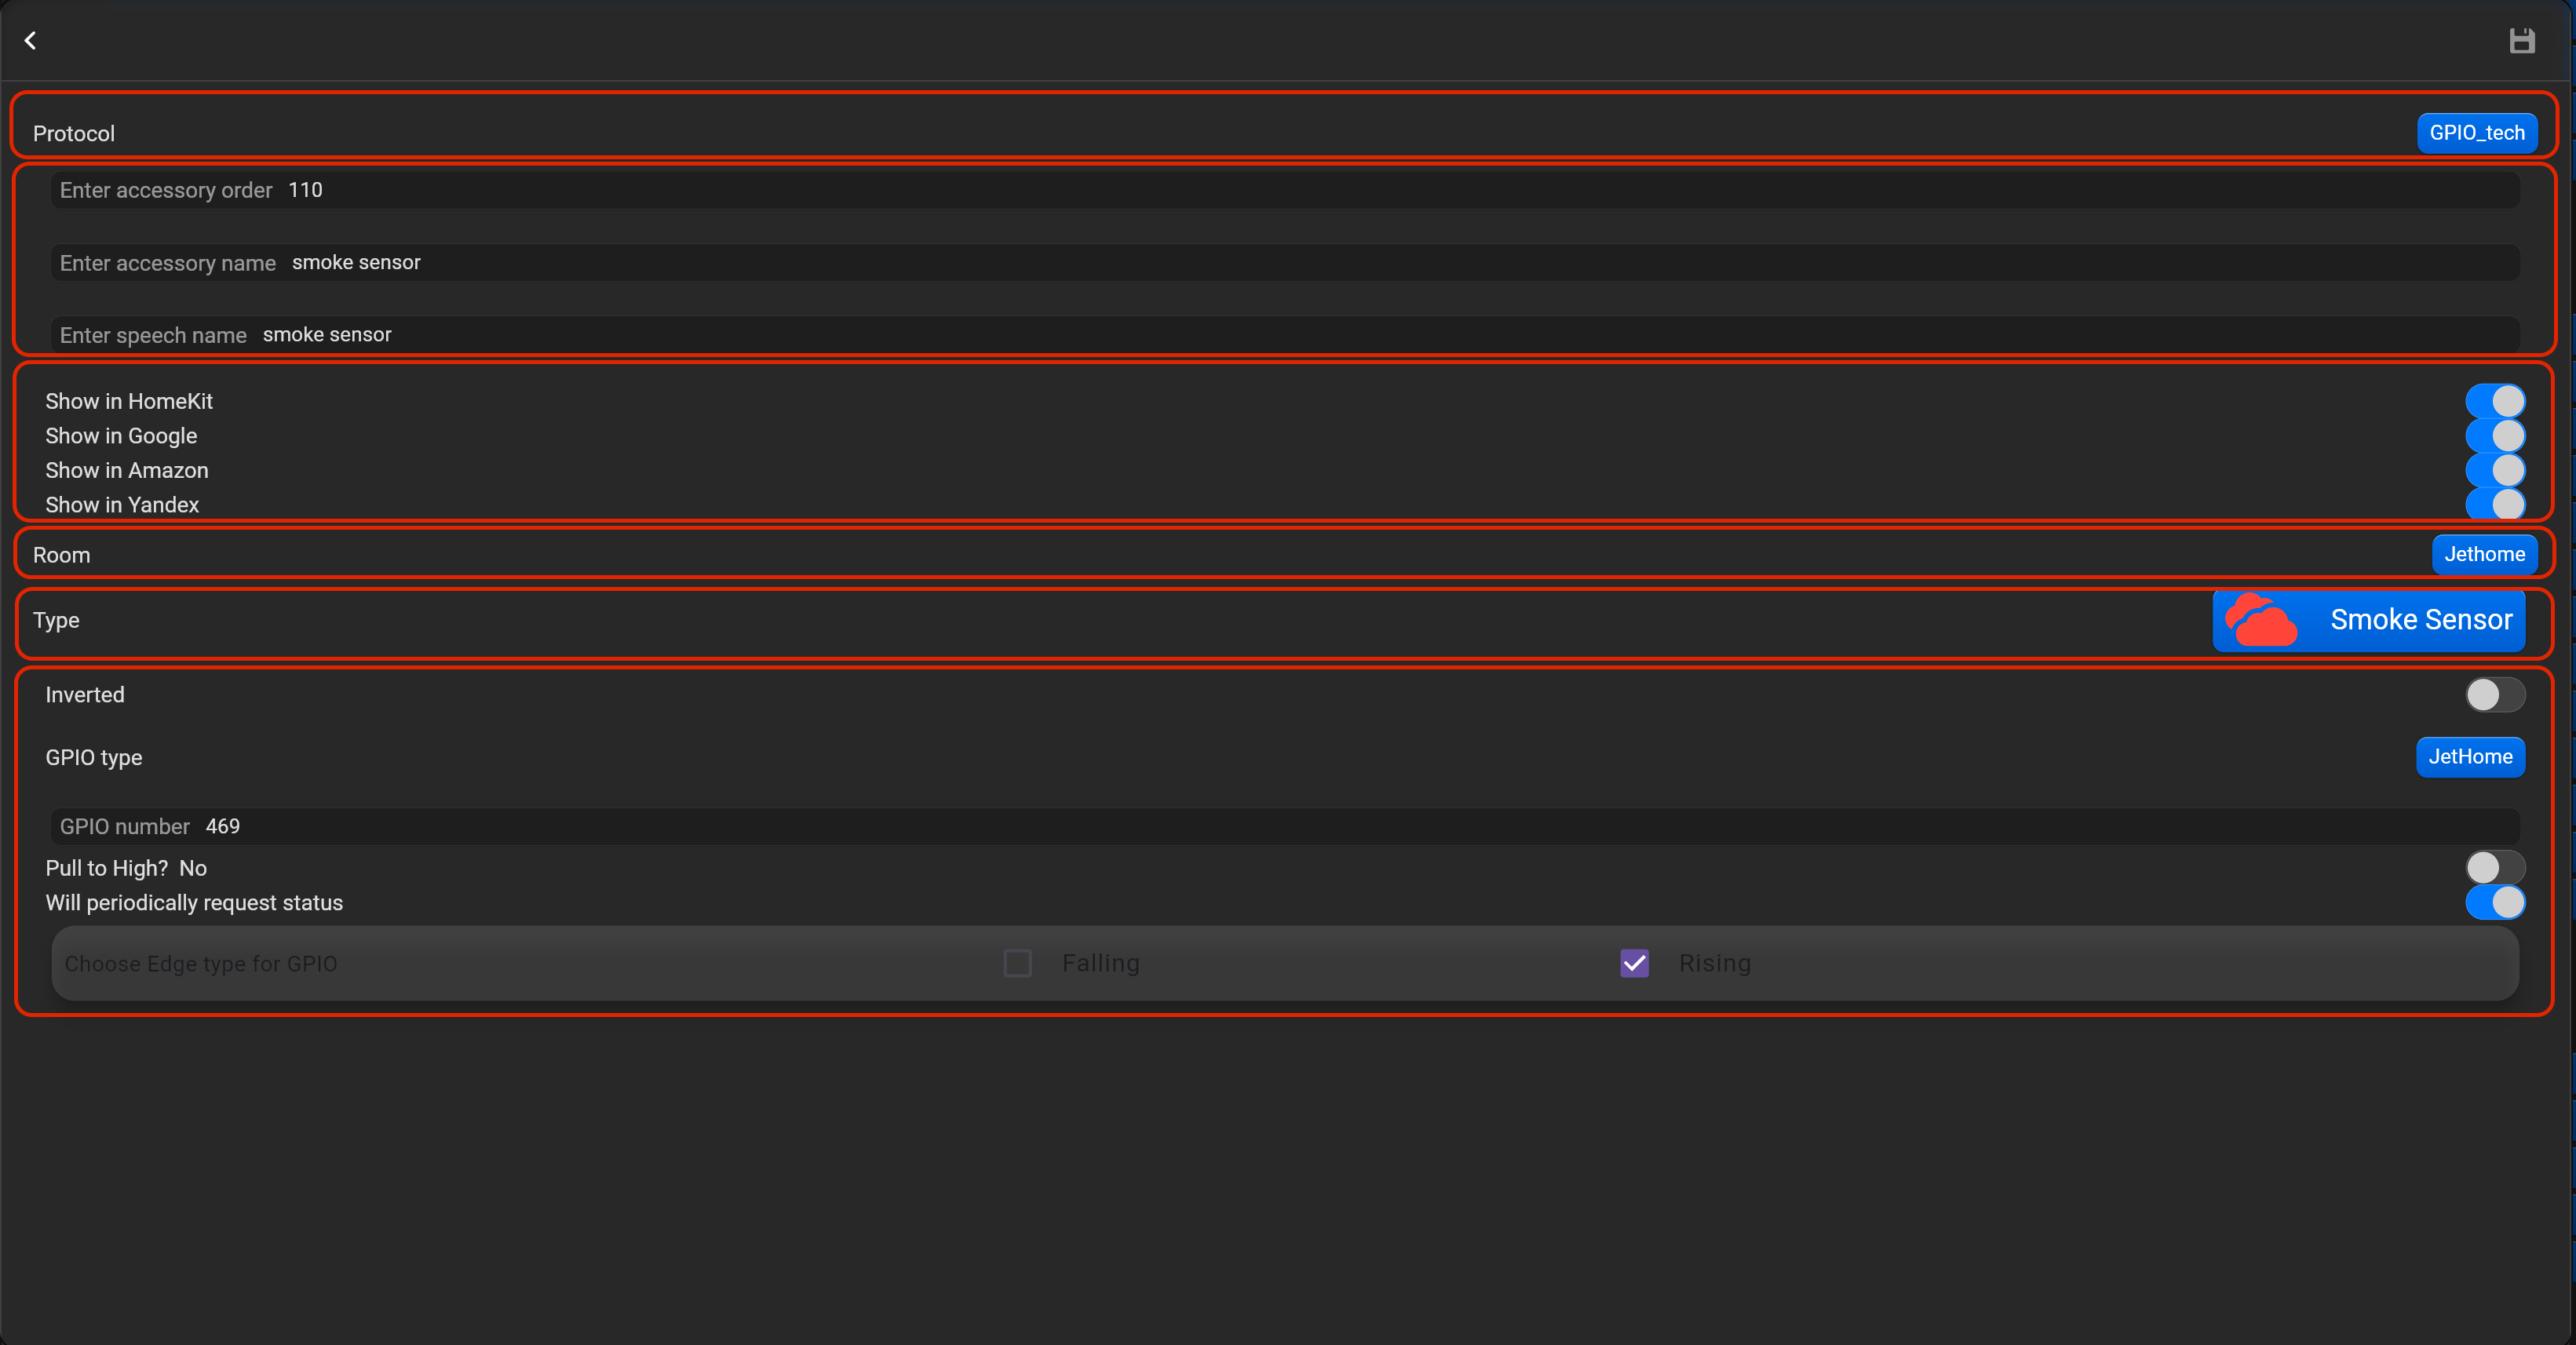
¶ Smoke sensor
- select the protocol in the drop-down list,
- put the accessory order (affects the location of the accessory in Pyxis app),
- put name of the accessory and for the voice assistants,
- select voice assistants, where the accessory should be displayed,
- select the room, where the accessory will be located,
- select the type of accessory (Smoke sensor),
- put subnet ID, device ID, channel and sensor type (Old 4Z or new module). You can invert value of this accessory.

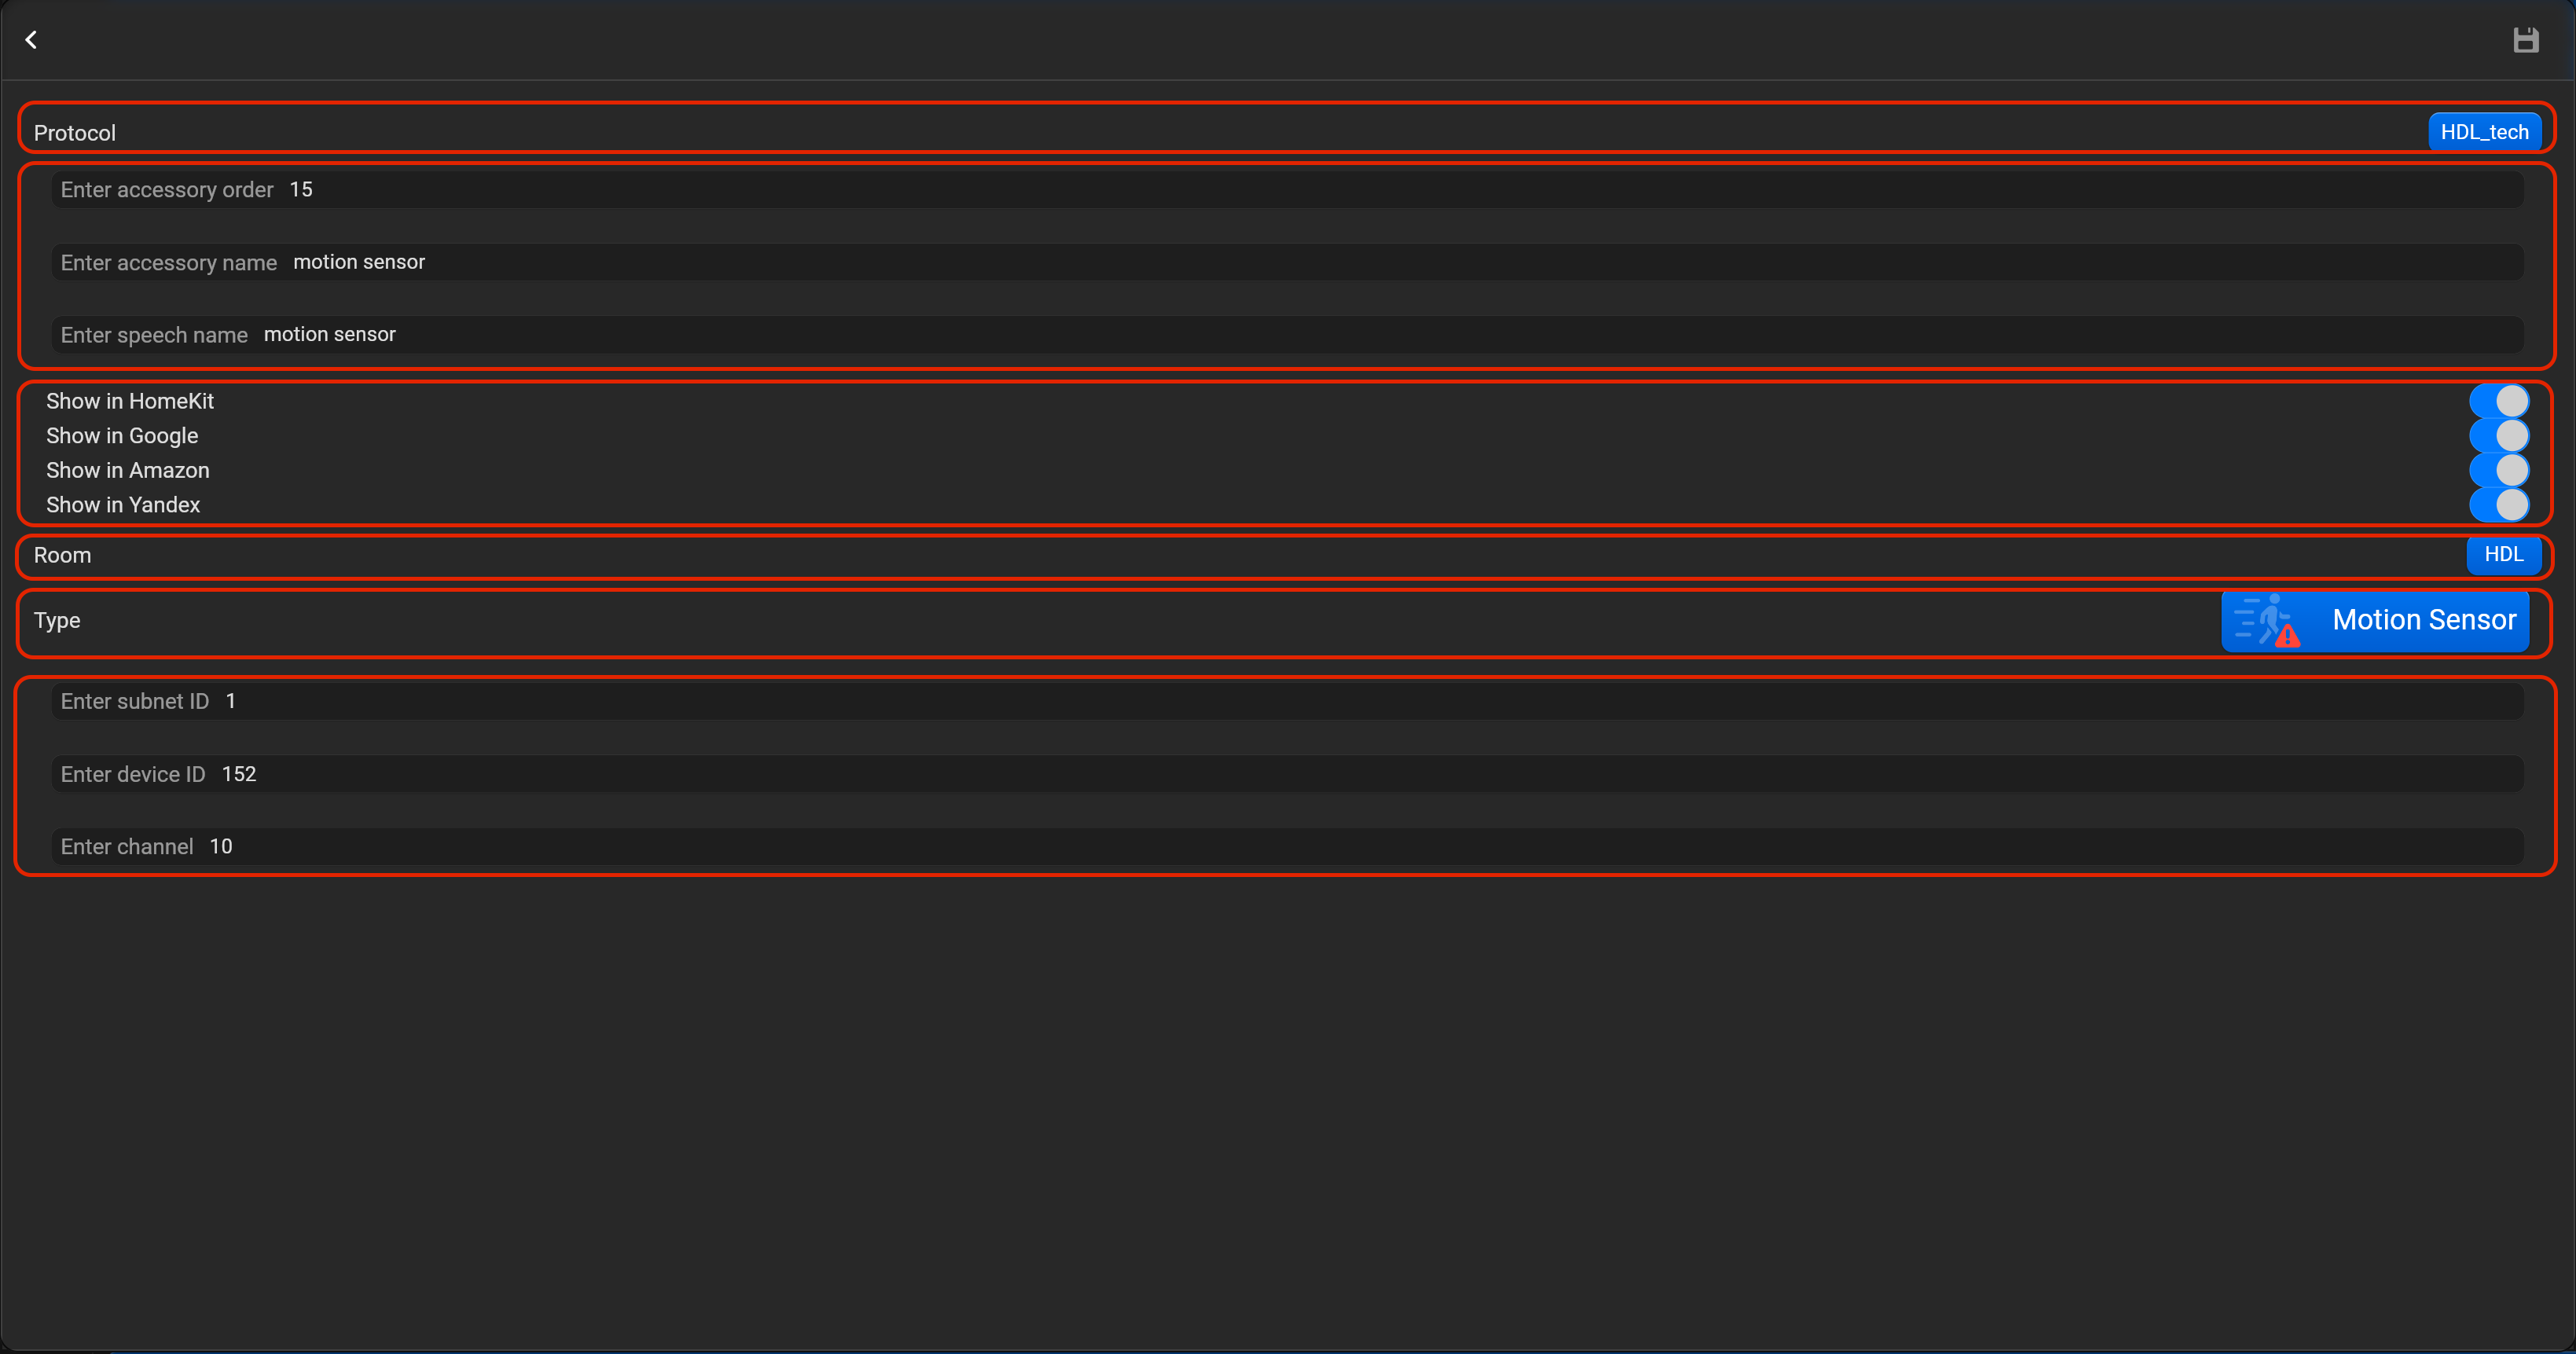
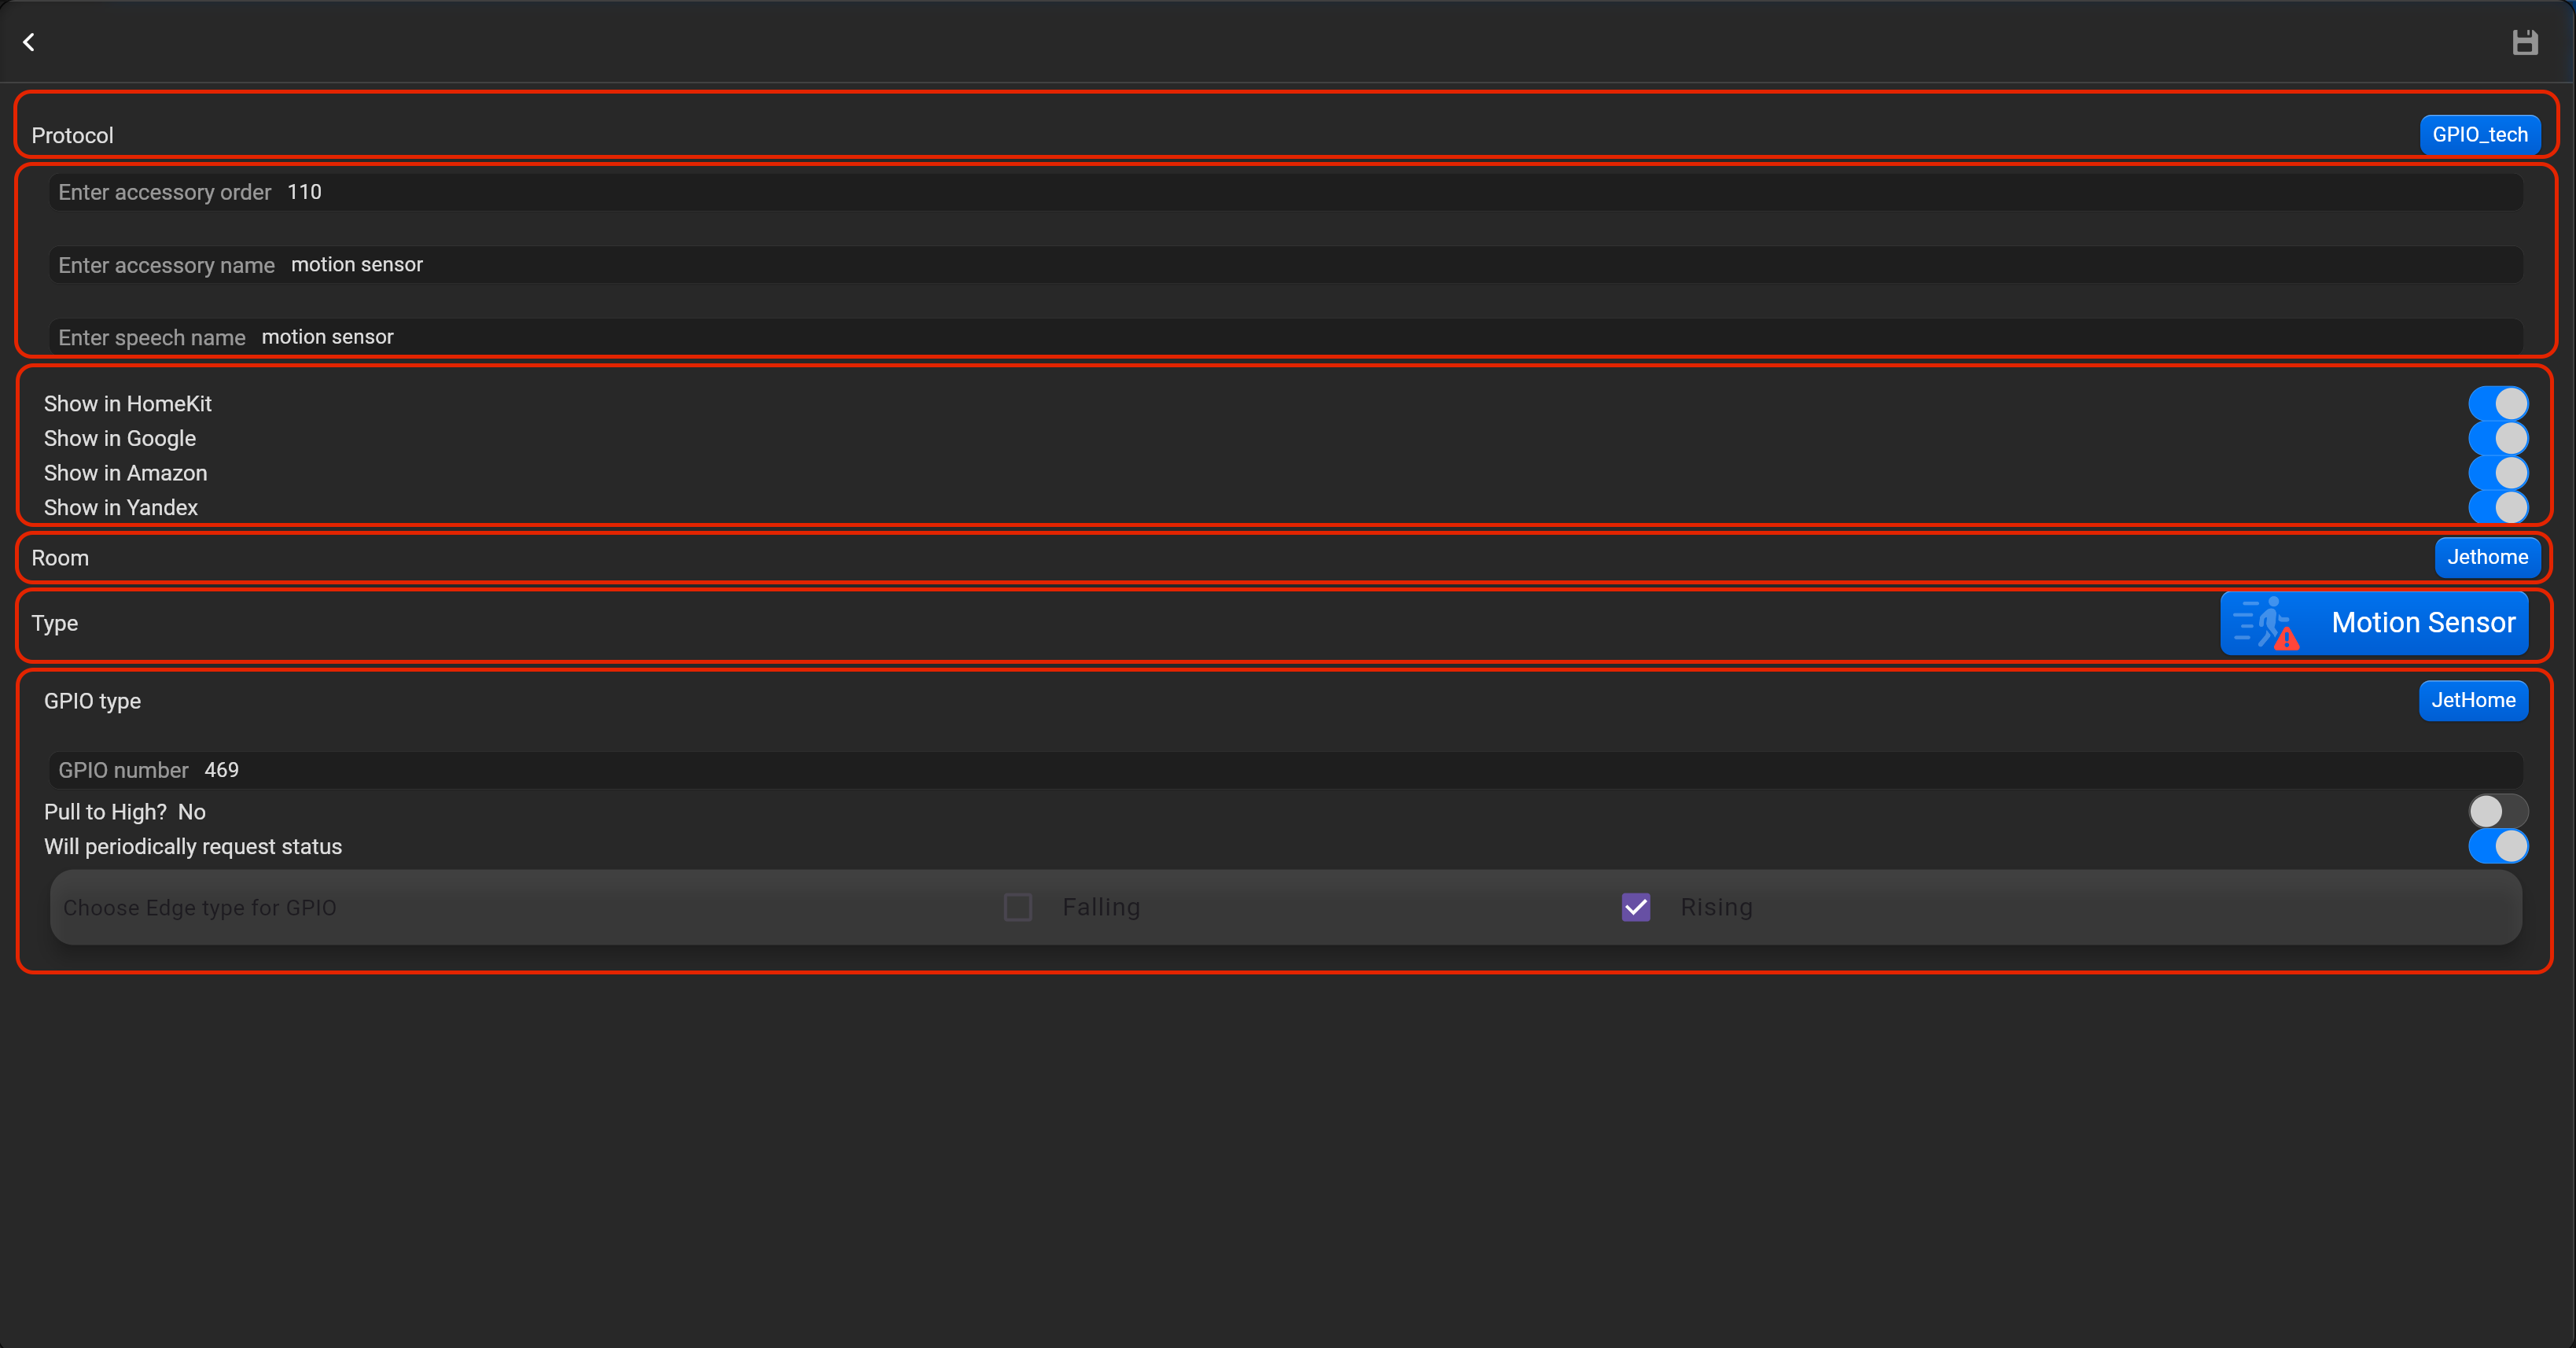
¶ Motion sensor
- select the protocol in the drop-down list,
- put the accessory order (affects the location of the accessory in Pyxis app),
- put name of the accessory and for the voice assistants,
- select voice assistants, where the accessory should be displayed,
- select the room, where the accessory will be located,
- select the type of accessory (Motionsensor),
- put subnet ID, device ID and channel for universal switch.
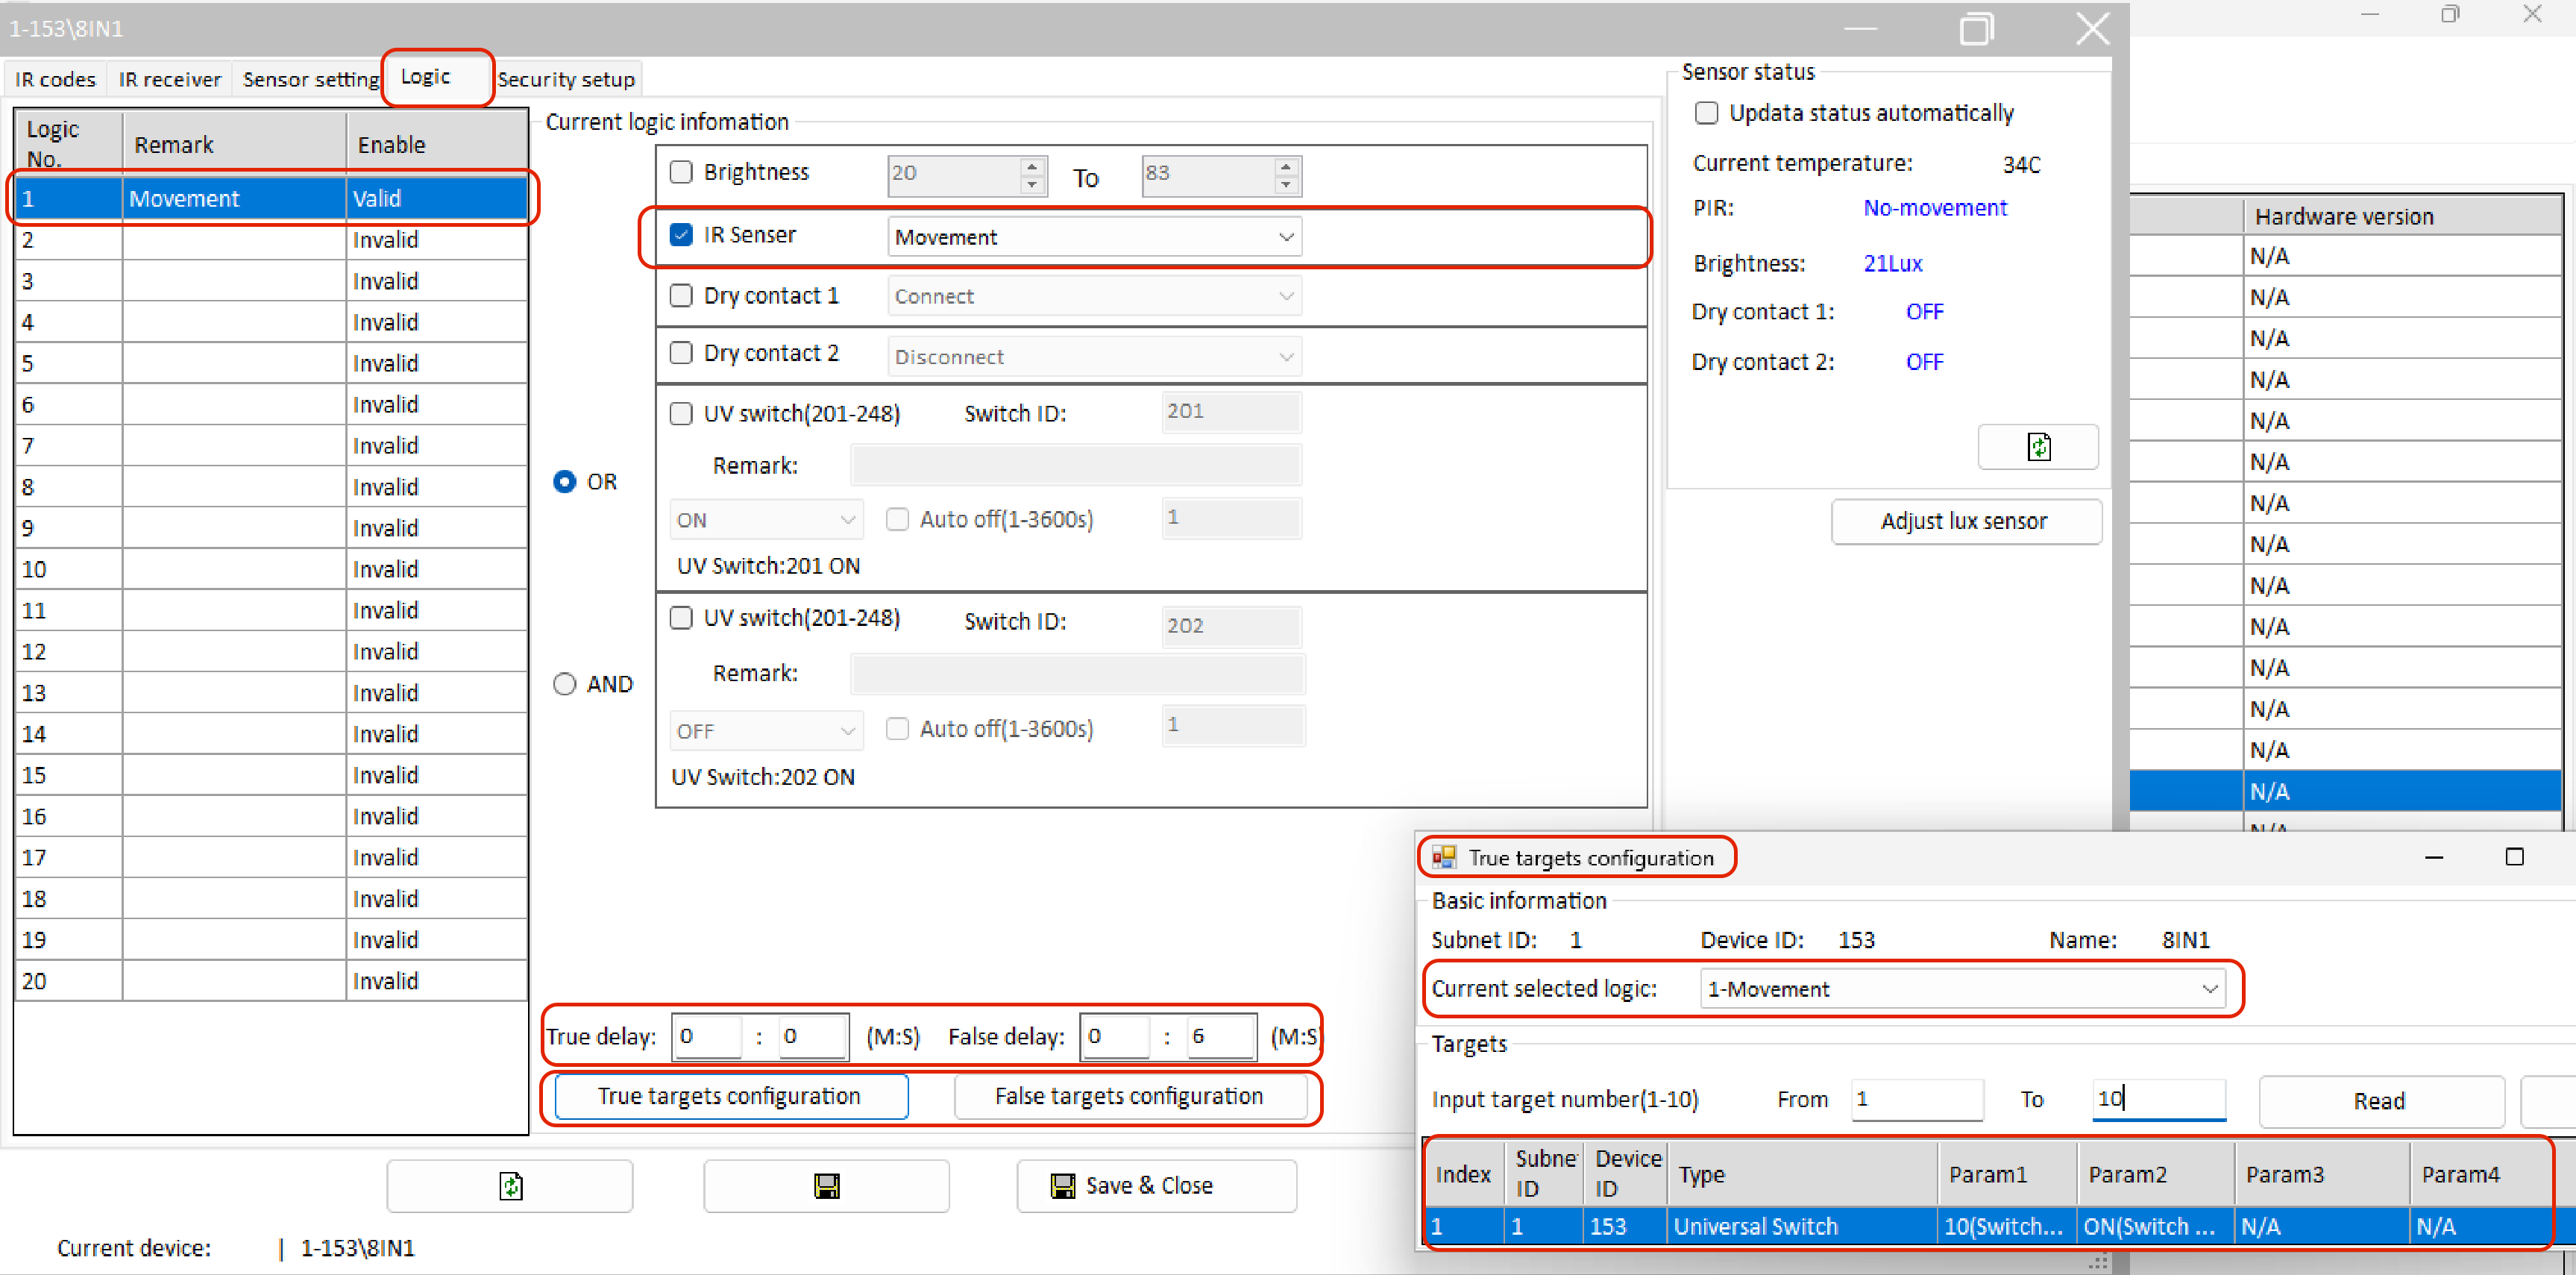
Motion sensor setting need addititonal setting in HDL Buspro setup tool:
- create logic and enable it,
- in this logic, mark IR sensor for movement,
- add for “True targets configuration” universal switch with parameter 2 is ON,
- add for “False targets configuration” universal switch with parameter 2 is OFF,
- set "True delay" and "False delay".
- save changes.
¶ IR emitter
- select the protocol in the drop-down list,
- put the accessory order (affects the location of the accessory in Pyxis app),
- put name of the accessory and for the voice assistants,
- select voice assistants, where the accessory should be displayed,
- select the room, where the accessory will be located,
- select the type of accessory (IR emitter),
- put subnet ID, device ID, channel and select type emitter type (e01c or 169c) .

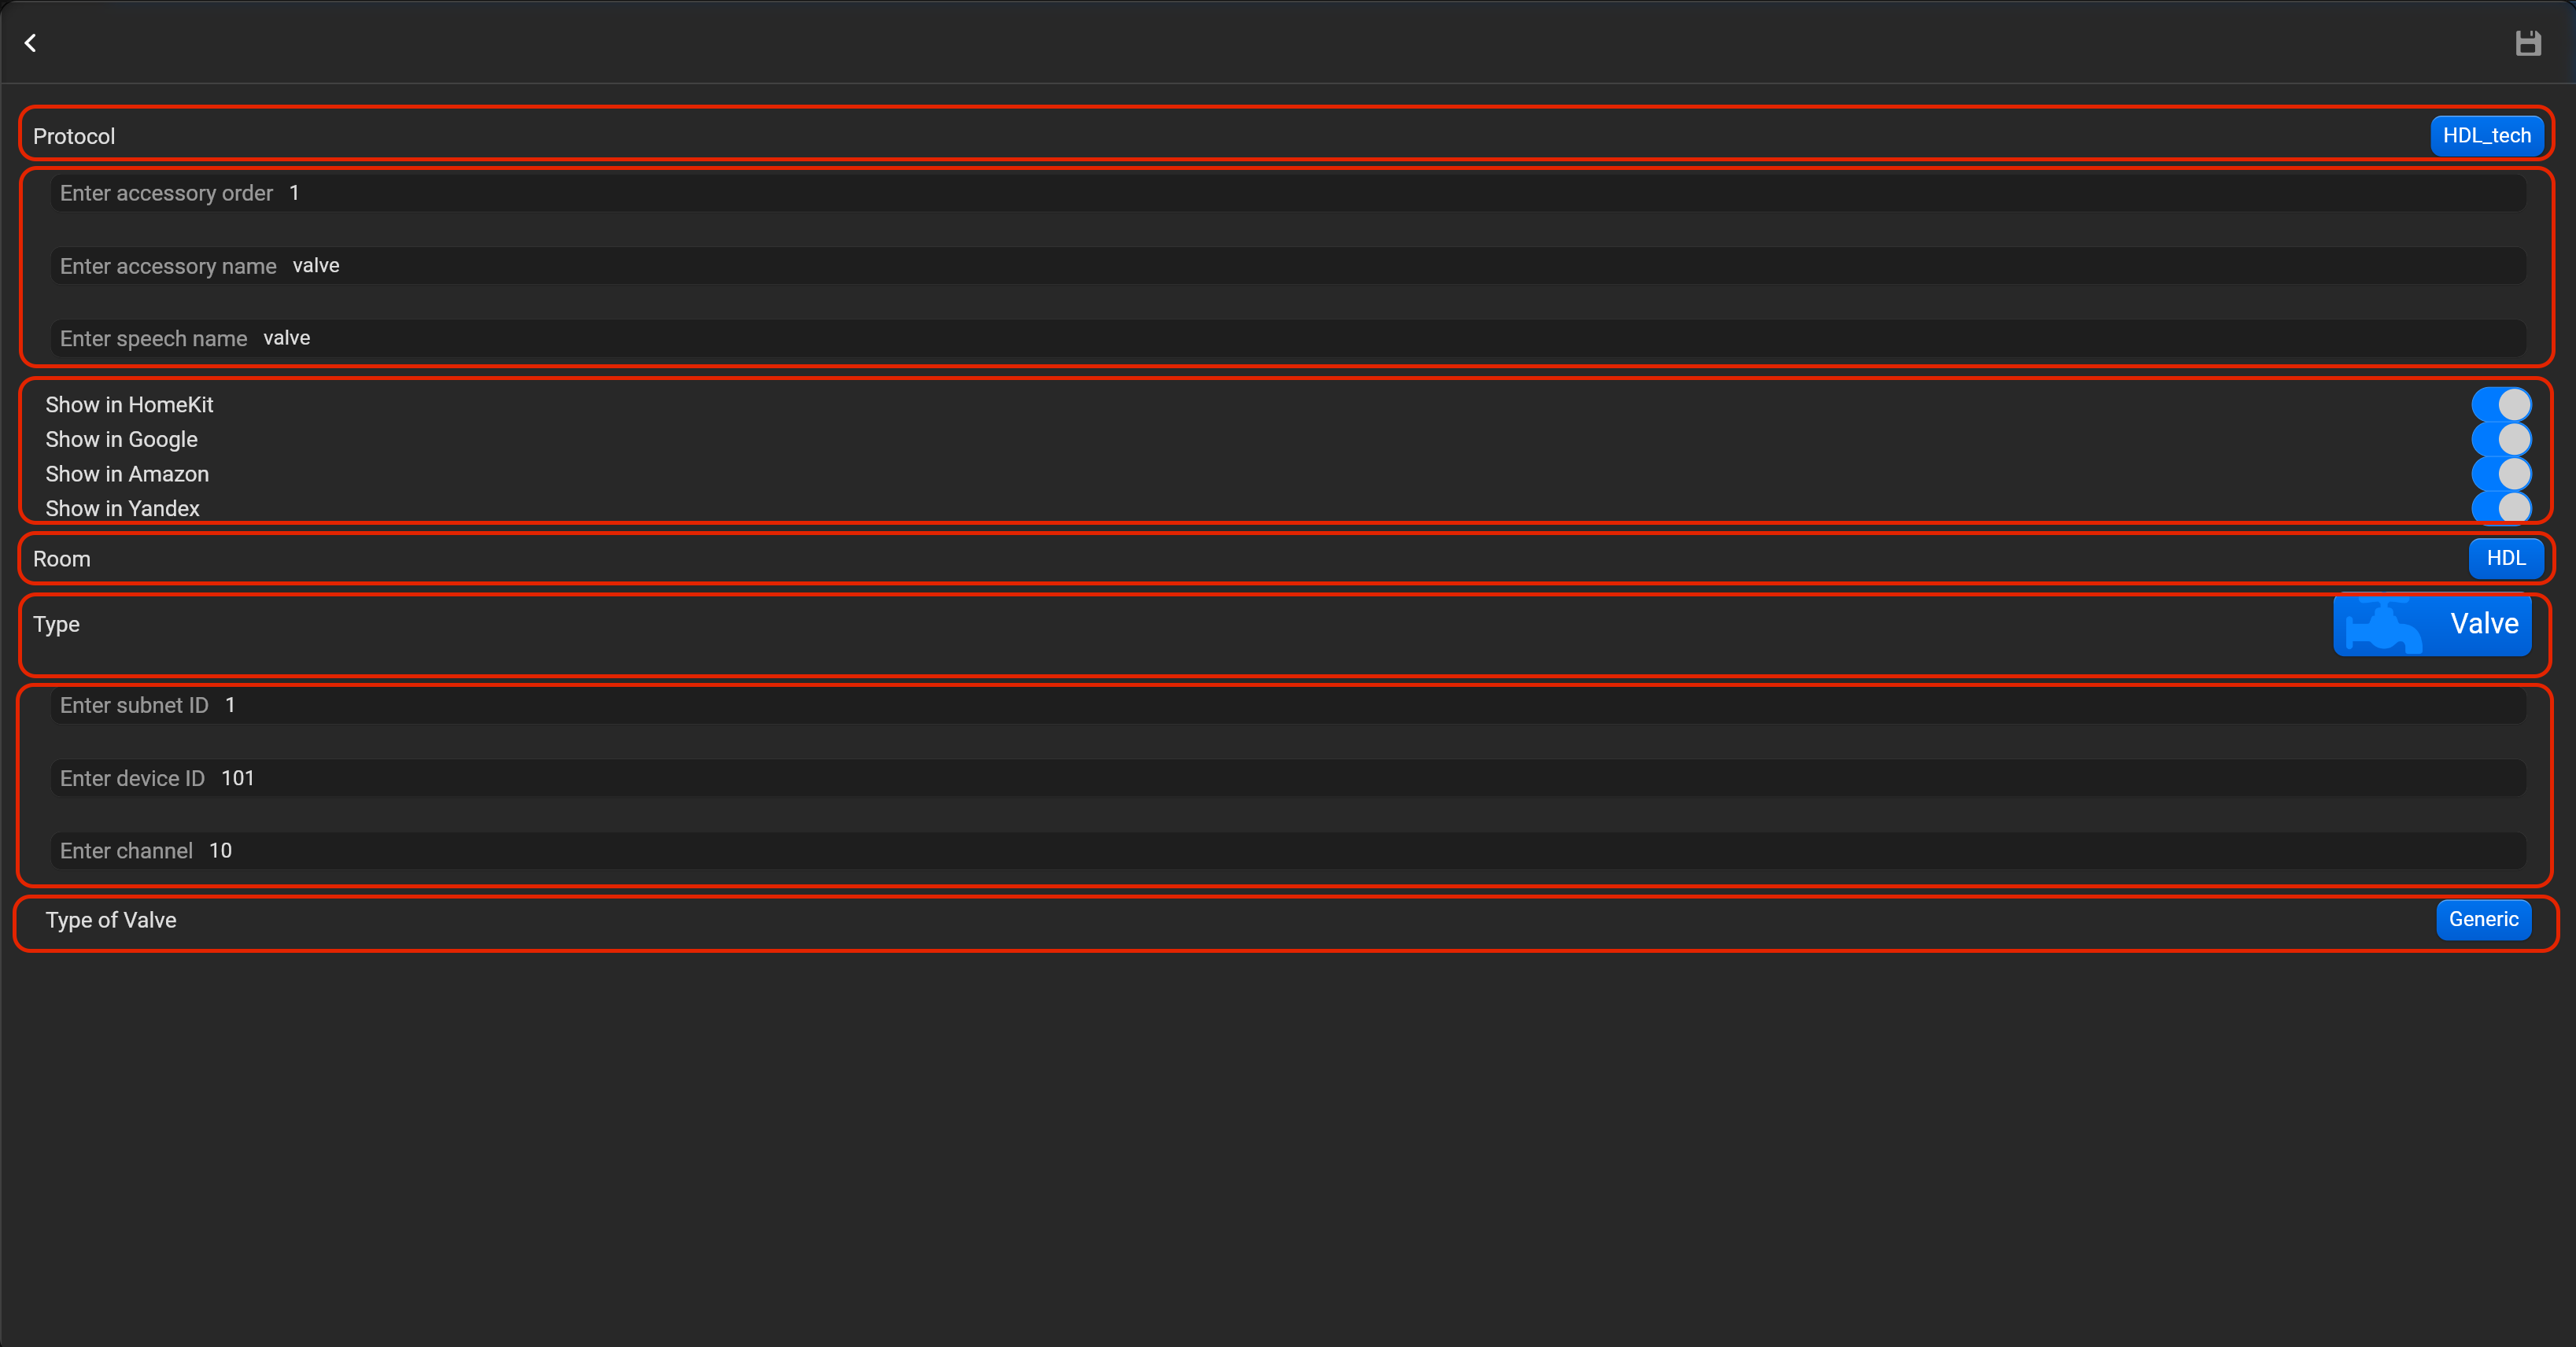
¶ Valve
- select the protocol in the drop-down list,
- put the accessory order (affects the location of the accessory in Pyxis app),
- put name of the accessory and for the voice assistants,
- select voice assistants, where the accessory should be displayed,
- select the room, where the accessory will be located,
- select the type of accessory (Valve),
- put subnet ID, device ID, channel and valve type (Generic, irrgation, shower, faucet).
¶ KNX
Please, find below, examples for every supported type of accessory. Do not forget save all changes and restart Pyxis.
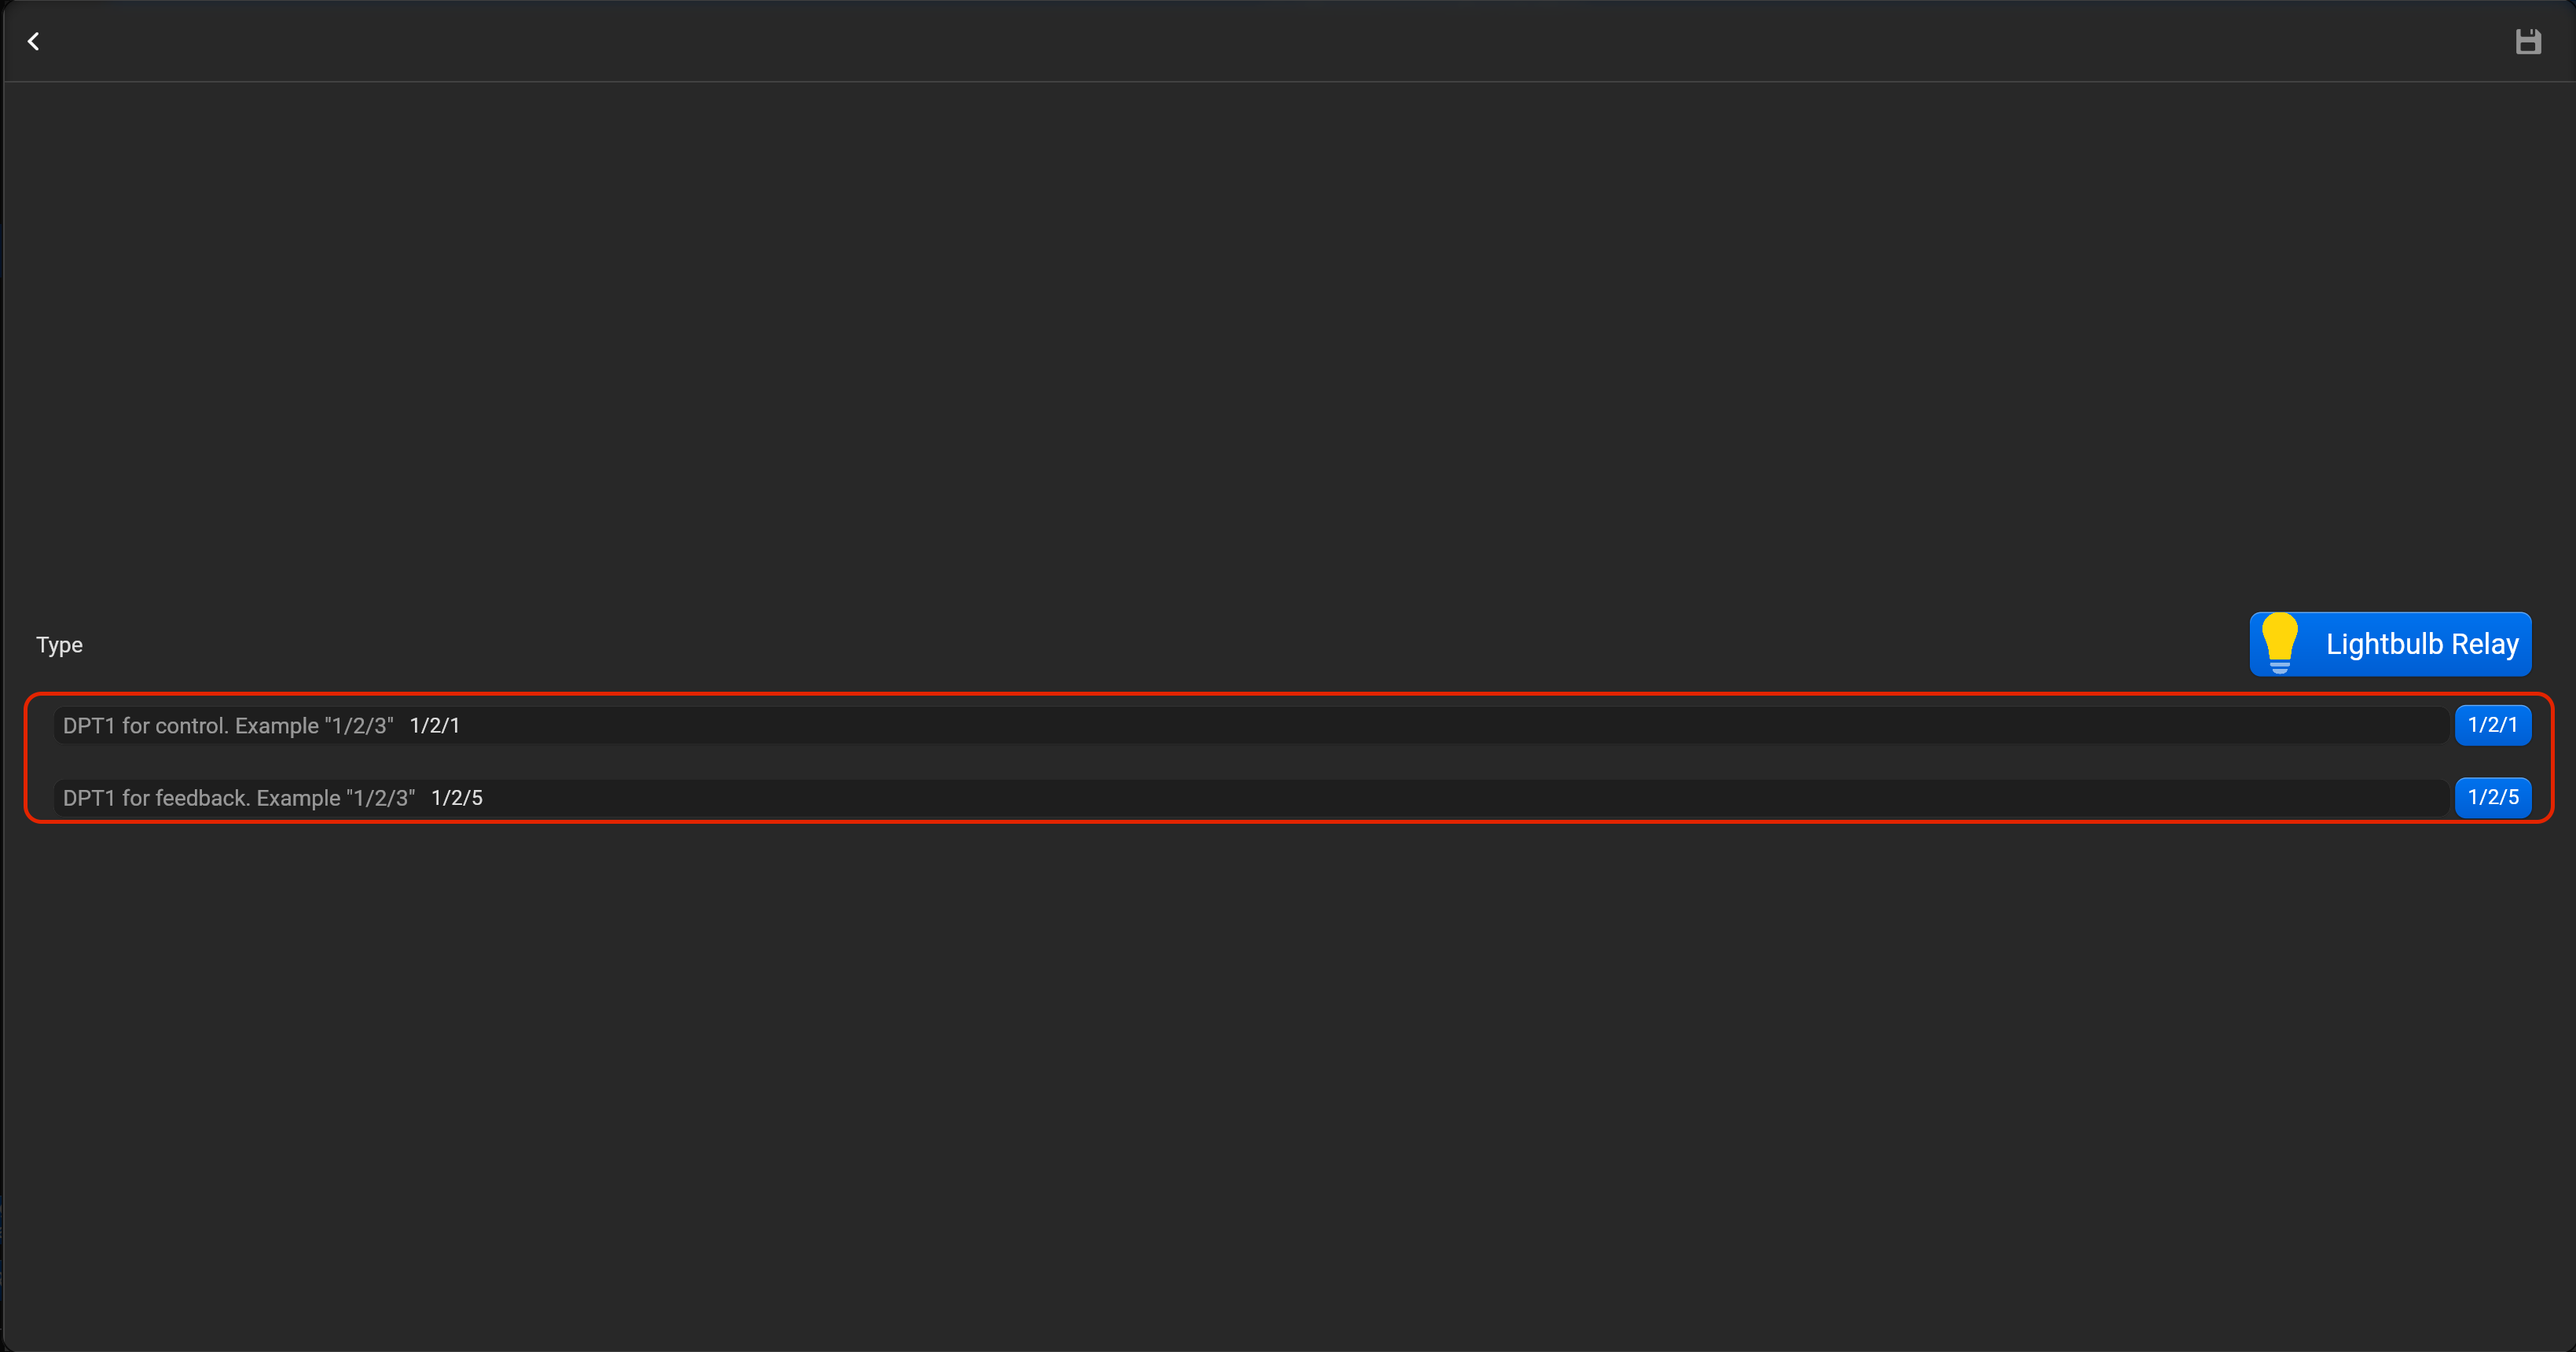
¶ Lightbulb relay
- select the protocol in the drop-down list,
- put the accessory order (affects the location of the accessory in Pyxis app),
- put name of the accessory and for the voice assistants,
- select voice assistants, where the accessory should be displayed,
- select the room, where the accessory will be located,
- select the type of accessory (Lightbulb relay),
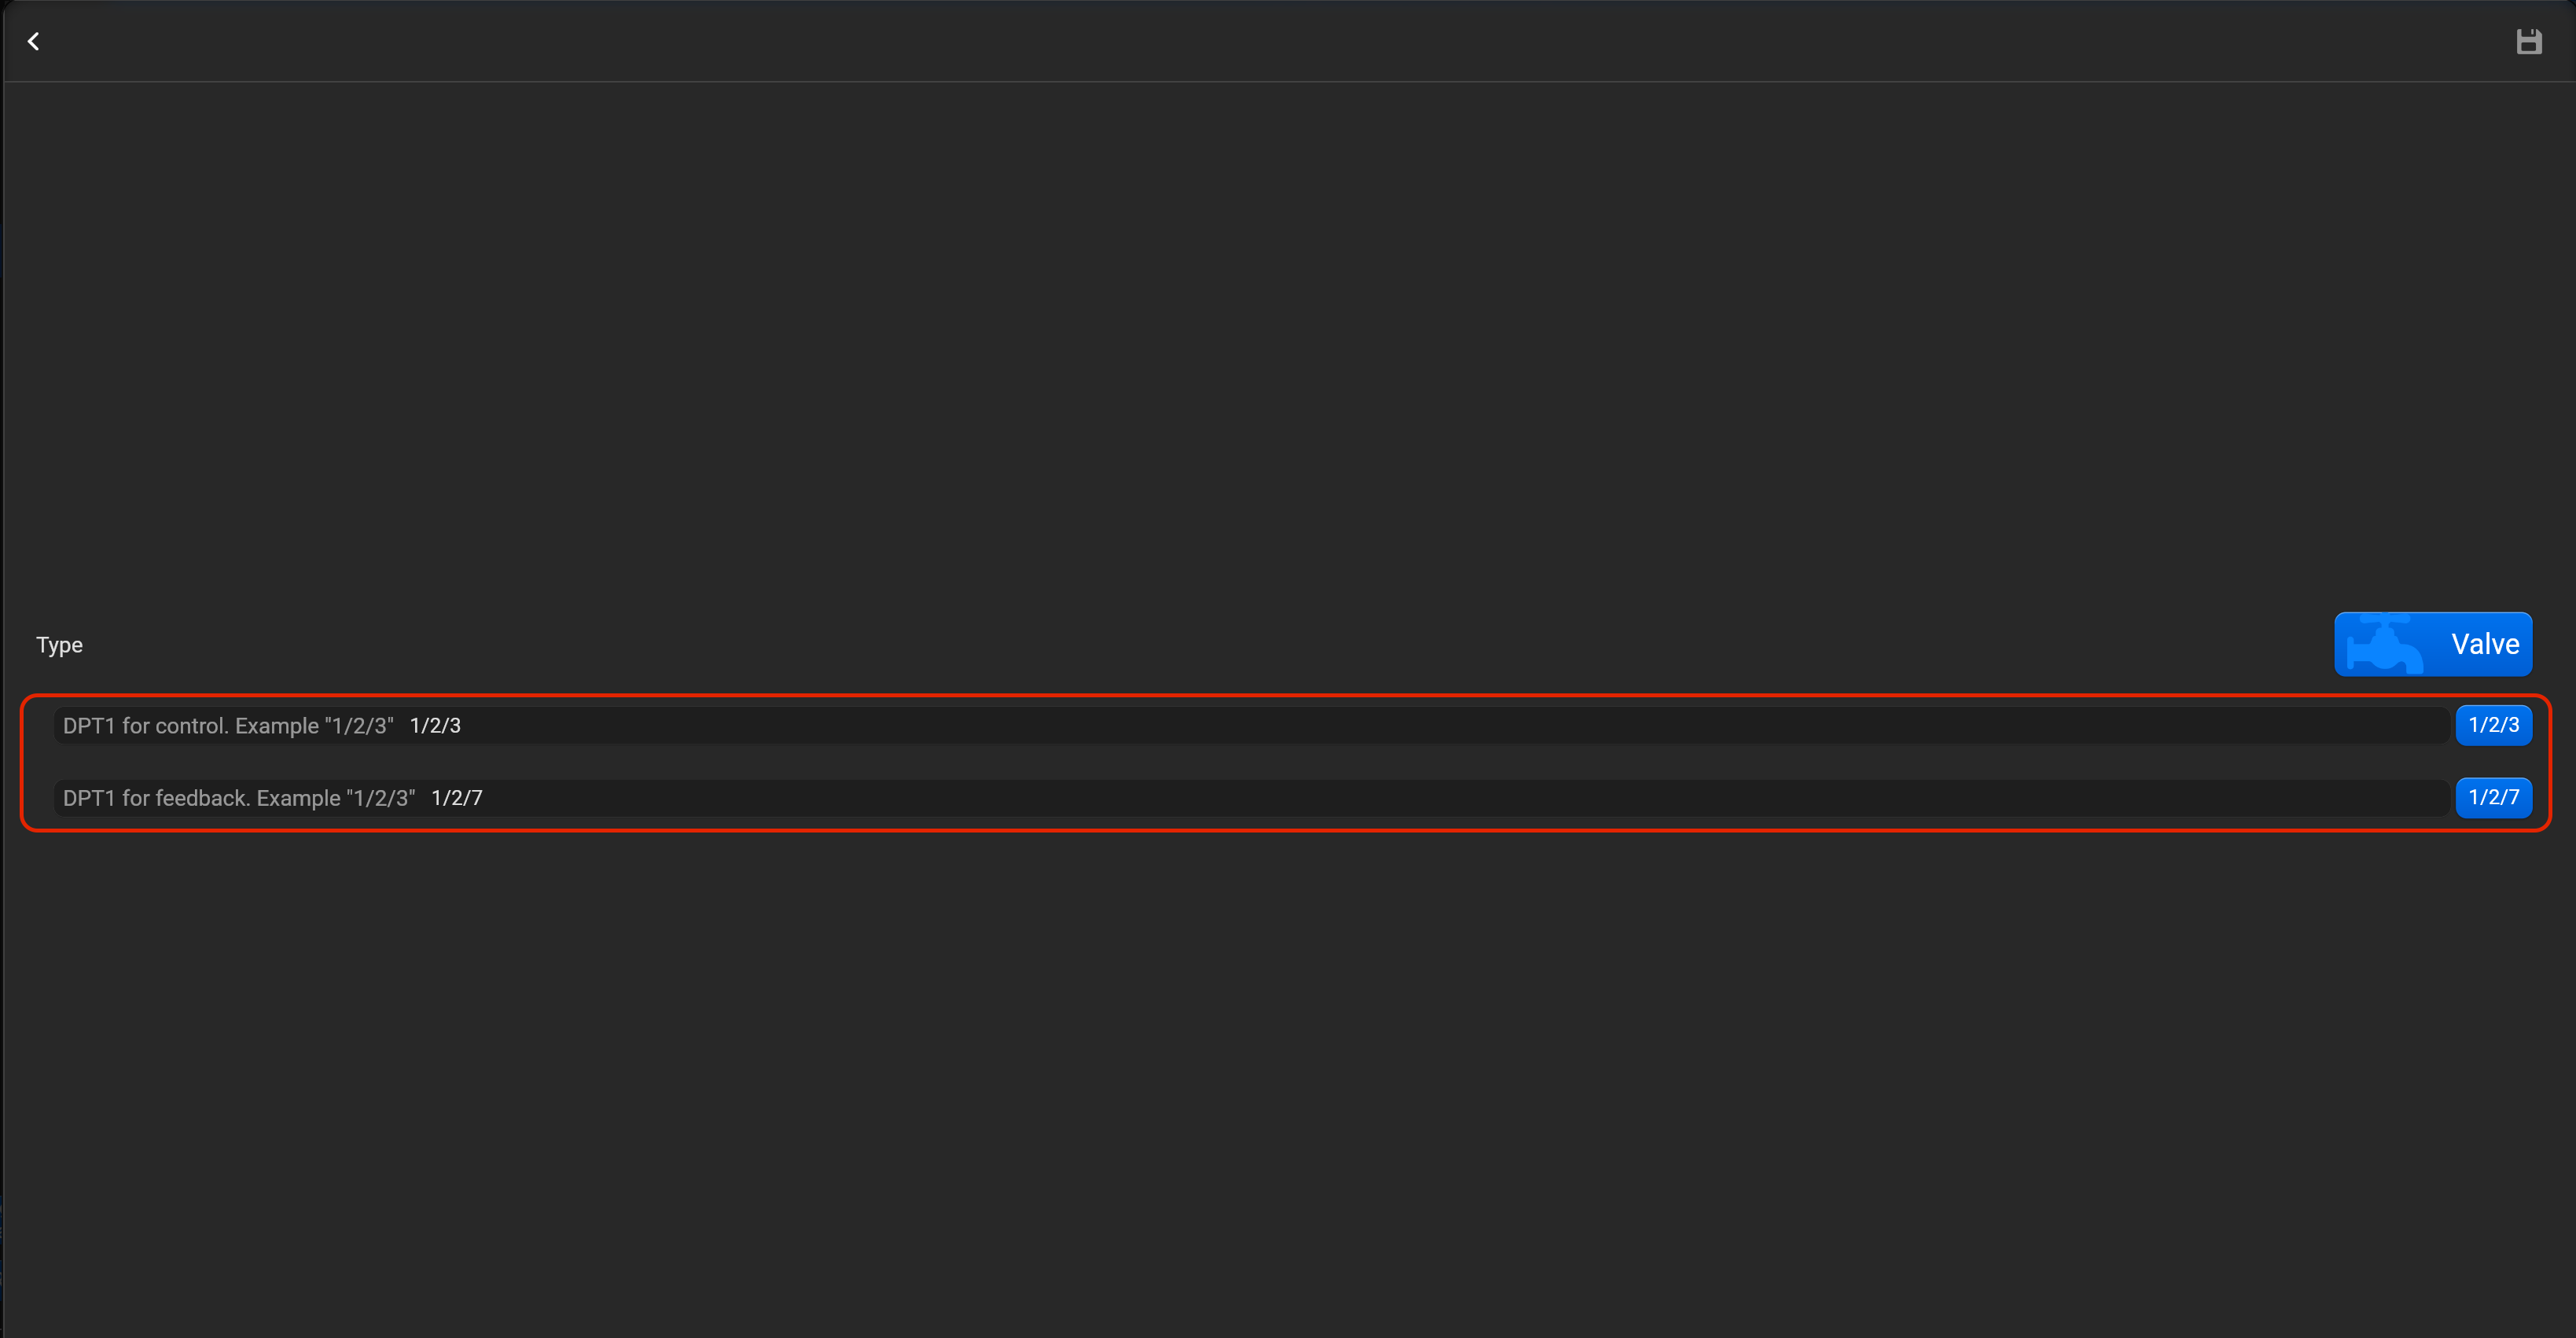
- tap on “Setup KNX device” and set DPT1 for control and DPT 1 for feedback

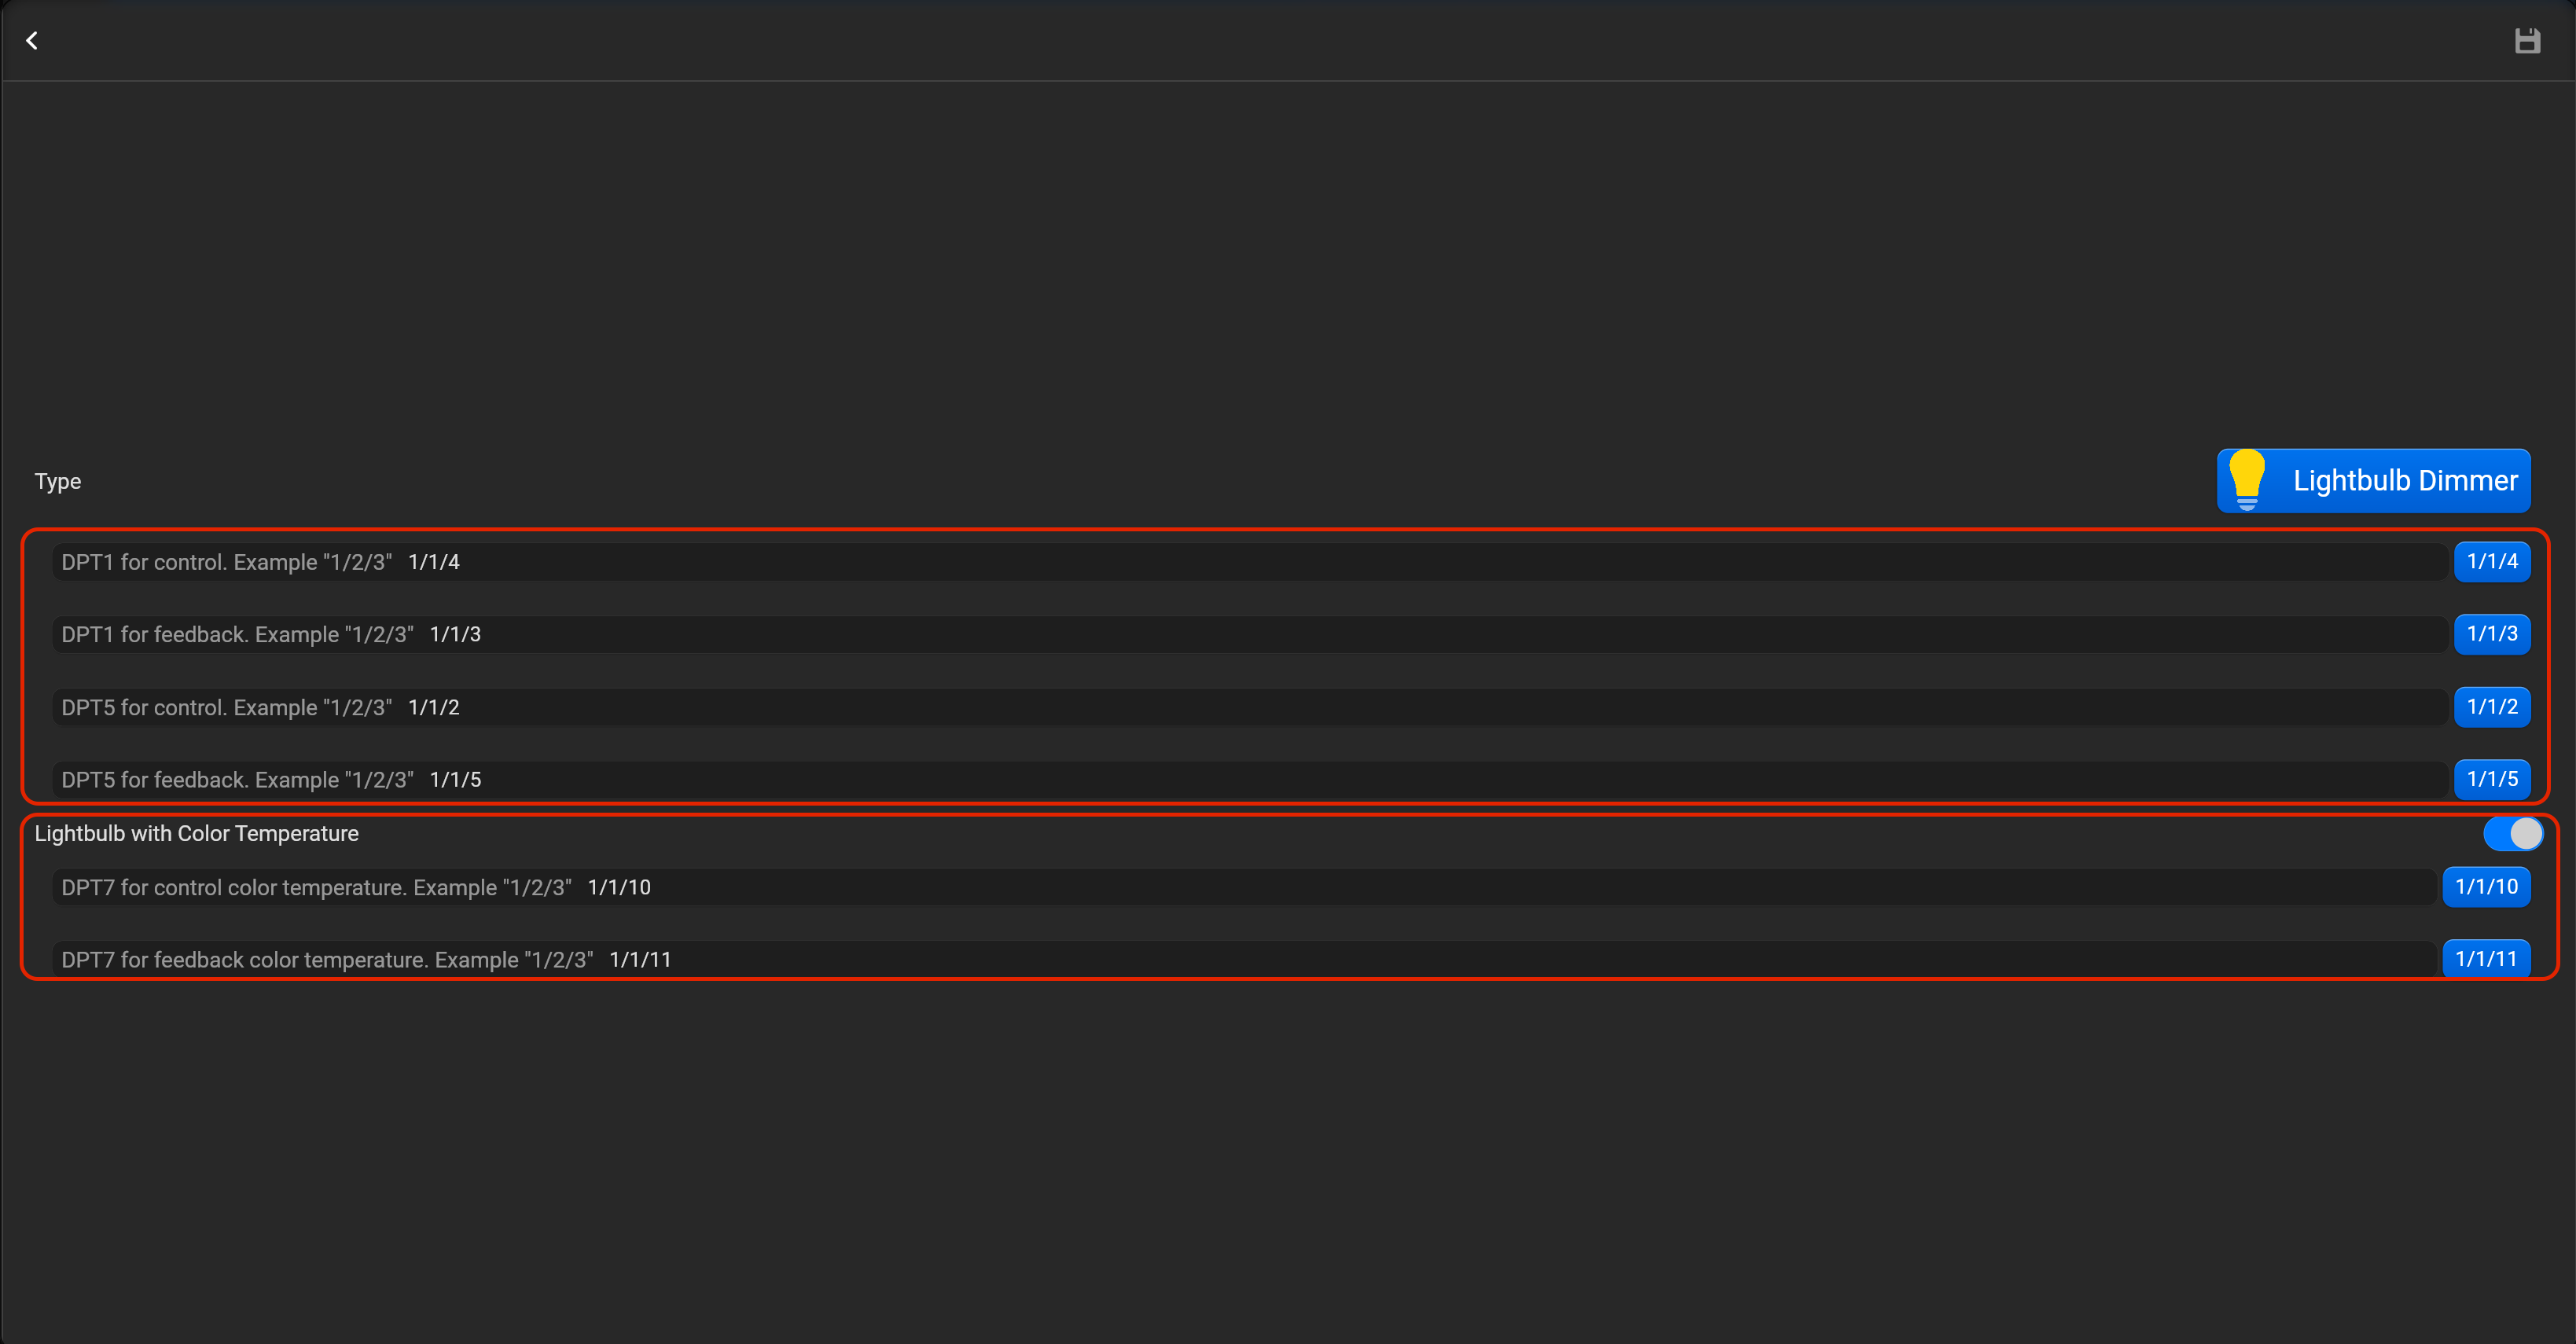
¶ Lightbulb dimmer
- select the protocol in the drop-down list,
- put the accessory order (affects the location of the accessory in Pyxis app),
- put name of the accessory and for the voice assistants,
- select voice assistants, where the accessory should be displayed,
- select the room, where the accessory will be located,
- select the type of accessory (Lightbulb dimmer),
- tap on “Setup KNX device” and set DPT1 and DPT5 for control, DPT1 and DPT5 for feedback, DPT7 for control CCT and DPT7 for feedback CCT.

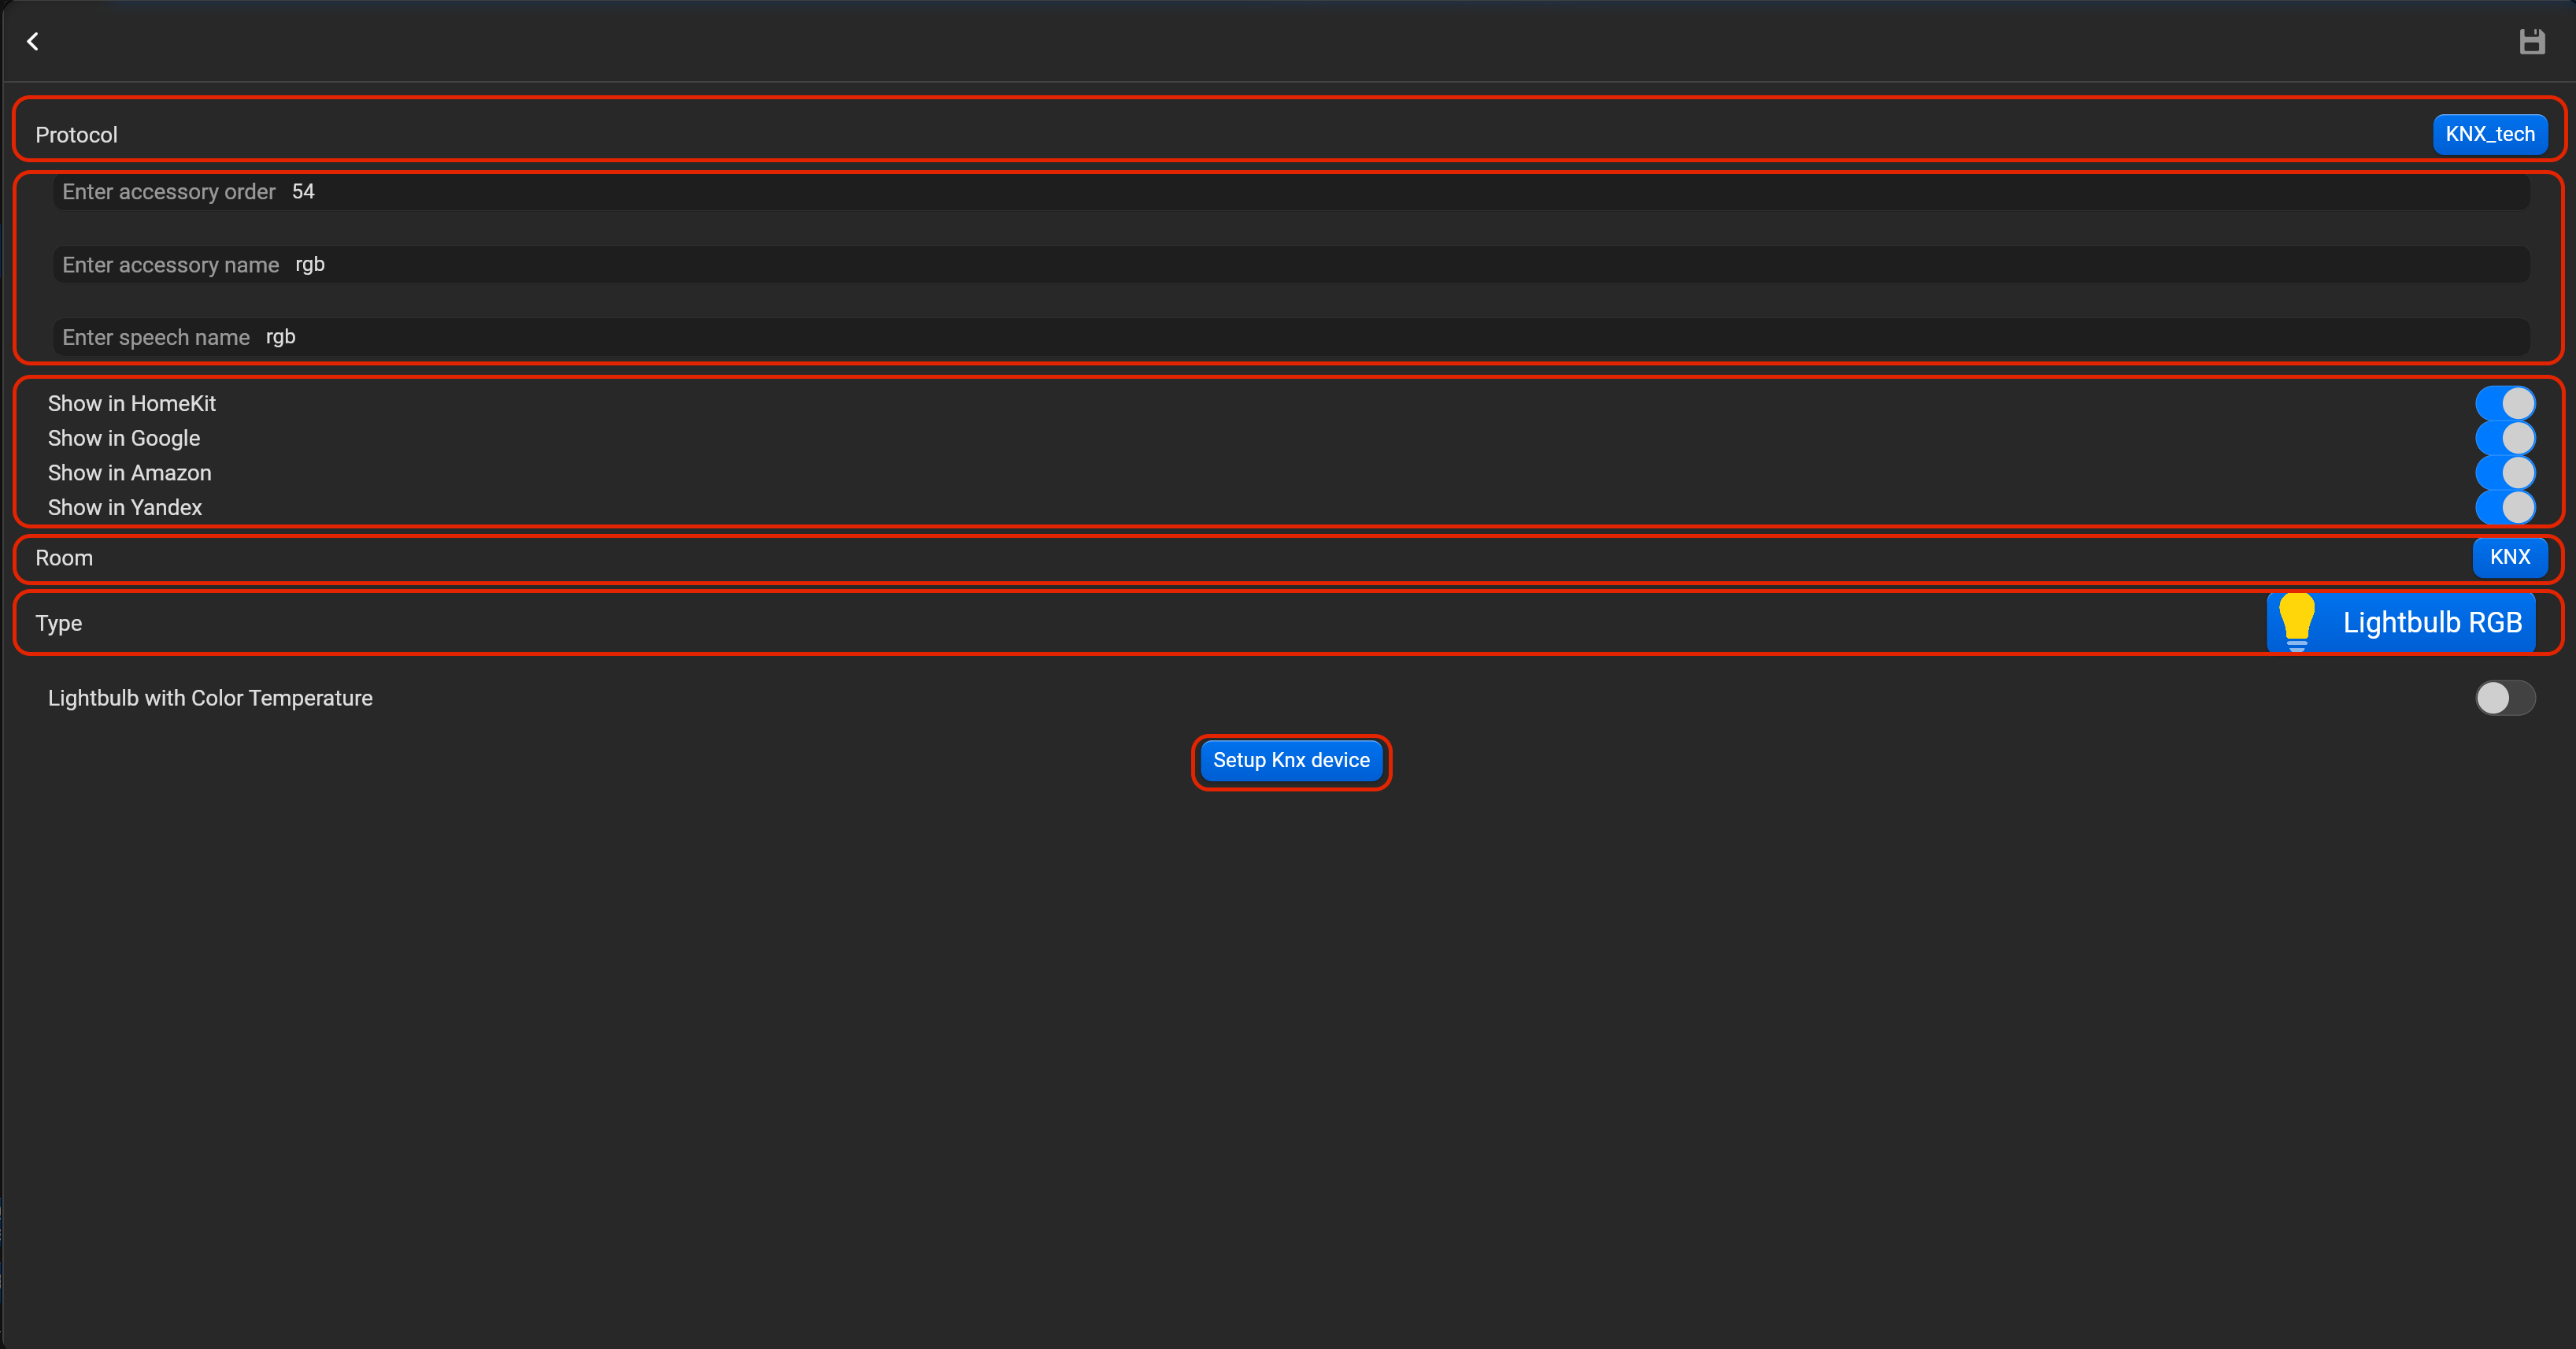
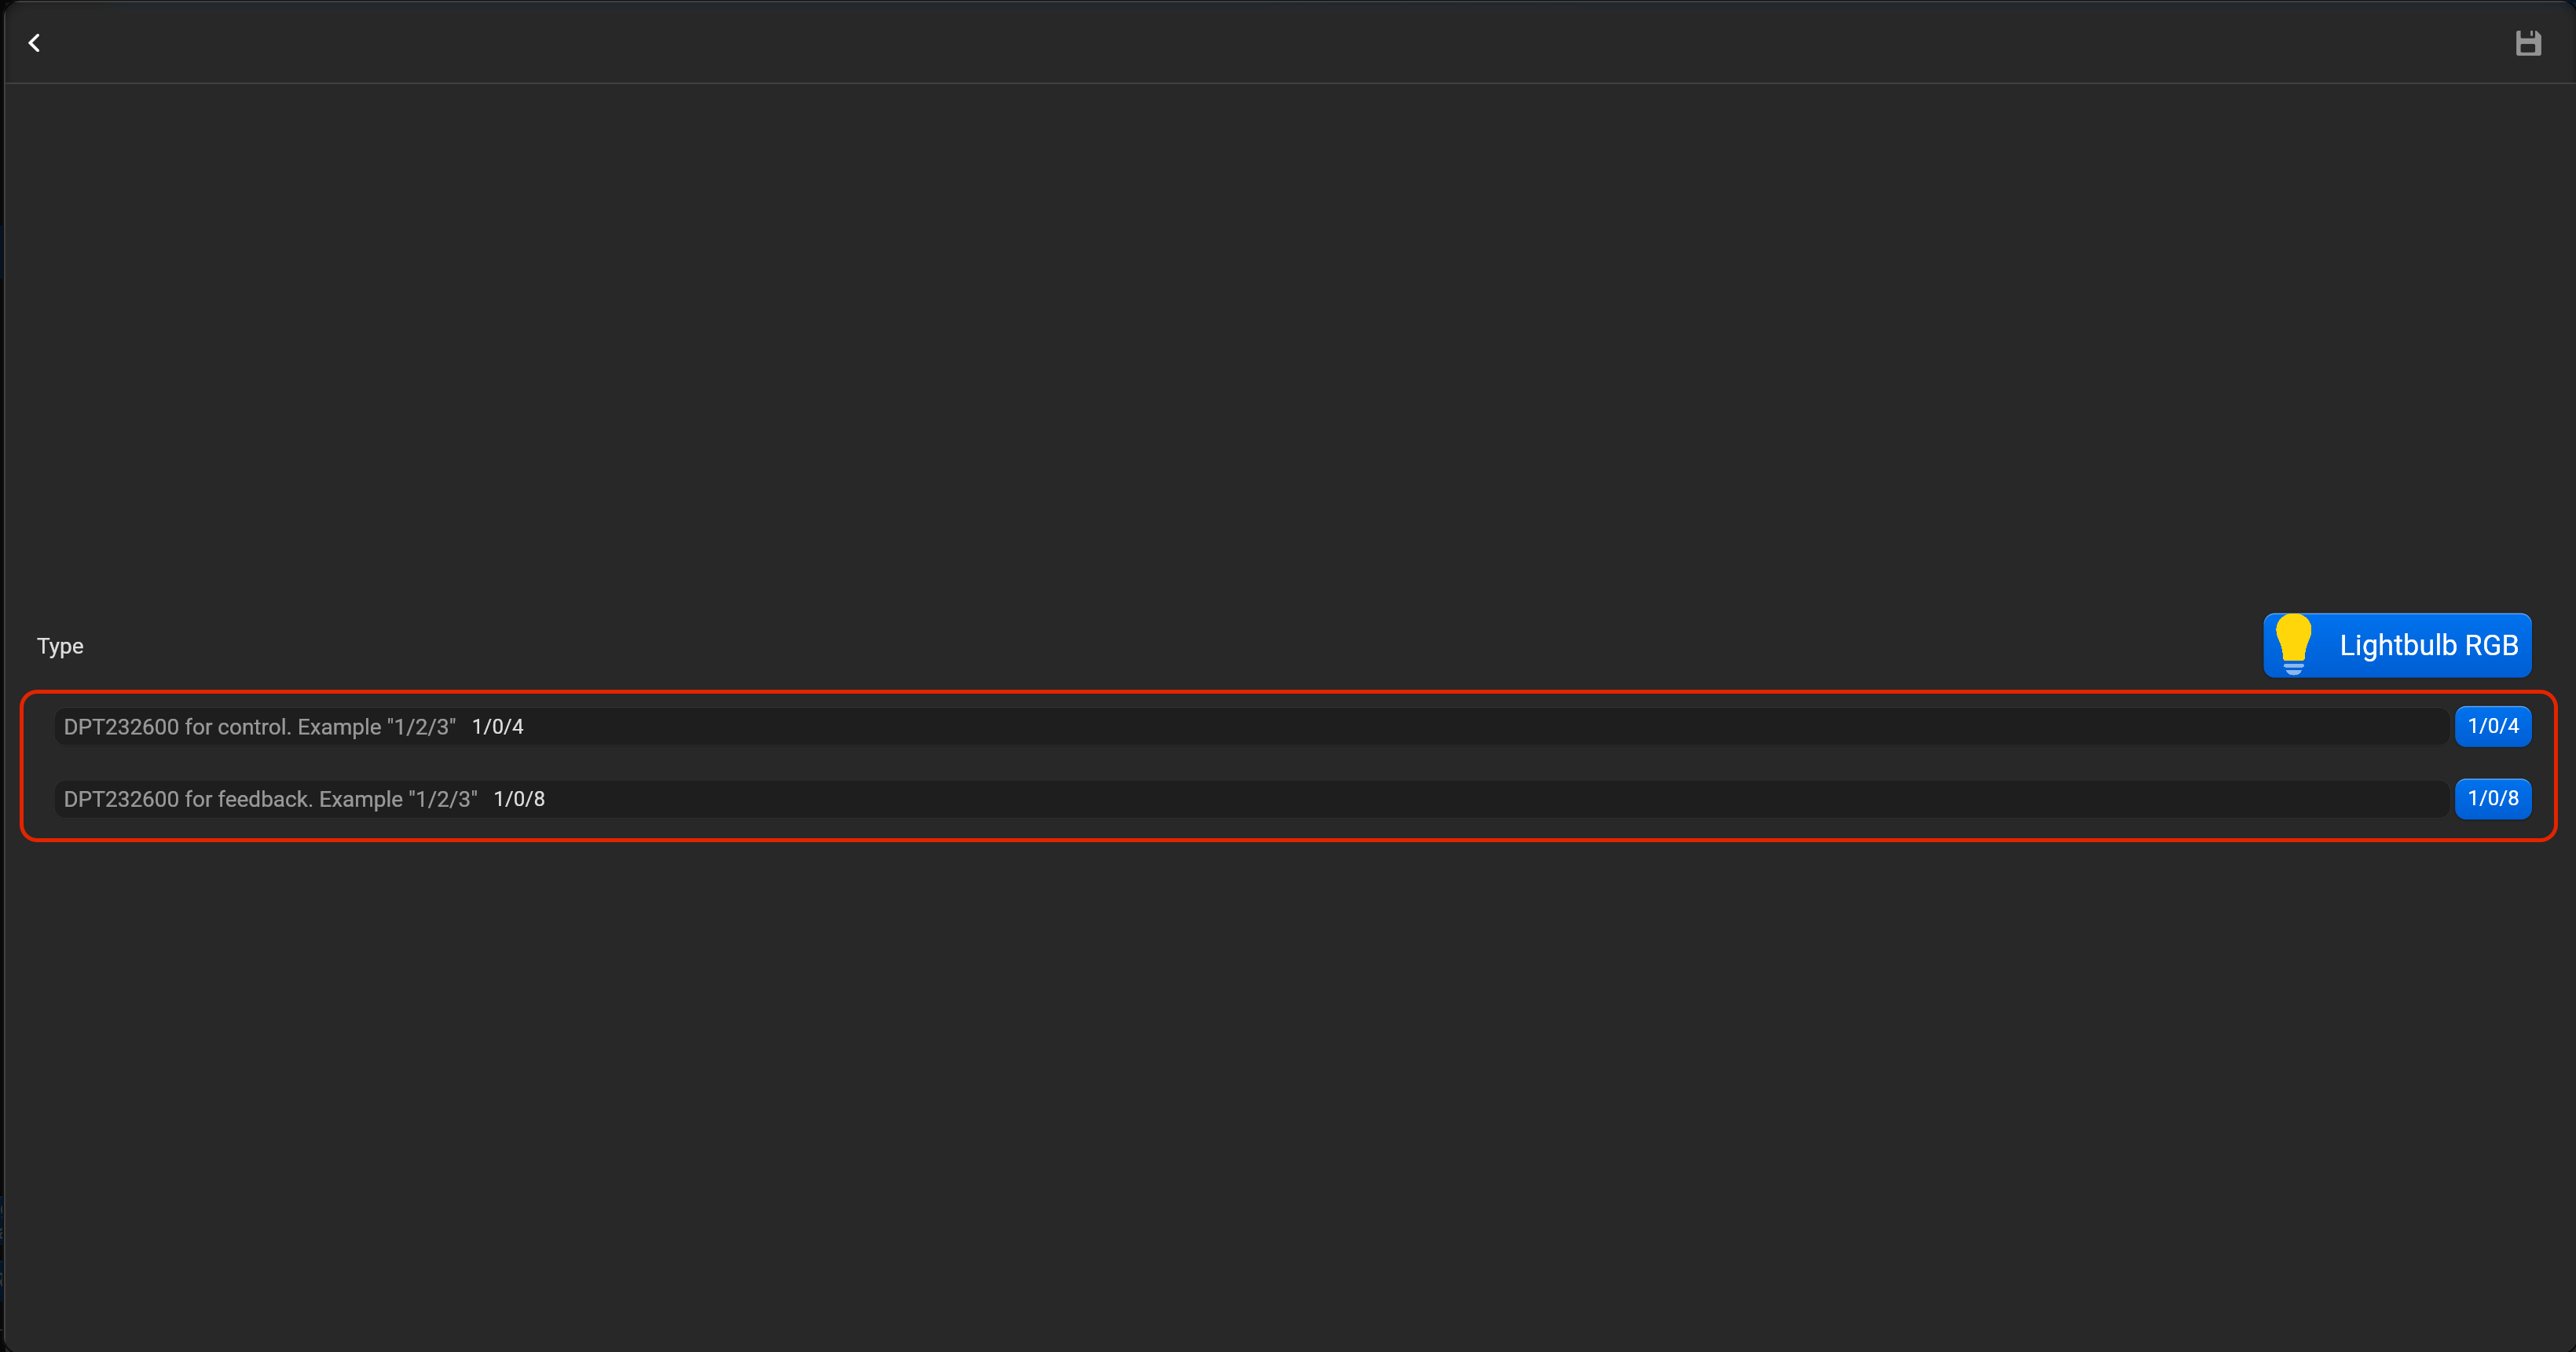
¶ Lightbulb RGB
- select the protocol in the drop-down list,
- put the accessory order (affects the location of the accessory in Pyxis app),
- put name of the accessory and for the voice assistants,
- select voice assistants, where the accessory should be displayed,
- select the room, where the accessory will be located,
- select the type of accessory (Lightbulb RGB),
- tap on “Setup KNX device” and set DPT23600 for control, DPT23600 for feedback.
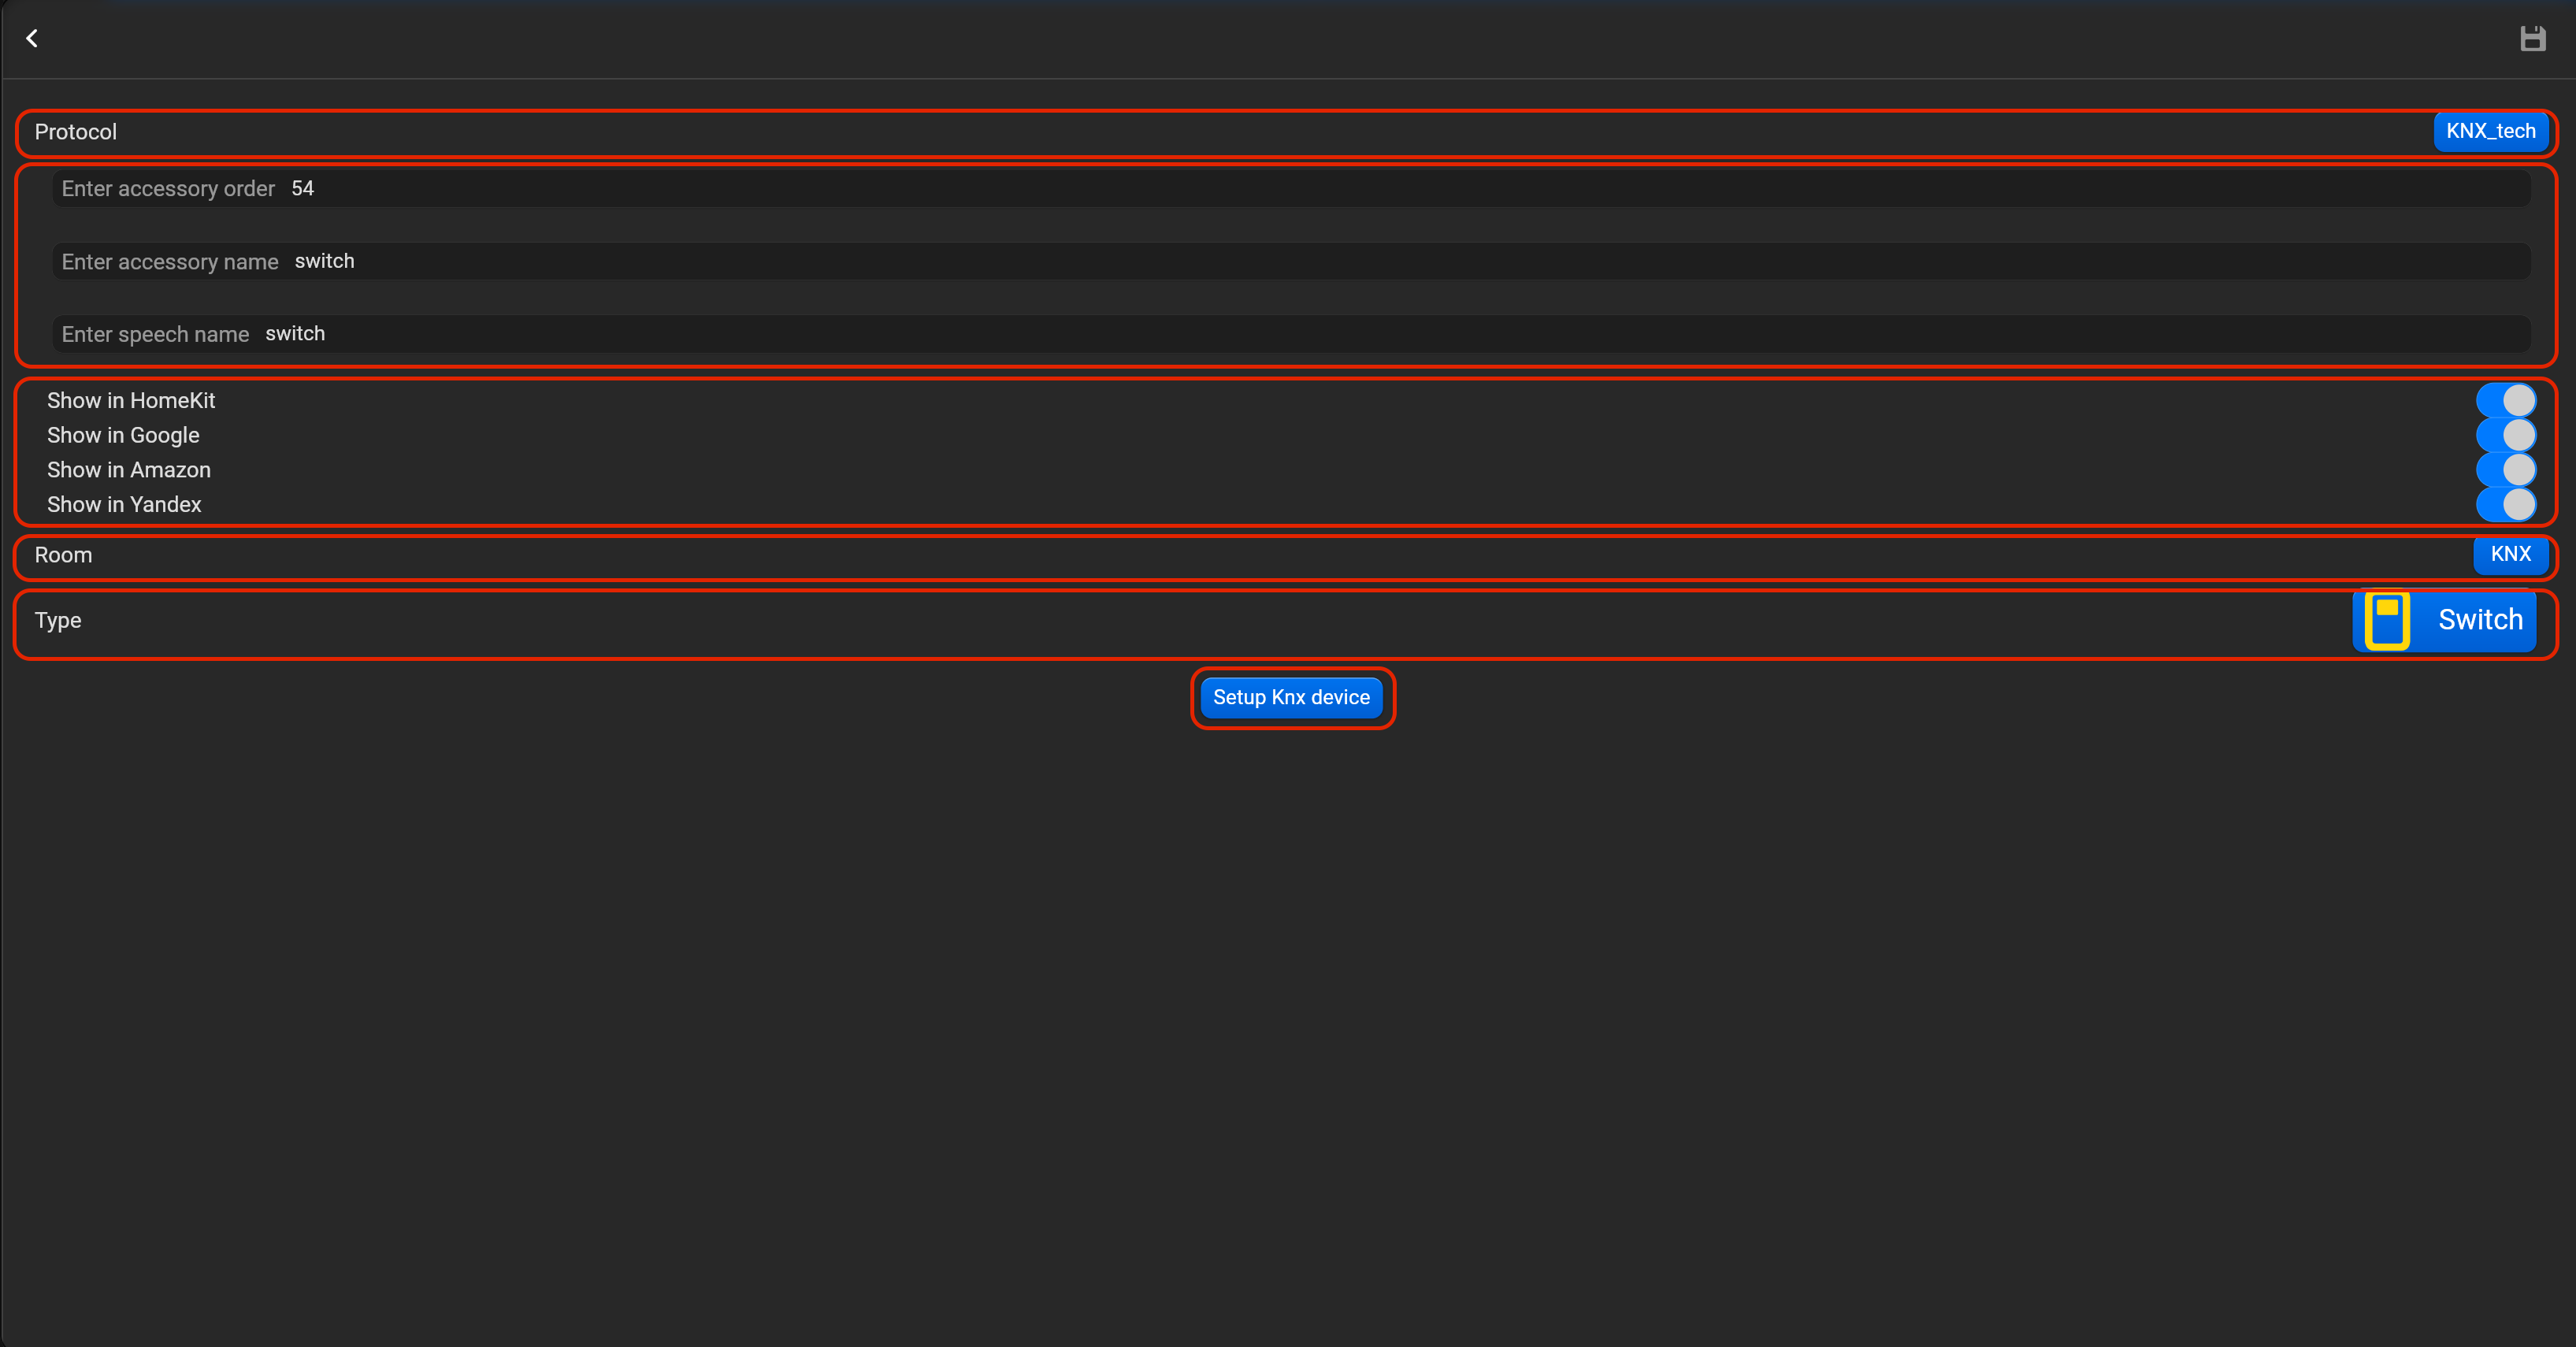
¶ Switch
- select the protocol in the drop-down list,
- put the accessory order (affects the location of the accessory in Pyxis app),
- put name of the accessory and for the voice assistants,
- select voice assistants, where the accessory should be displayed,
- select the room, where the accessory will be located,
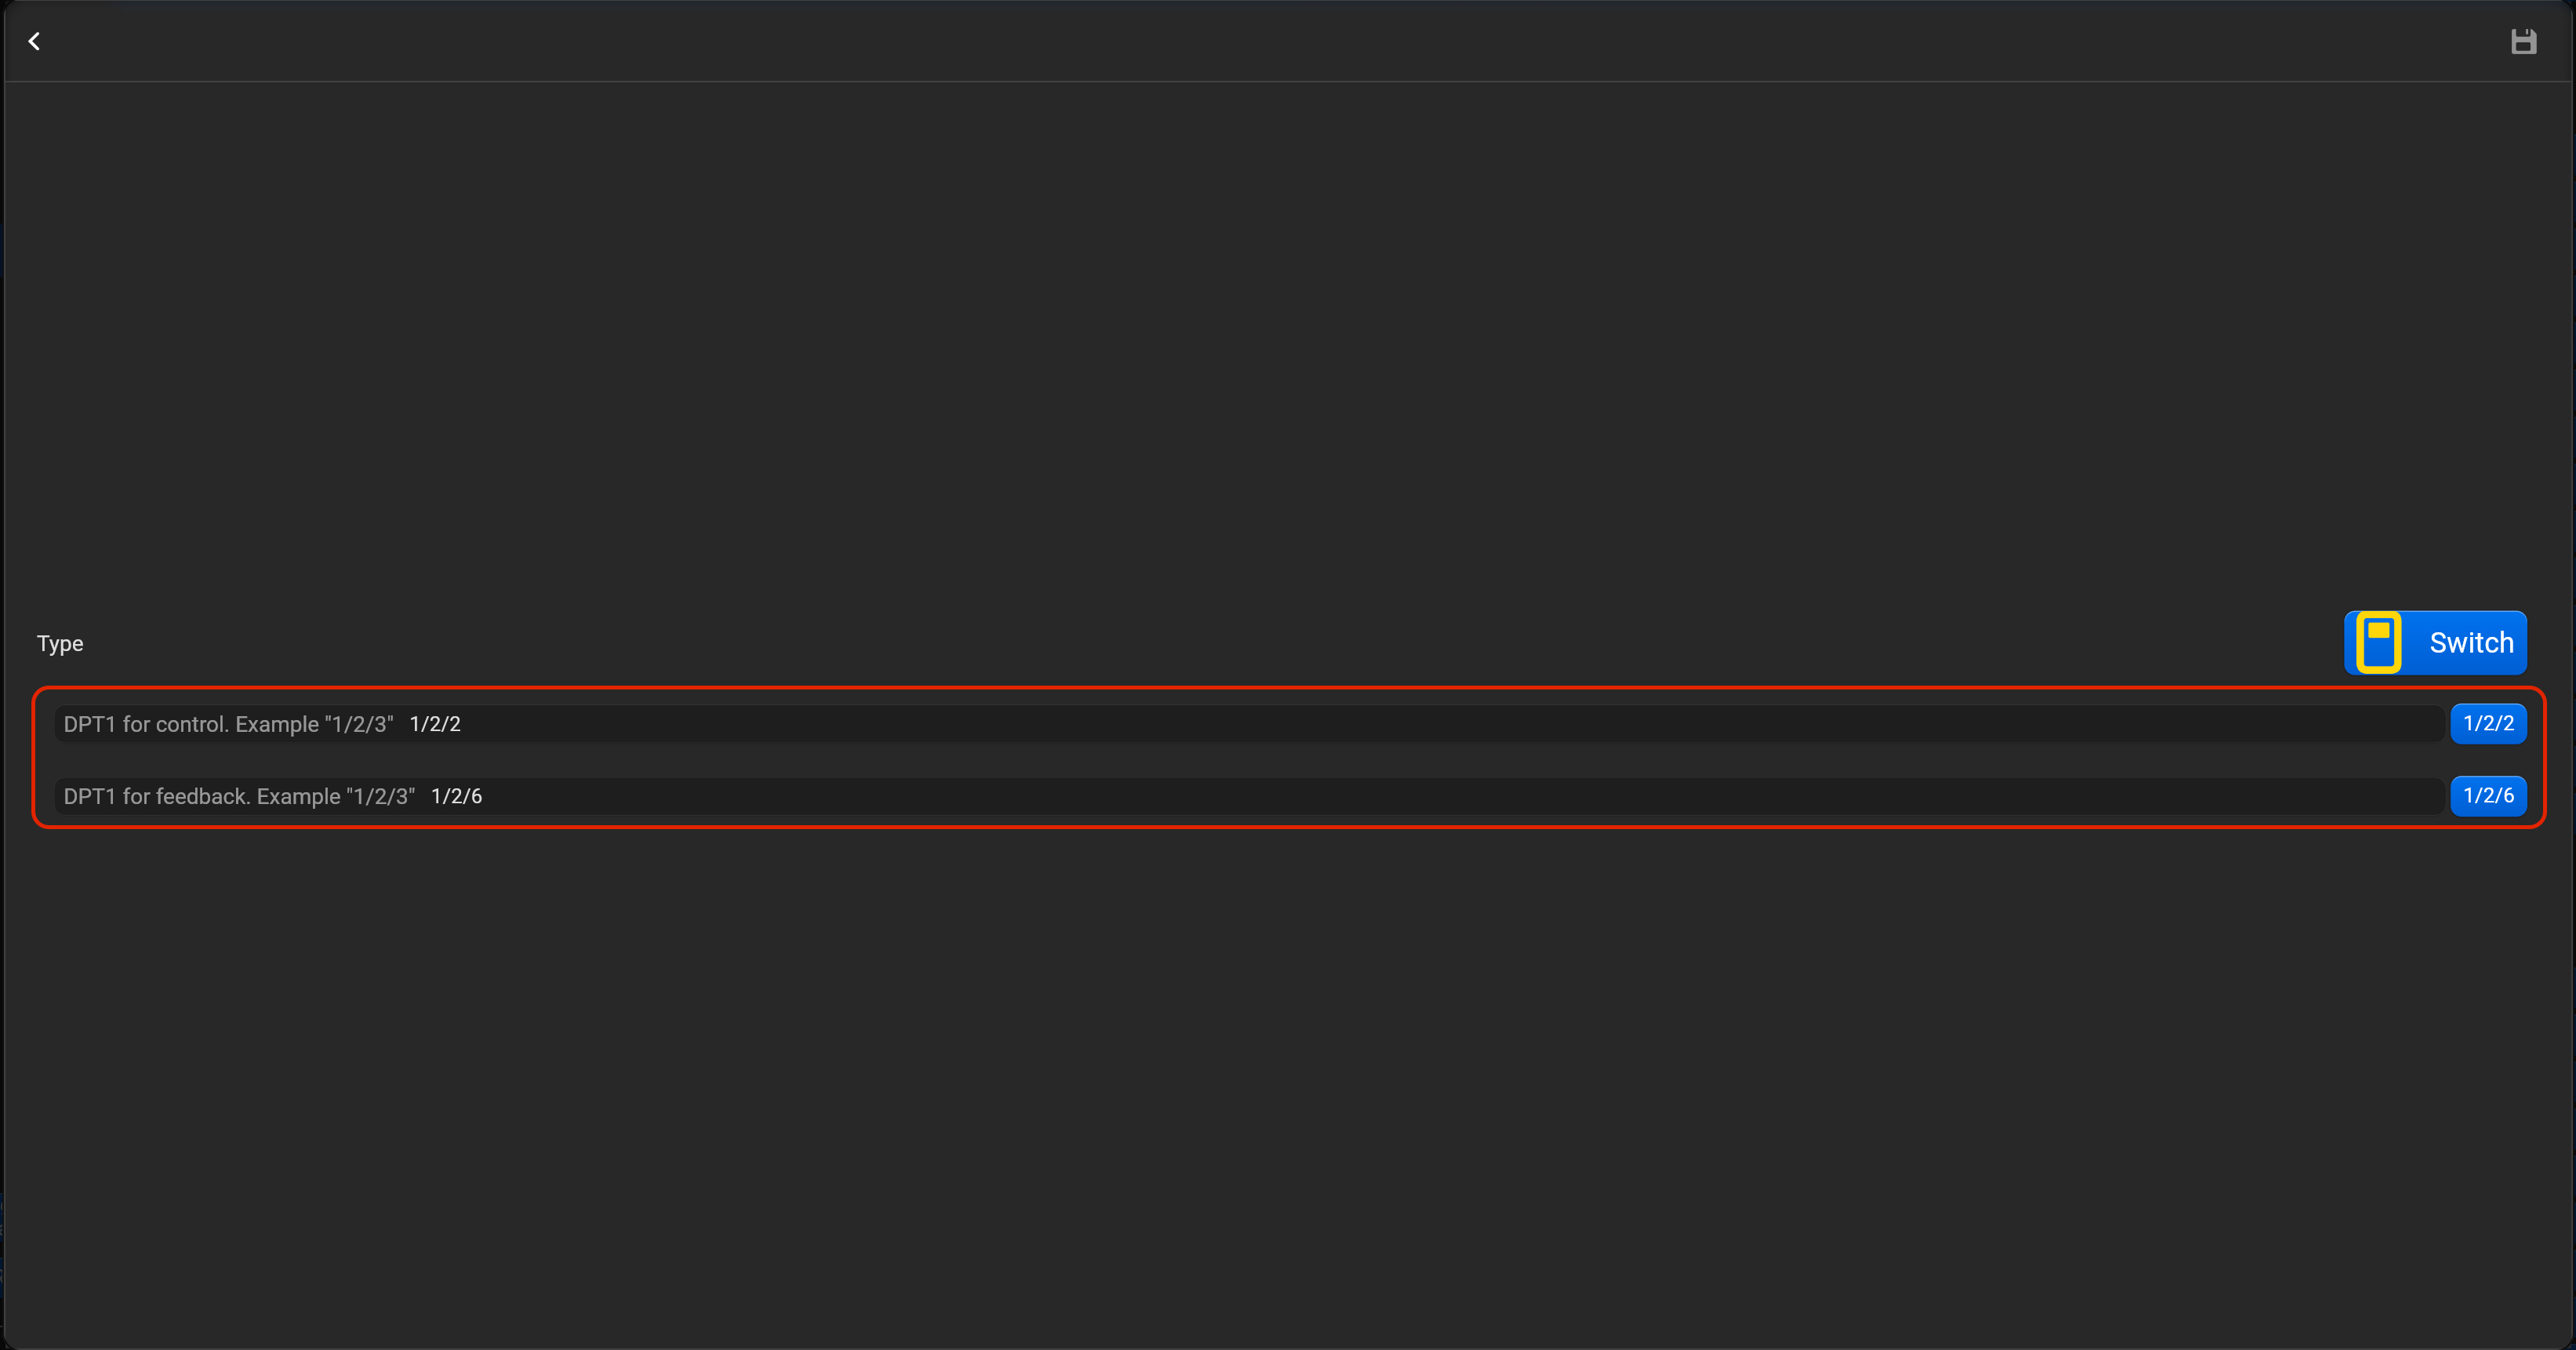
- select the type of accessory (Switch),
- tap on “Setup KNX device” and set DPT1 for control and DPT 1 for feedback
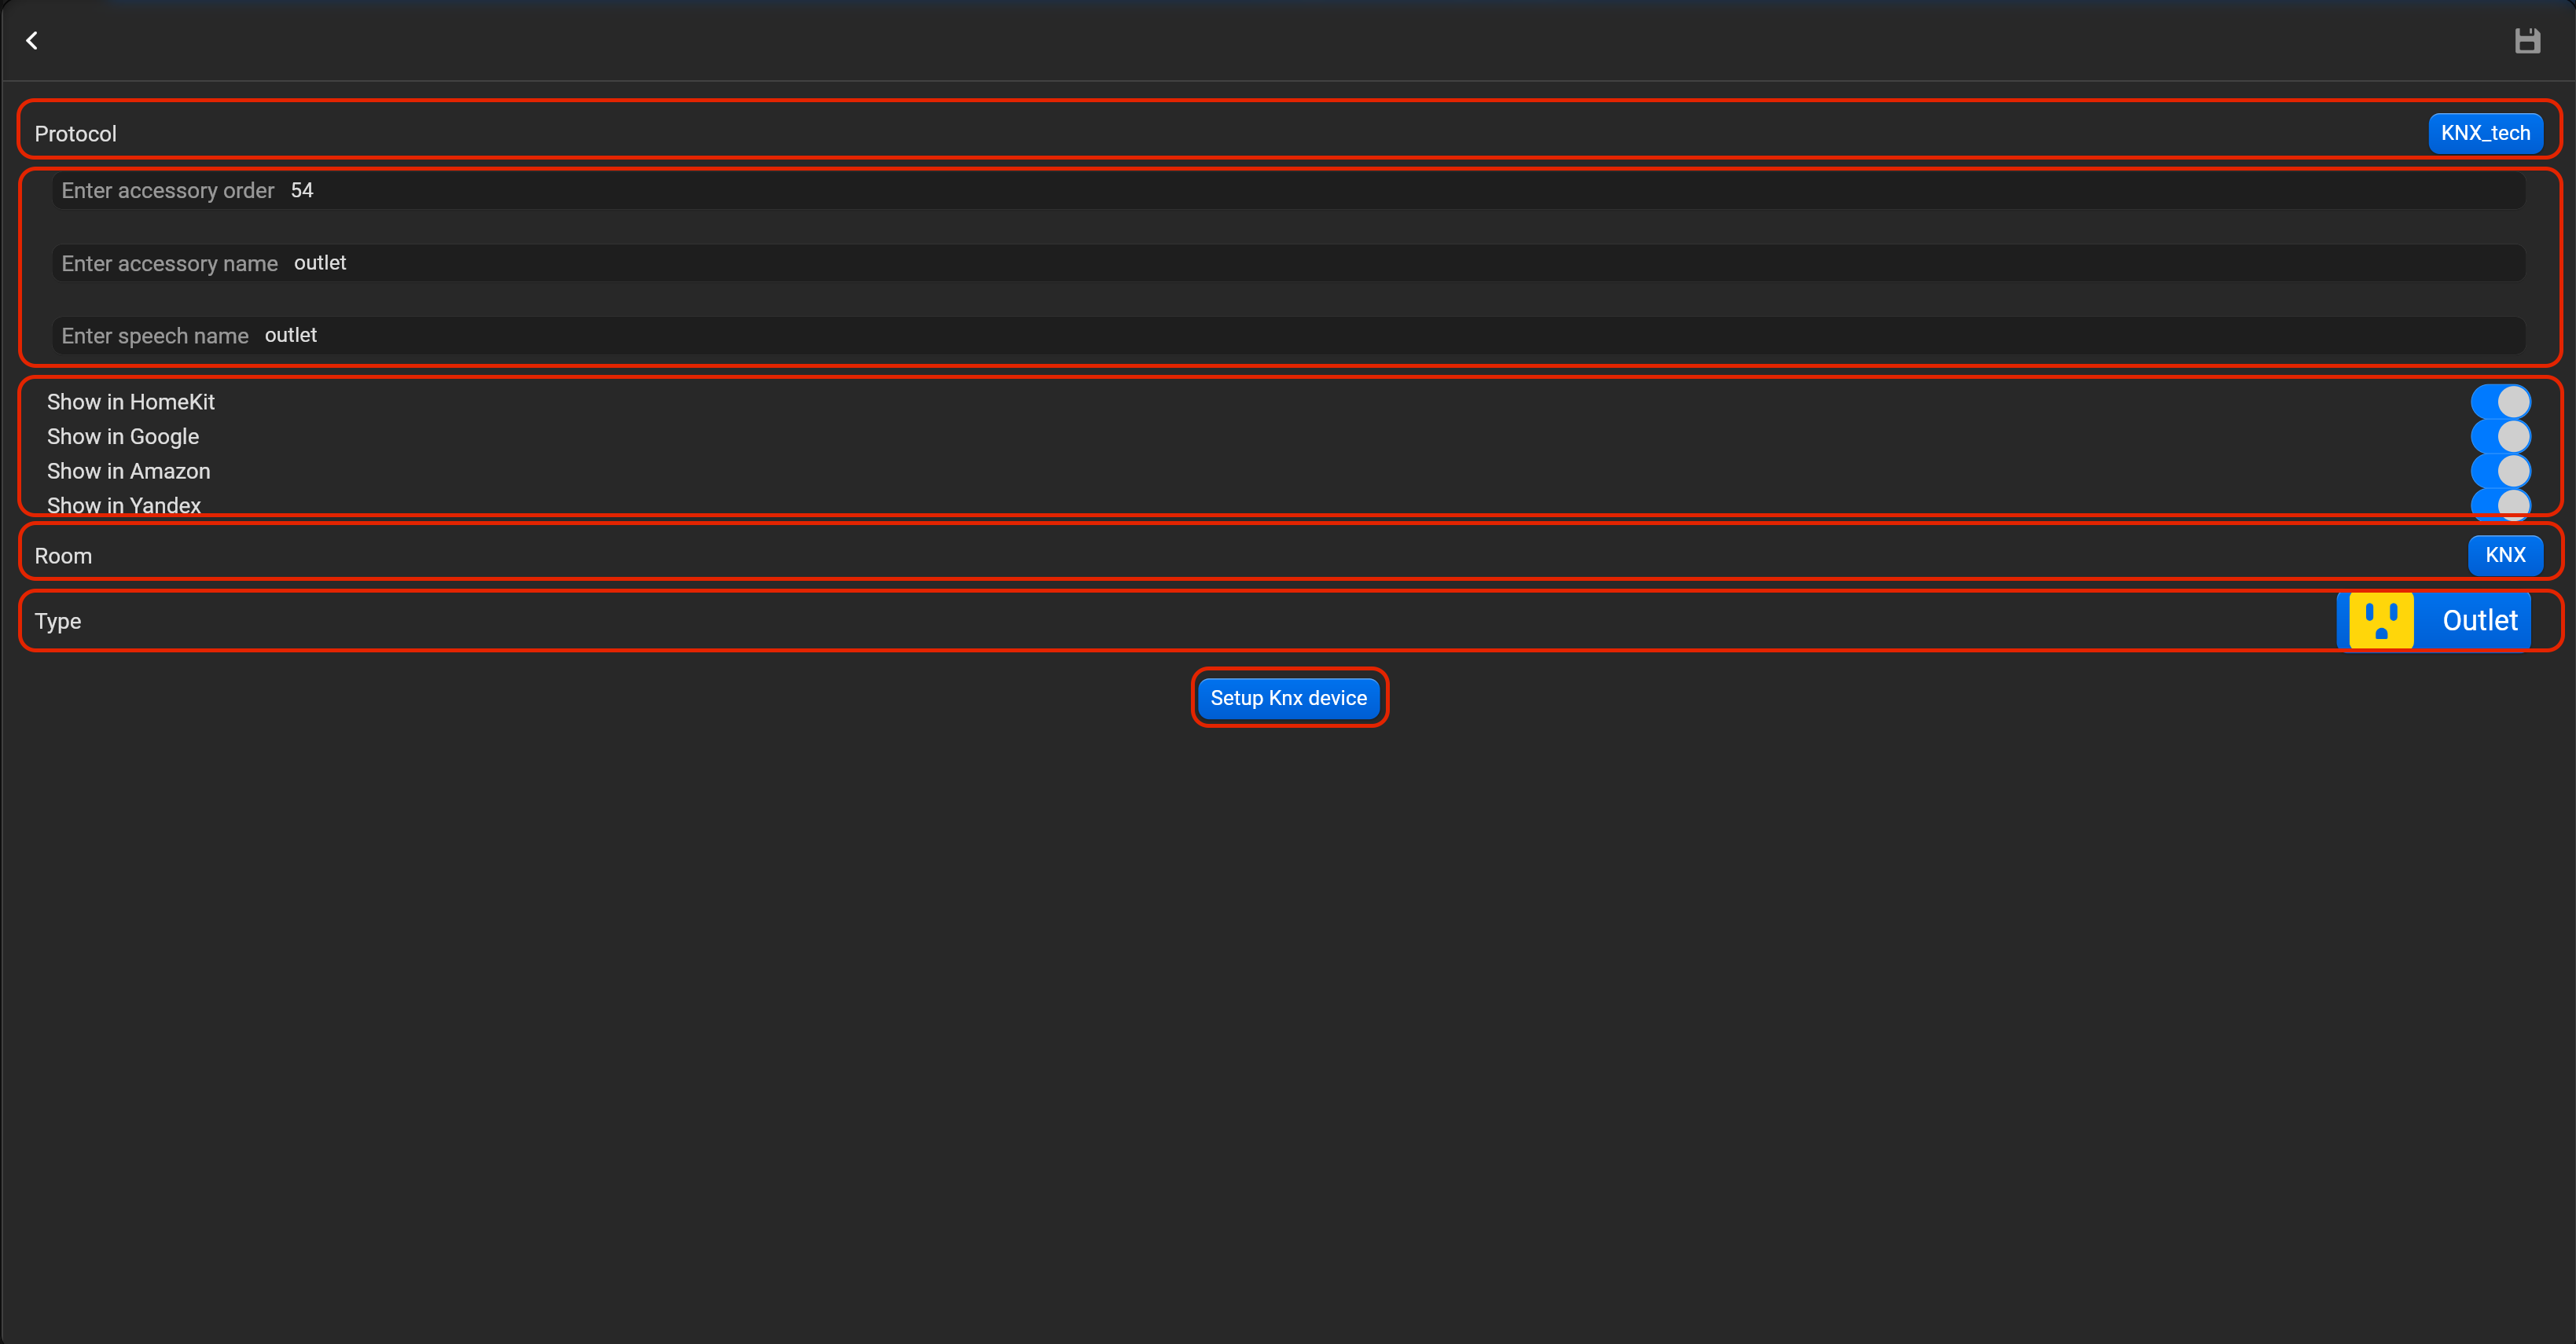
¶ Outlet
- select the protocol in the drop-down list,
- put the accessory order (affects the location of the accessory in Pyxis app),
- put name of the accessory and for the voice assistants,
- select voice assistants, where the accessory should be displayed,
- select the room, where the accessory will be located,
- select the type of accessory (Outlet),
- tap on “Setup KNX device” and set DPT1 for control and DPT1 for feedback.

¶ Window covering
- select the protocol in the drop-down list,
- put the accessory order (affects the location of the accessory in Pyxis app),
- put name of the accessory and for the voice assistants,
- select voice assistants, where the accessory should be displayed,
- select the room, where the accessory will be located,
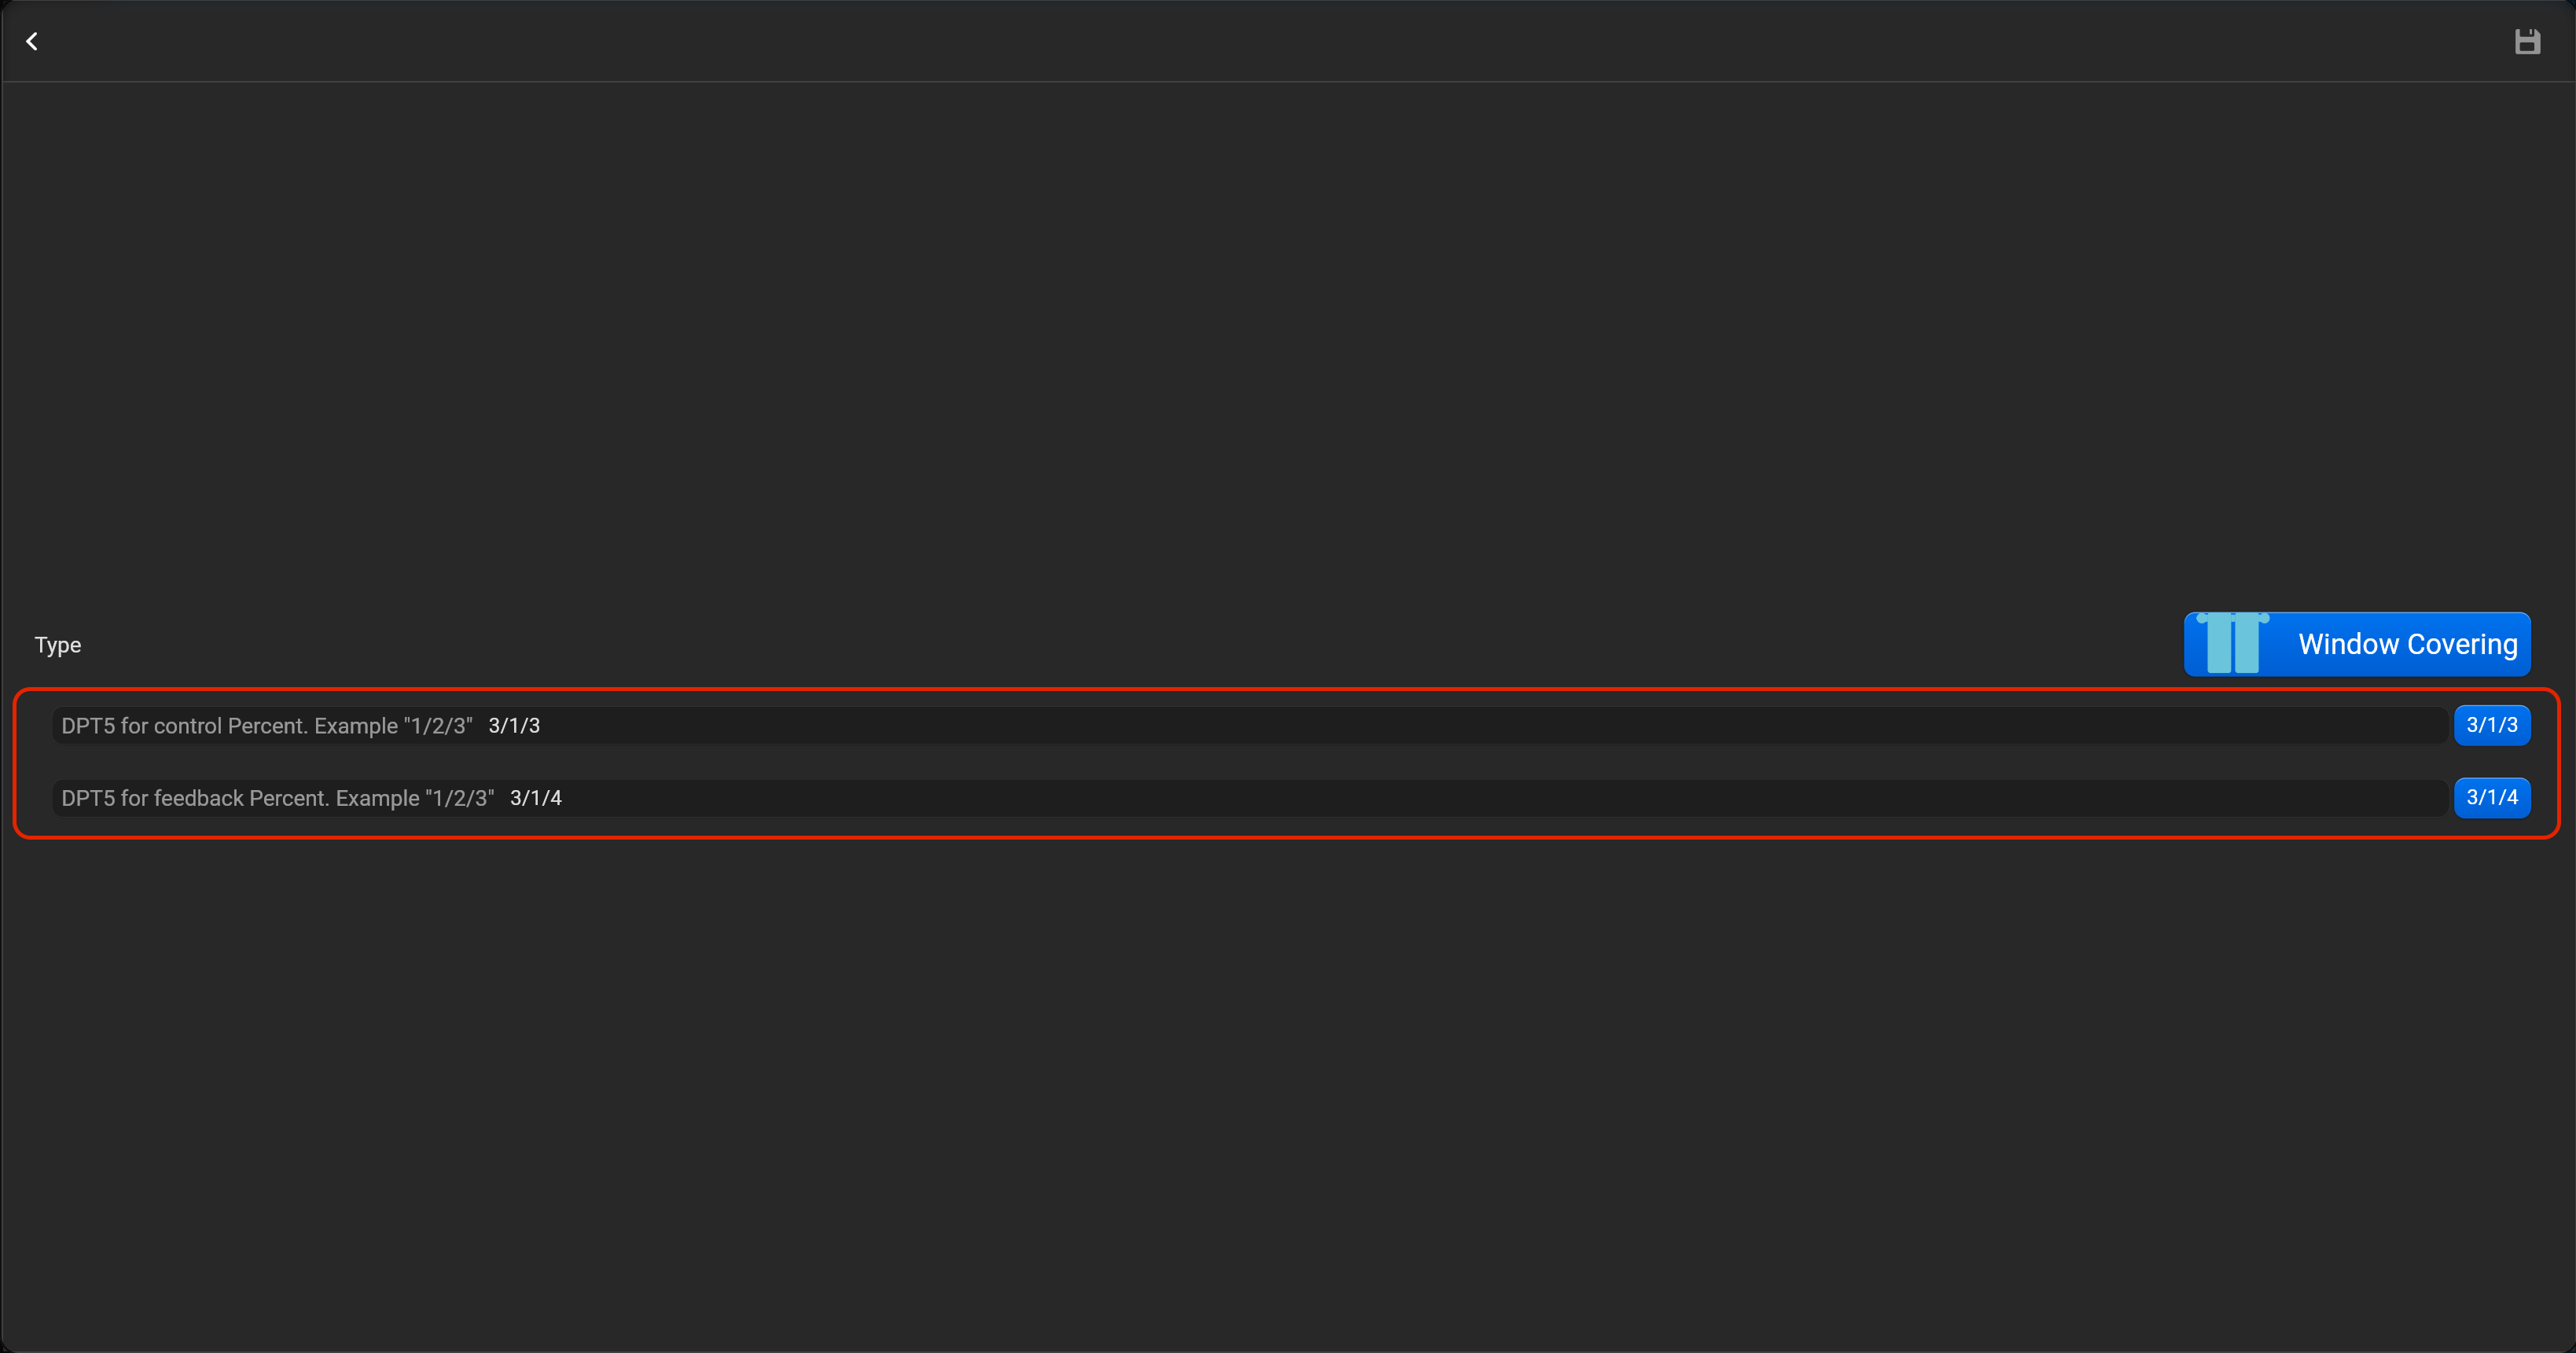
- select the type of accessory (Window covering),
- tap on “Setup KNX device” and set DPT5 for control and DPT5 for feedback. You can invert direction for this accessory.

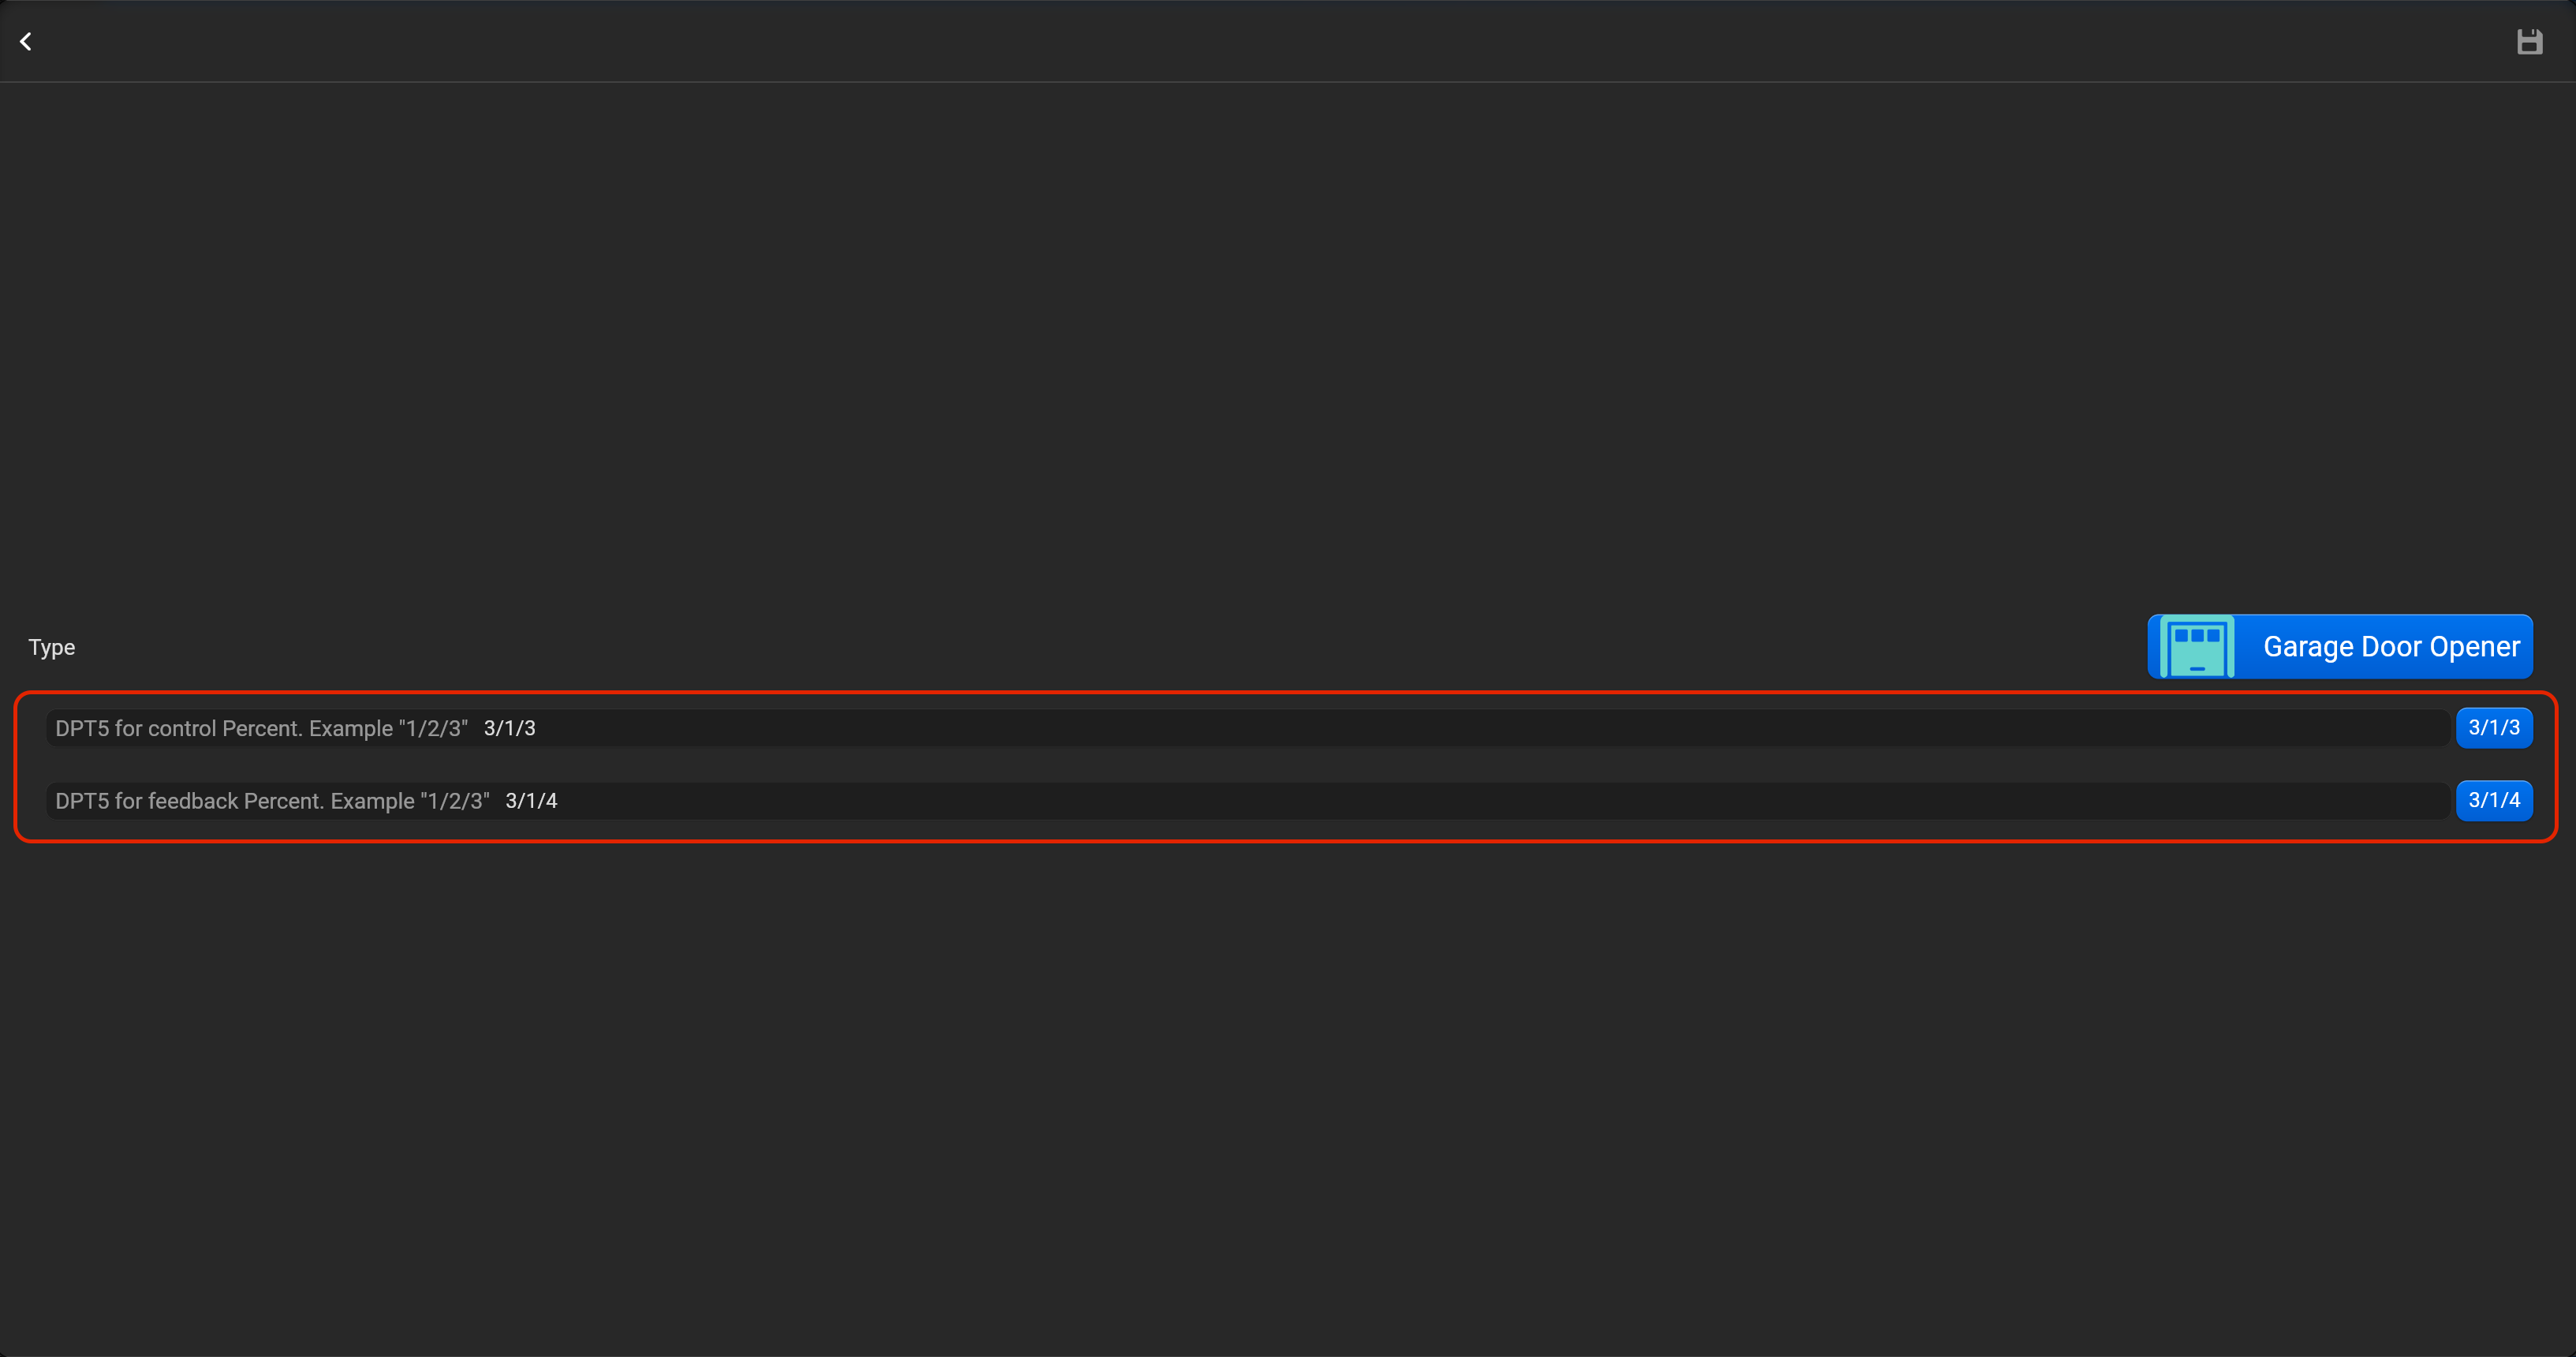
¶ Garage door
- select the protocol in the drop-down list,
- put the accessory order (affects the location of the accessory in Pyxis app),
- put name of the accessory and for the voice assistants,
- select voice assistants, where the accessory should be displayed,
- select the room, where the accessory will be located,
- select the type of accessory (garage door),
- tap on “Setup KNX device” and set DPT5 for control and DPT5 for feedback. You can invert direction for this accessory.
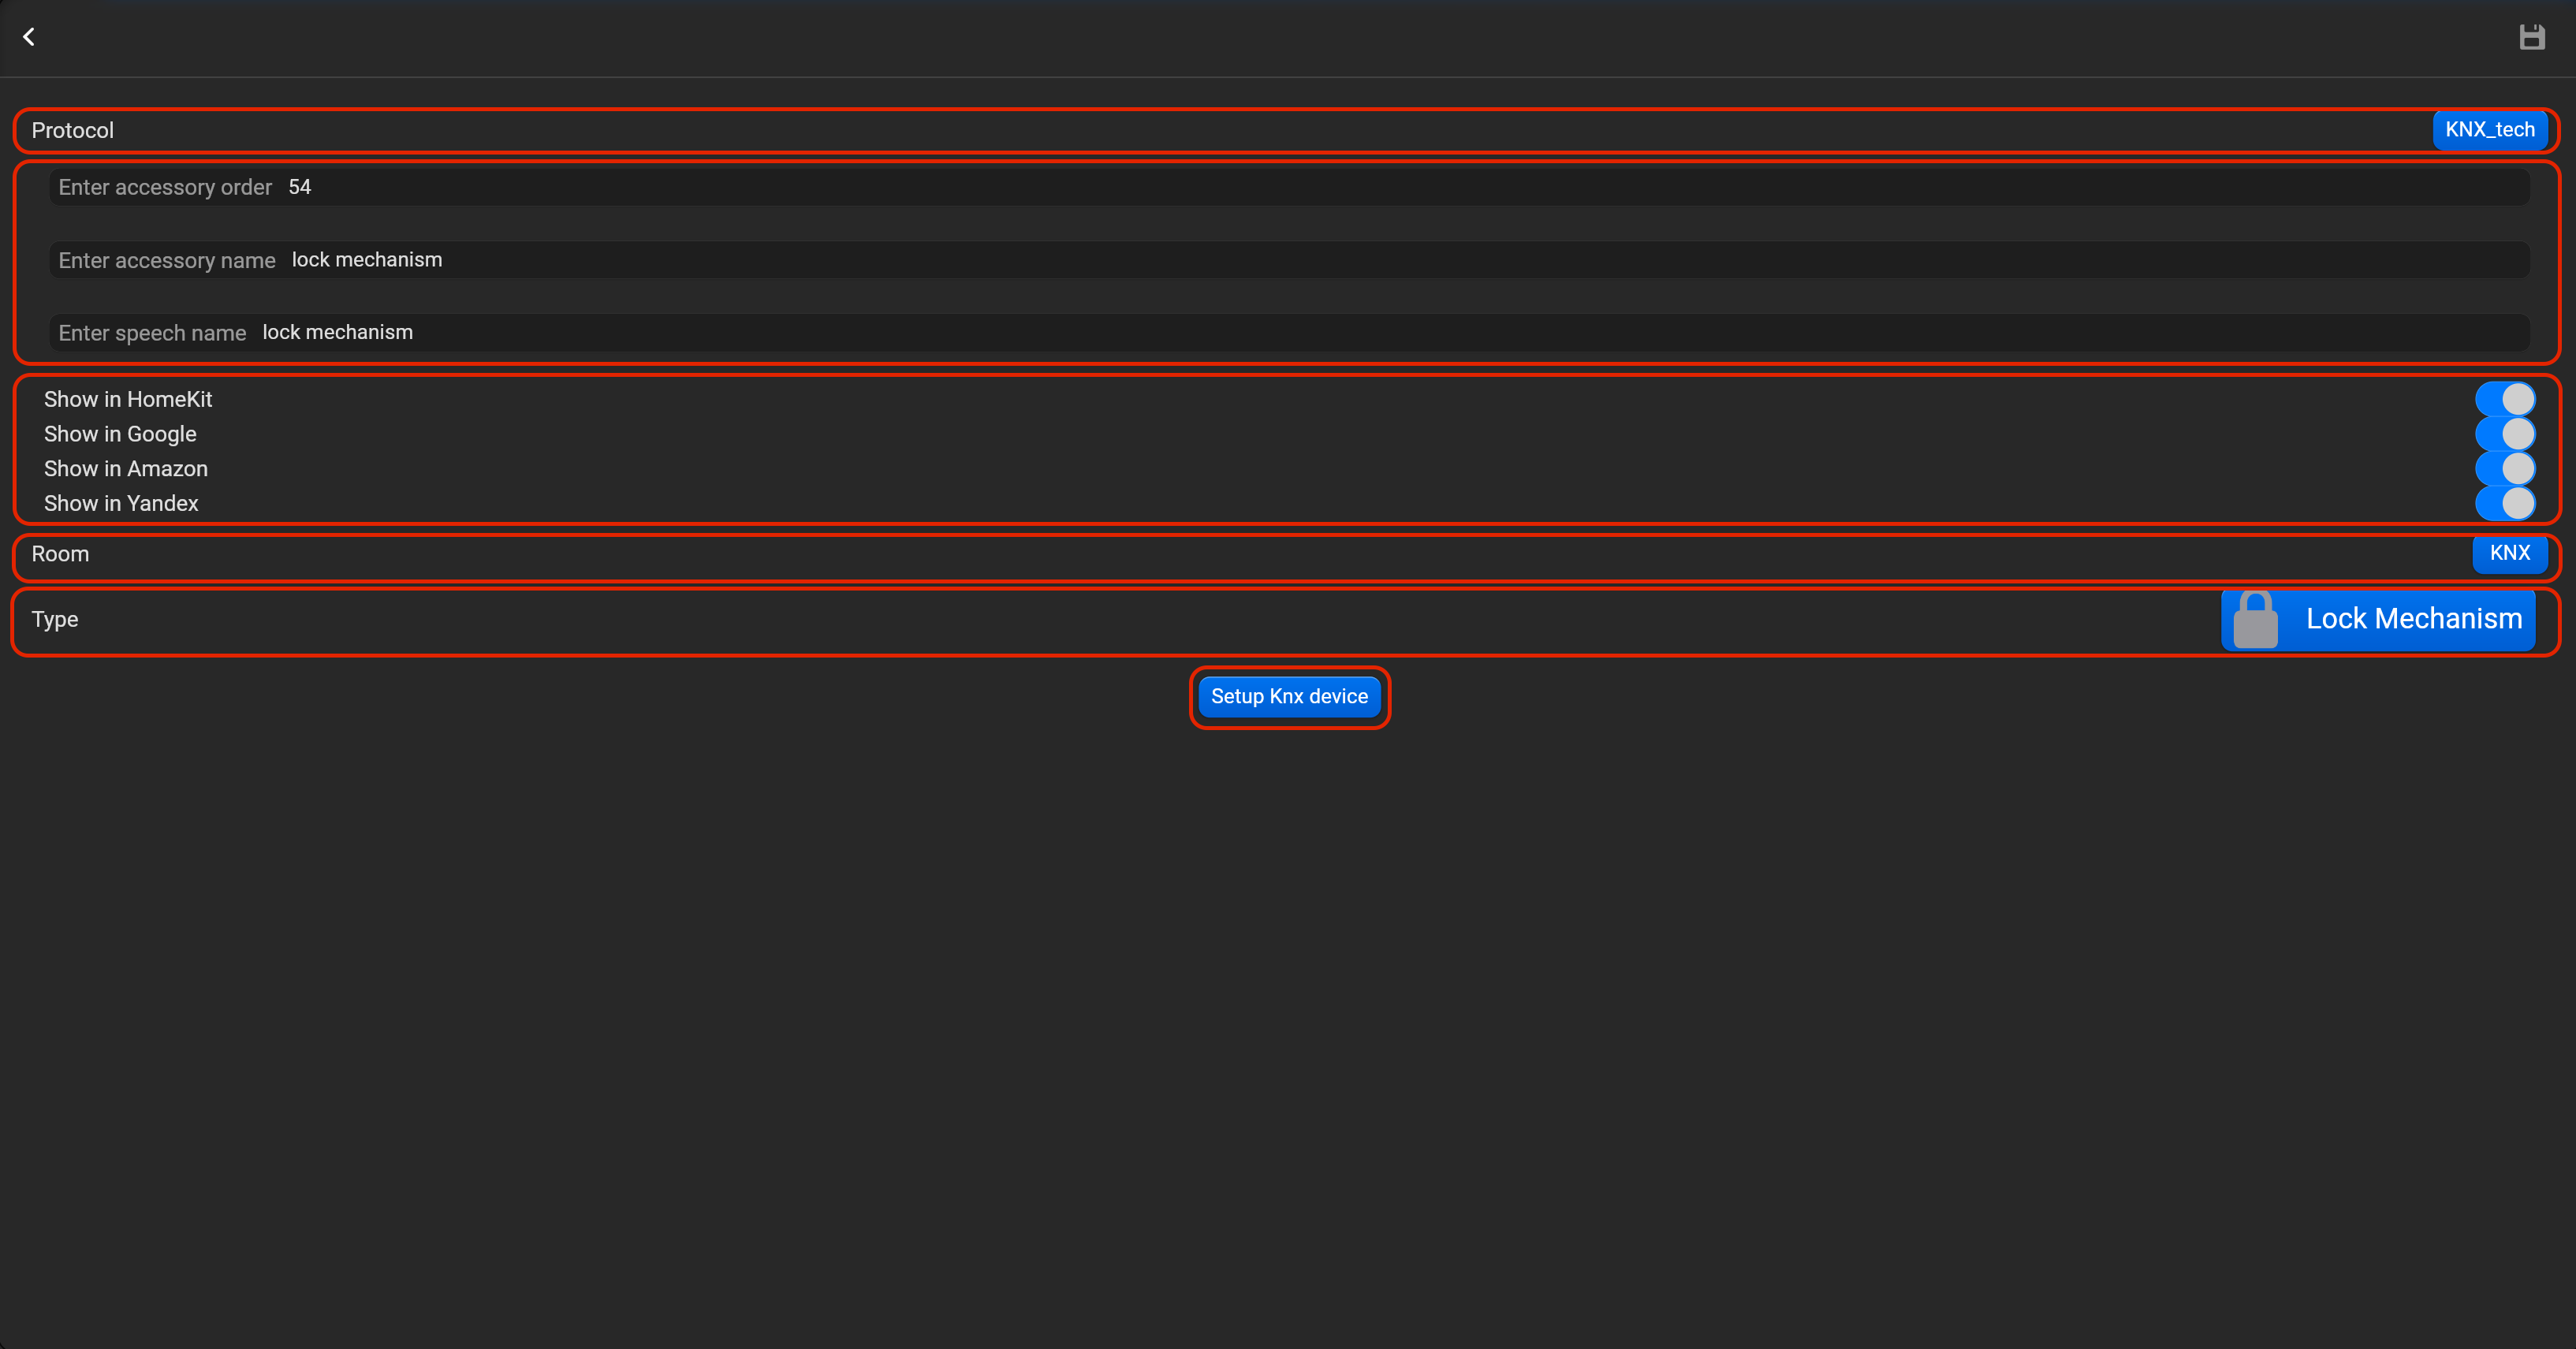
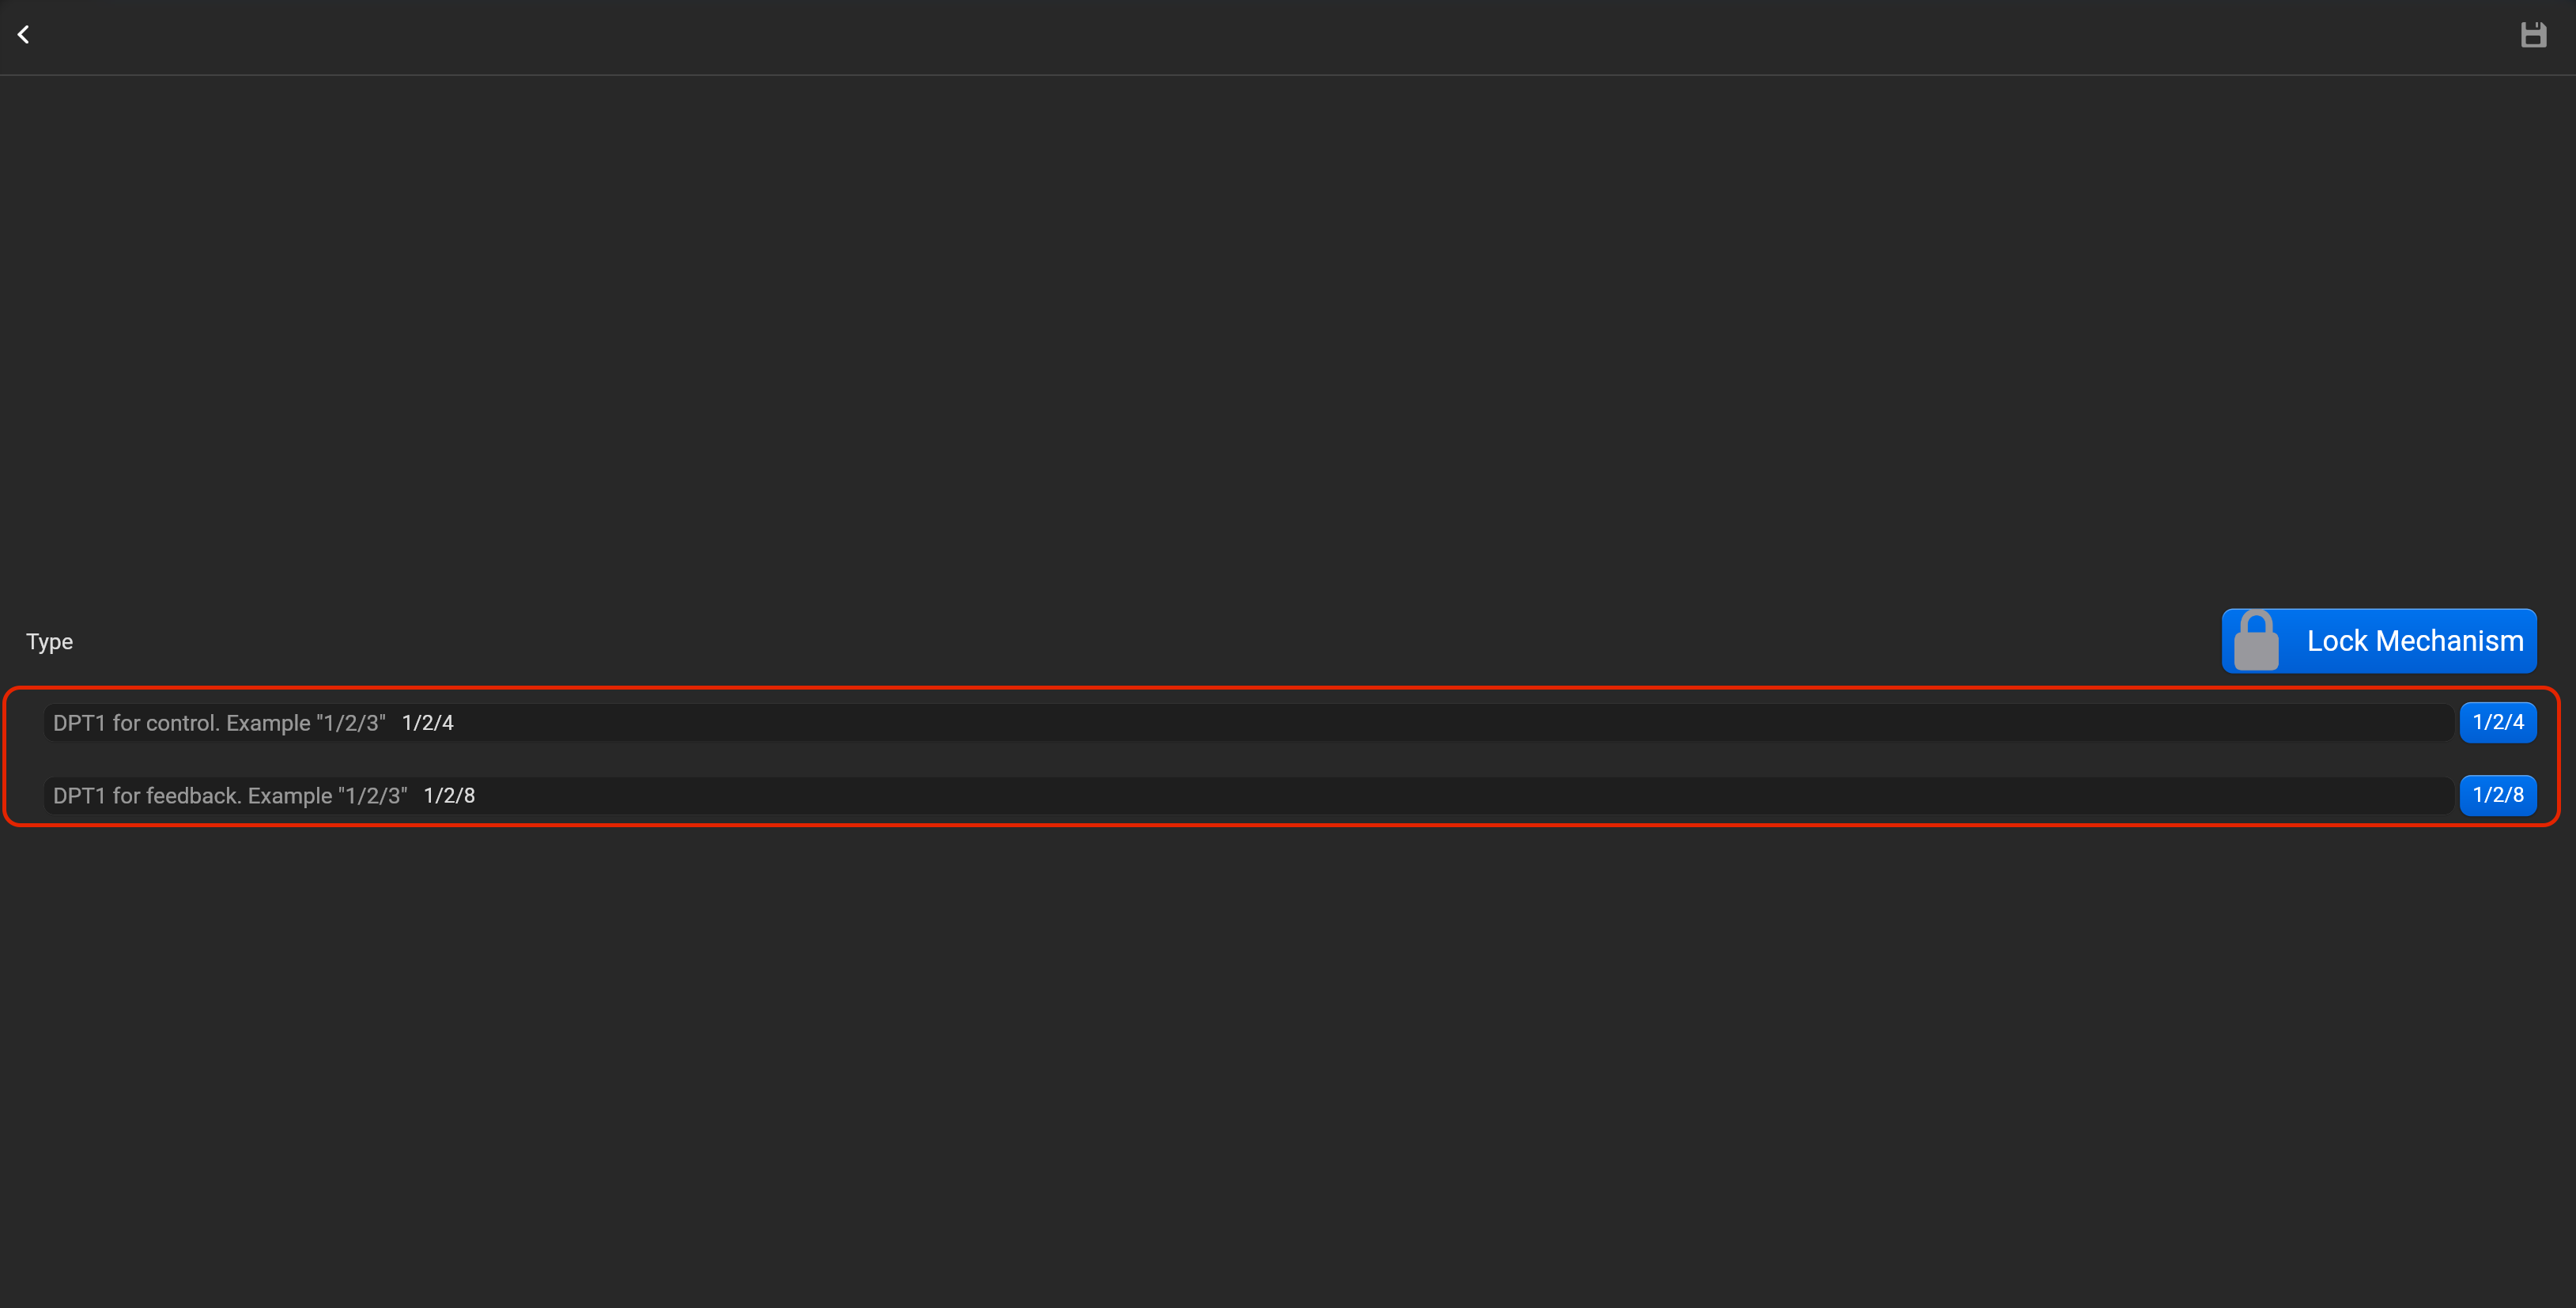
¶ Lock mechanism
- select the protocol in the drop-down list,
- put the accessory order (affects the location of the accessory in Pyxis app),
- put name of the accessory and for the voice assistants,
- select voice assistants, where the accessory should be displayed,
- select the room, where the accessory will be located,
- select the type of accessory (Lock mechanism),
- tap on “Setup KNX device” and set DPT1 for control and DPT1 for feedback.
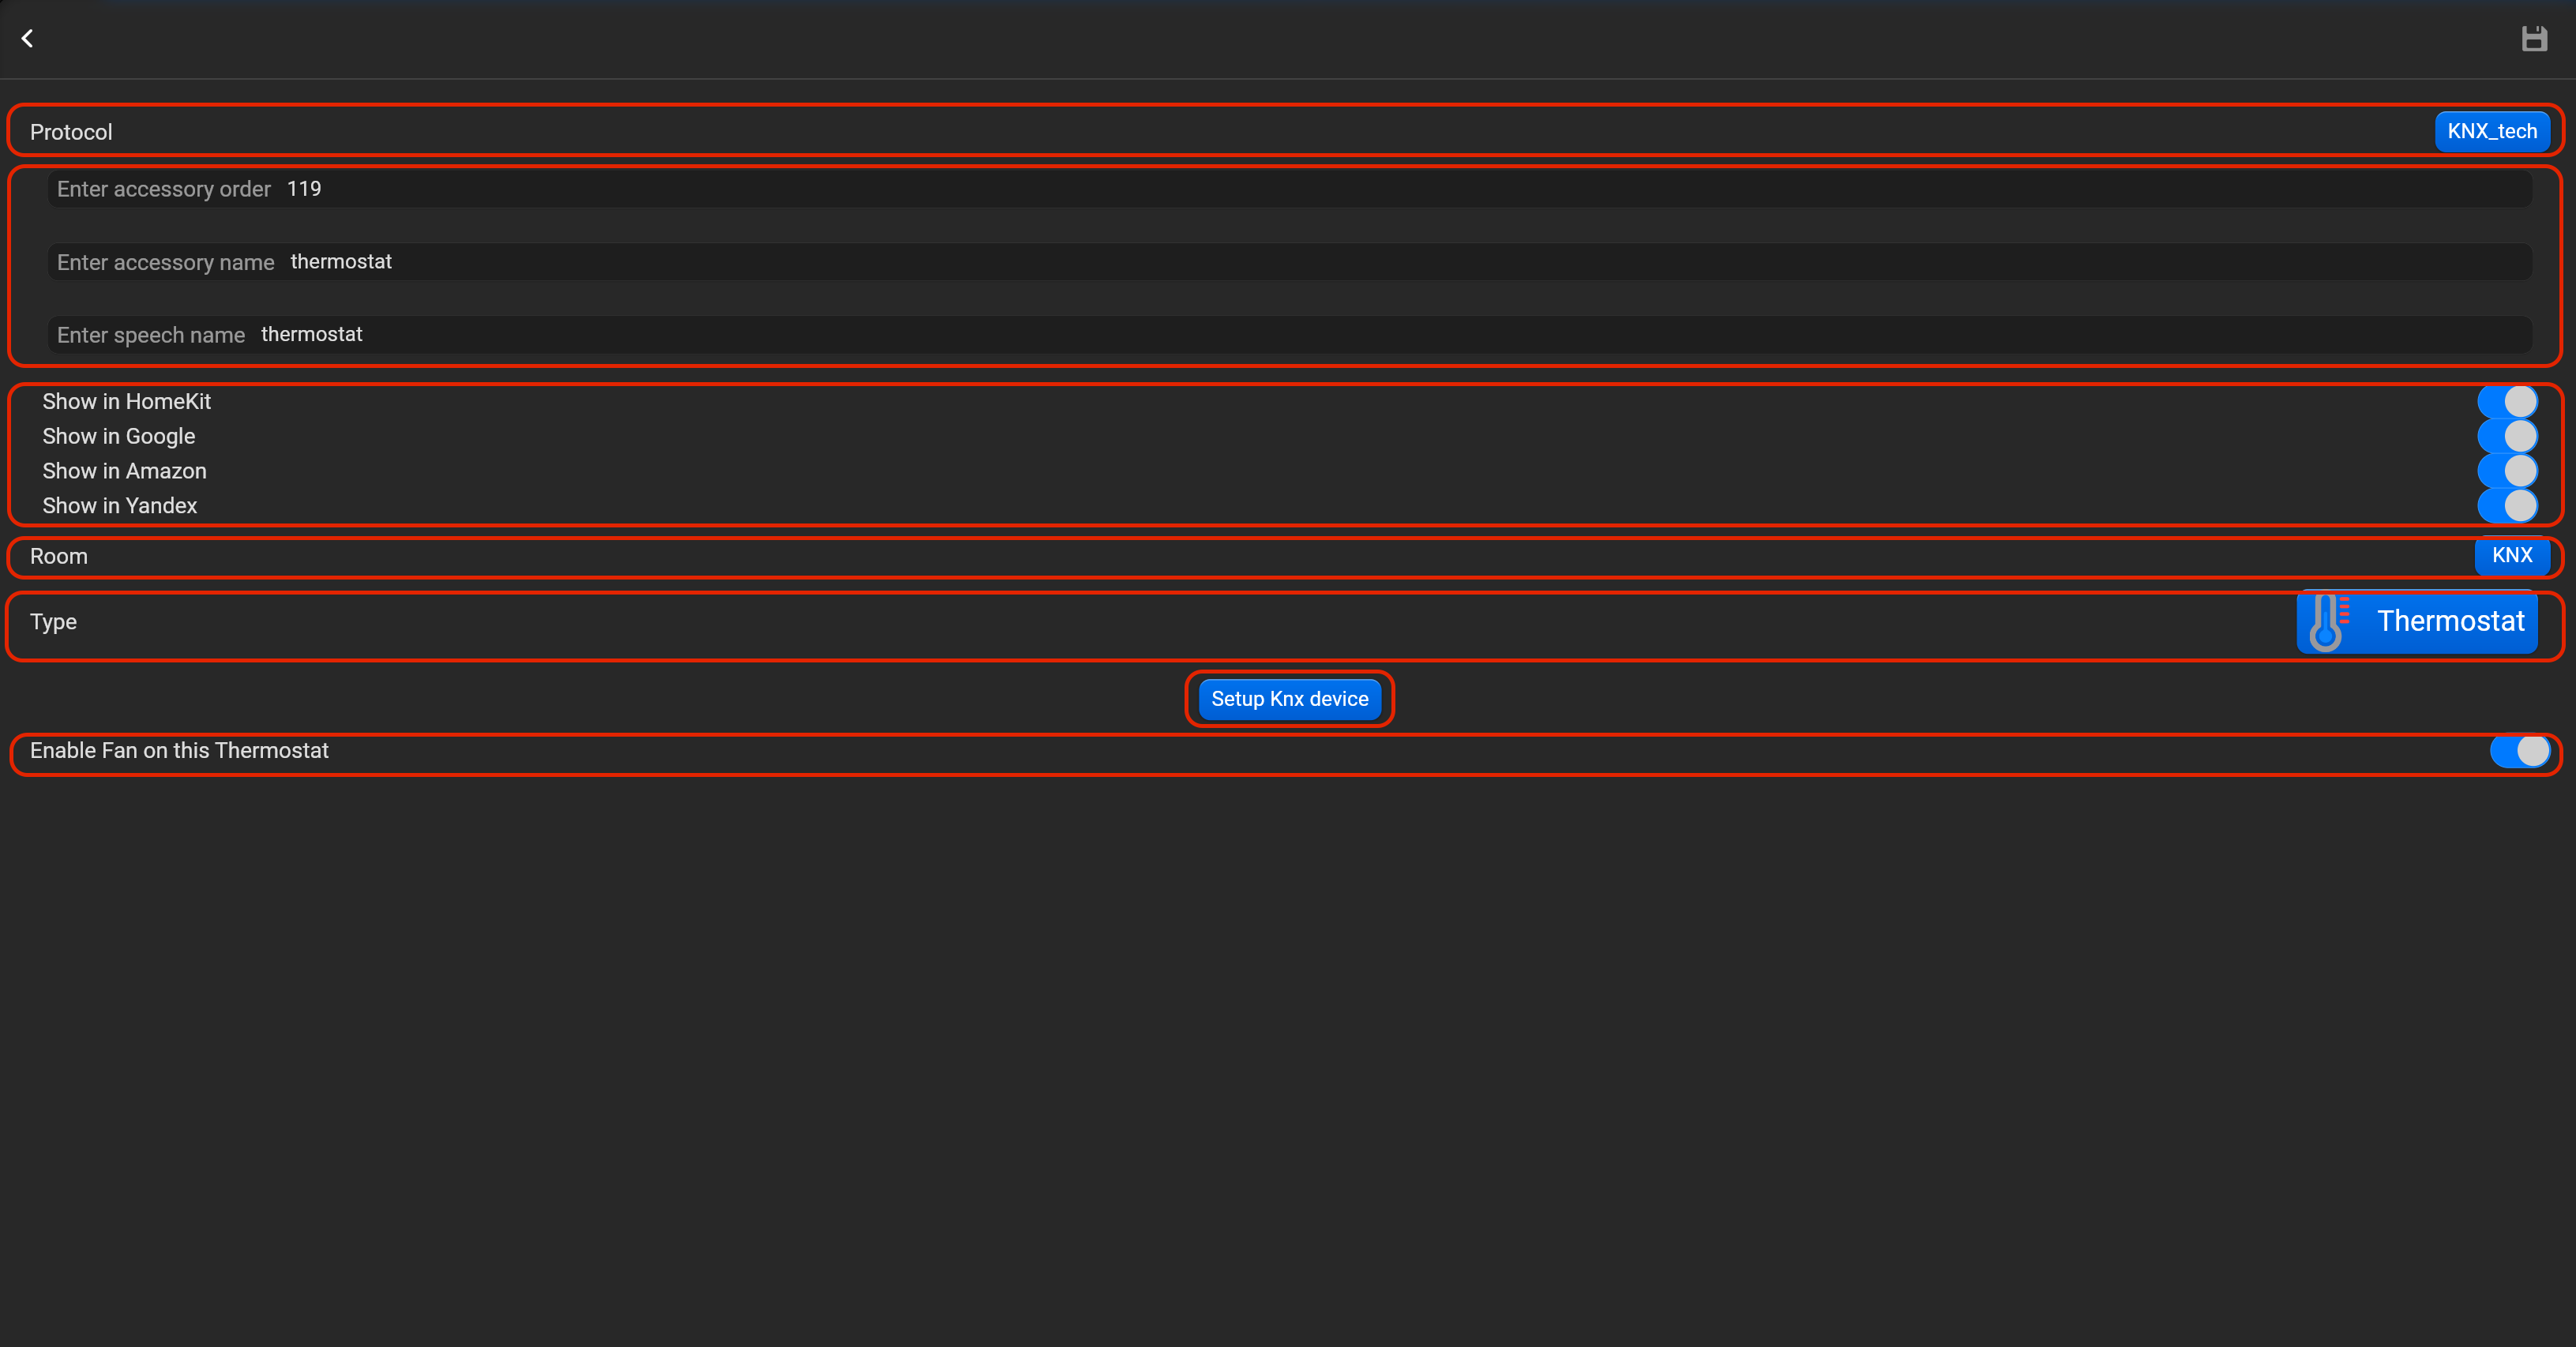
¶ Thermostat
- select the protocol in the drop-down list,
- put the accessory order (affects the location of the accessory in Pyxis app),
- put name of the accessory and for the voice assistants,
- select voice assistants, where the accessory should be displayed,
- select the room, where the accessory will be located,
- select the type of accessory (Thermostat),
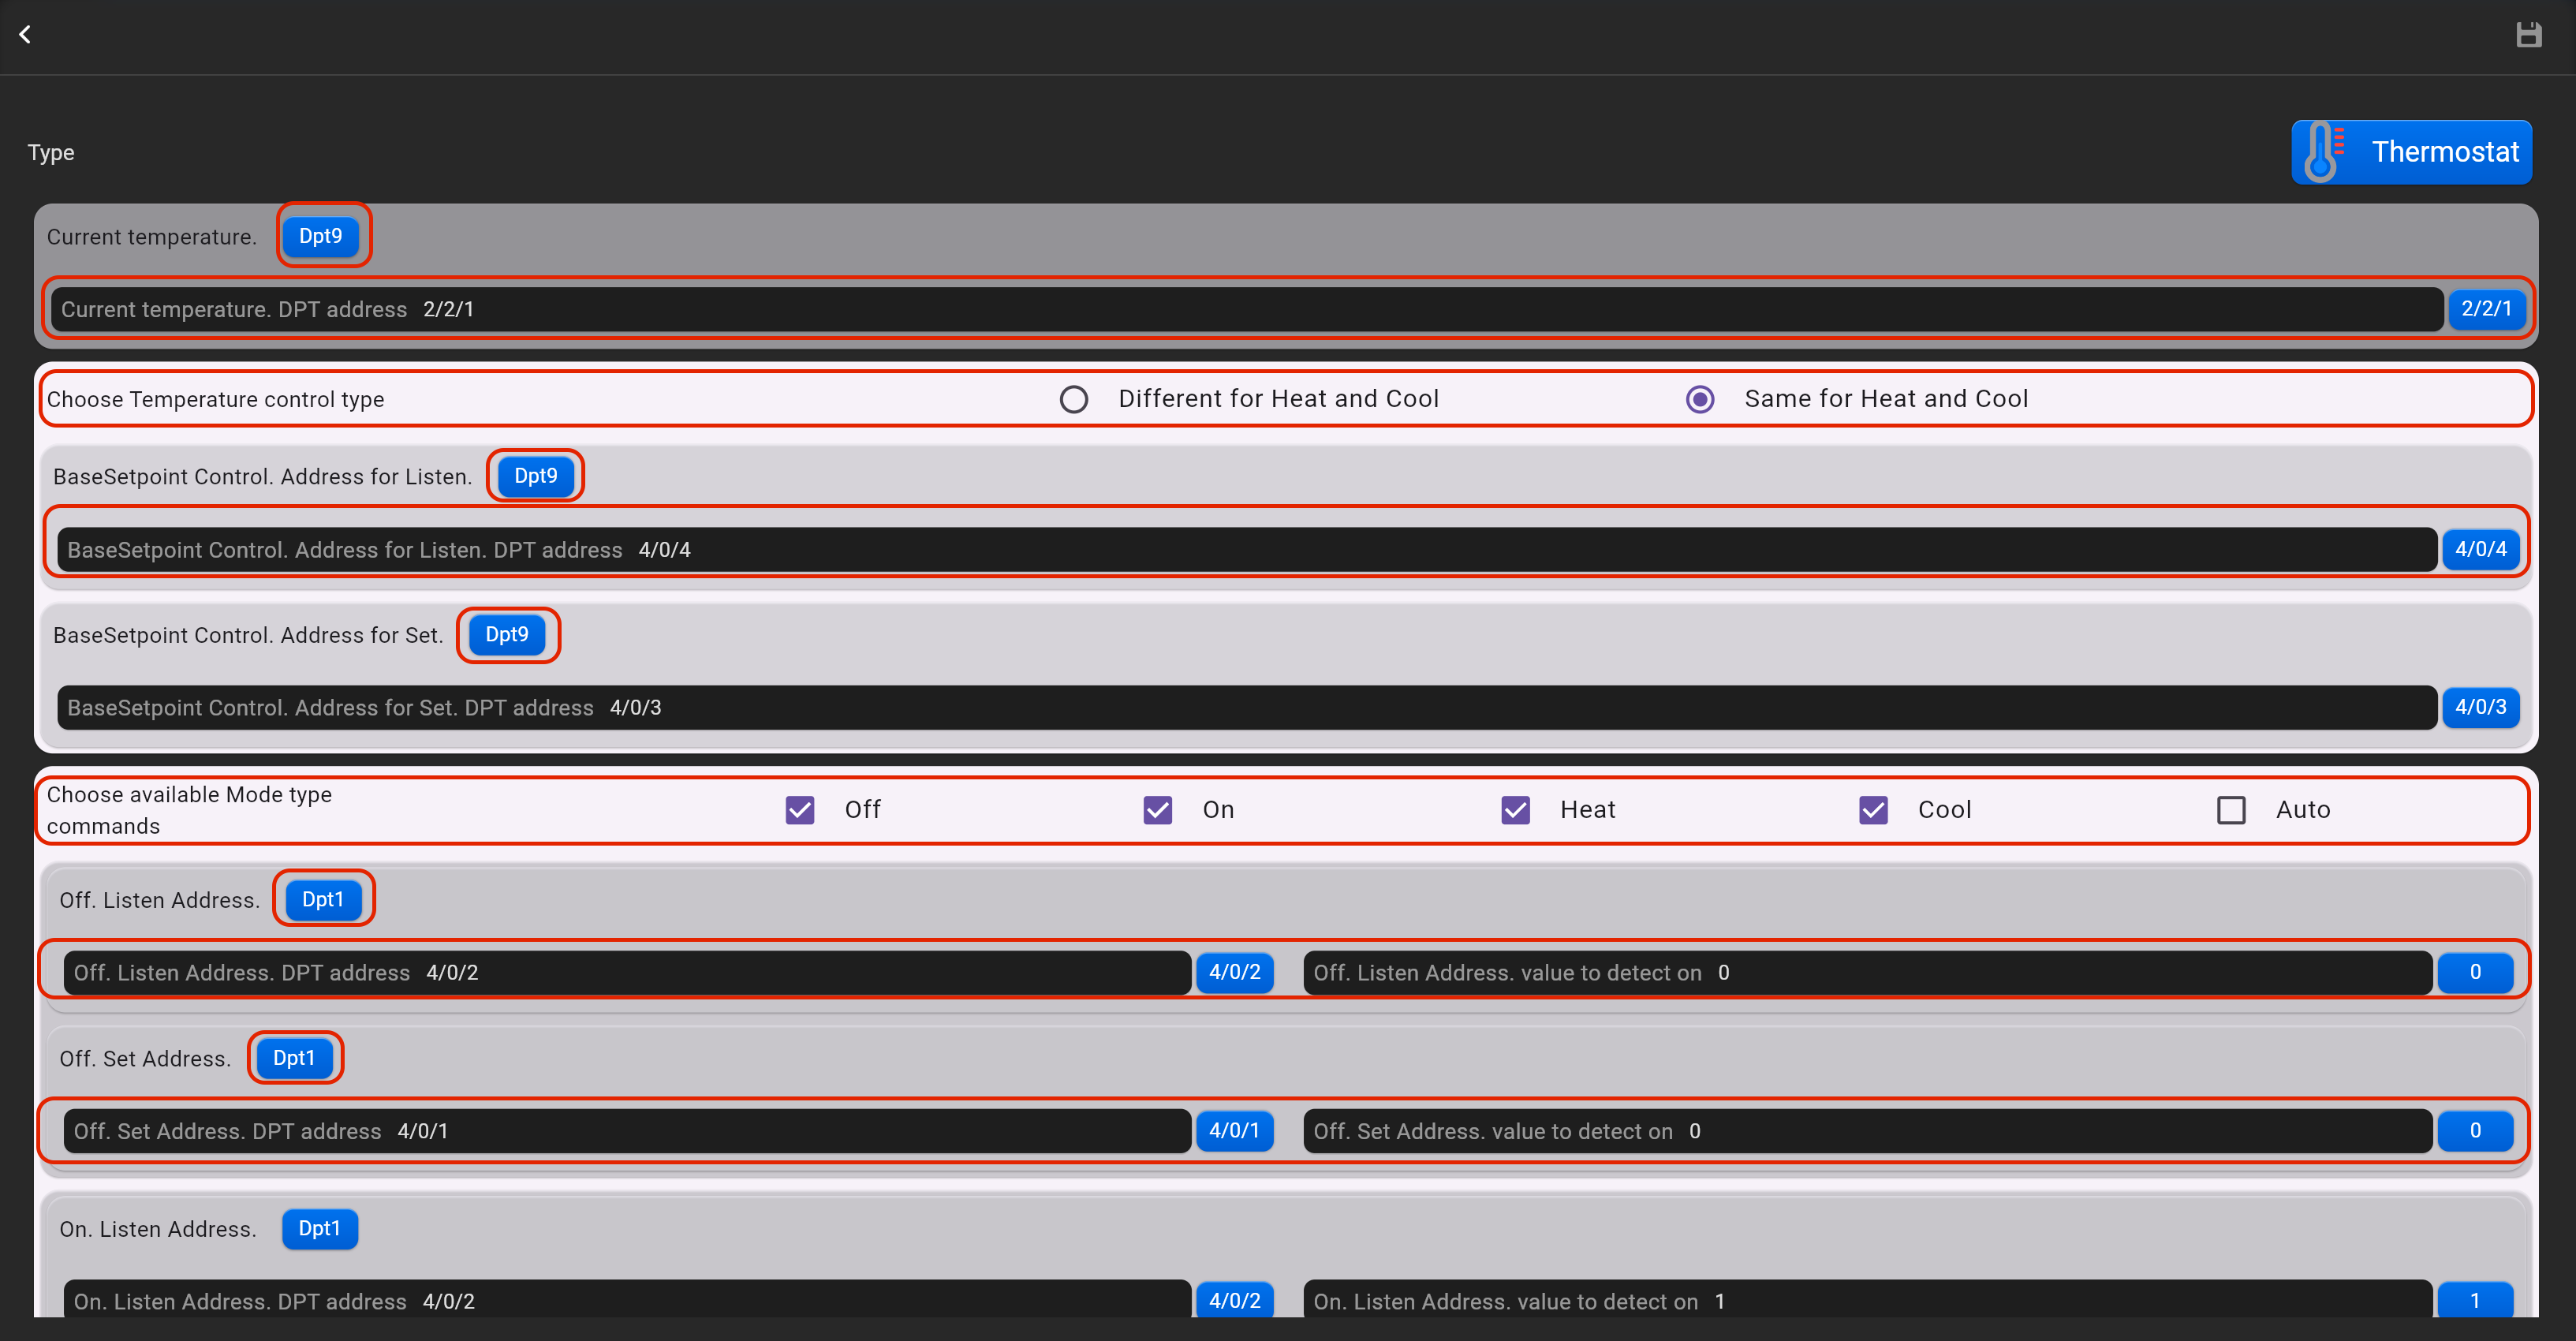
- tap on “Setup KNX device” and set DPT's for control and feedback.
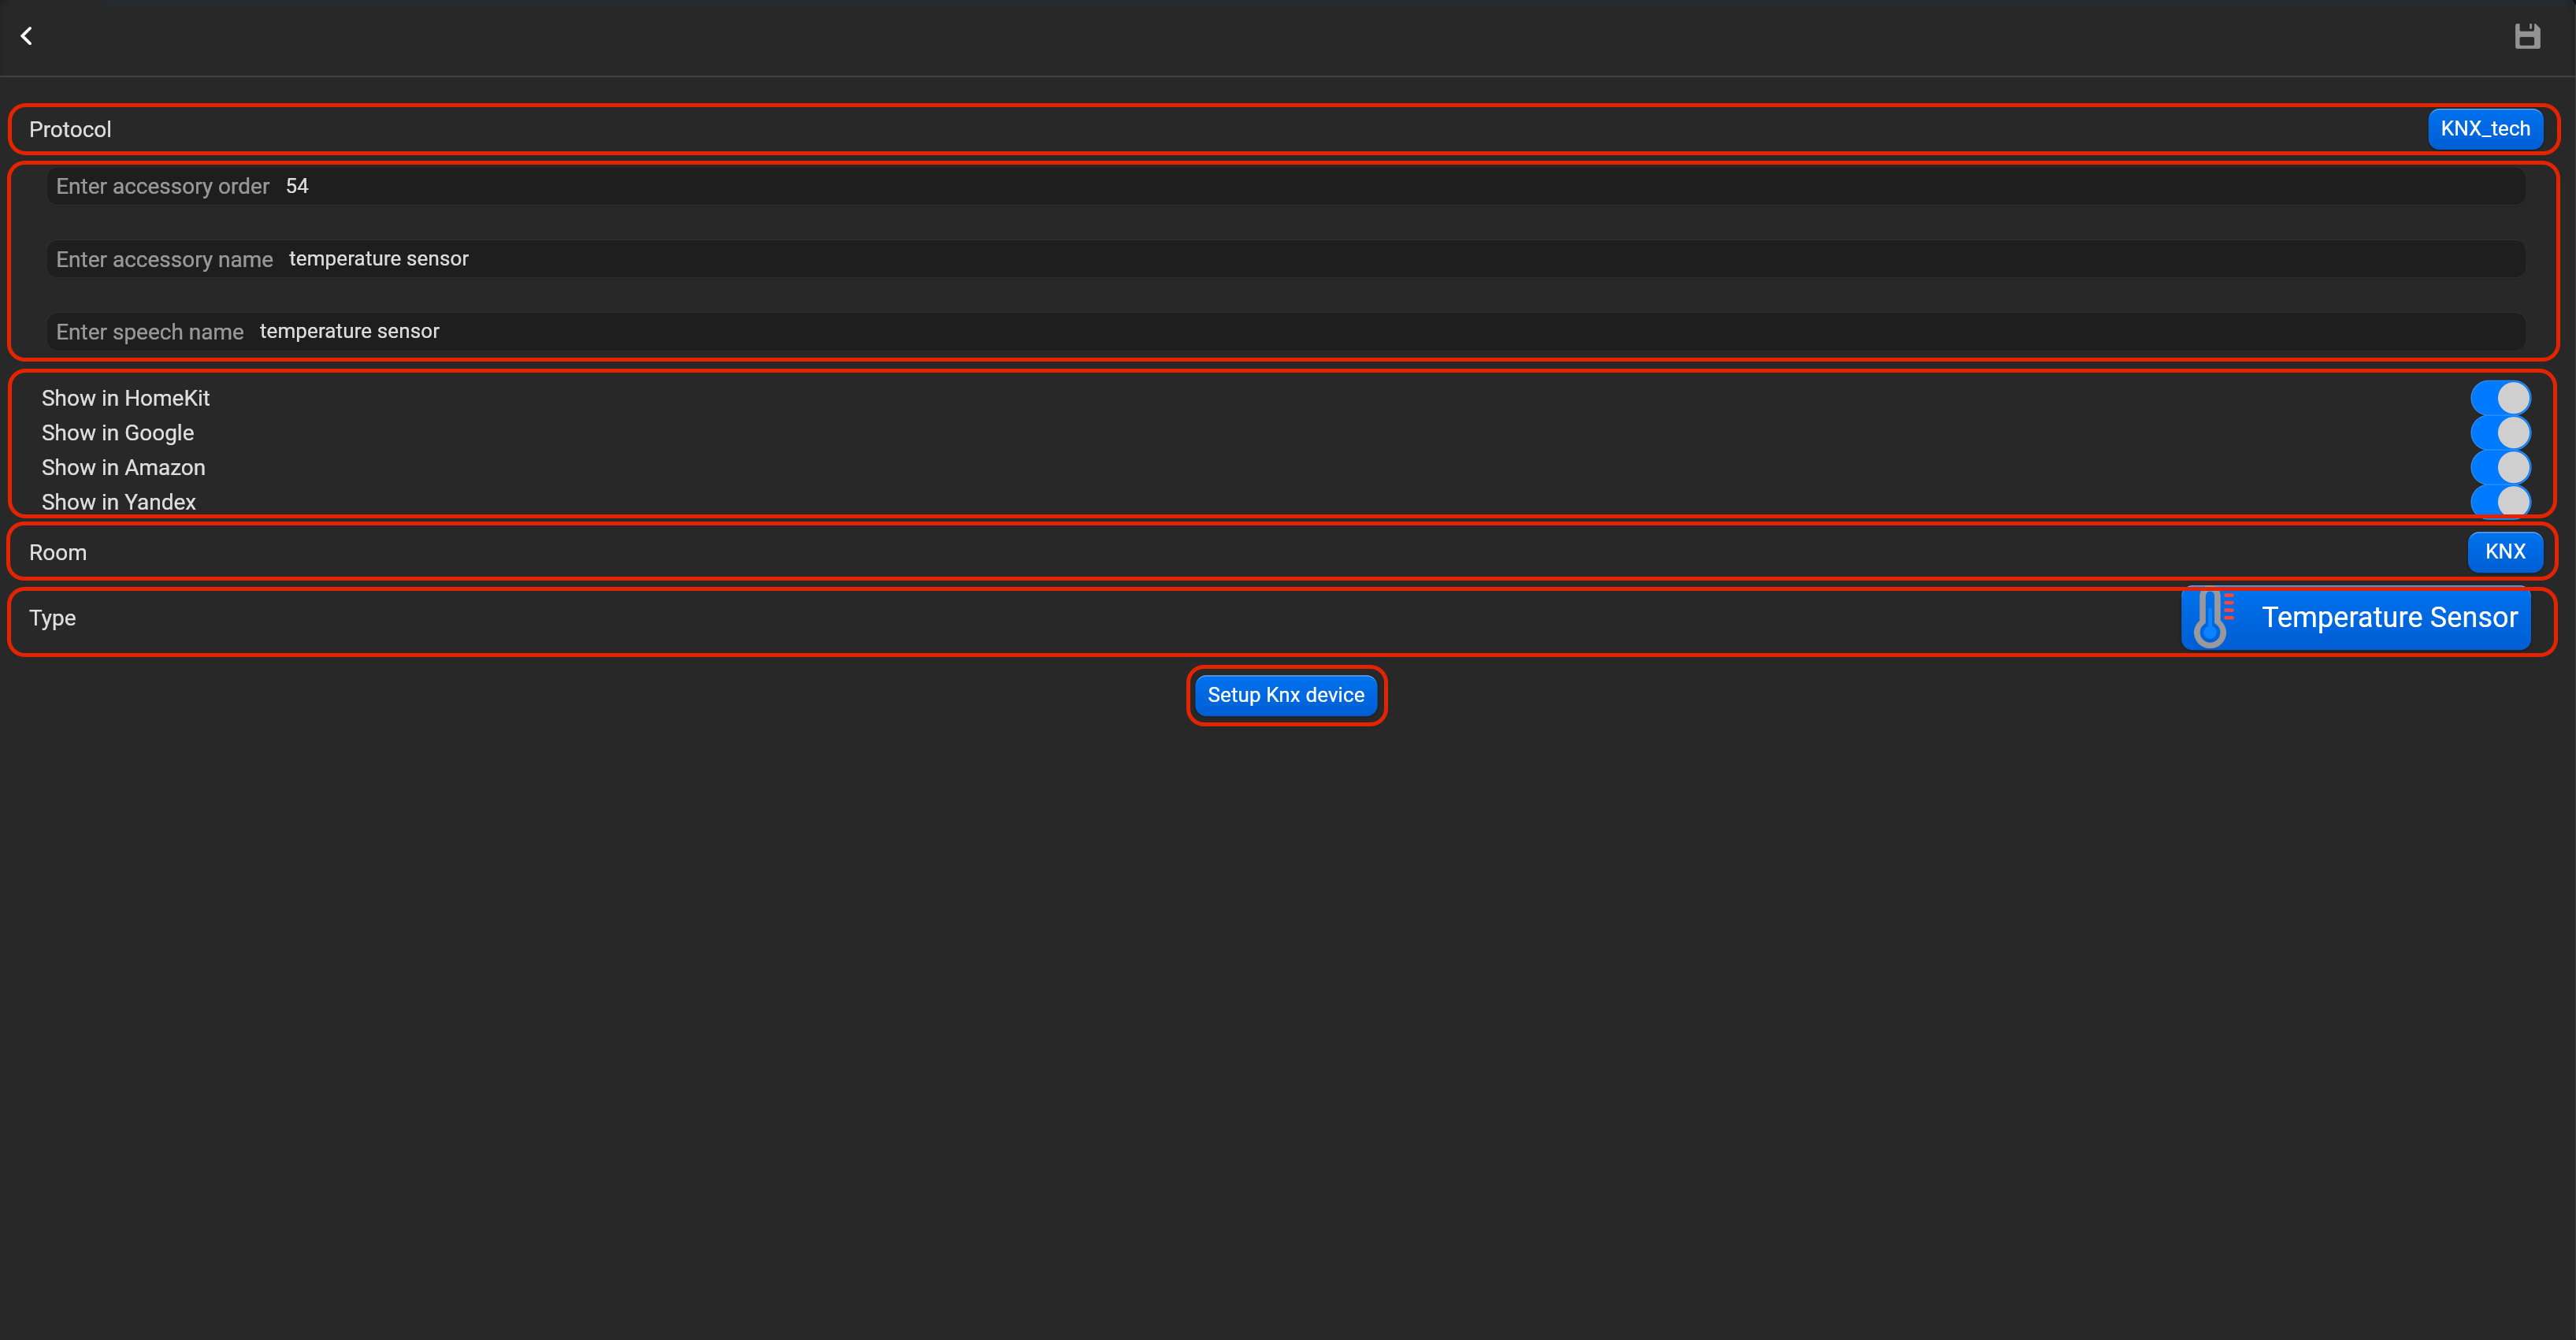
¶ Temperature sensor
- select the protocol in the drop-down list,
- put the accessory order (affects the location of the accessory in Pyxis app),
- put name of the accessory and for the voice assistants,
- select voice assistants, where the accessory should be displayed,
- select the room, where the accessory will be located,
- select the type of accessory (Temperature sensor),
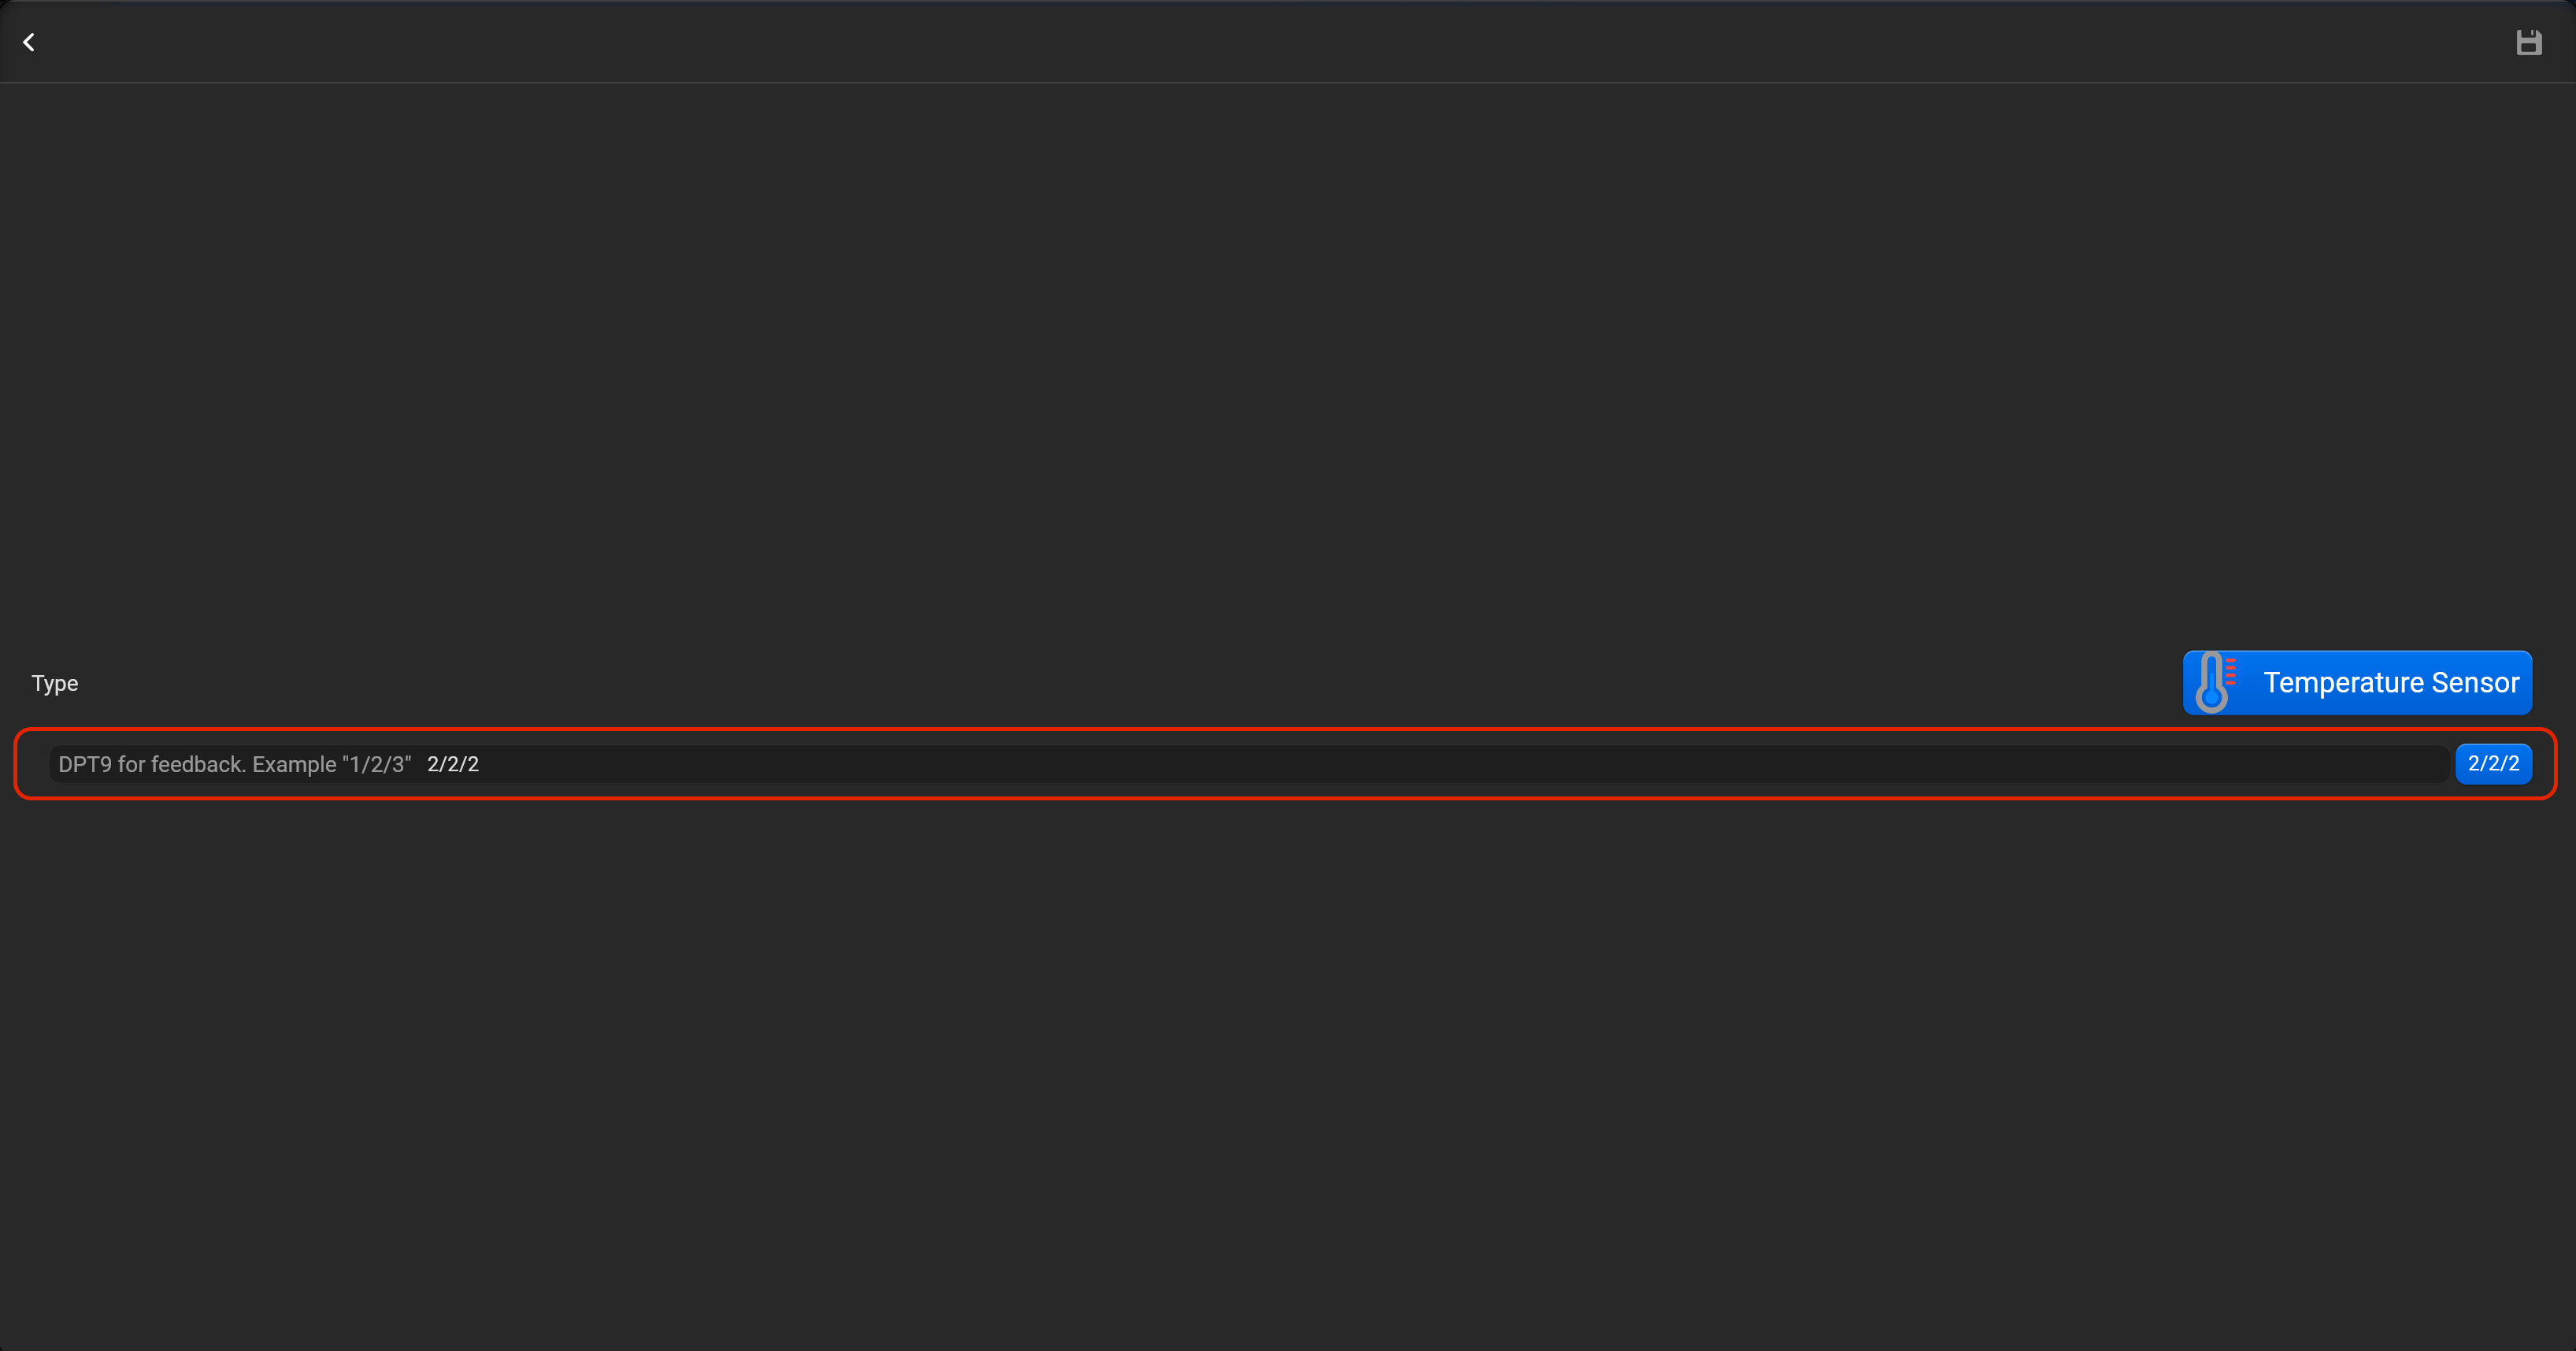
- tap on “Setup KNX device” and set DPT9 for feedback.
¶ Humidity sensor
- select the protocol in the drop-down list,
- put the accessory order (affects the location of the accessory in Pyxis app),
- put name of the accessory and for the voice assistants,
- select voice assistants, where the accessory should be displayed,
- select the room, where the accessory will be located,
- select the type of accessory (Humidity sensor),
- tap on “Setup KNX device” and set DPT9 for feedback.

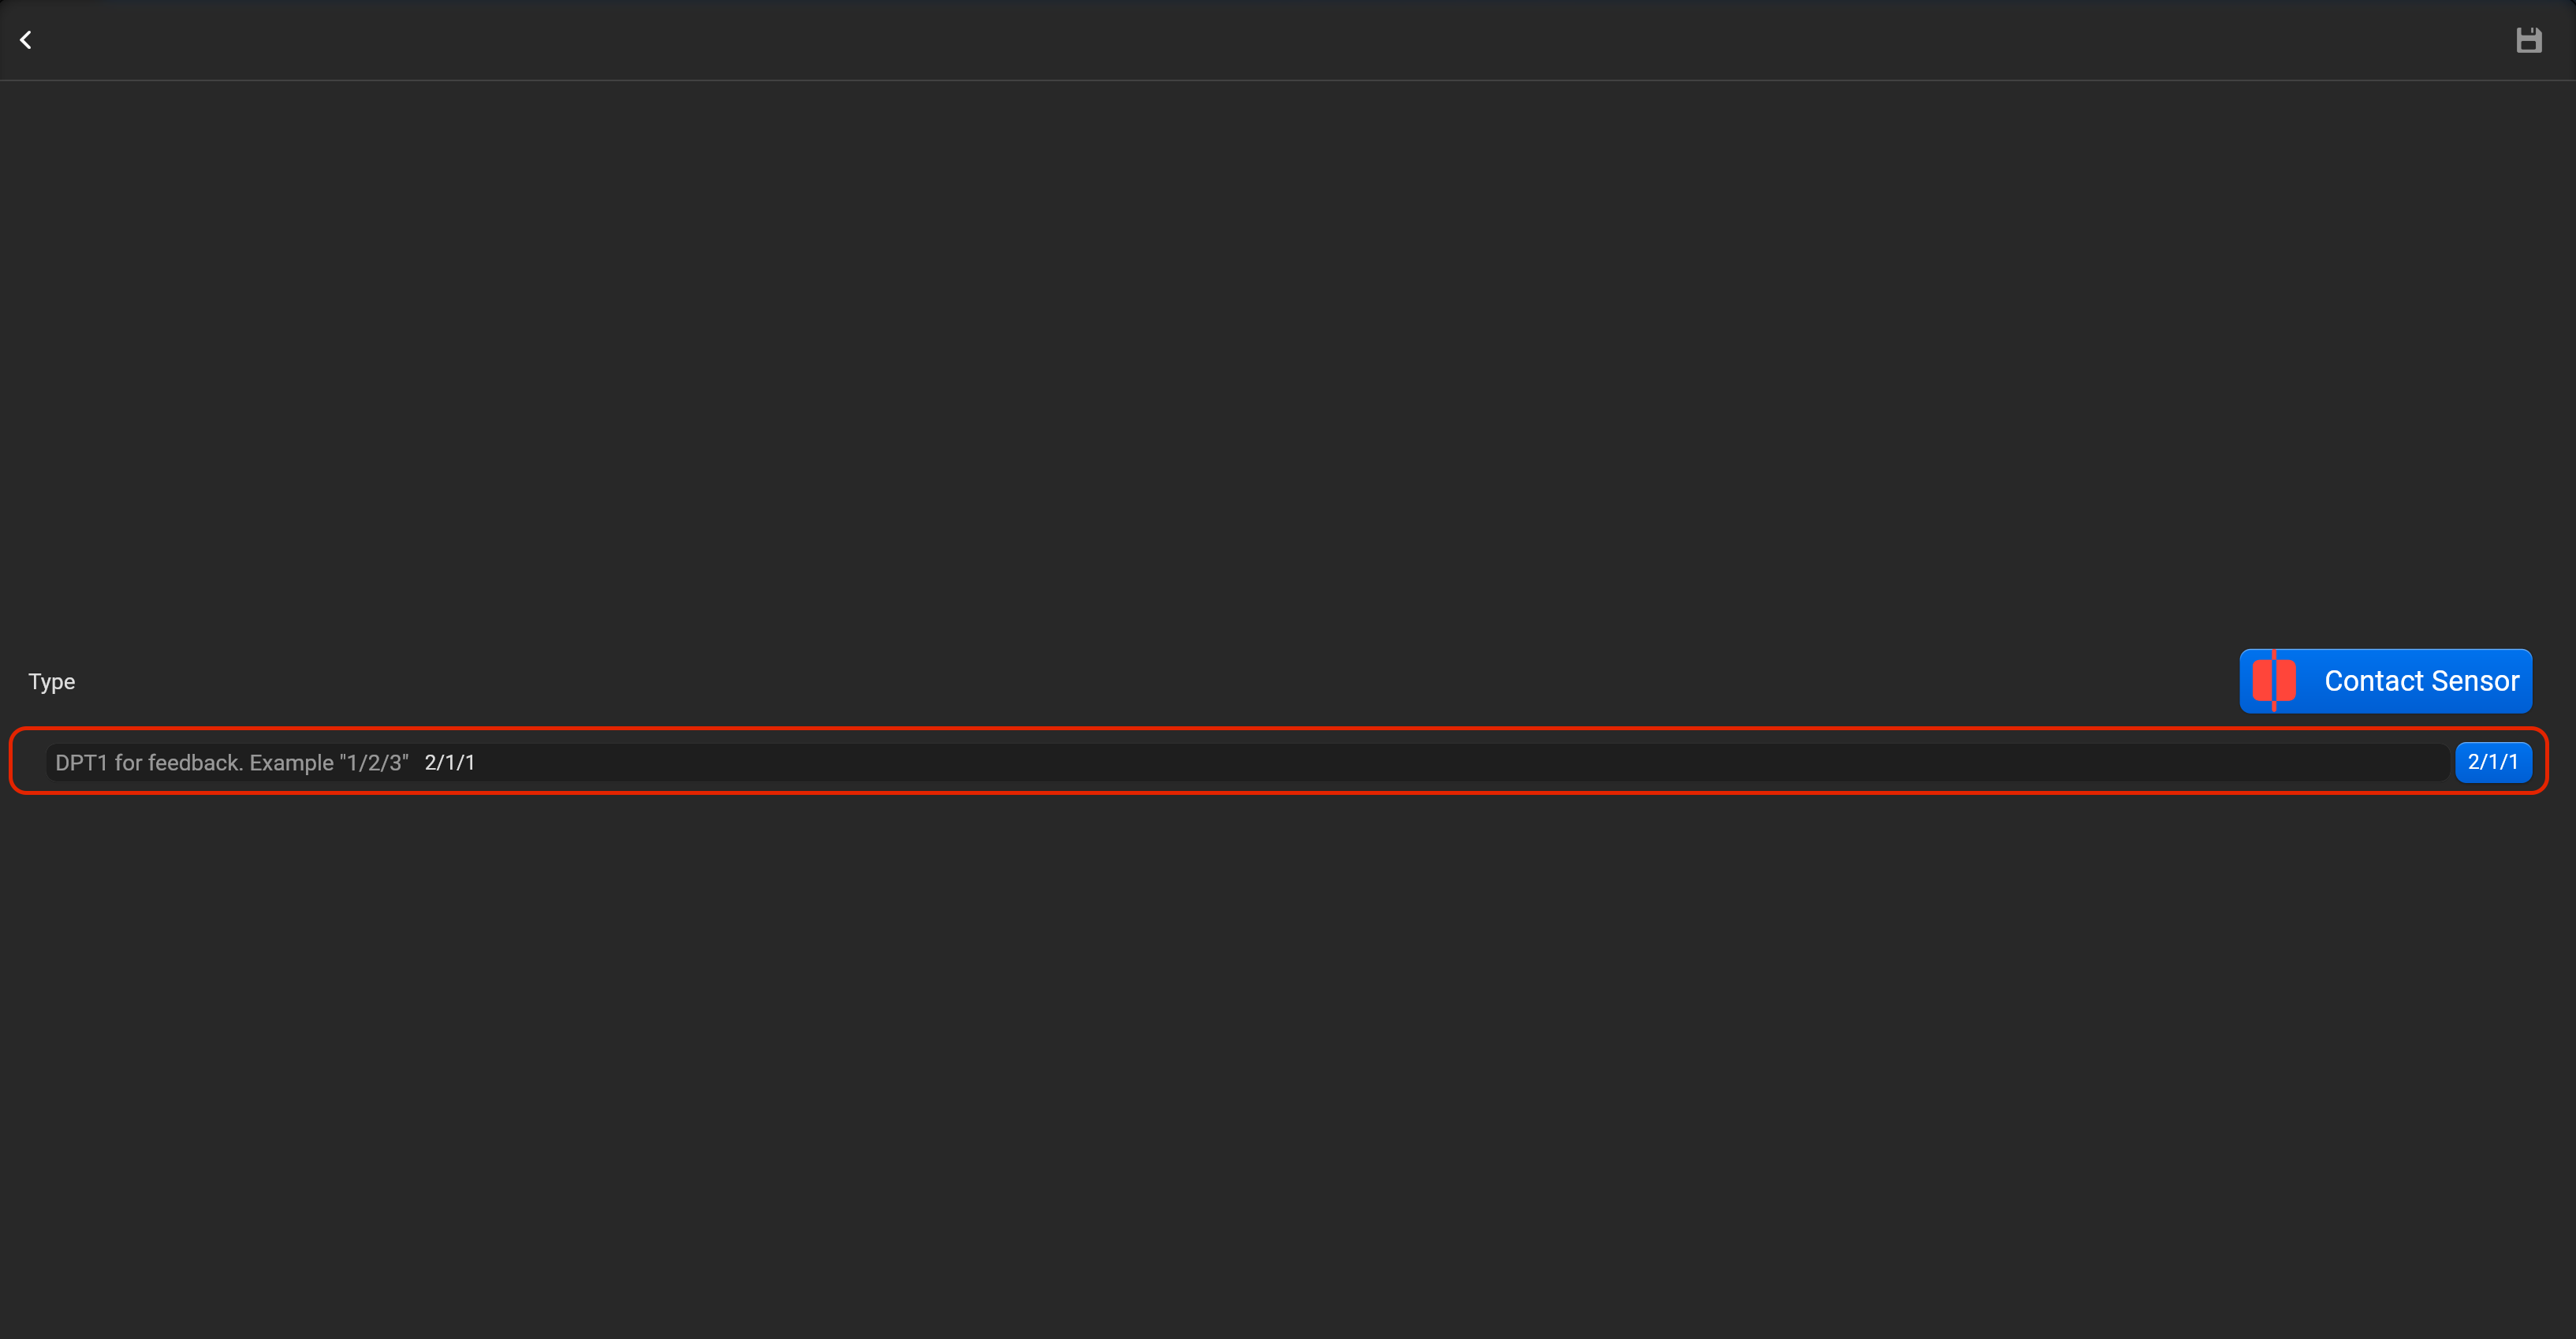
¶ Contact sensor
- select the protocol in the drop-down list,
- put the accessory order (affects the location of the accessory in Pyxis app),
- put name of the accessory and for the voice assistants,
- select voice assistants, where the accessory should be displayed,
- select the room, where the accessory will be located,
- select the type of accessory (Contact sensor),
- tap on “Setup KNX device” and set DPT1 for feedback. You can invert value of this accessory.

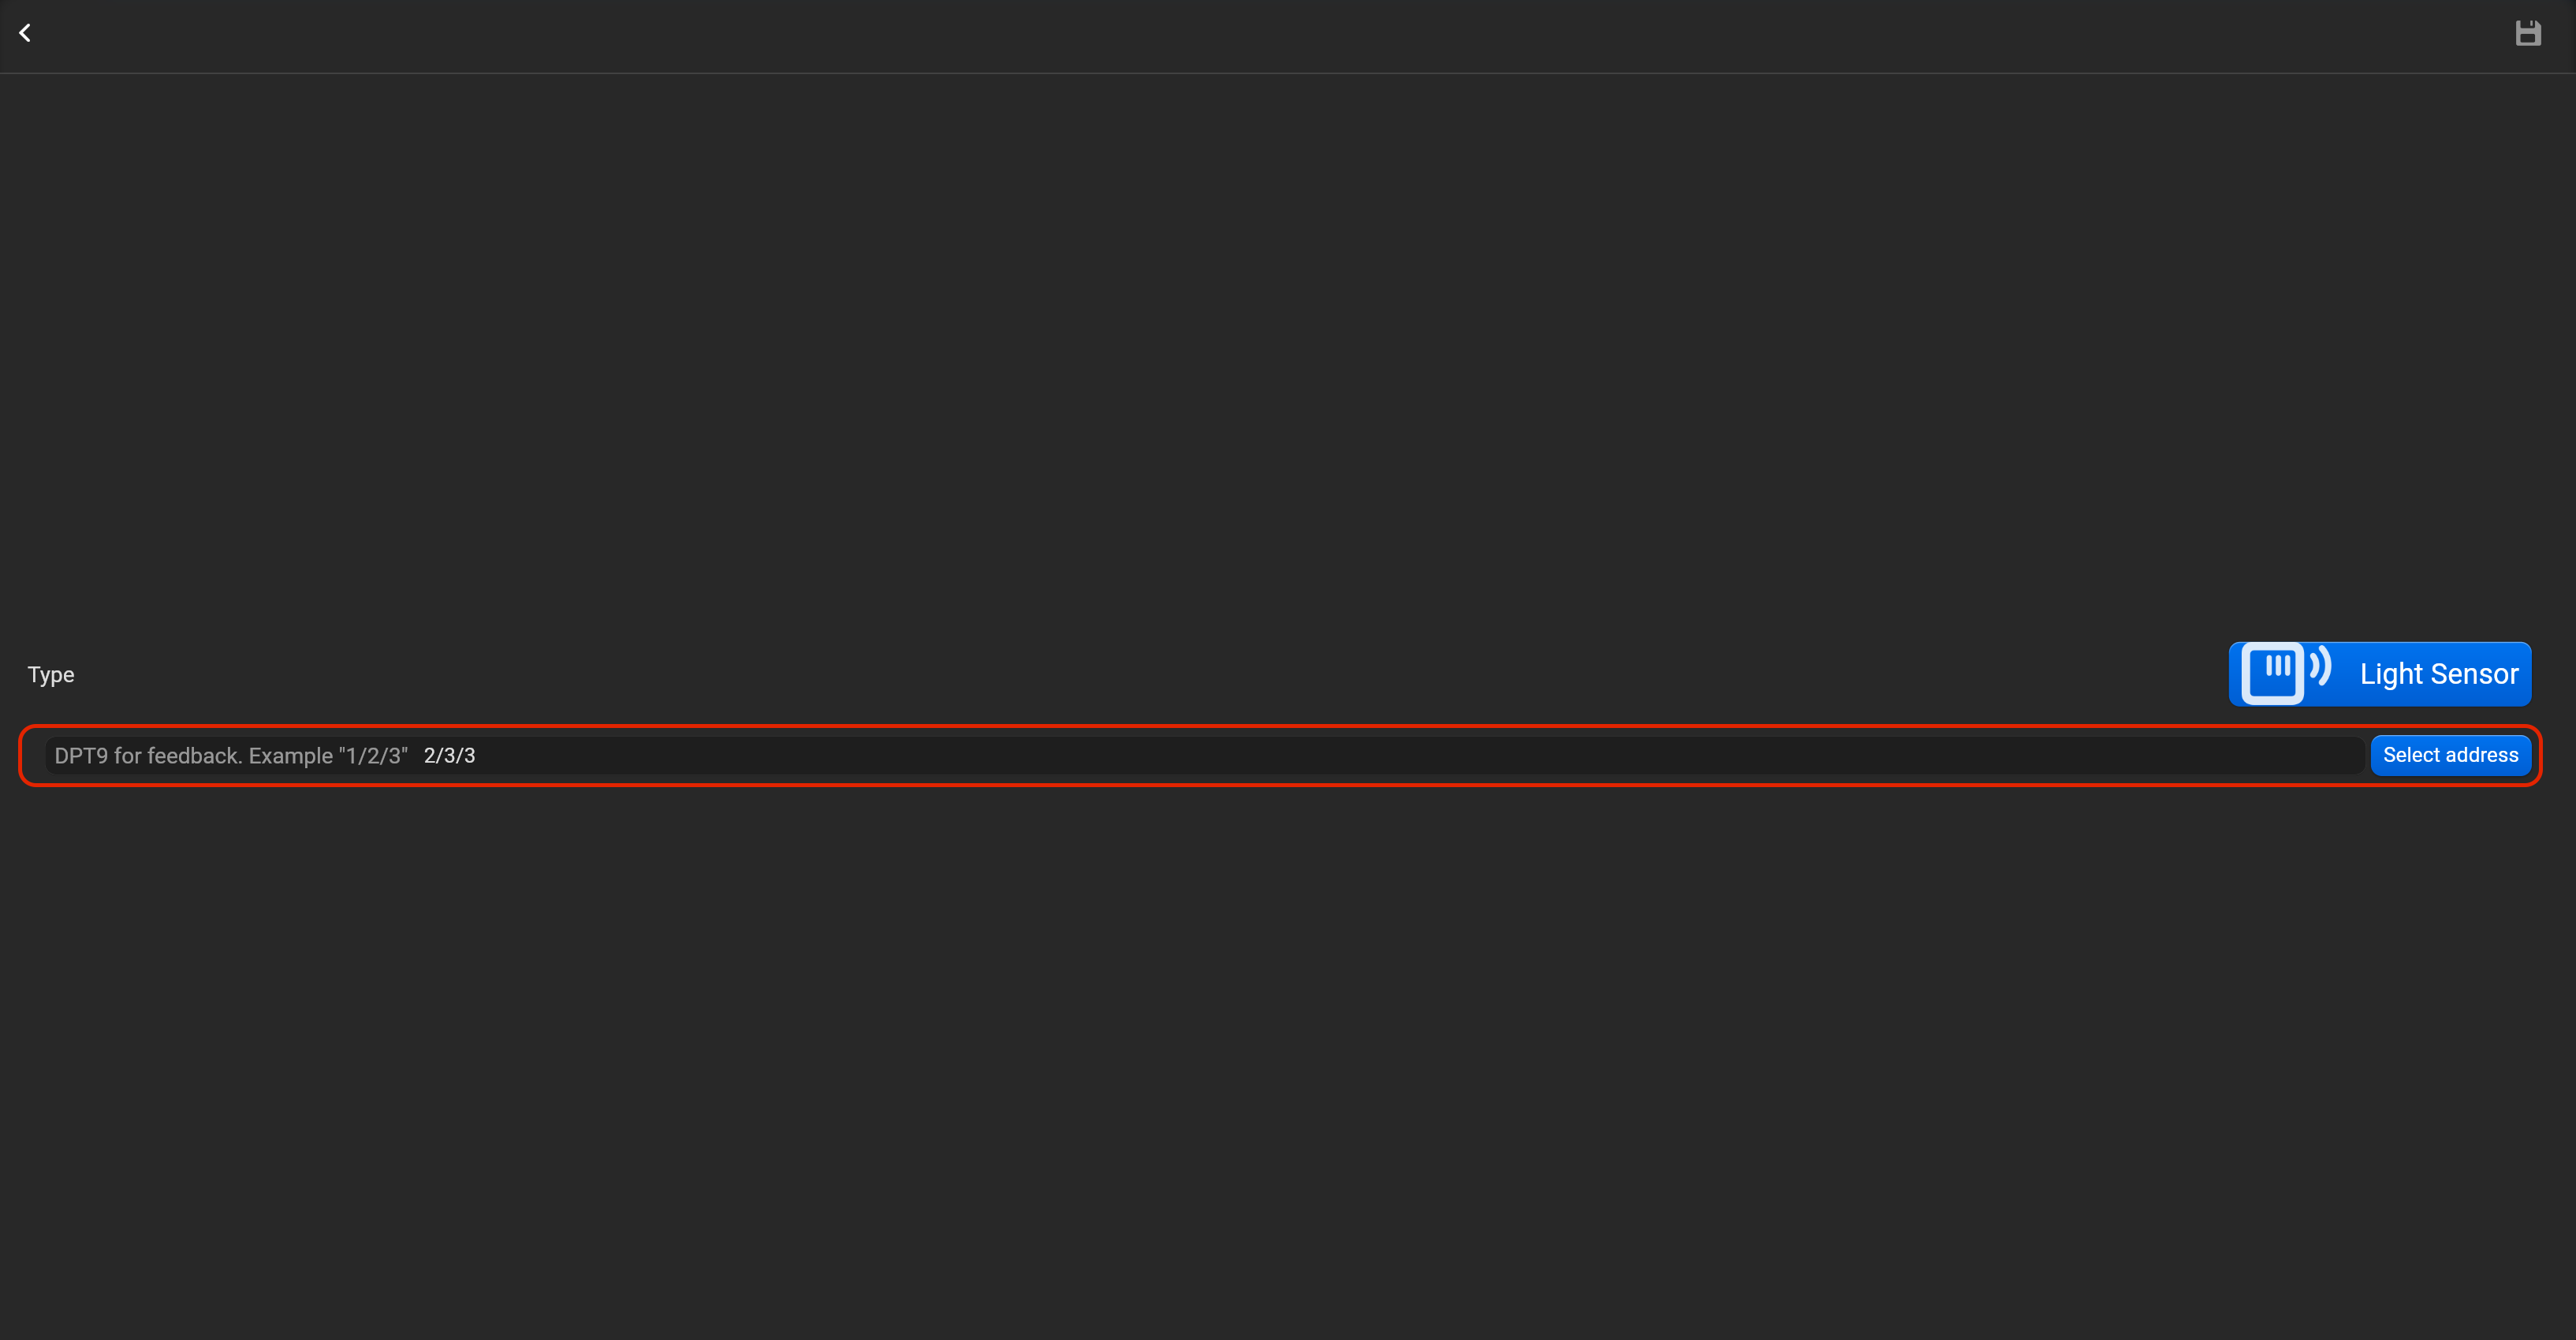
¶ Light sensor
- select the protocol in the drop-down list,
- put the accessory order (affects the location of the accessory in Pyxis app),
- put name of the accessory and for the voice assistants,
- select voice assistants, where the accessory should be displayed,
- select the room, where the accessory will be located,
- select the type of accessory (Light sensor),
- tap on “Setup KNX device” and set DPT9 for feedback.

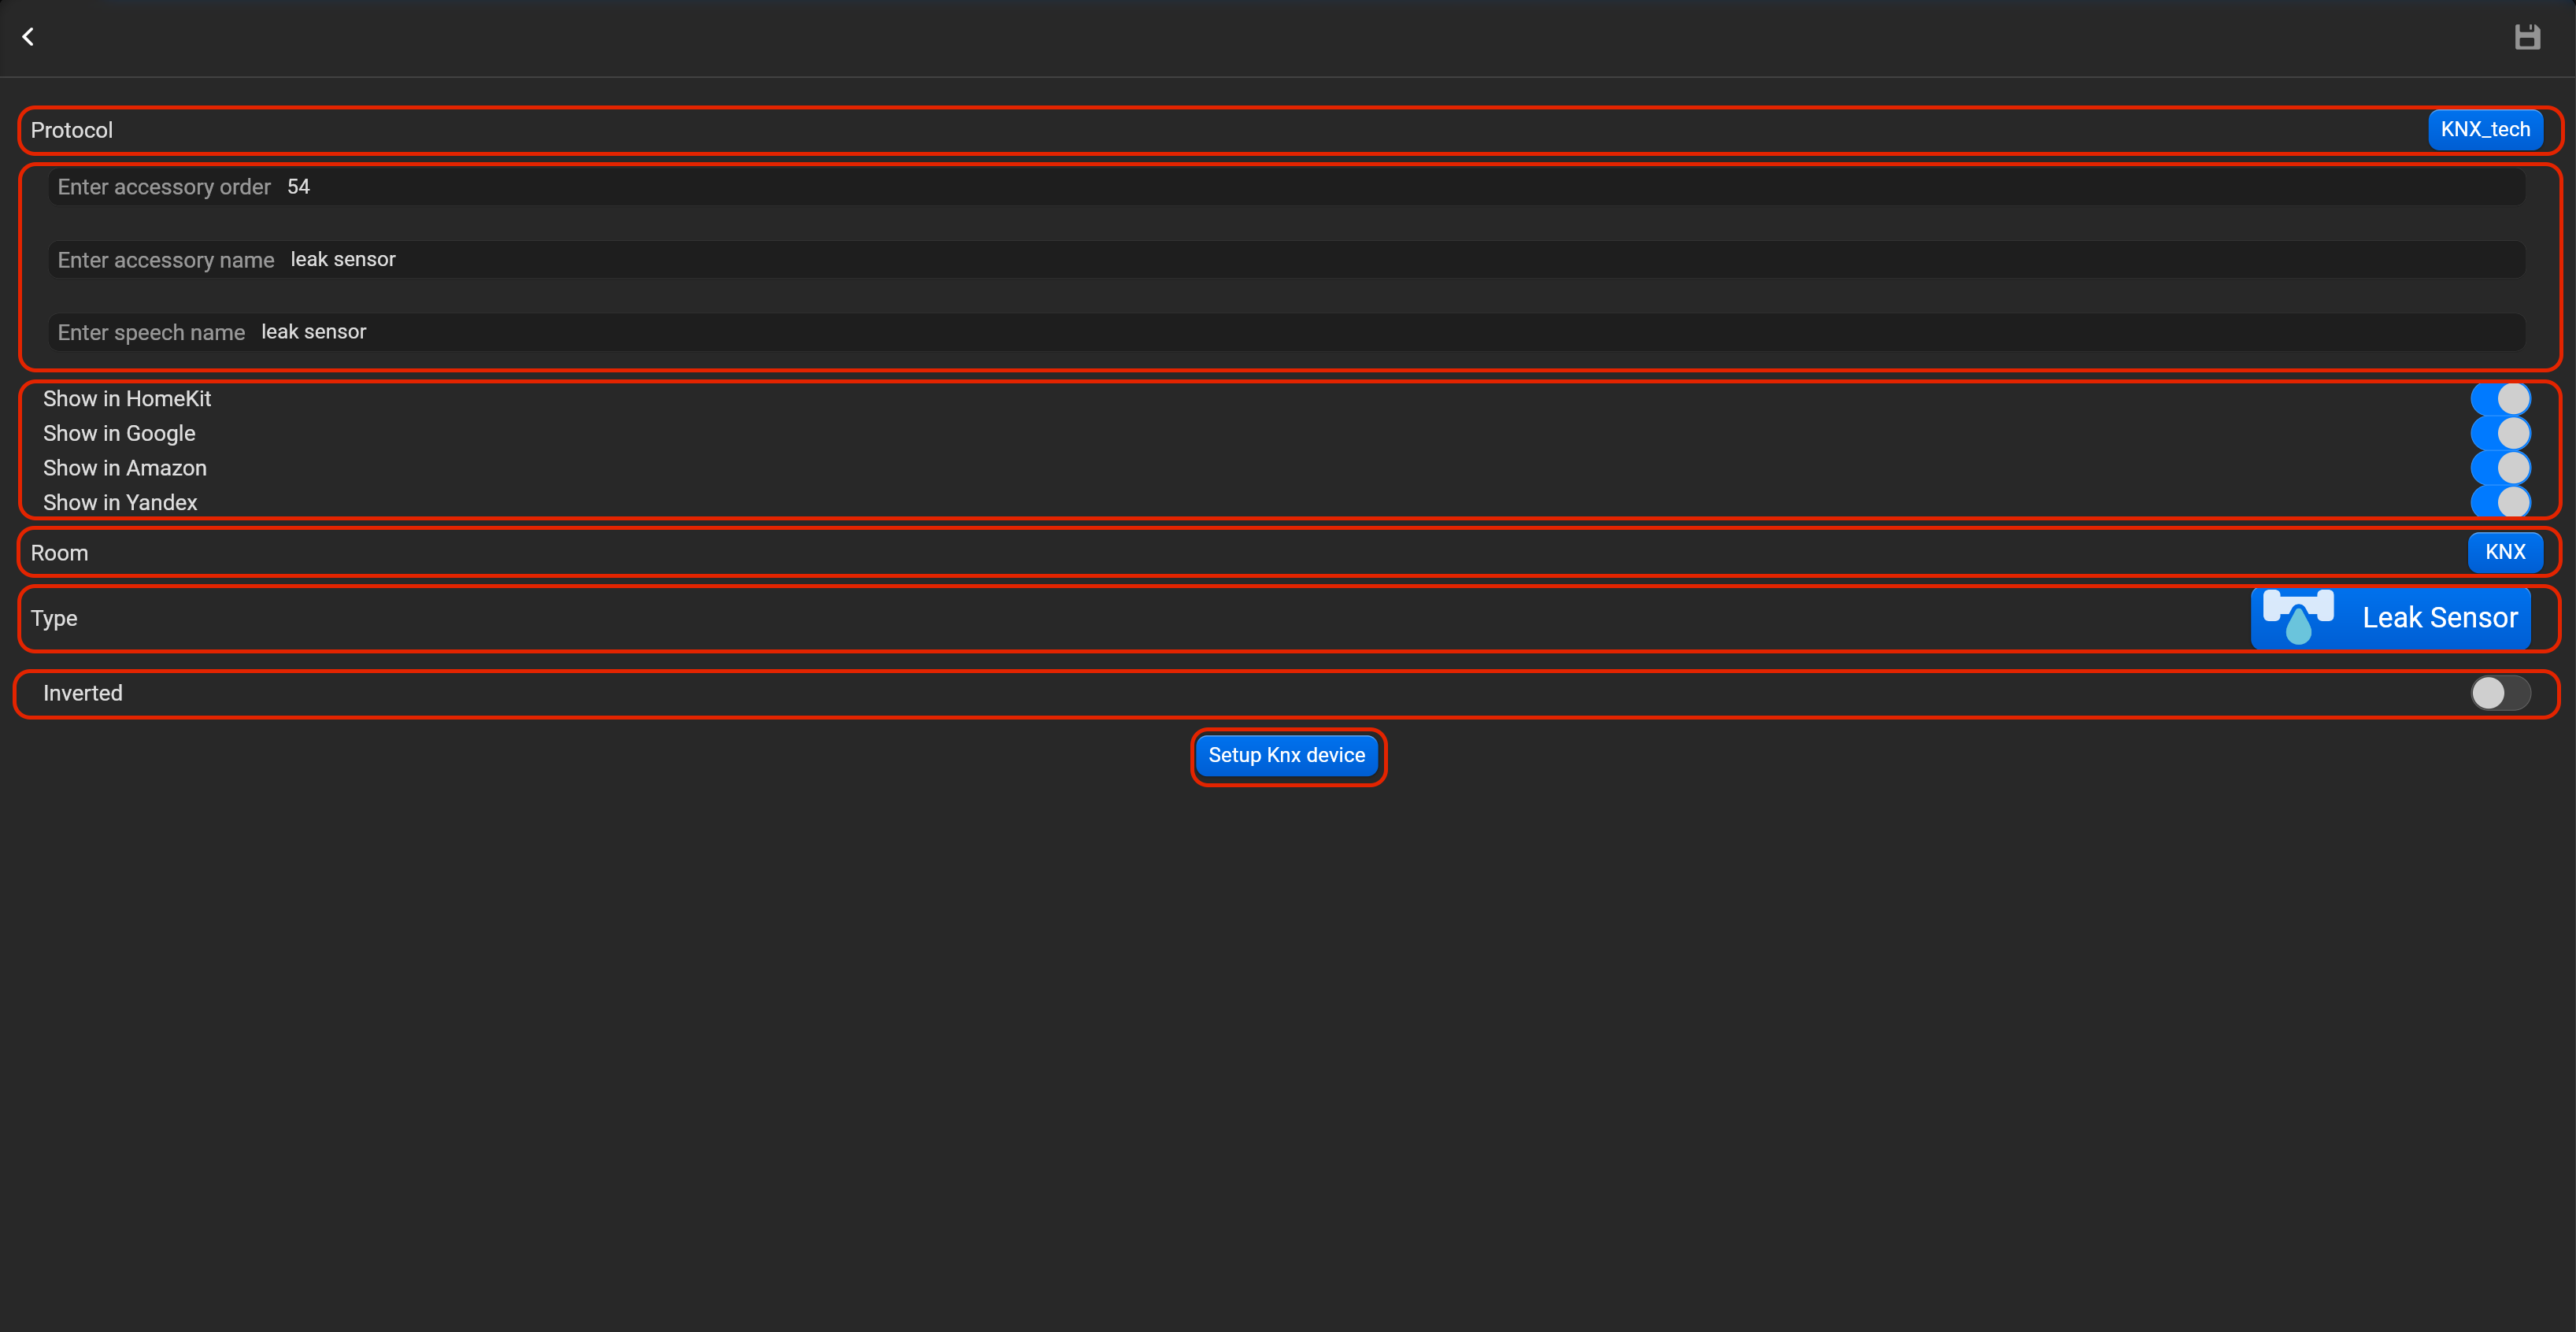
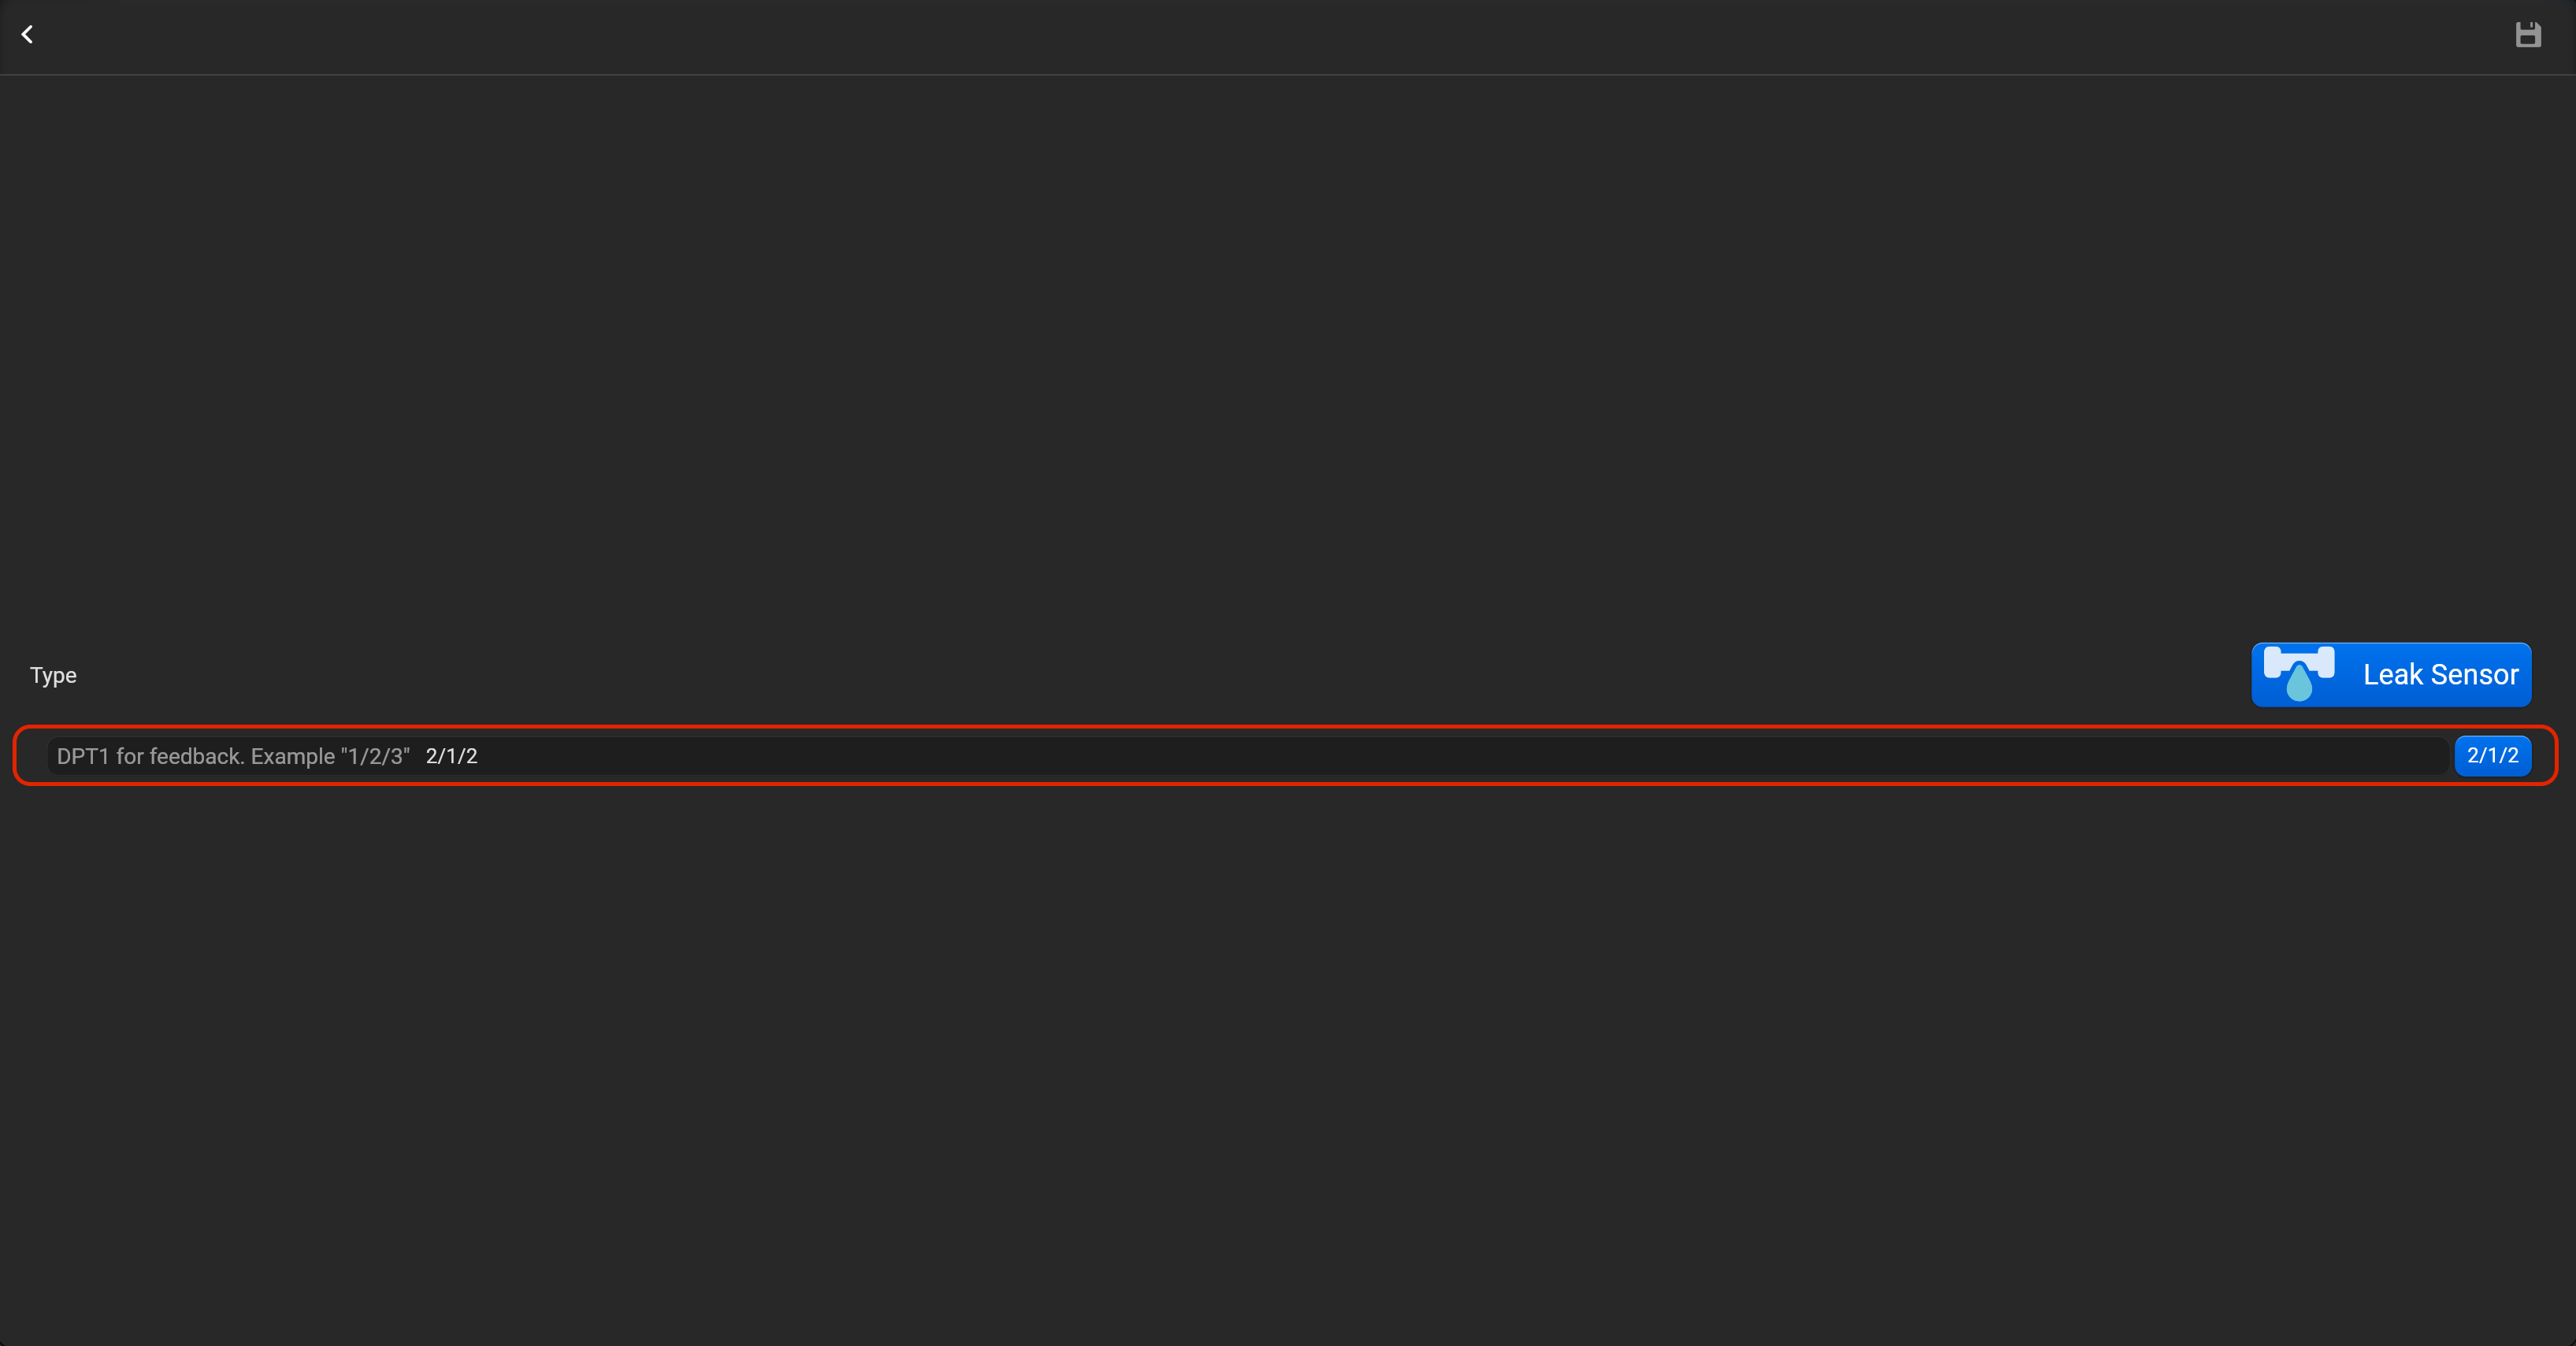
¶ Leak sensor
- select the protocol in the drop-down list,
- put the accessory order (affects the location of the accessory in Pyxis app),
- put name of the accessory and for the voice assistants,
- select voice assistants, where the accessory should be displayed,
- select the room, where the accessory will be located,
- select the type of accessory (Leak sensor),
- tap on “Setup KNX device” and set DPT1 for feedback. You can invert value of this accessory.
¶ Smoke sensor
- select the protocol in the drop-down list,
- put the accessory order (affects the location of the accessory in Pyxis app),
- put name of the accessory and for the voice assistants,
- select voice assistants, where the accessory should be displayed,
- select the room, where the accessory will be located,
- select the type of accessory (Smoke sensor),
- tap on “Setup KNX device” and set DPT1 for feedback. You can invert value of this accessory.


¶ Motion sensor
- select the protocol in the drop-down list,
- put the accessory order (affects the location of the accessory in Pyxis app),
- put name of the accessory and for the voice assistants,
- select voice assistants, where the accessory should be displayed,
- select the room, where the accessory will be located,
- select the type of accessory (Motion sensor),
- tap on “Setup KNX device” and set DPT1 for feedback.


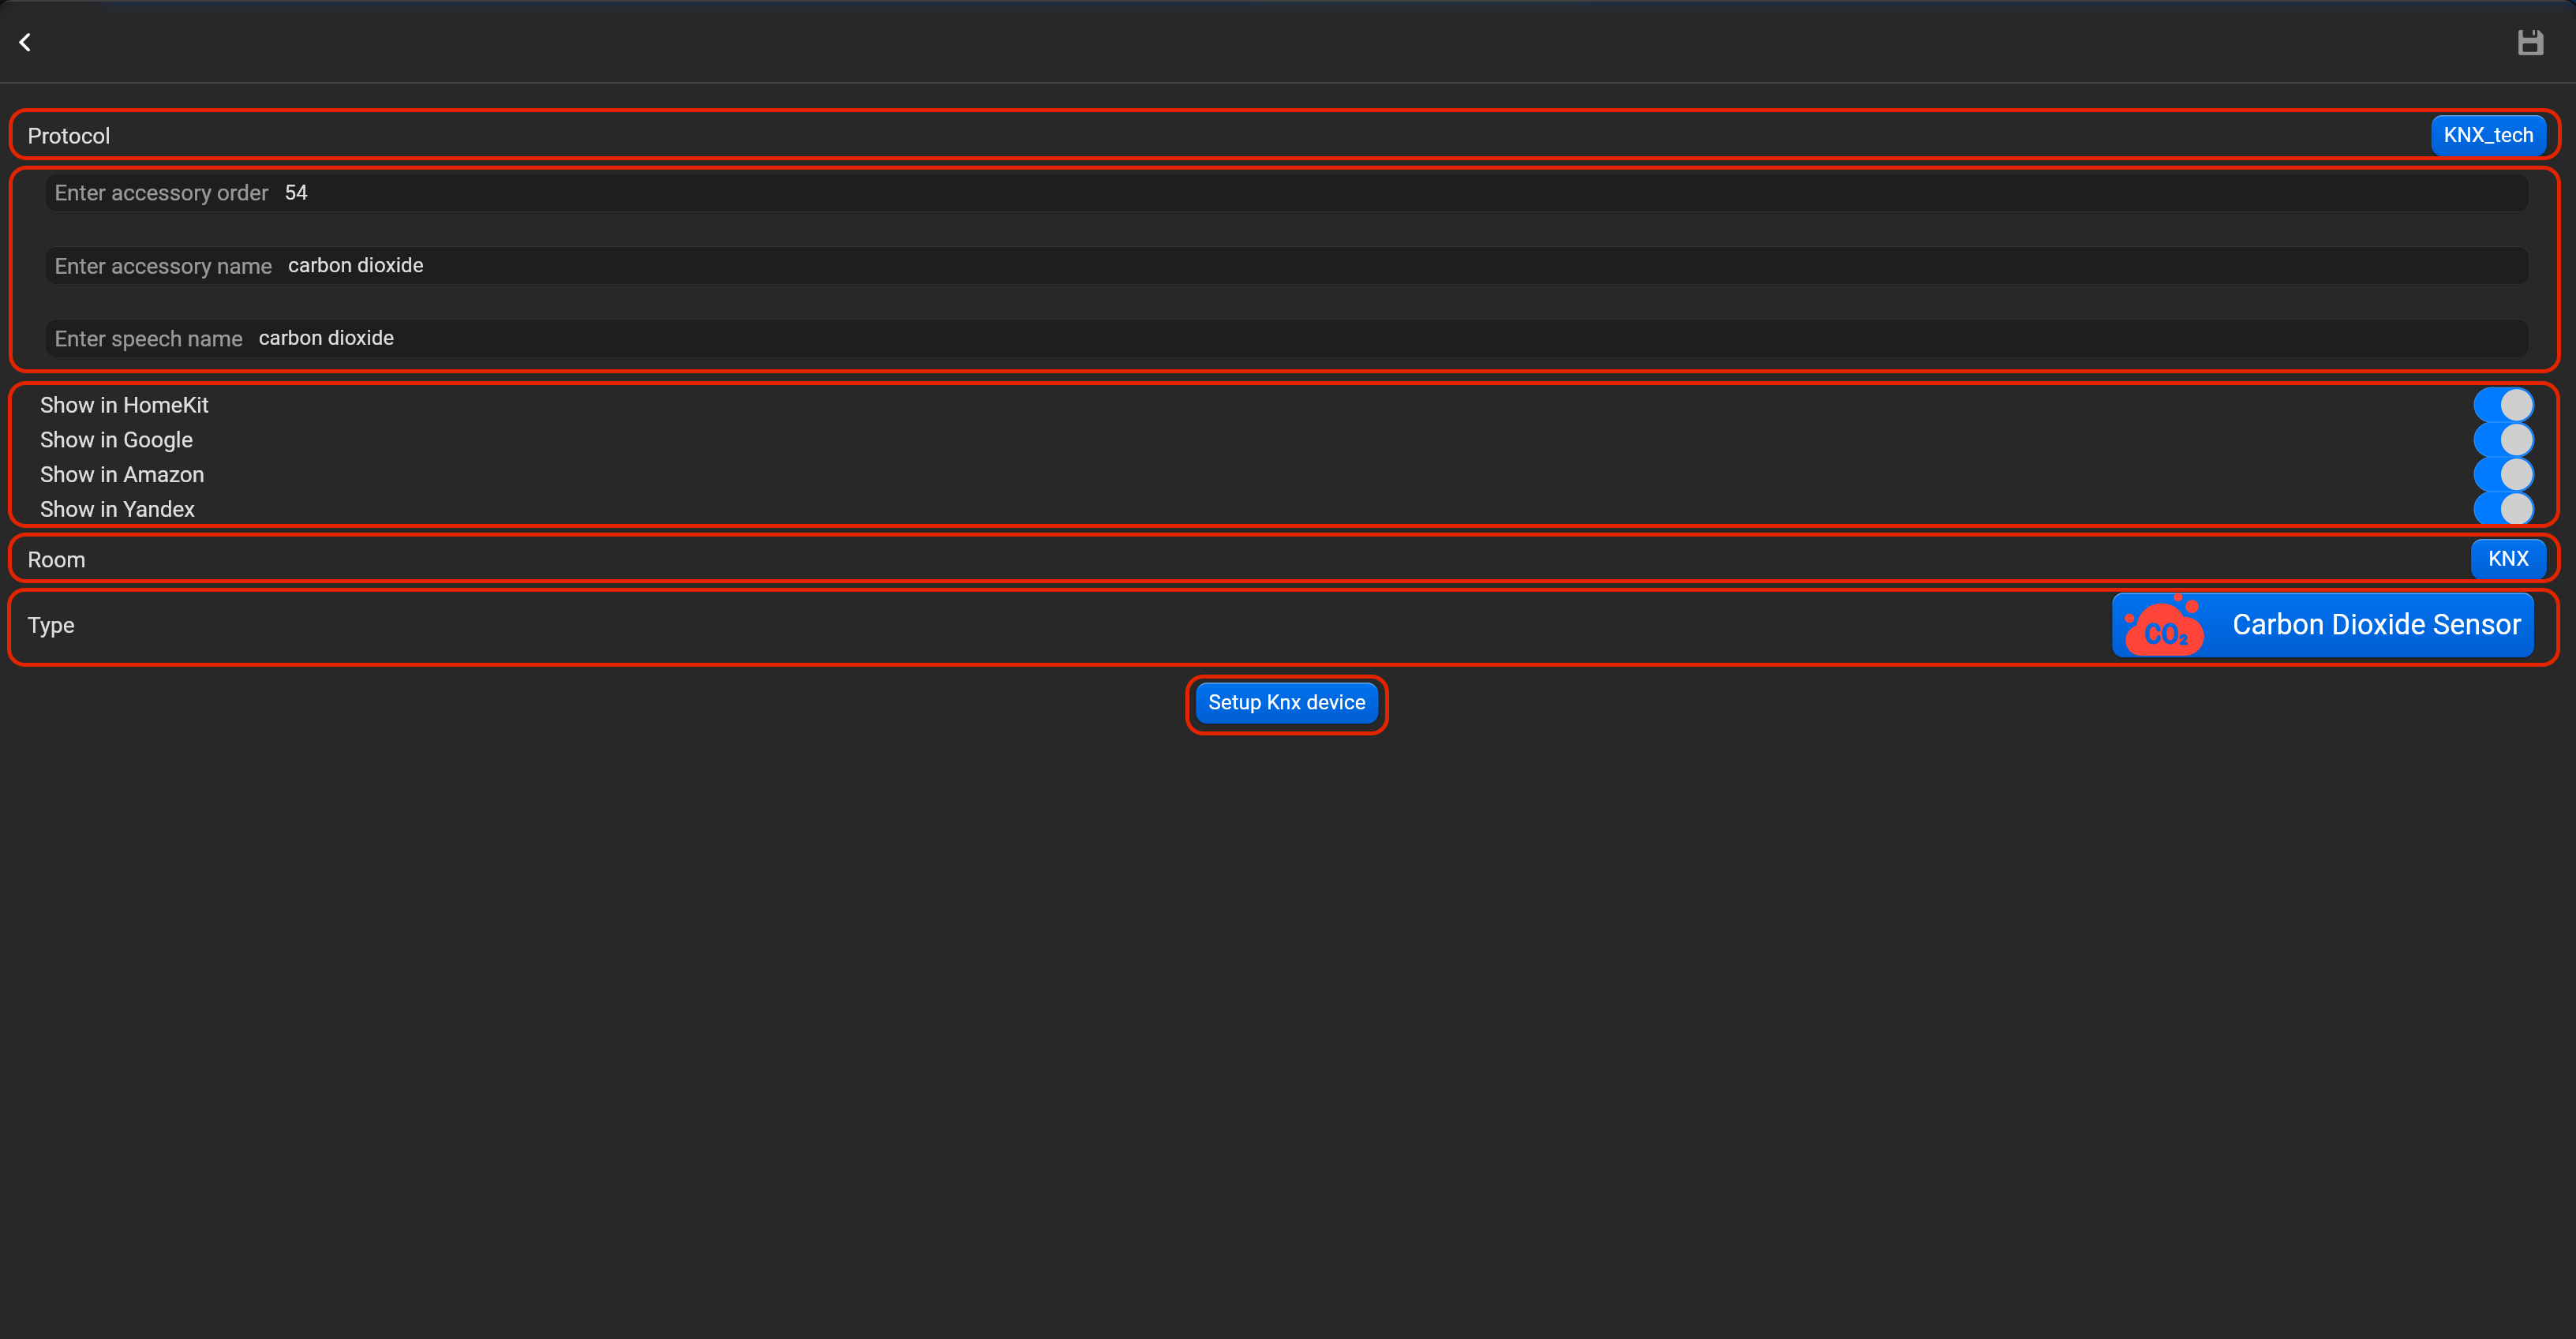
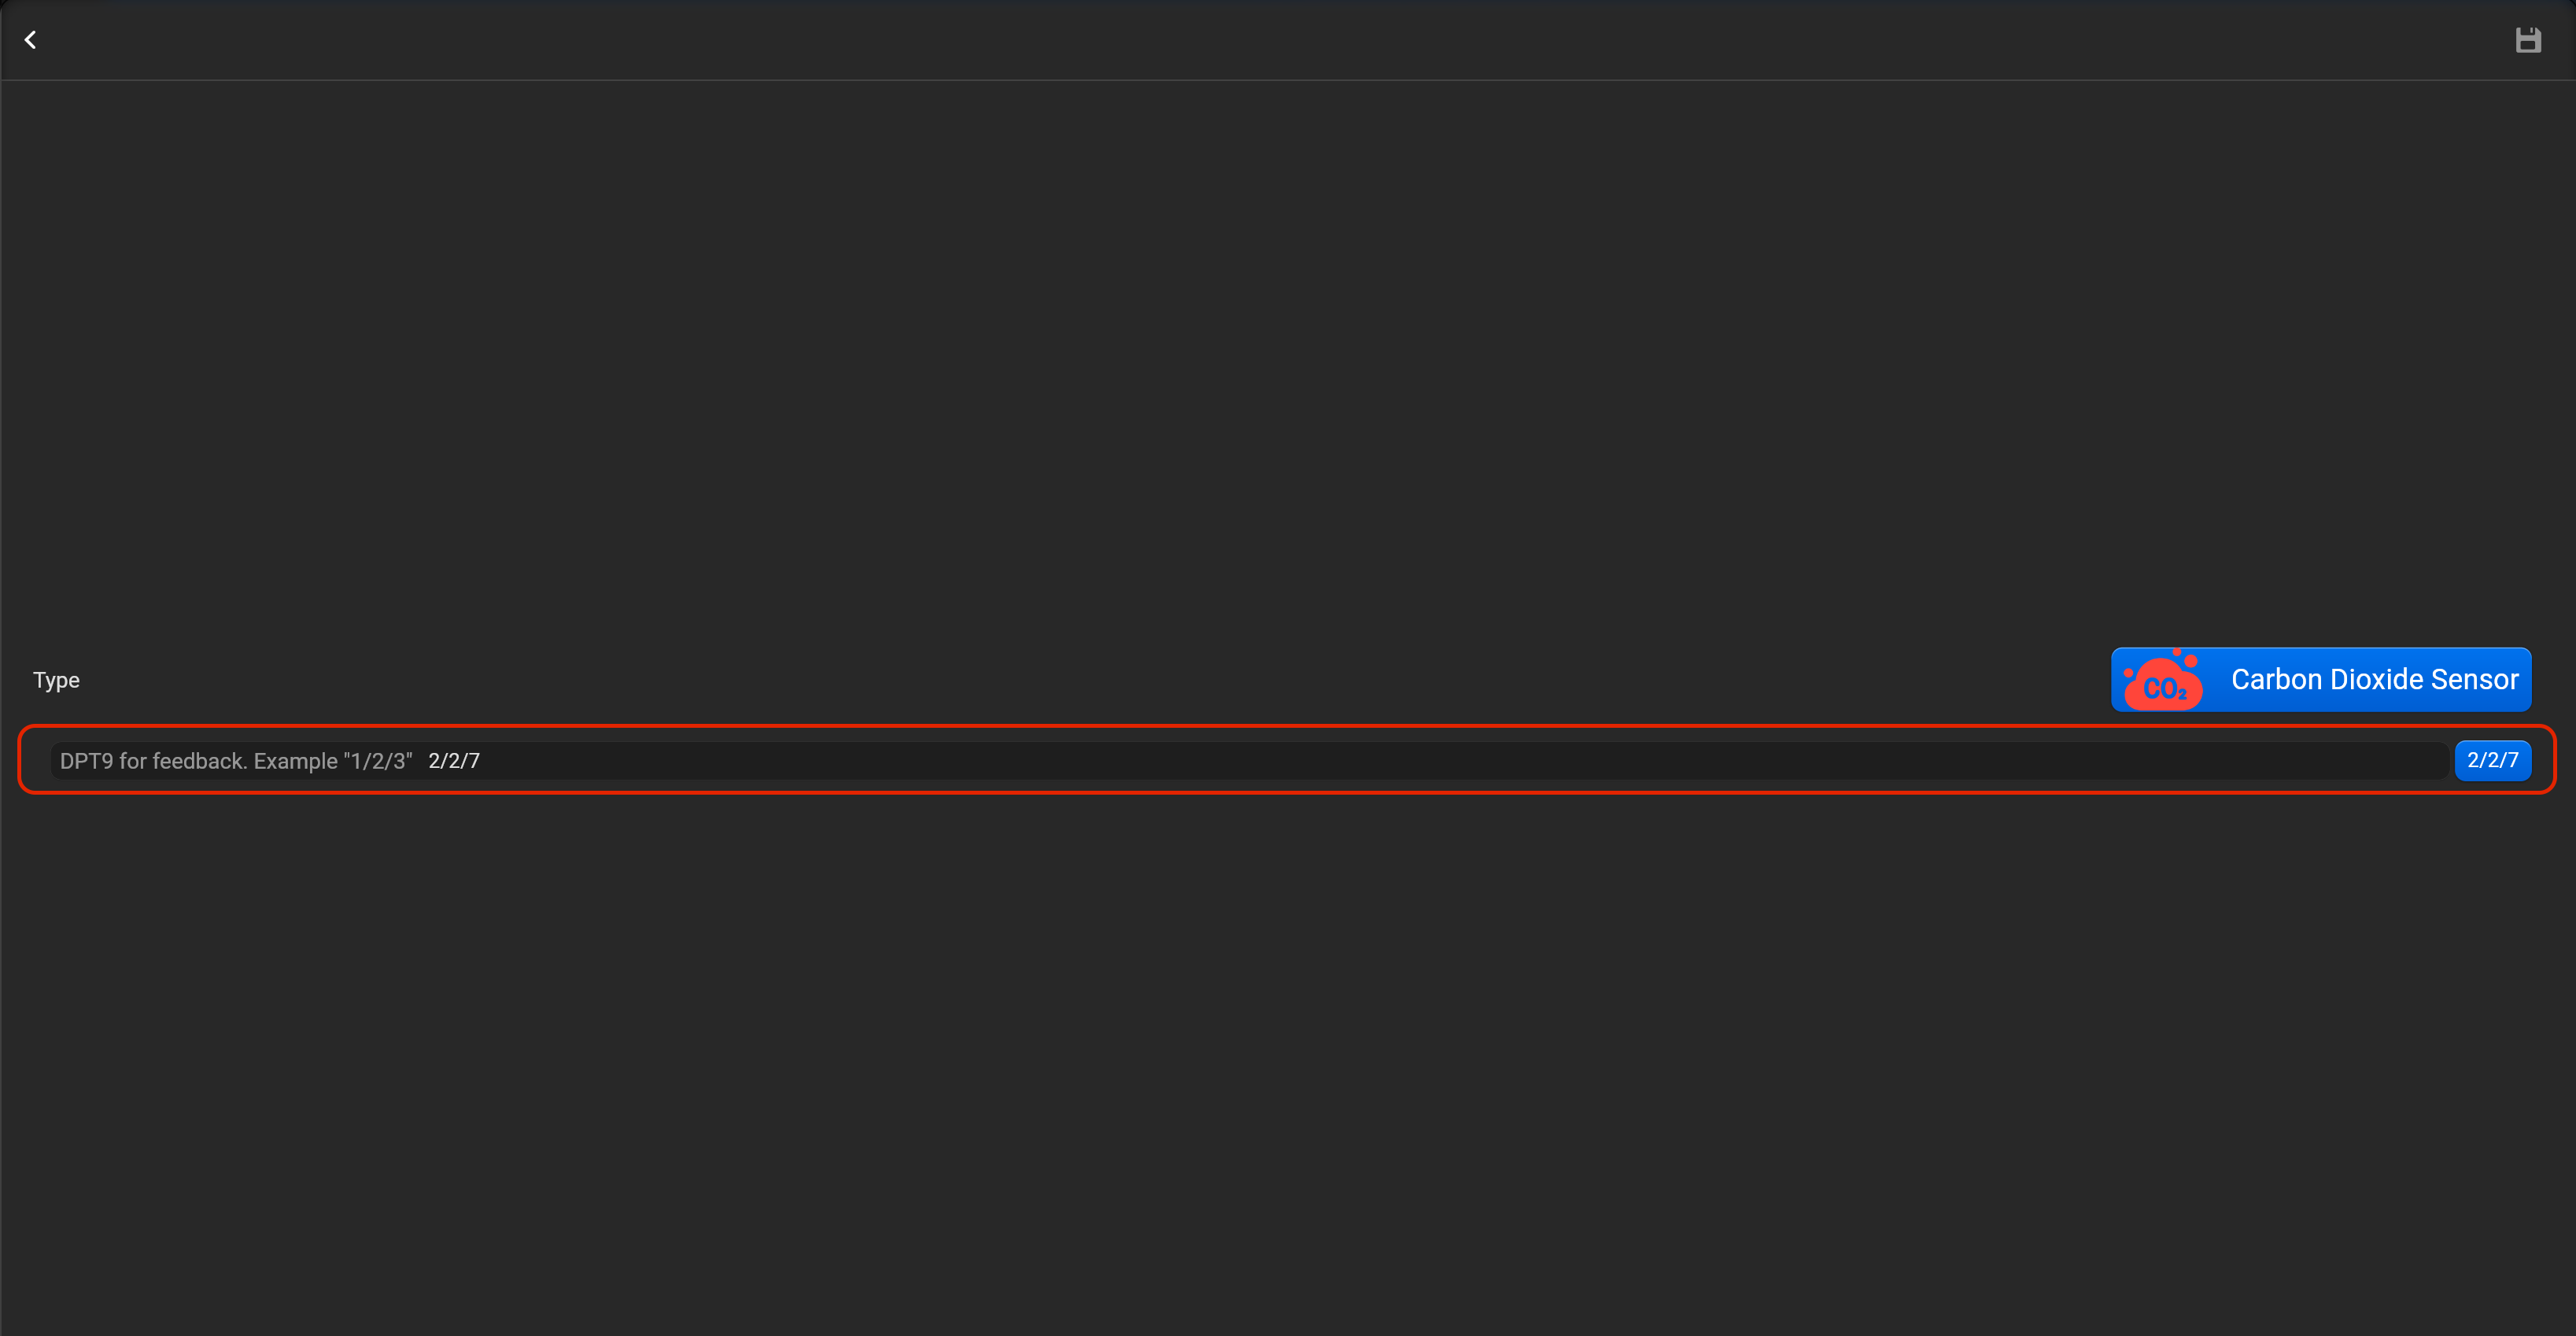
¶ Carbon dioxide sensor
- select the protocol in the drop-down list,
- put the accessory order (affects the location of the accessory in Pyxis app),
- put name of the accessory and for the voice assistants,
- select voice assistants, where the accessory should be displayed,
- select the room, where the accessory will be located,
- select the type of accessory (Carbon dioxide sensor),
- tap on “Setup KNX device” and set DPT9 for feedback.
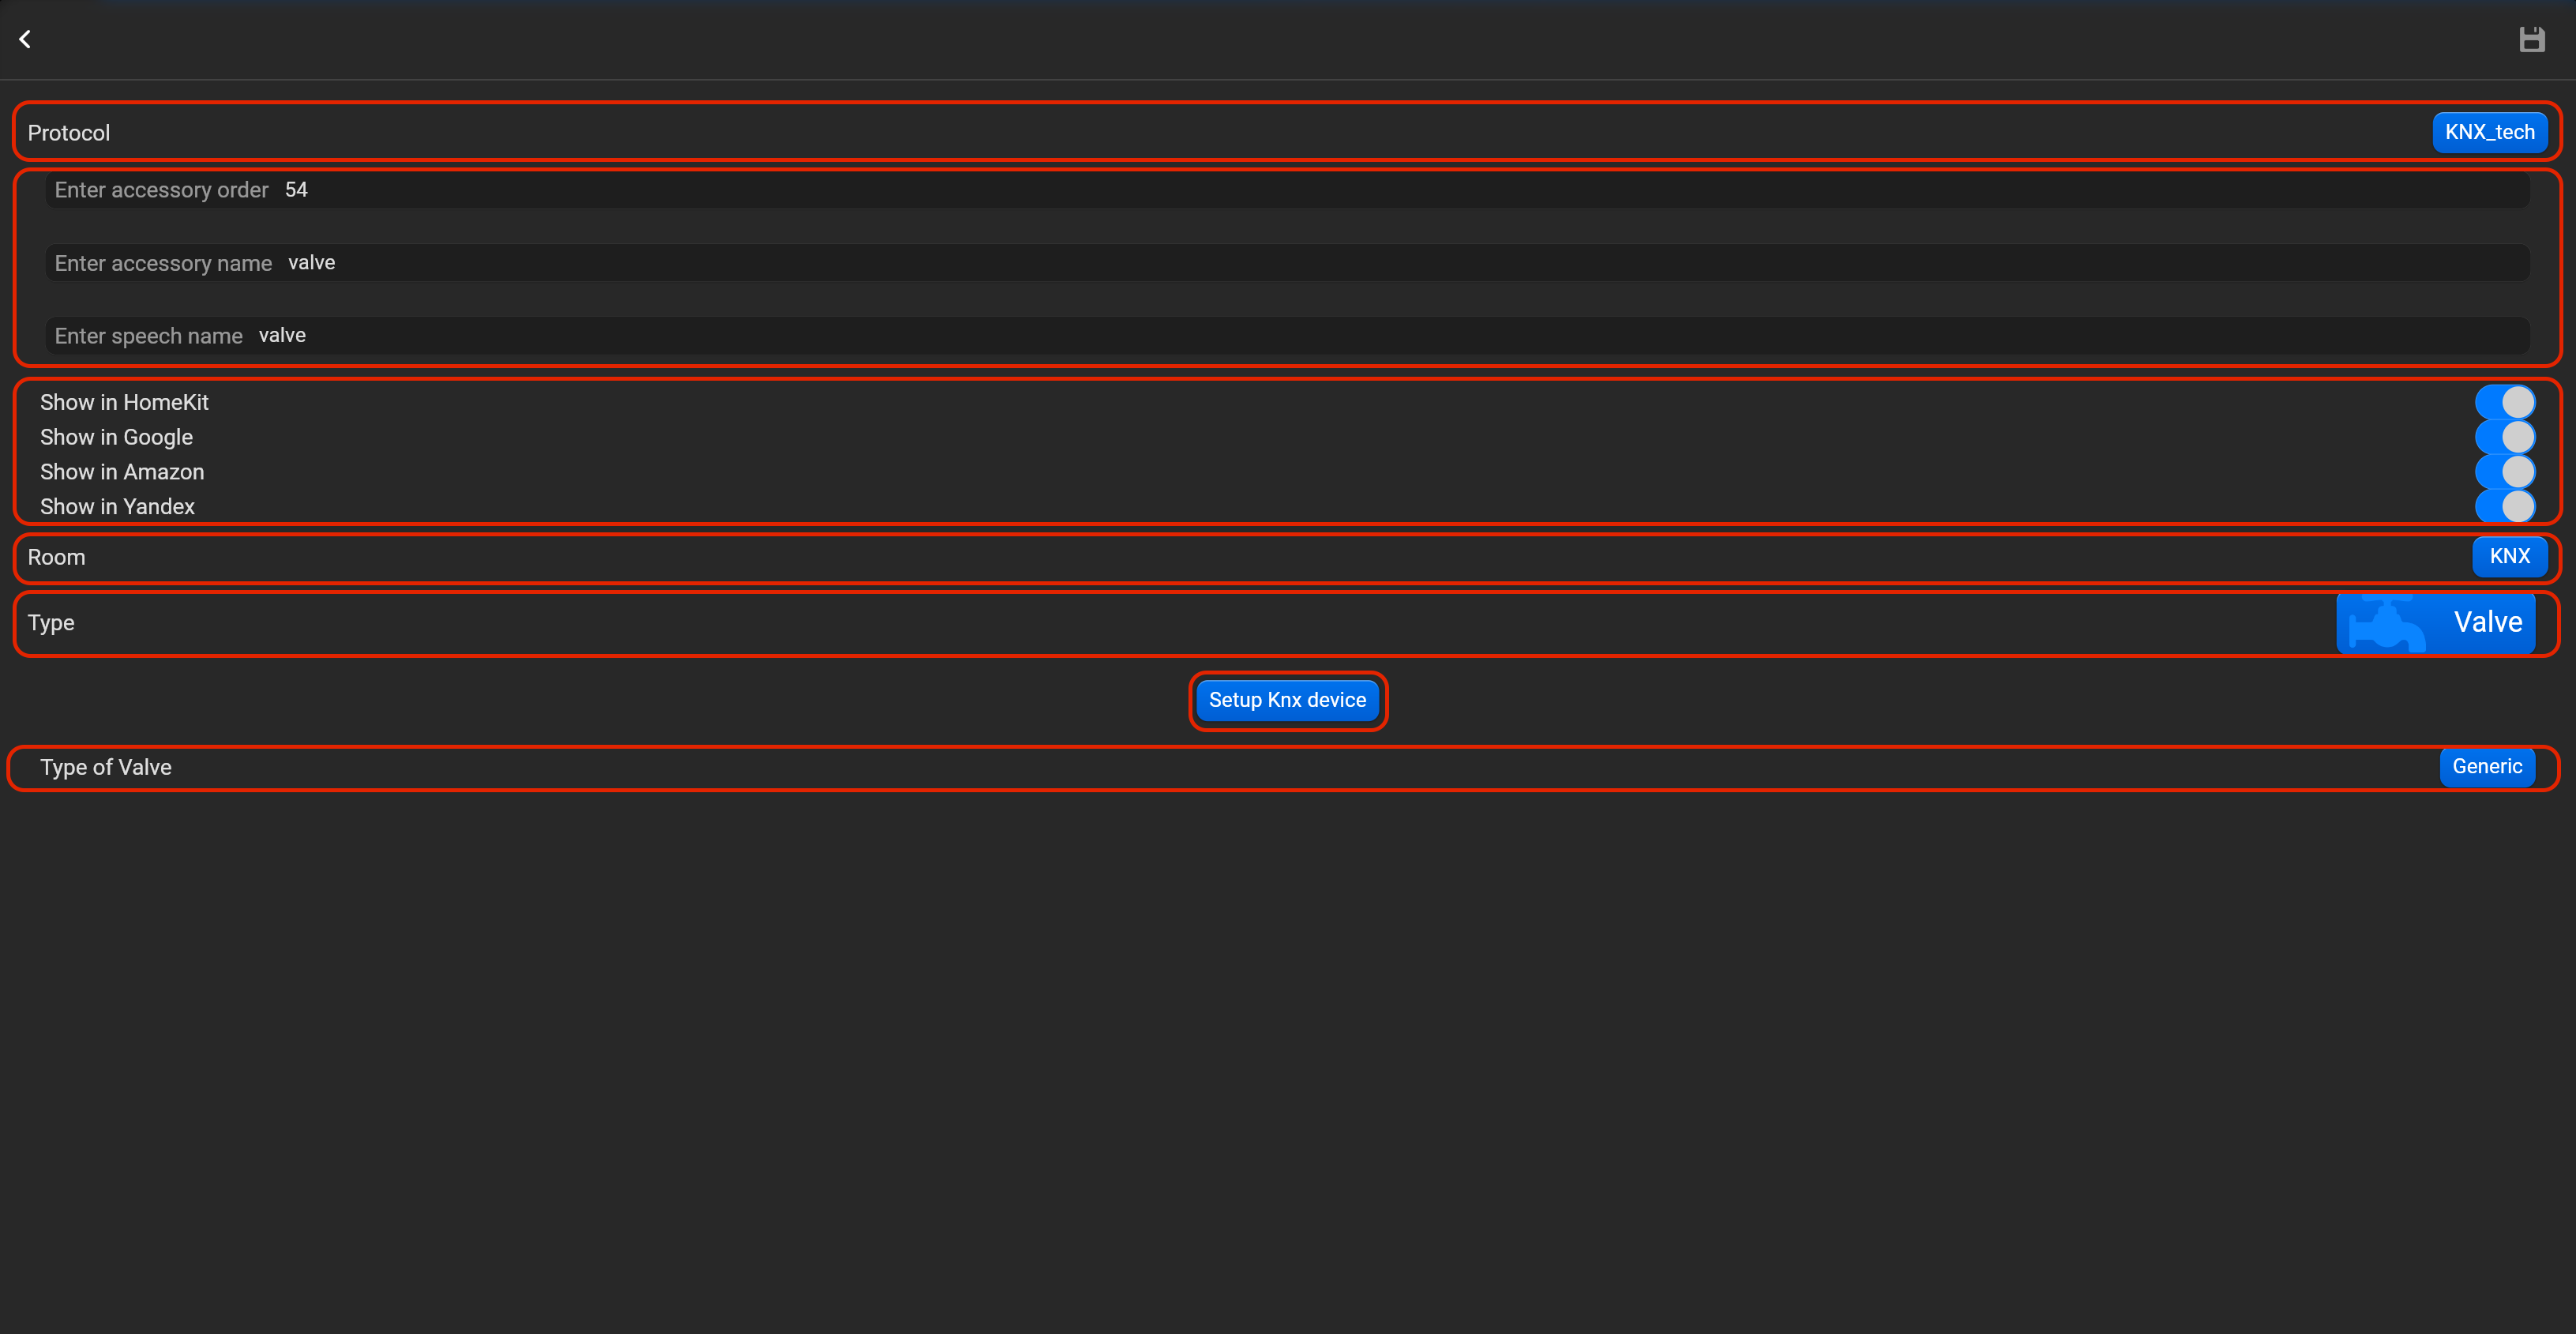
¶ Valve
- select the protocol in the drop-down list,
- put the accessory order (affects the location of the accessory in Pyxis app),
- put name of the accessory and for the voice assistants,
- select voice assistants, where the accessory should be displayed,
- select the room, where the accessory will be located,
- select the type of accessory (Valve),
- tap on “Setup KNX device”, set DPT1 for control and DPT1 for feedback and valve type (Generic, irrgation, shower, faucet).
¶ Modbus
Please, find below, examples for every supported type of accessory. Do not forget save all changes and restart Pyxis.
¶ Lightbulb relay
- select the protocol in the drop-down list,
- put the accessory order (affects the location of the accessory in Pyxis app),
- put name of the accessory and for the voice assistants,
- select voice assistants, where the accessory should be displayed,
- select the room, where the accessory will be located,
- select the type of accessory (Lightbulb relay),
- tap on “Setup Modbus device”, set Modbus connection type (enable for Modbus TCP/IP or disable for Modbus Serial), device address, read timer and coil.


¶ Lightbulb RGB
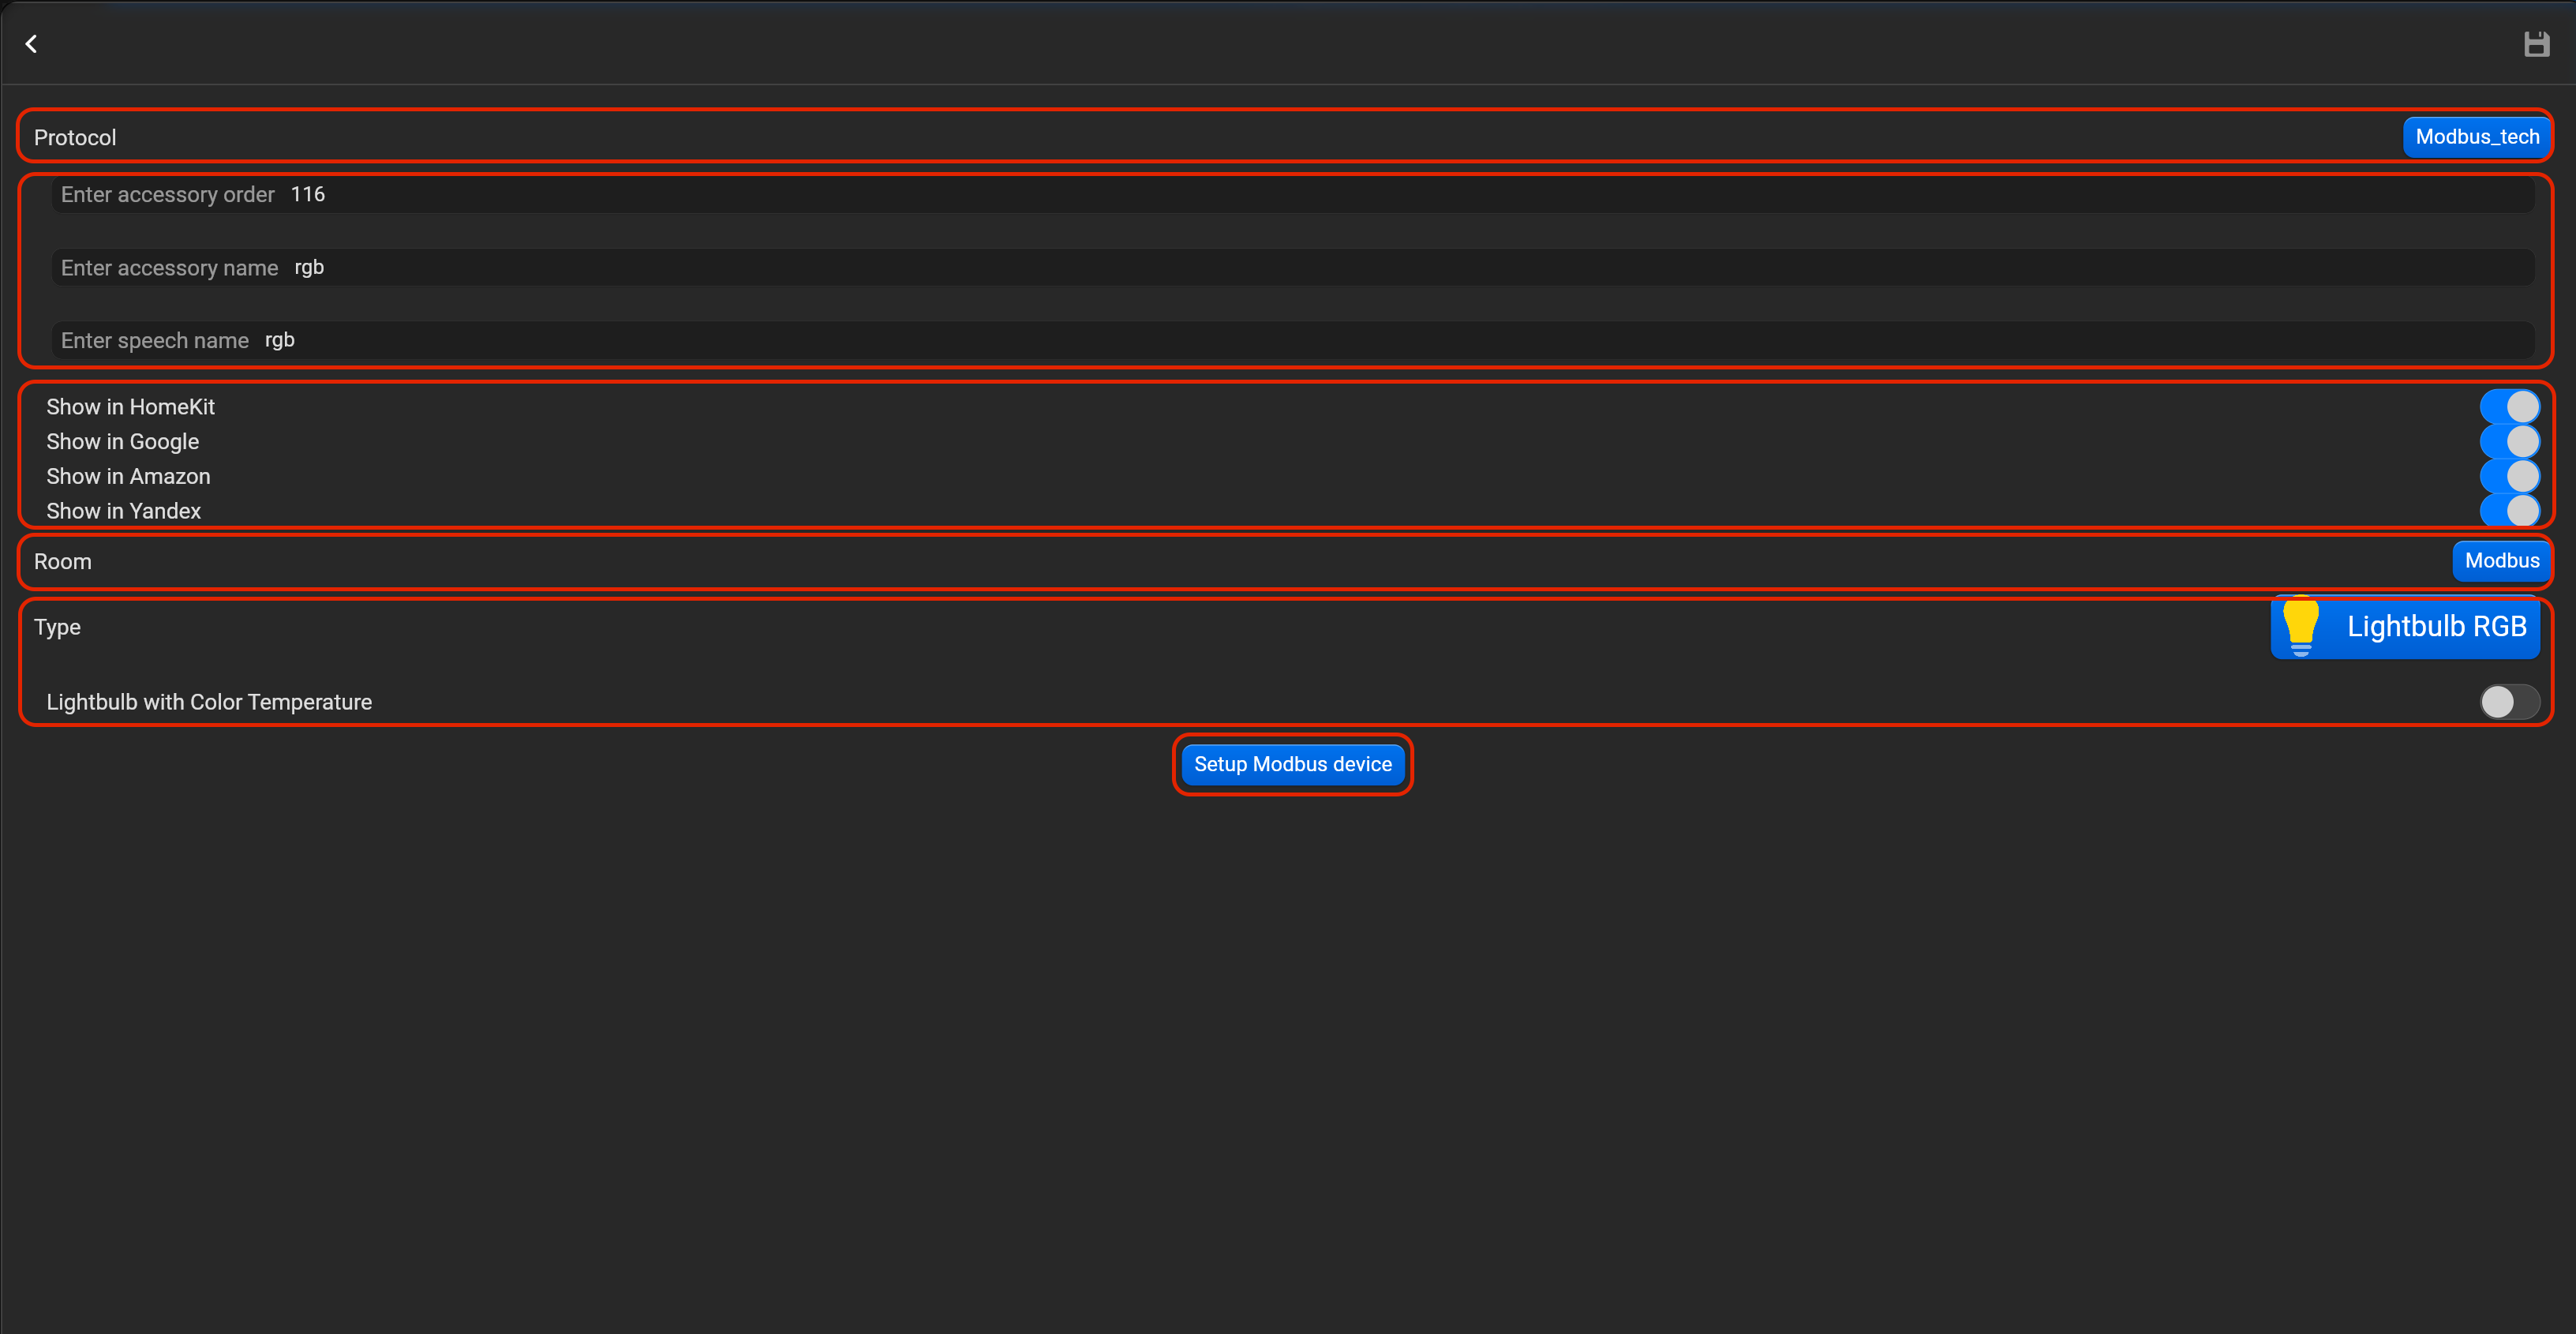
- select the protocol in the drop-down list,
- put the accessory order (affects the location of the accessory in Pyxis app),
- put name of the accessory and for the voice assistants,
- select voice assistants, where the accessory should be displayed,
- select the room, where the accessory will be located,
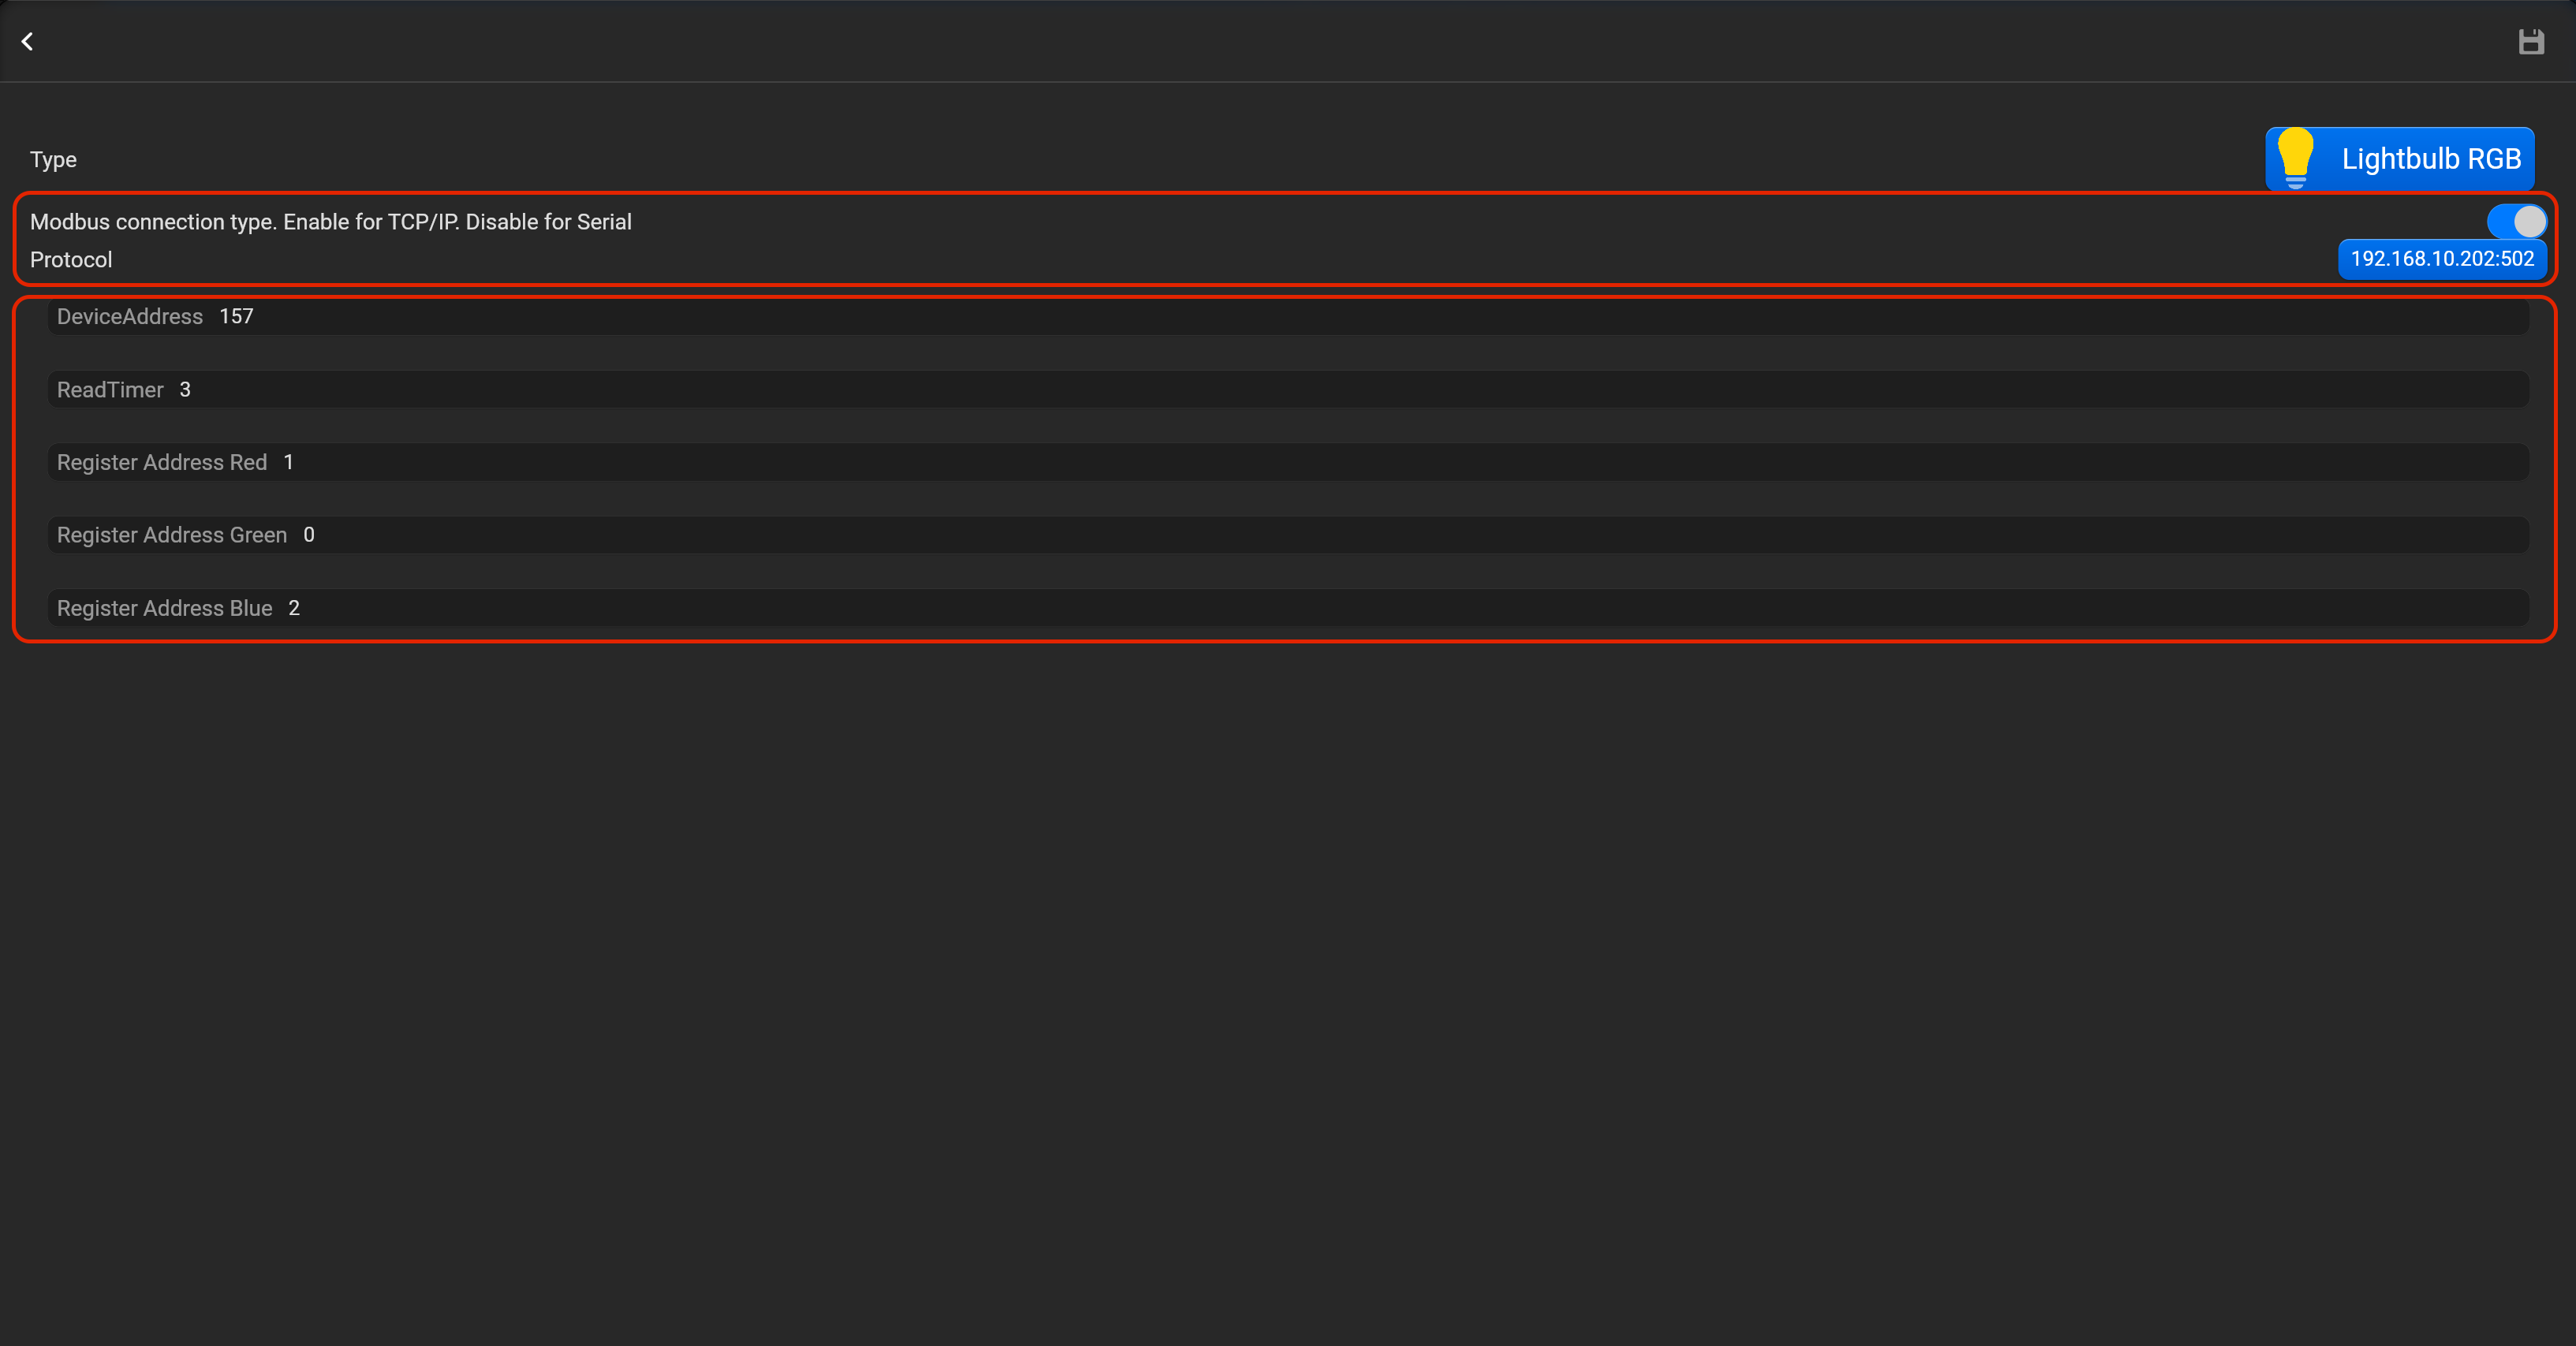
- select the type of accessory (Lightbulb RGB),
- tap on “Setup Modbus device”, set Modbus connection type (enable for Modbus TCP/IP or disable for Modbus Serial), device address, read timer and register addresses for red, green and blue.
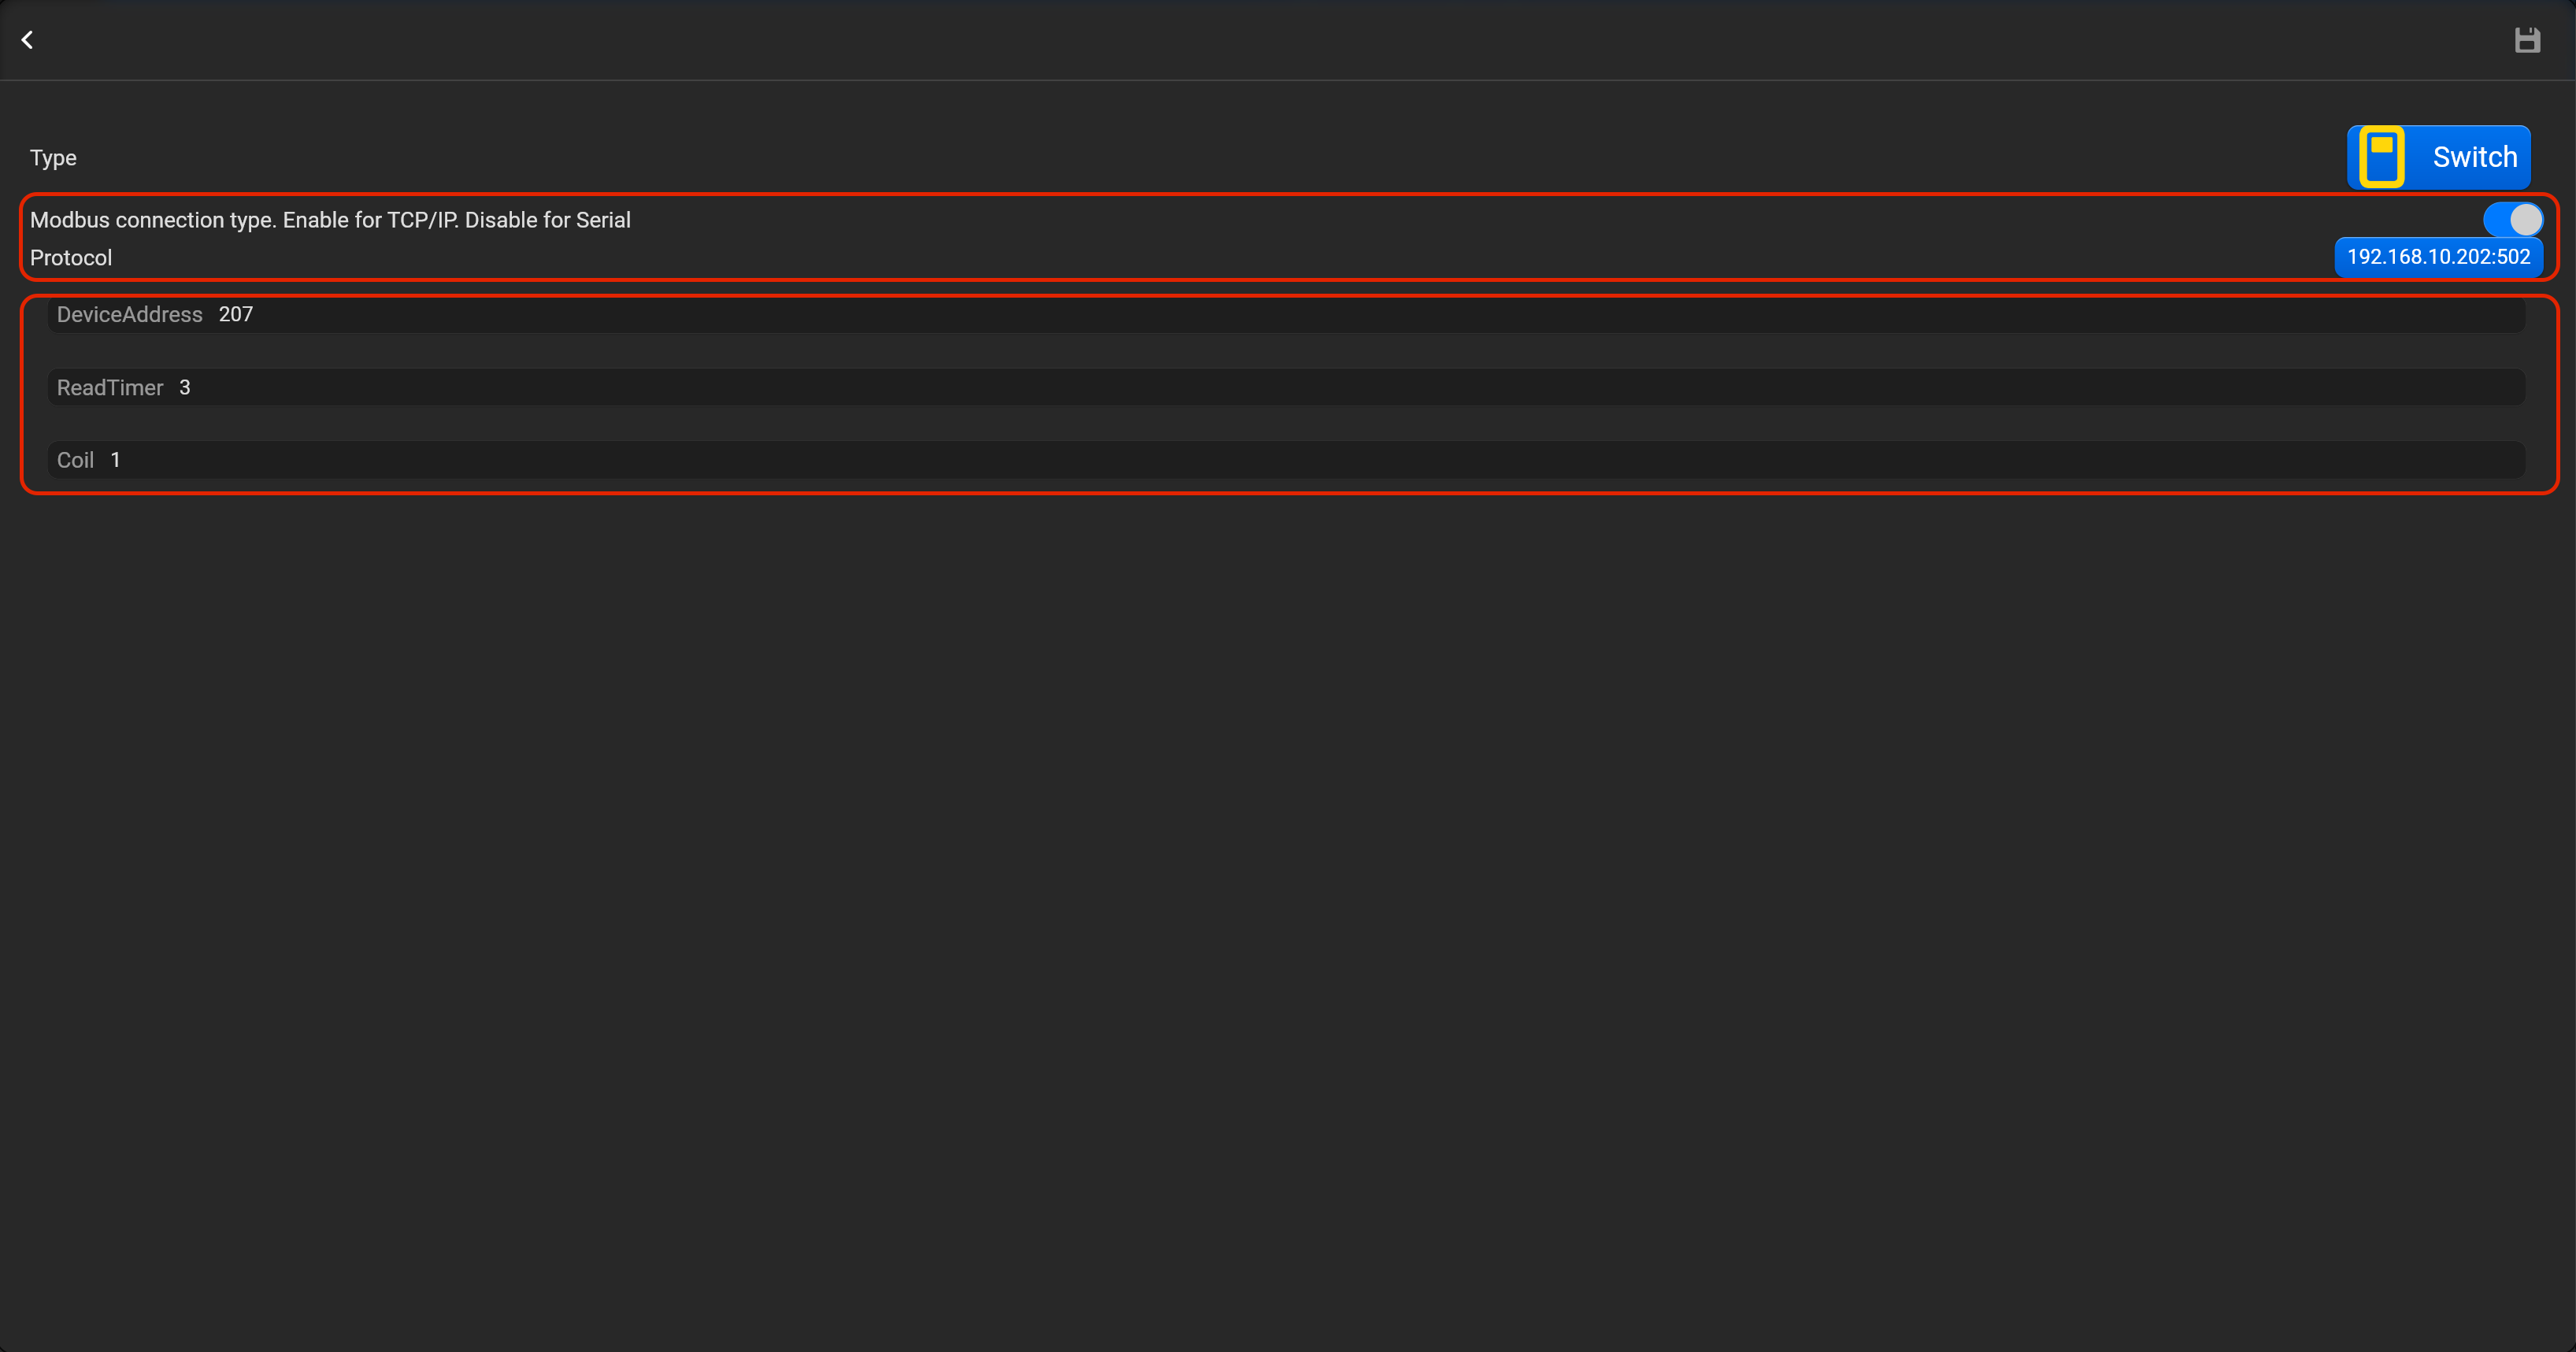
¶ Switch
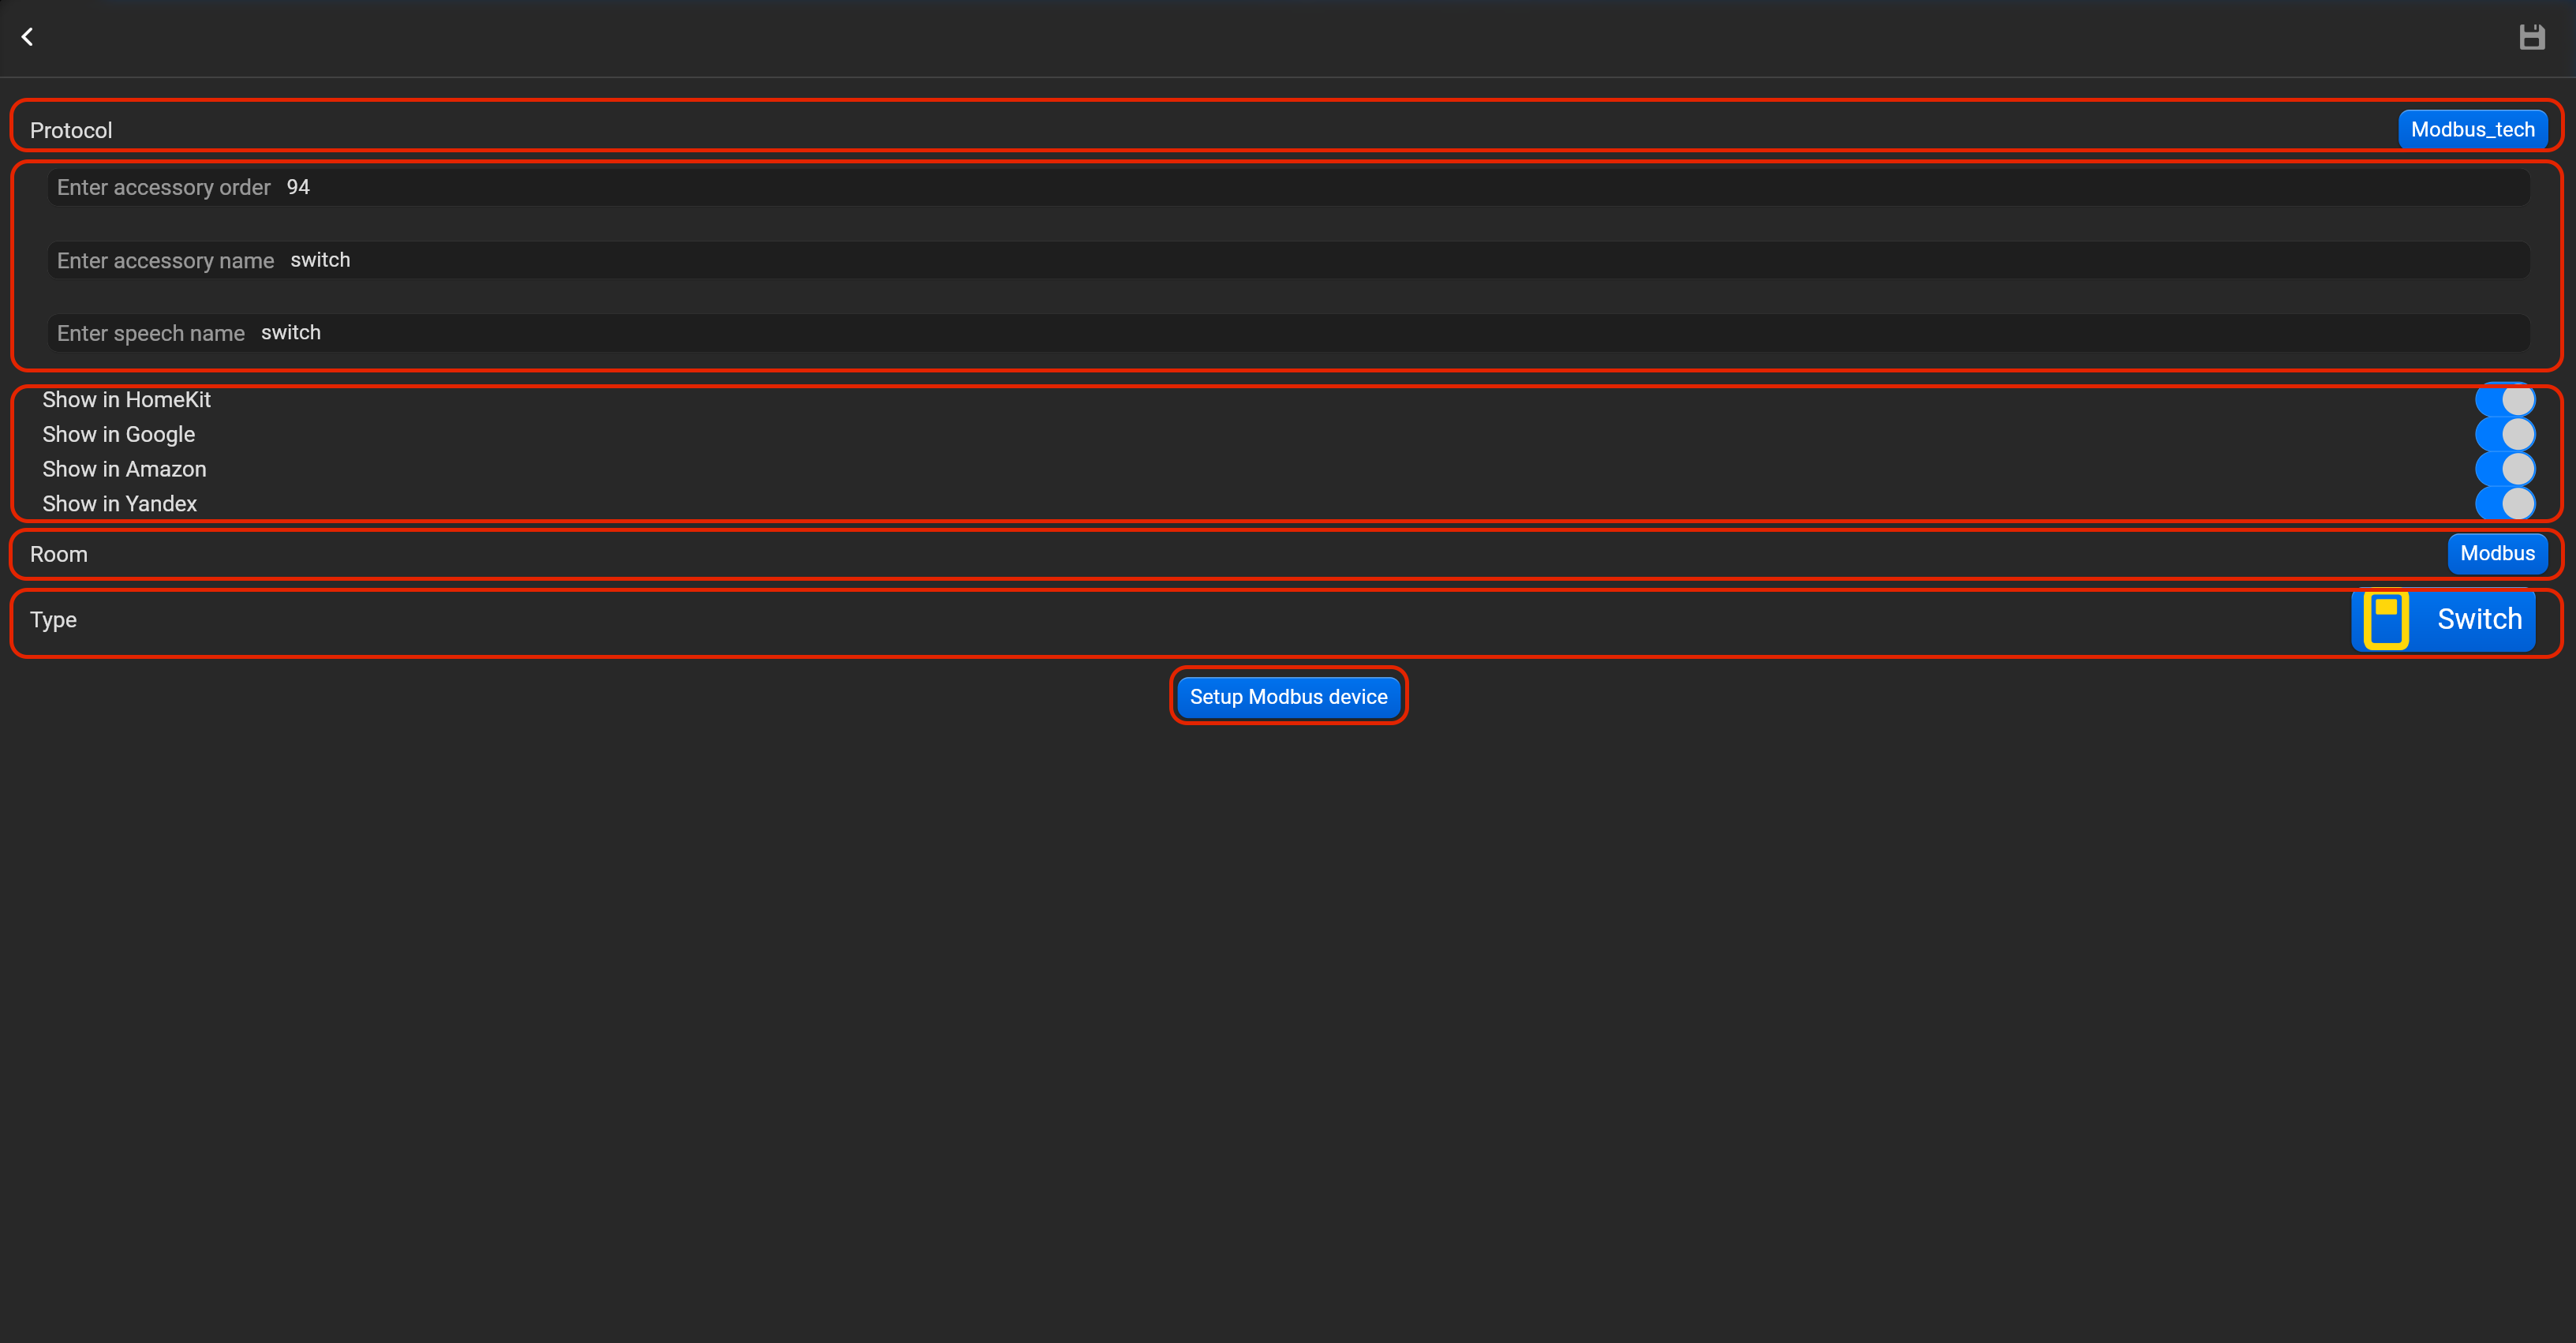
- select the protocol in the drop-down list,
- put the accessory order (affects the location of the accessory in Pyxis app),
- put name of the accessory and for the voice assistants,
- select voice assistants, where the accessory should be displayed,
- select the room, where the accessory will be located,
- select the type of accessory (Switch),
- tap on “Setup Modbus device”, set Modbus connection type (enable for Modbus TCP/IP or disable for Modbus Serial), device address, read timer and coil.
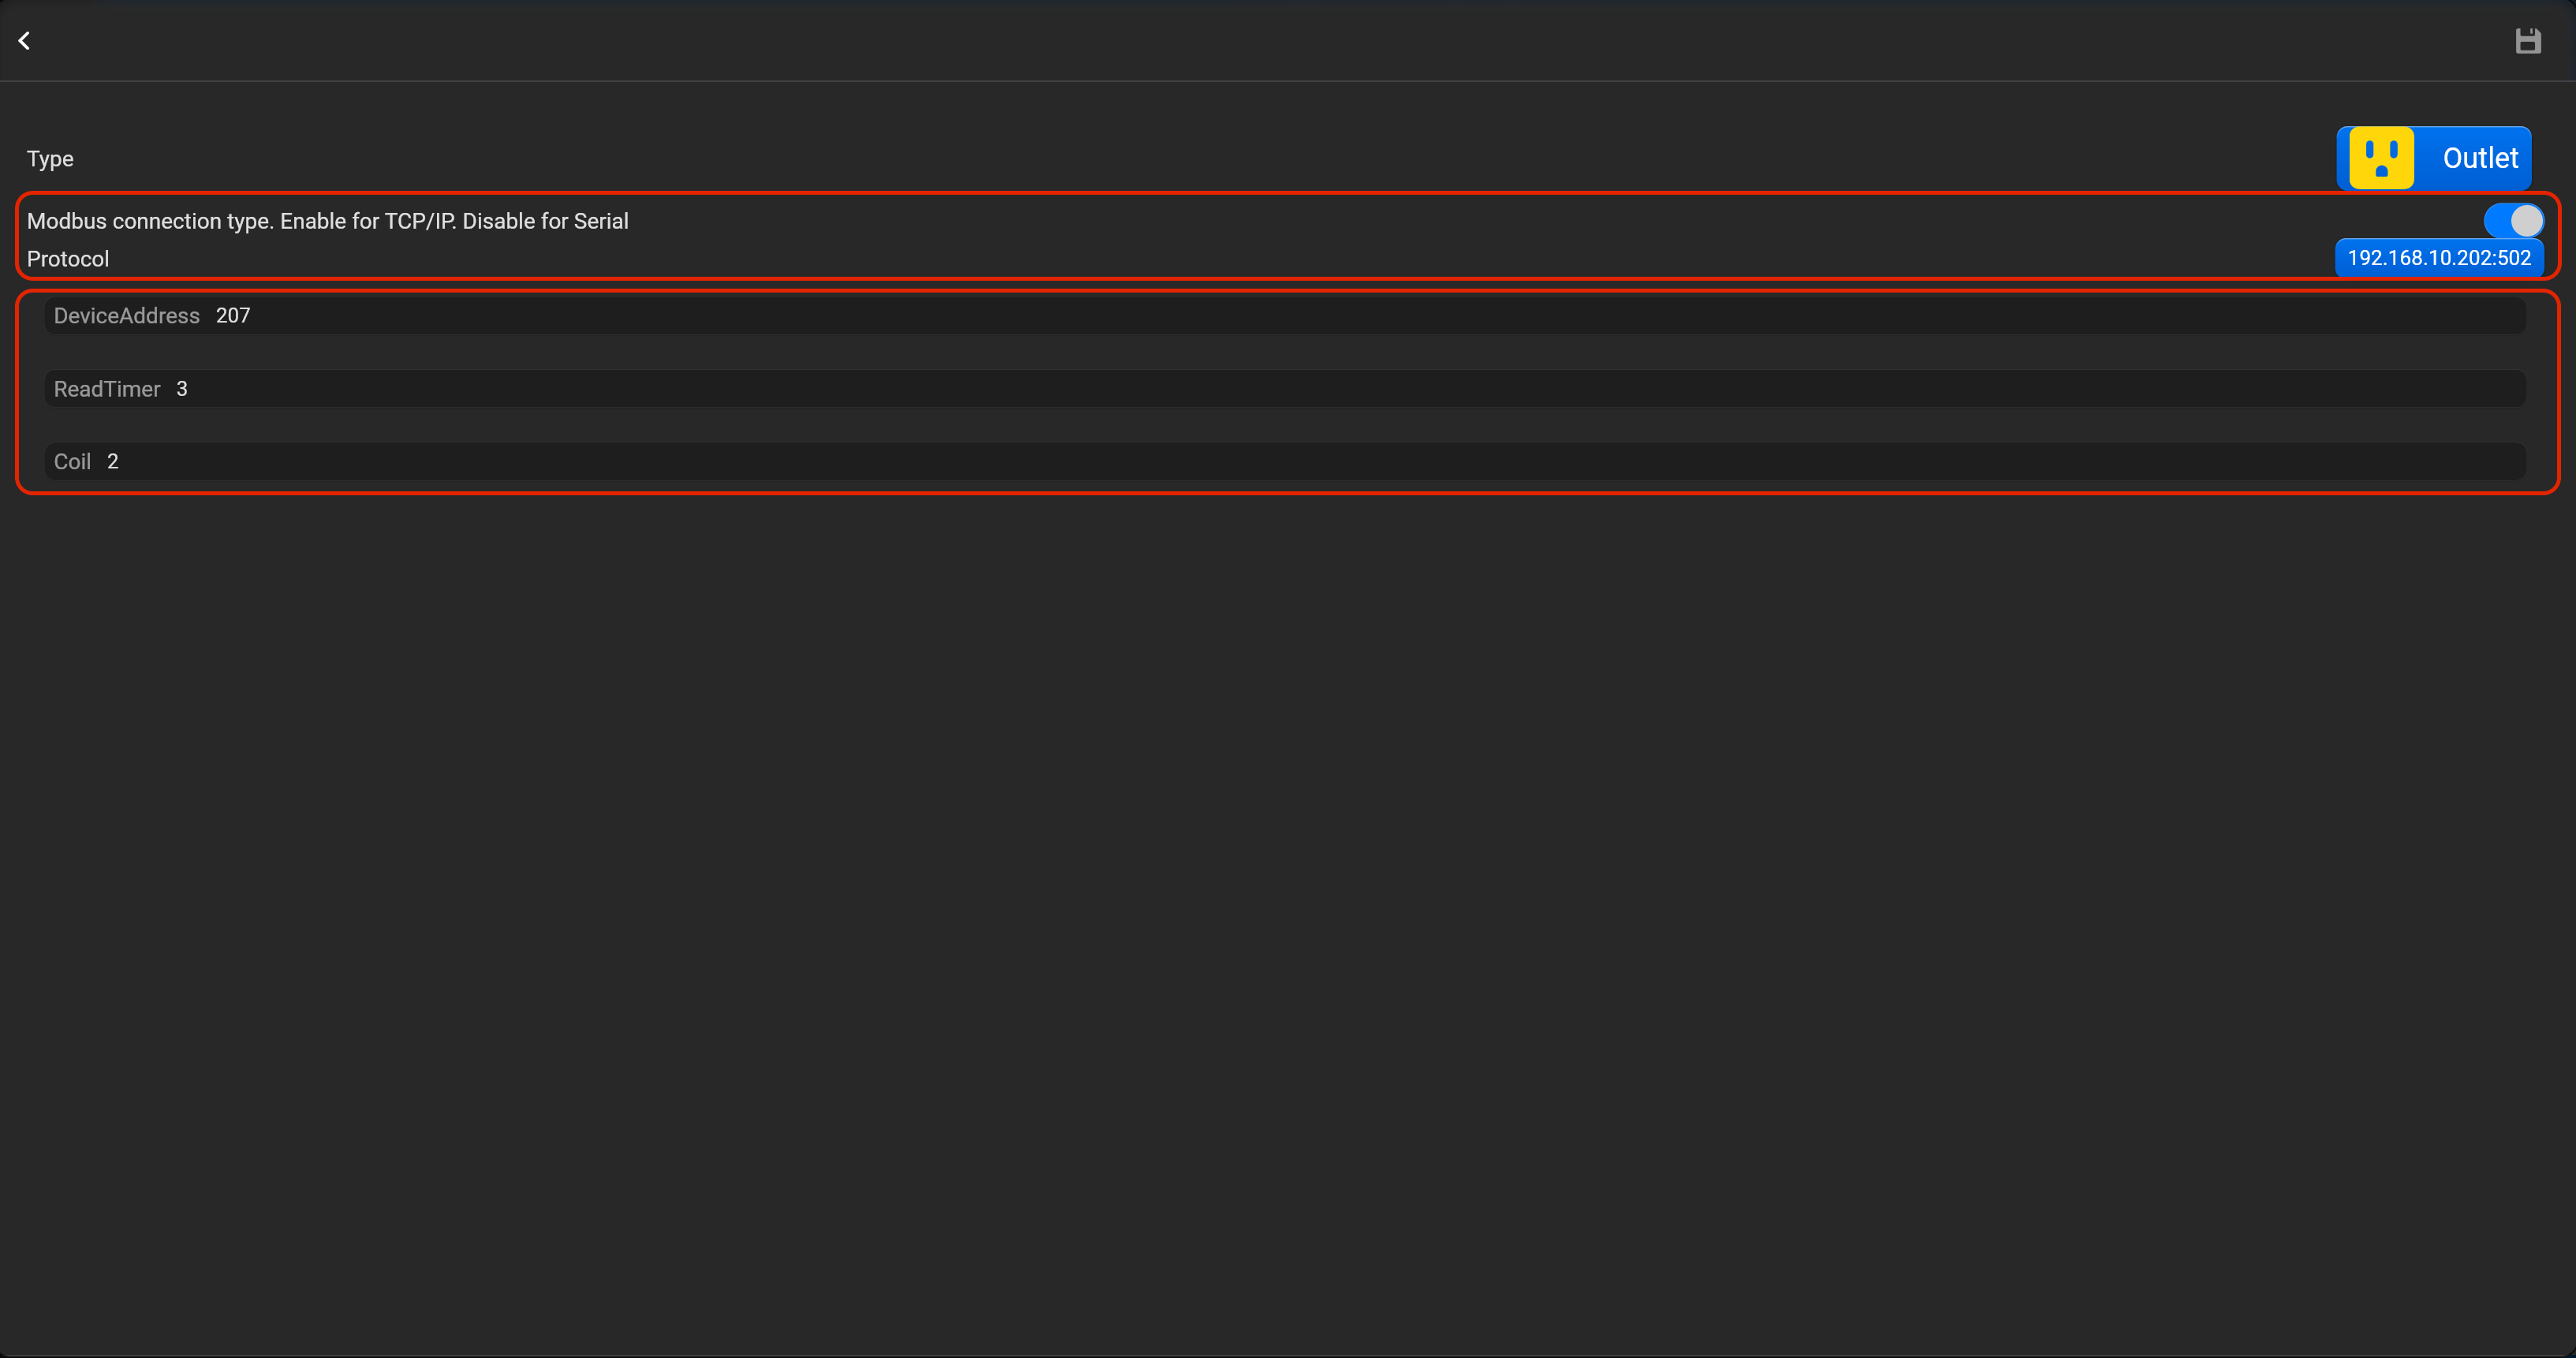
¶ Outlet
- select the protocol in the drop-down list,
- put the accessory order (affects the location of the accessory in Pyxis app),
- put name of the accessory and for the voice assistants,
- select voice assistants, where the accessory should be displayed,
- select the room, where the accessory will be located,
- select the type of accessory (Outlet),
- tap on “Setup Modbus device”, set Modbus connection type (enable for Modbus TCP/IP or disable for Modbus Serial), device address, read timer and coil.

¶ Lock mechanism
- select the protocol in the drop-down list,
- put the accessory order (affects the location of the accessory in Pyxis app),
- put name of the accessory and for the voice assistants,
- select voice assistants, where the accessory should be displayed,
- select the room, where the accessory will be located,
- select the type of accessory (Lock mechanism),
- tap on “Setup Modbus device”, set Modbus connection type (enable for Modbus TCP/IP or disable for Modbus Serial), device address, read timer and coil.


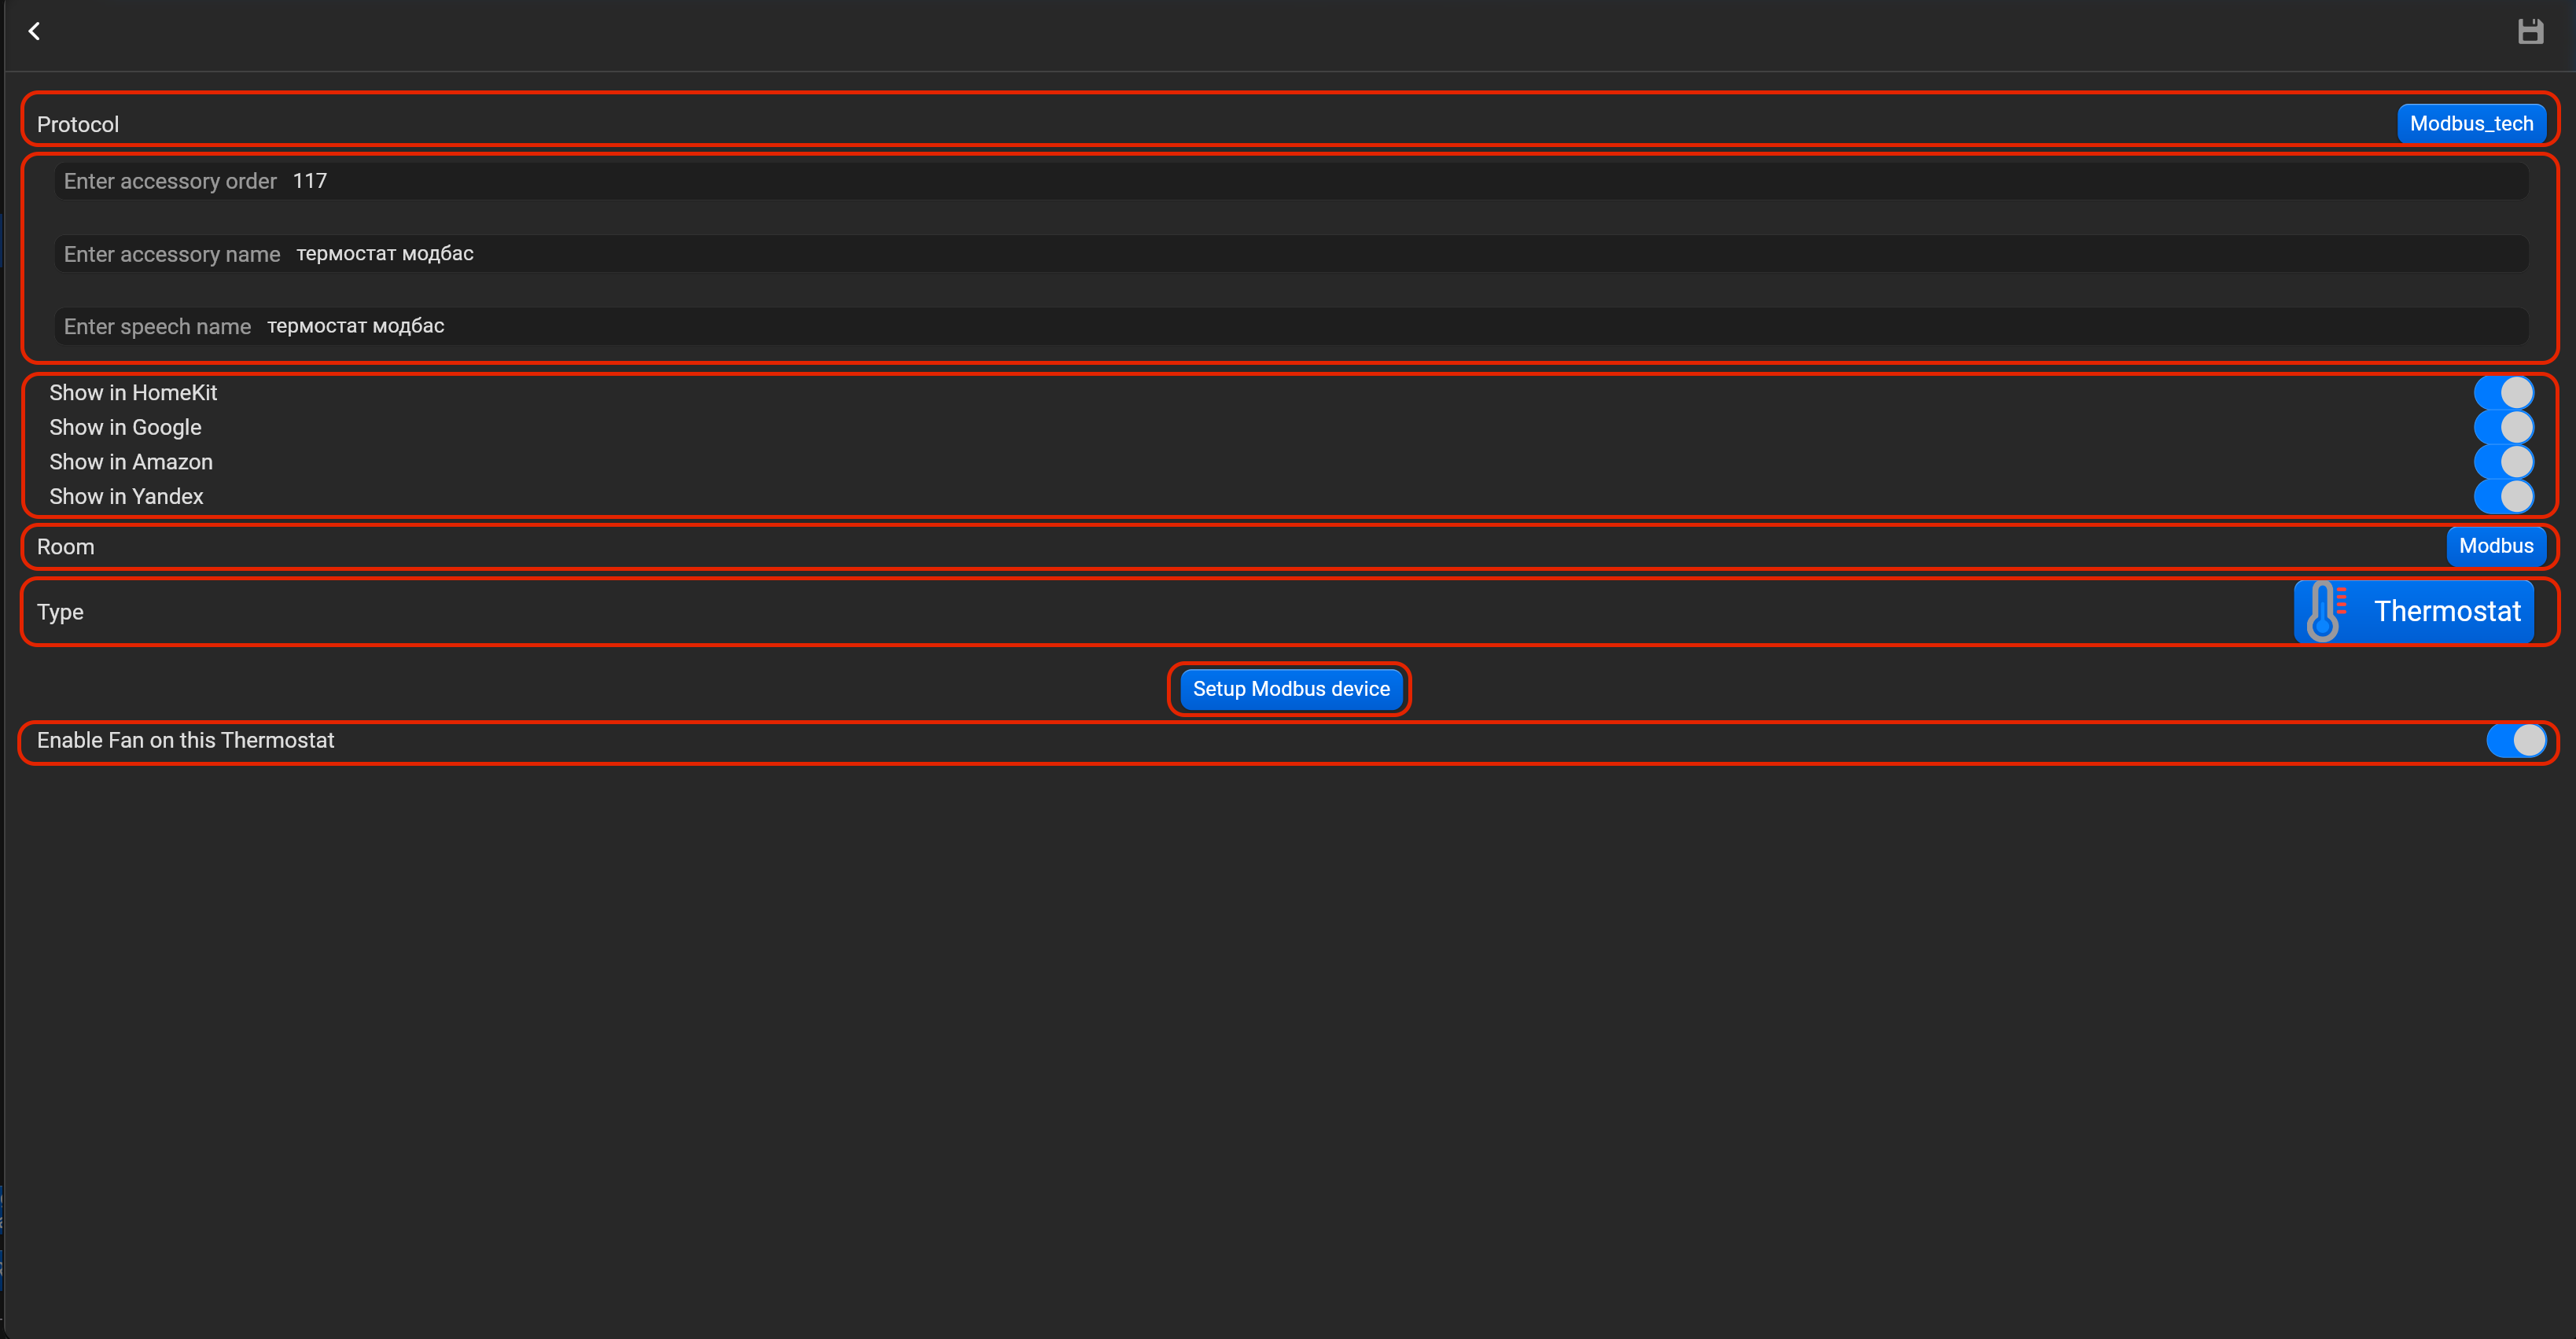
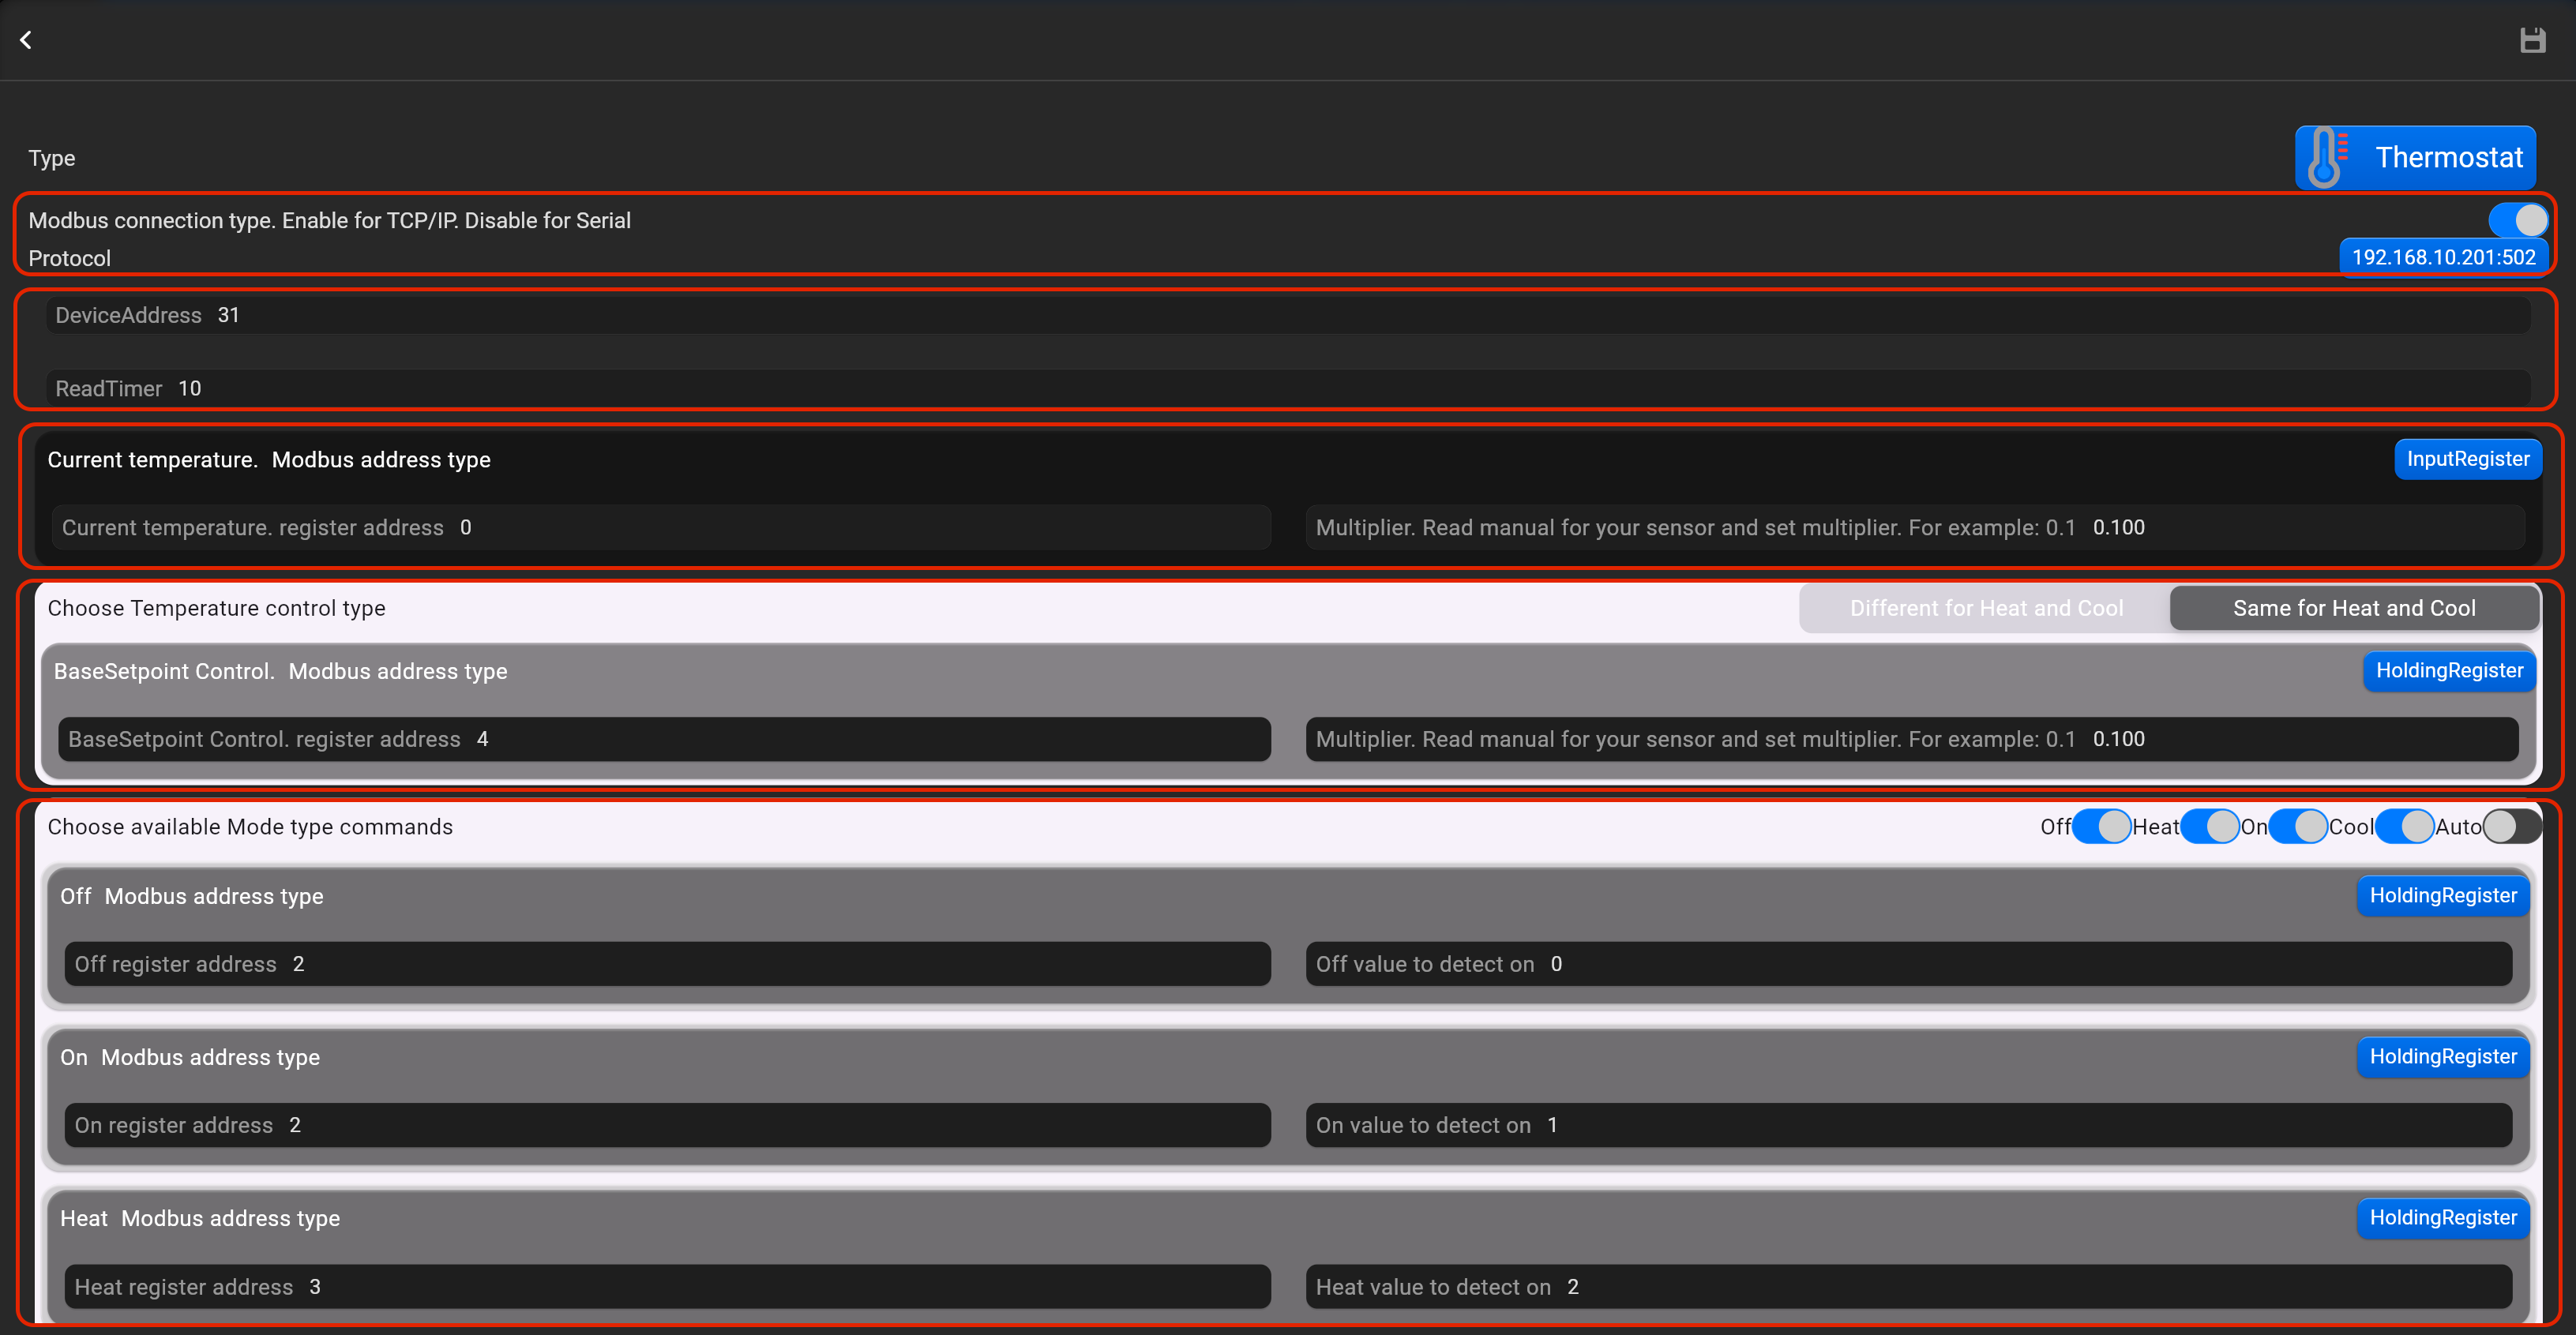
¶ Thermostat
- select the protocol in the drop-down list,
- put the accessory order (affects the location of the accessory in Pyxis app),
- put name of the accessory and for the voice assistants,
- select voice assistants, where the accessory should be displayed,
- select the room, where the accessory will be located,
- select the type of accessory (Thermostat),
- tap on “Setup Modbus device”, set Modbus connection type (enable for Modbus TCP/IP or disable for Modbus Serial), device address, read timer and register addresses. For sensors set multiplier as well. Value of multiplier, find manual for sensor.
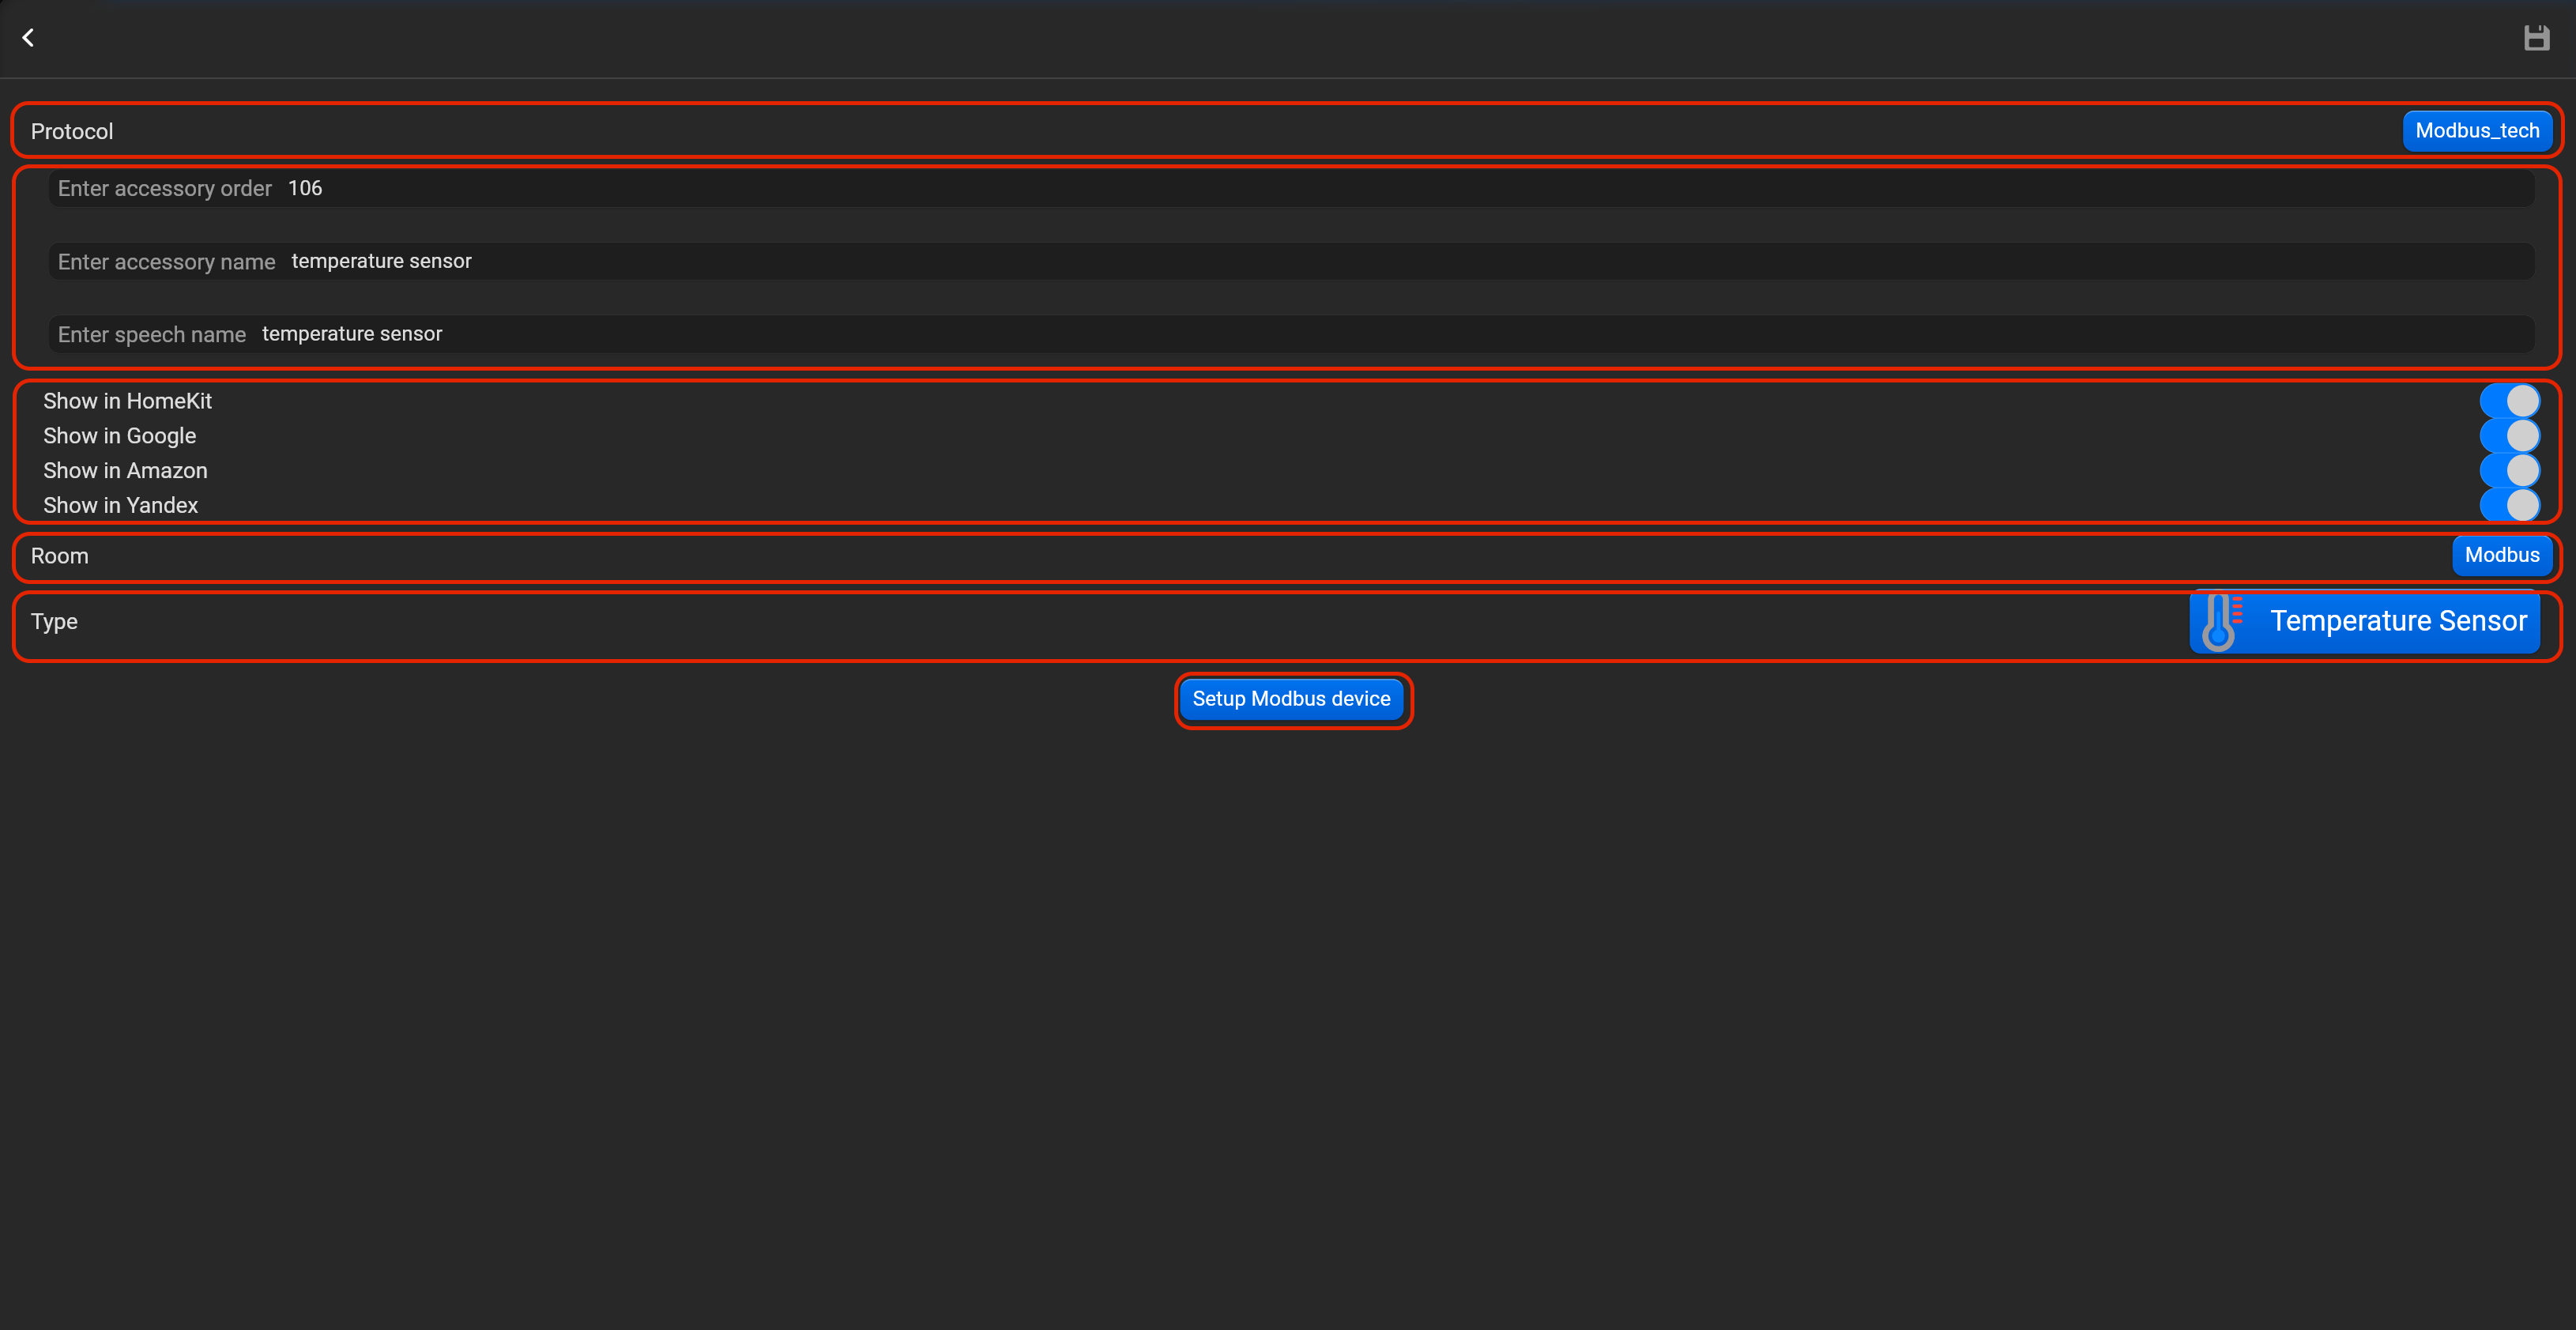
¶ Temperature sensor
- select the protocol in the drop-down list,
- put the accessory order (affects the location of the accessory in Pyxis app),
- put name of the accessory and for the voice assistants,
- select voice assistants, where the accessory should be displayed,
- select the room, where the accessory will be located,
- select the type of accessory (Temperature sensor),
- tap on “Setup Modbus device”, set Modbus connection type (enable for Modbus TCP/IP or disable for Modbus Serial), device address, read timer, register and multiplier. Value of multiplier, find manual for sensor.

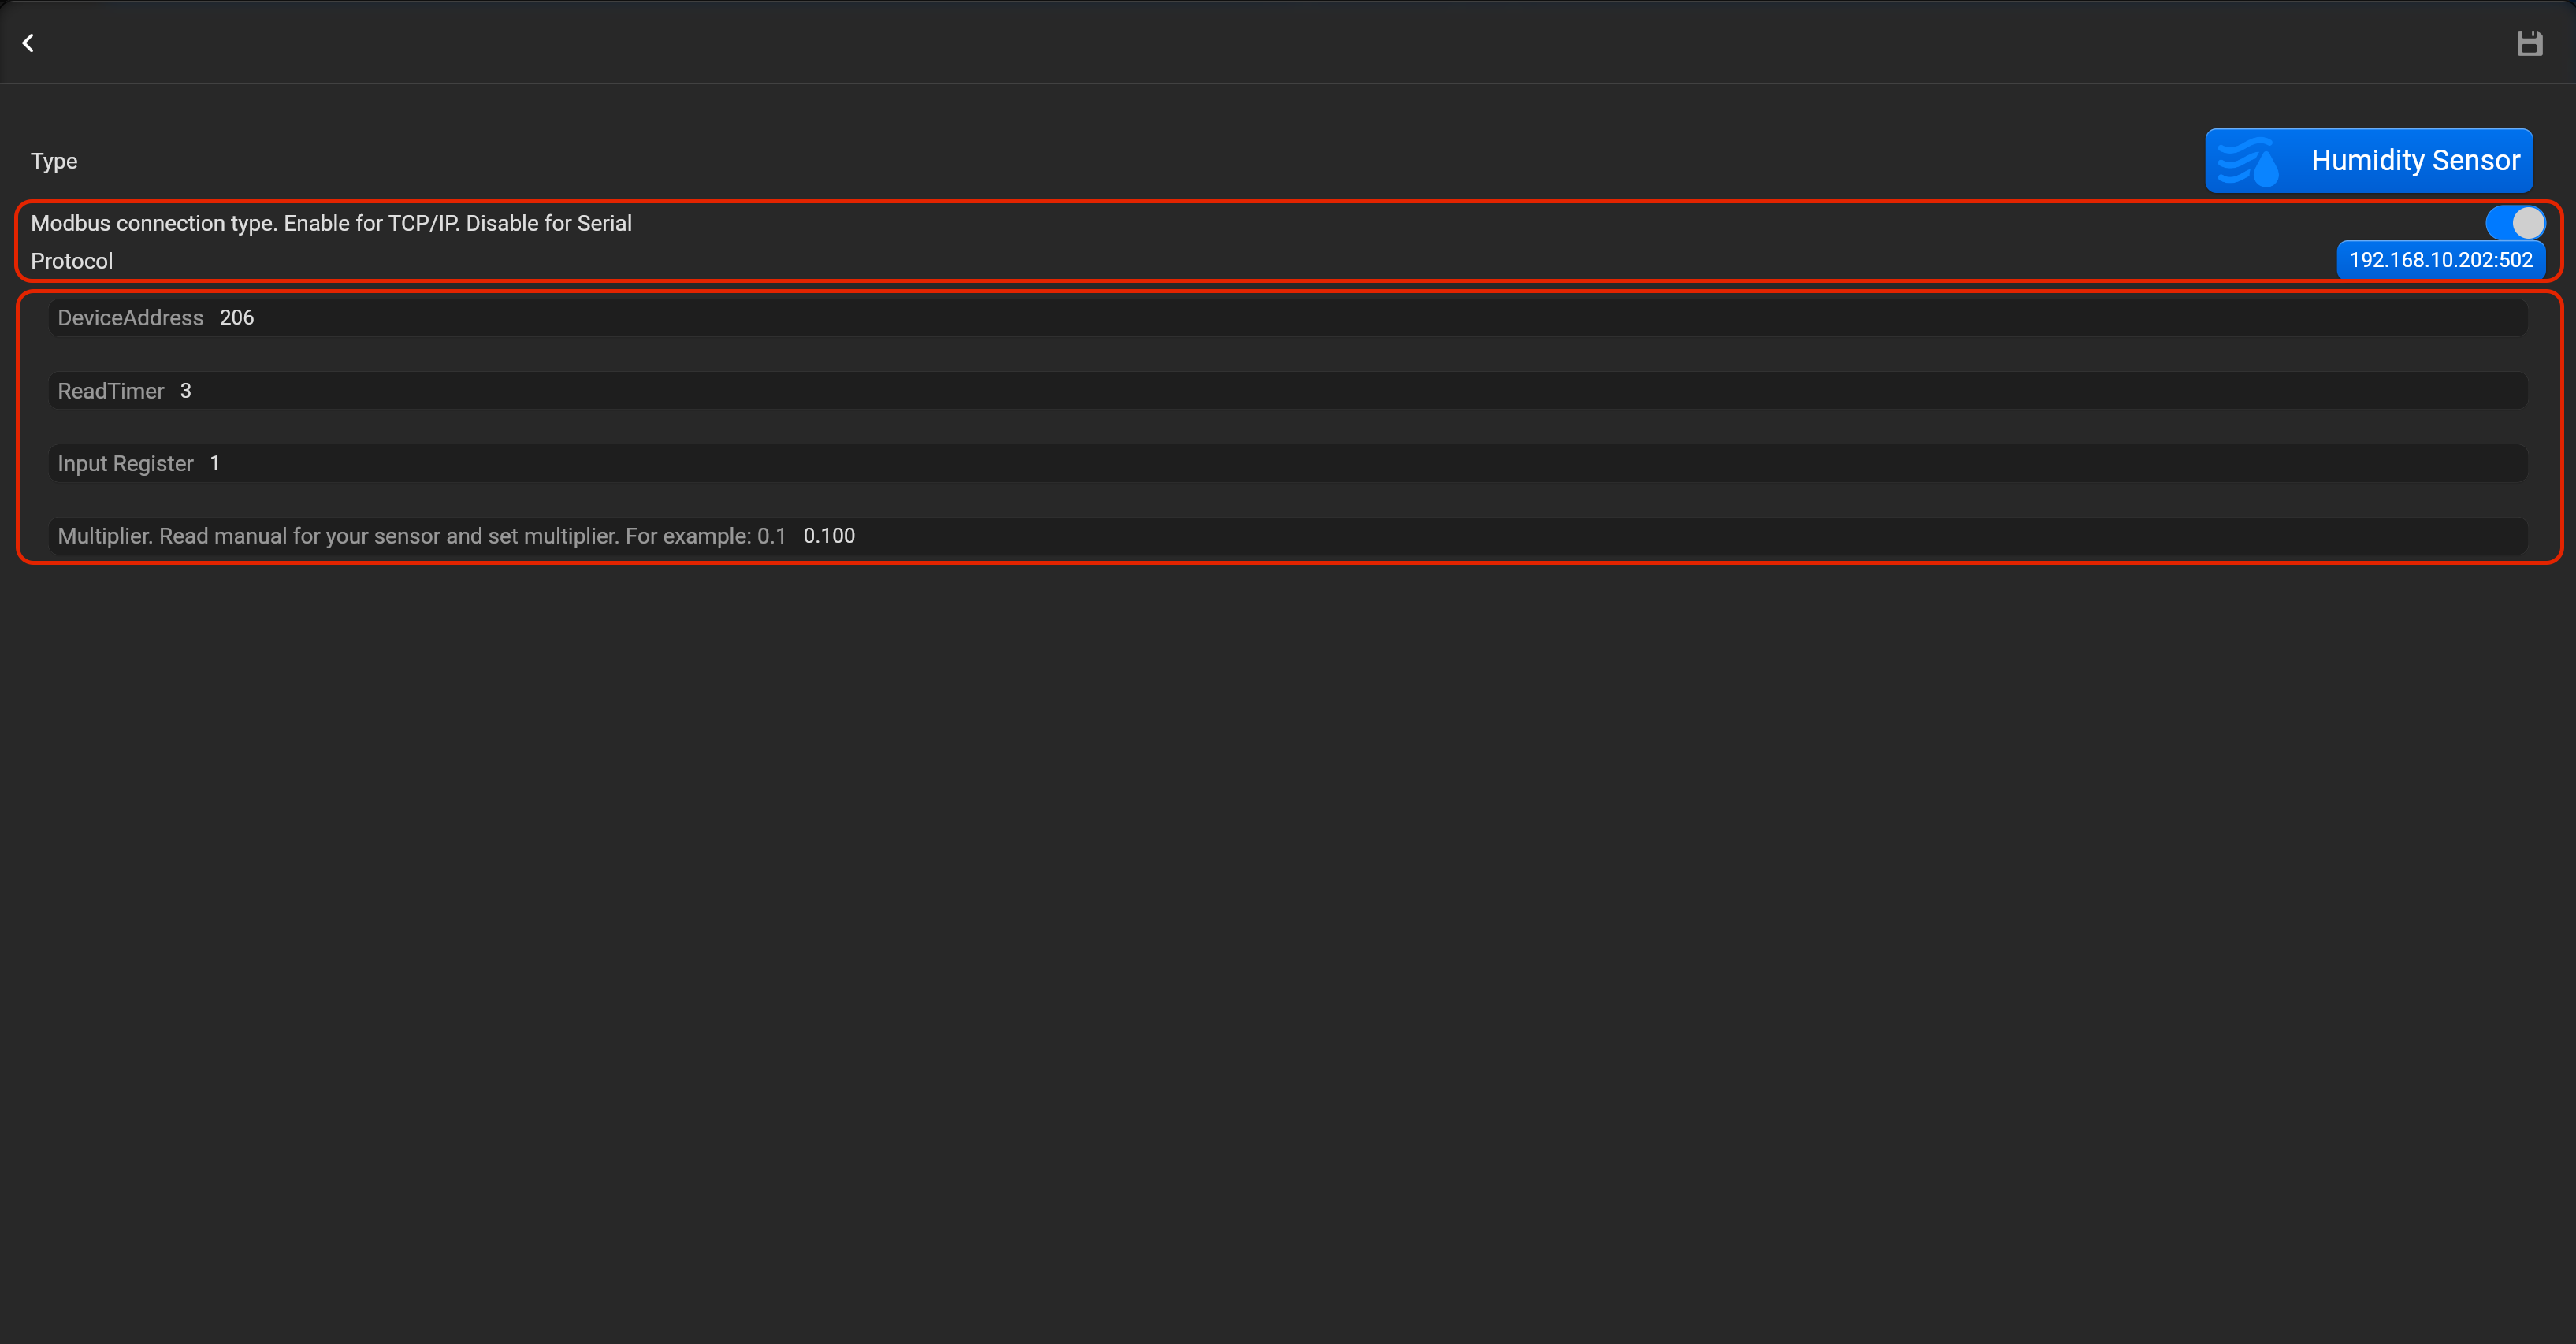
¶ Humidity sensor
- select the protocol in the drop-down list,
- put the accessory order (affects the location of the accessory in Pyxis app),
- put name of the accessory and for the voice assistants,
- select voice assistants, where the accessory should be displayed,
- select the room, where the accessory will be located,
- select the type of accessory (Humidity sensor),
- tap on “Setup Modbus device”, set Modbus connection type (enable for Modbus TCP/IP or disable for Modbus Serial), device address, read timer, register and multiplier. Value of multiplier, find manual for sensor.

¶ Contact sensor
- select the protocol in the drop-down list,
- put the accessory order (affects the location of the accessory in Pyxis app),
- put name of the accessory and for the voice assistants,
- select voice assistants, where the accessory should be displayed,
- select the room, where the accessory will be located,
- select the type of accessory (Contact sensor),
- tap on “Setup Modbus device”, set Modbus connection type (enable for Modbus TCP/IP or disable for Modbus Serial), device address, read timer and discrete input register. You can invert value of this accessory.


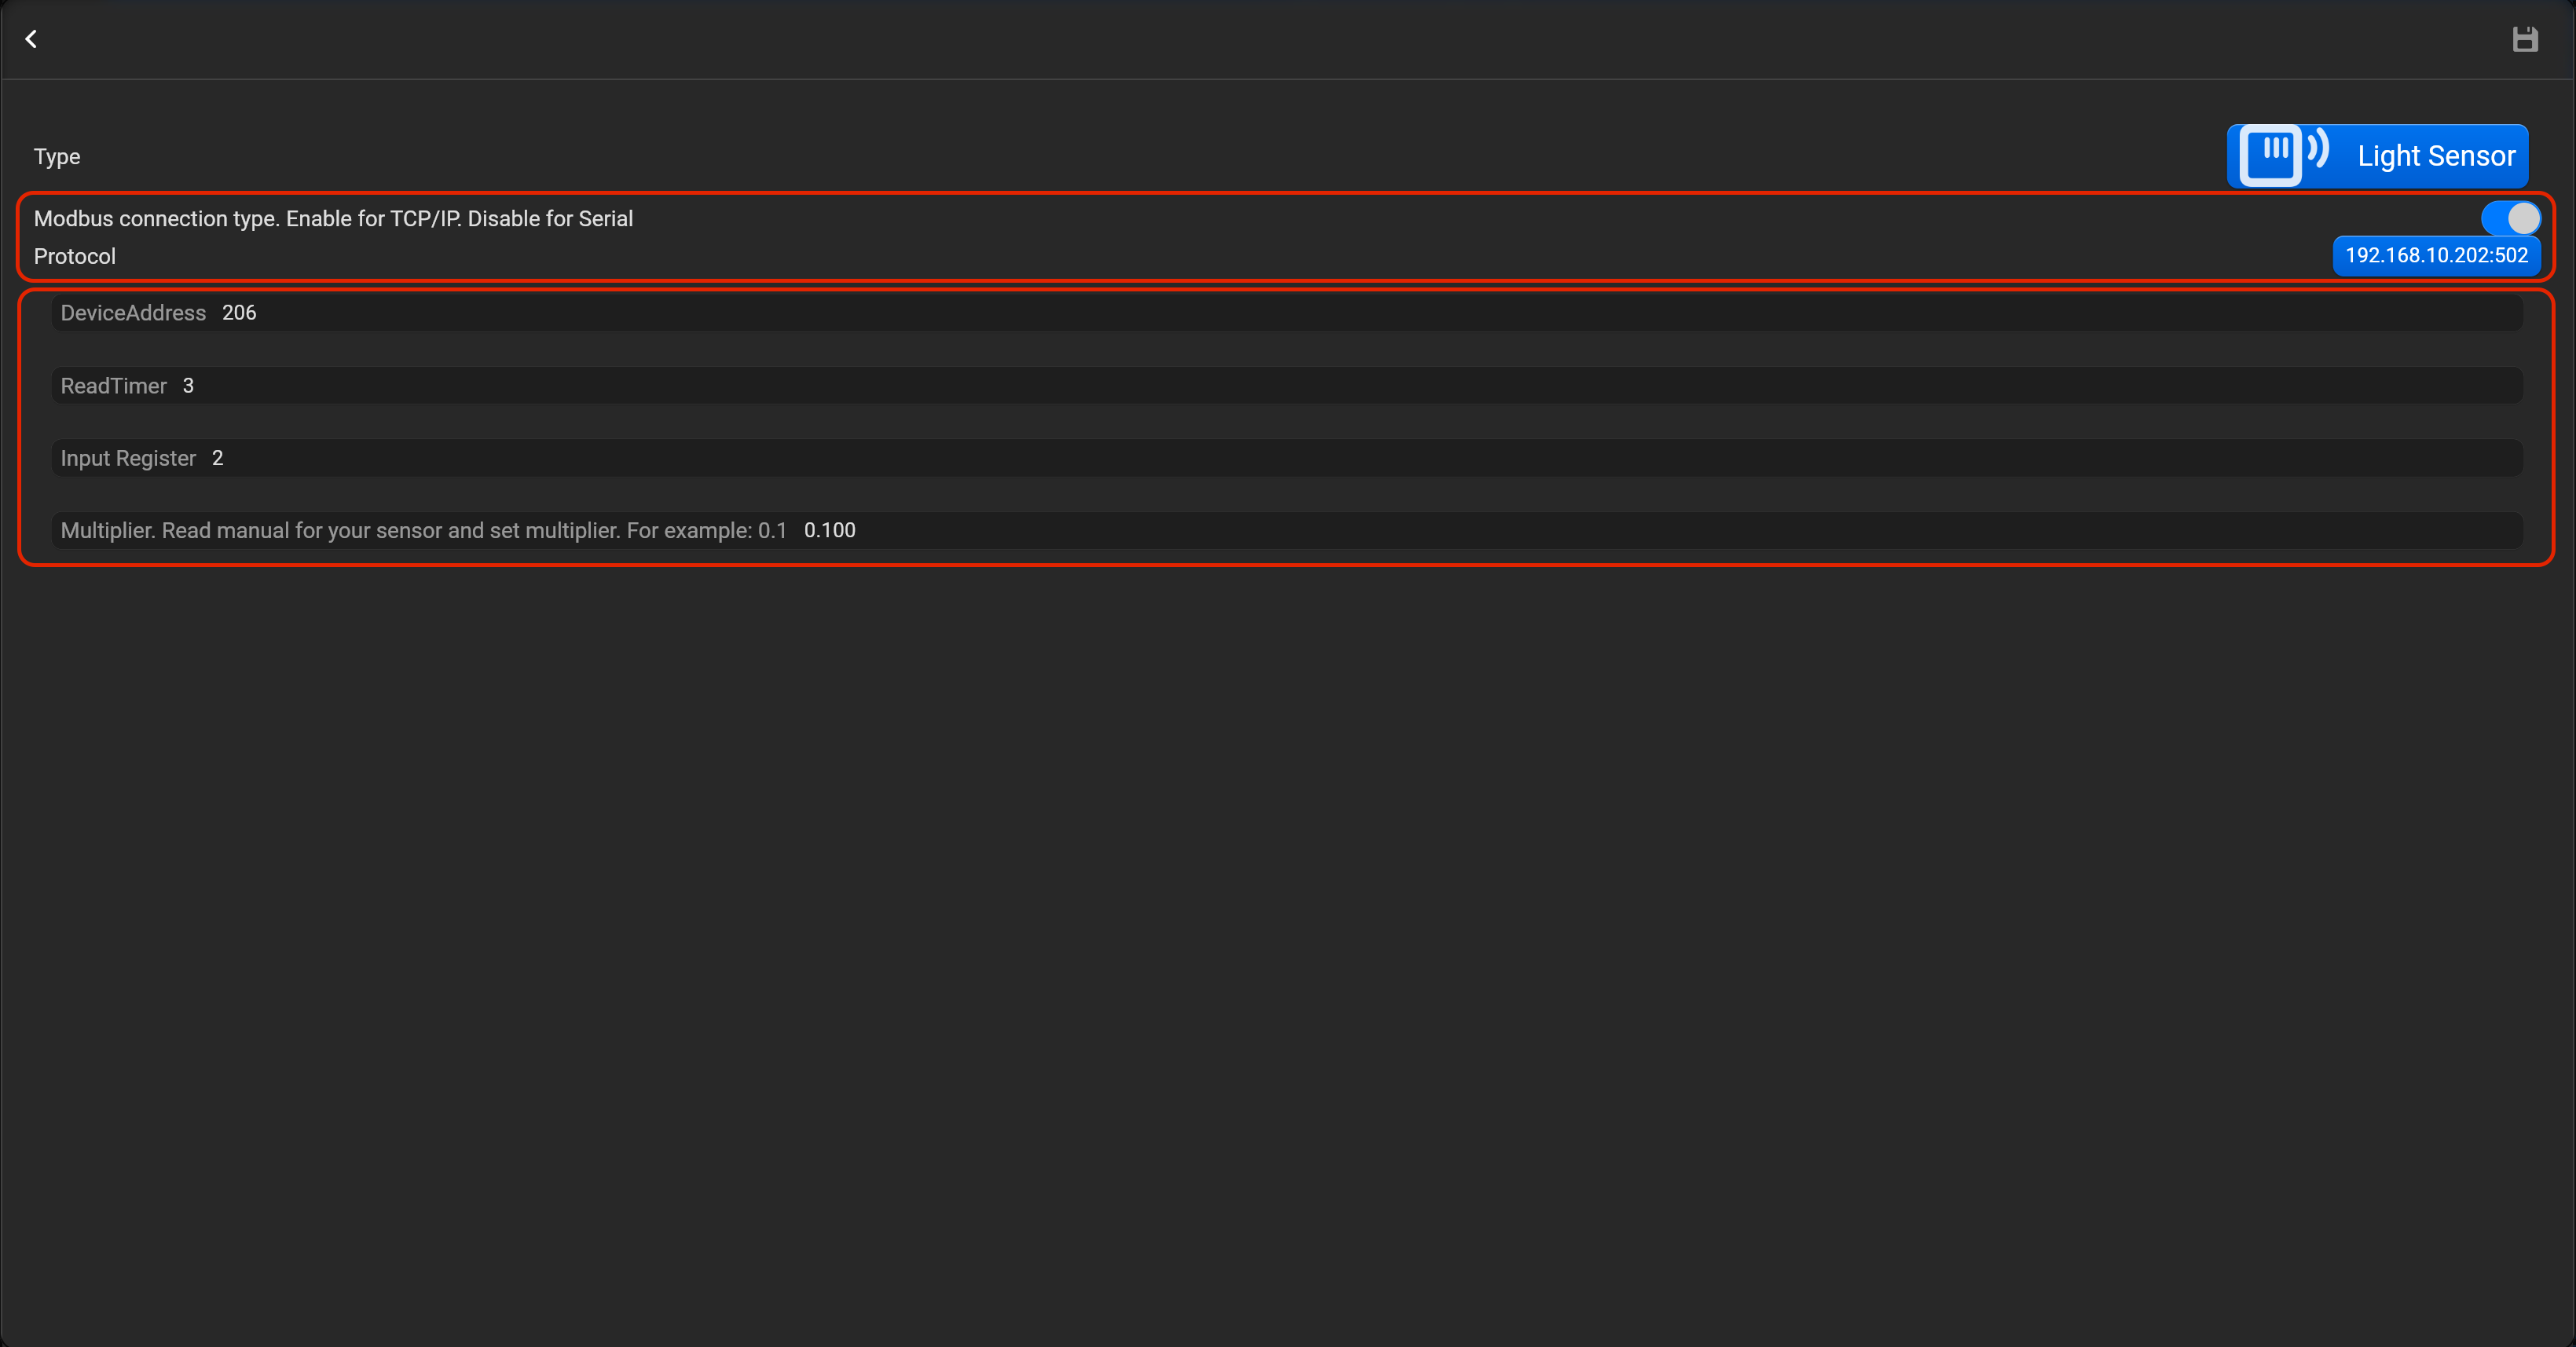
¶ Light sensor
- select the protocol in the drop-down list,
- put the accessory order (affects the location of the accessory in Pyxis app),
- put name of the accessory and for the voice assistants,
- select voice assistants, where the accessory should be displayed,
- select the room, where the accessory will be located,
- select the type of accessory (Light sensor),
- tap on “Setup Modbus device”, set Modbus connection type (enable for Modbus TCP/IP or disable for Modbus Serial), device address, read timer, register and multiplier. Value of multiplier, find manual for sensor.

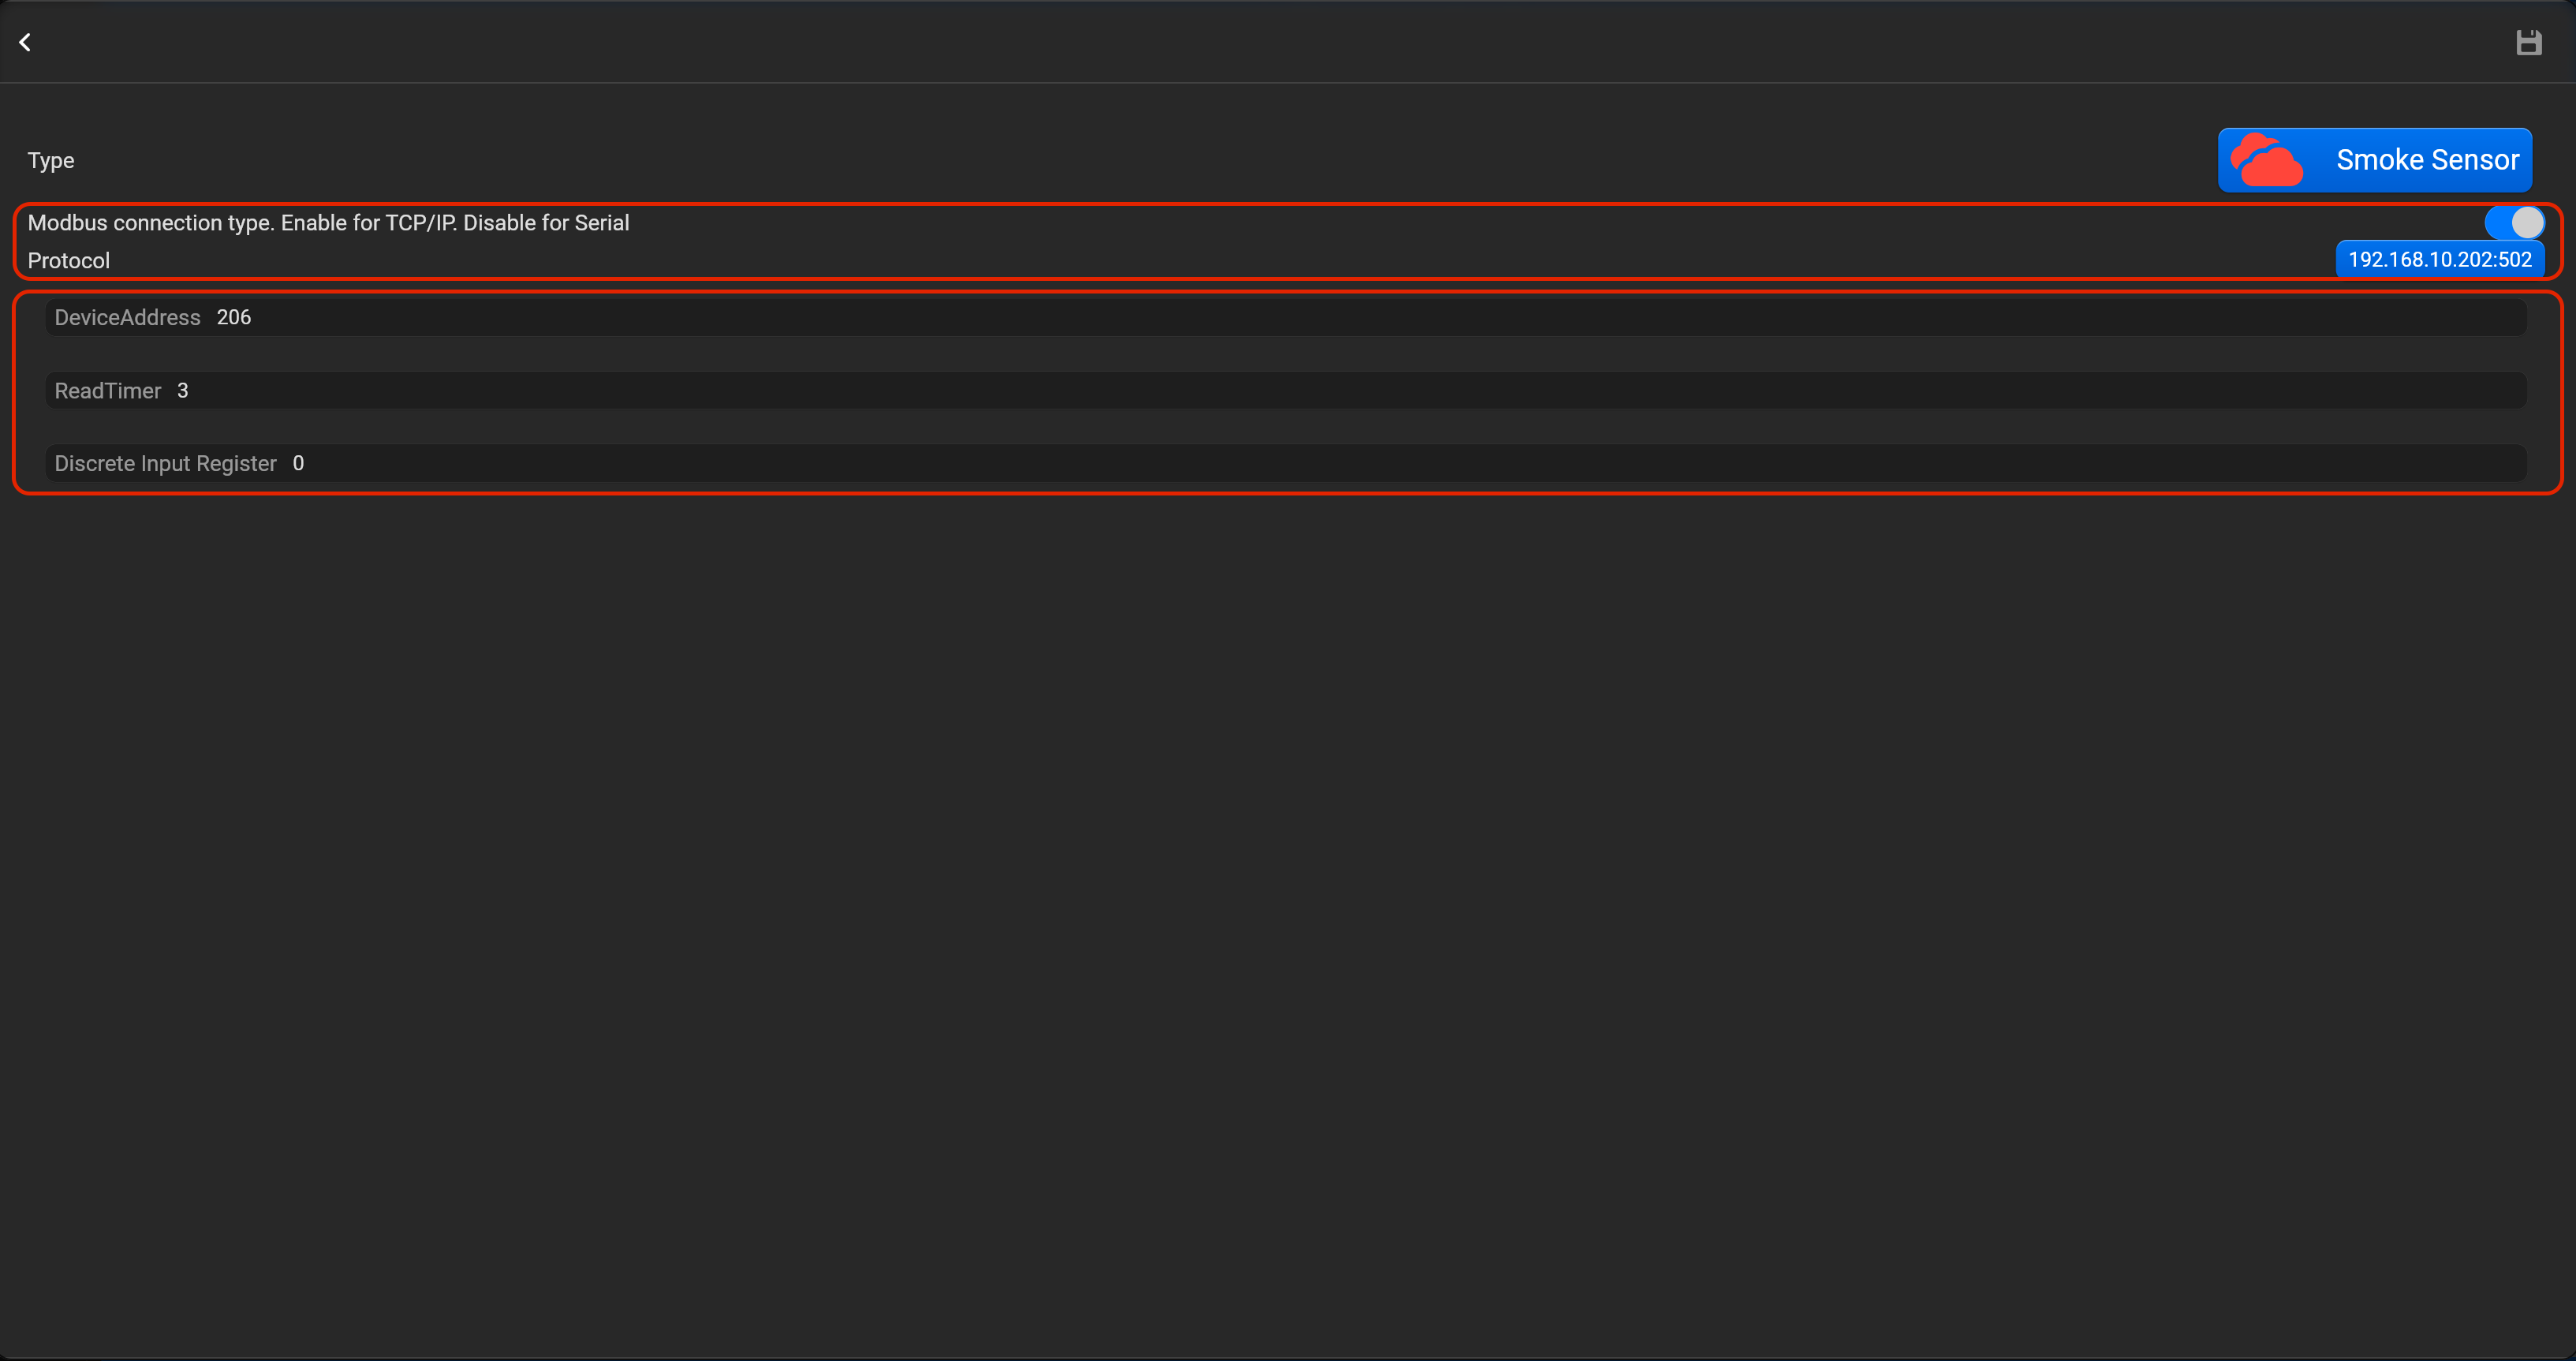
¶ Smoke sensor
- select the protocol in the drop-down list,
- put the accessory order (affects the location of the accessory in Pyxis app),
- put name of the accessory and for the voice assistants,
- select voice assistants, where the accessory should be displayed,
- select the room, where the accessory will be located,
- select the type of accessory (Smoke sensor),
- tap on “Setup Modbus device”, set Modbus connection type (enable for Modbus TCP/IP or disable for Modbus Serial), device address, read timer and discrete input register. You can invert value of this accessory.

¶ Motion sensor
- select the protocol in the drop-down list,
- put the accessory order (affects the location of the accessory in Pyxis app),
- put name of the accessory and for the voice assistants,
- select voice assistants, where the accessory should be displayed,
- select the room, where the accessory will be located,
- select the type of accessory (Motion sensor),
- tap on “Setup Modbus device”, set Modbus connection type (enable for Modbus TCP/IP or disable for Modbus Serial), device address, read timer and discrete input register.


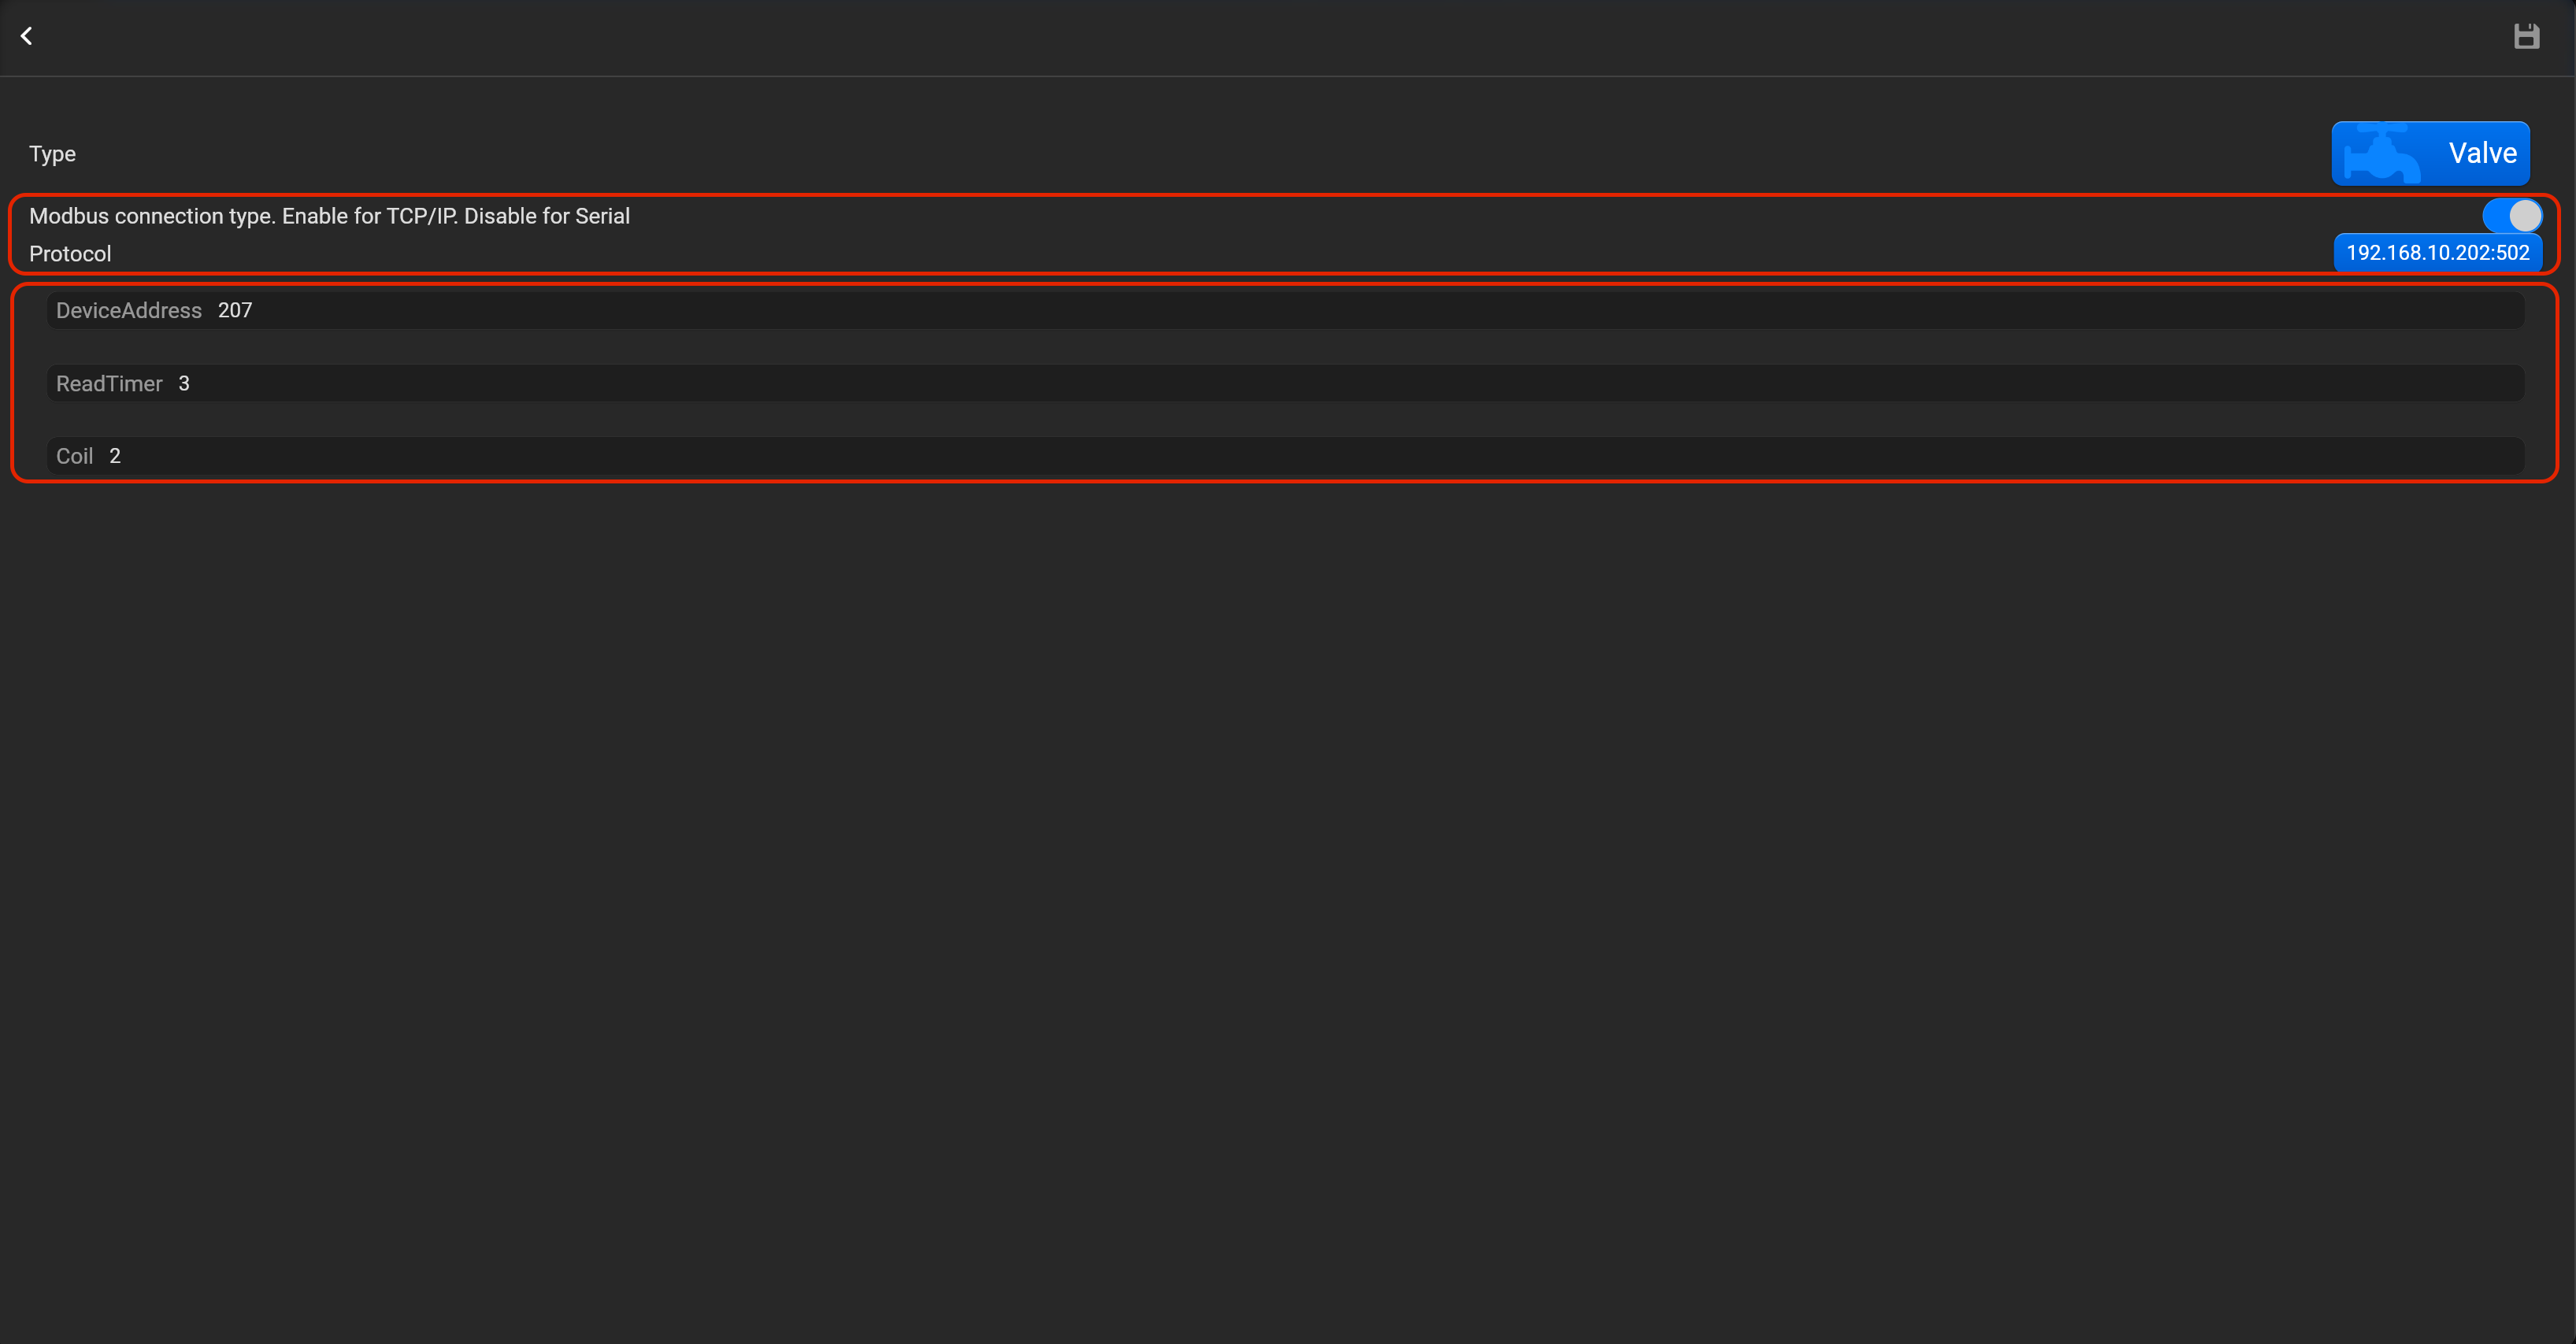
¶ Valve
- select the protocol in the drop-down list,
- put the accessory order (affects the location of the accessory in Pyxis app),
- put name of the accessory and for the voice assistants,
- select voice assistants, where the accessory should be displayed,
- select the room, where the accessory will be located,
- select the type of accessory (Valve), valve type (Generic, irrgation, shower, faucet).
- tap on “Setup Modbus device”, set Modbus connection type (enable for Modbus TCP/IP or disable for Modbus Serial), device address, read timer and coil.

¶ Loxone
Pyxis synchronize info about devices from Loxone Miniserver, making setup easy and convenient. To set up the accessories, you must first synchronize Loxone Miniserver devices, providing Loxone Miniserver settings in the “ PROTOCOLS” section.
Please, find below, examples for every supported type of accessory. Do not forget save all changes and restart Pyxis.
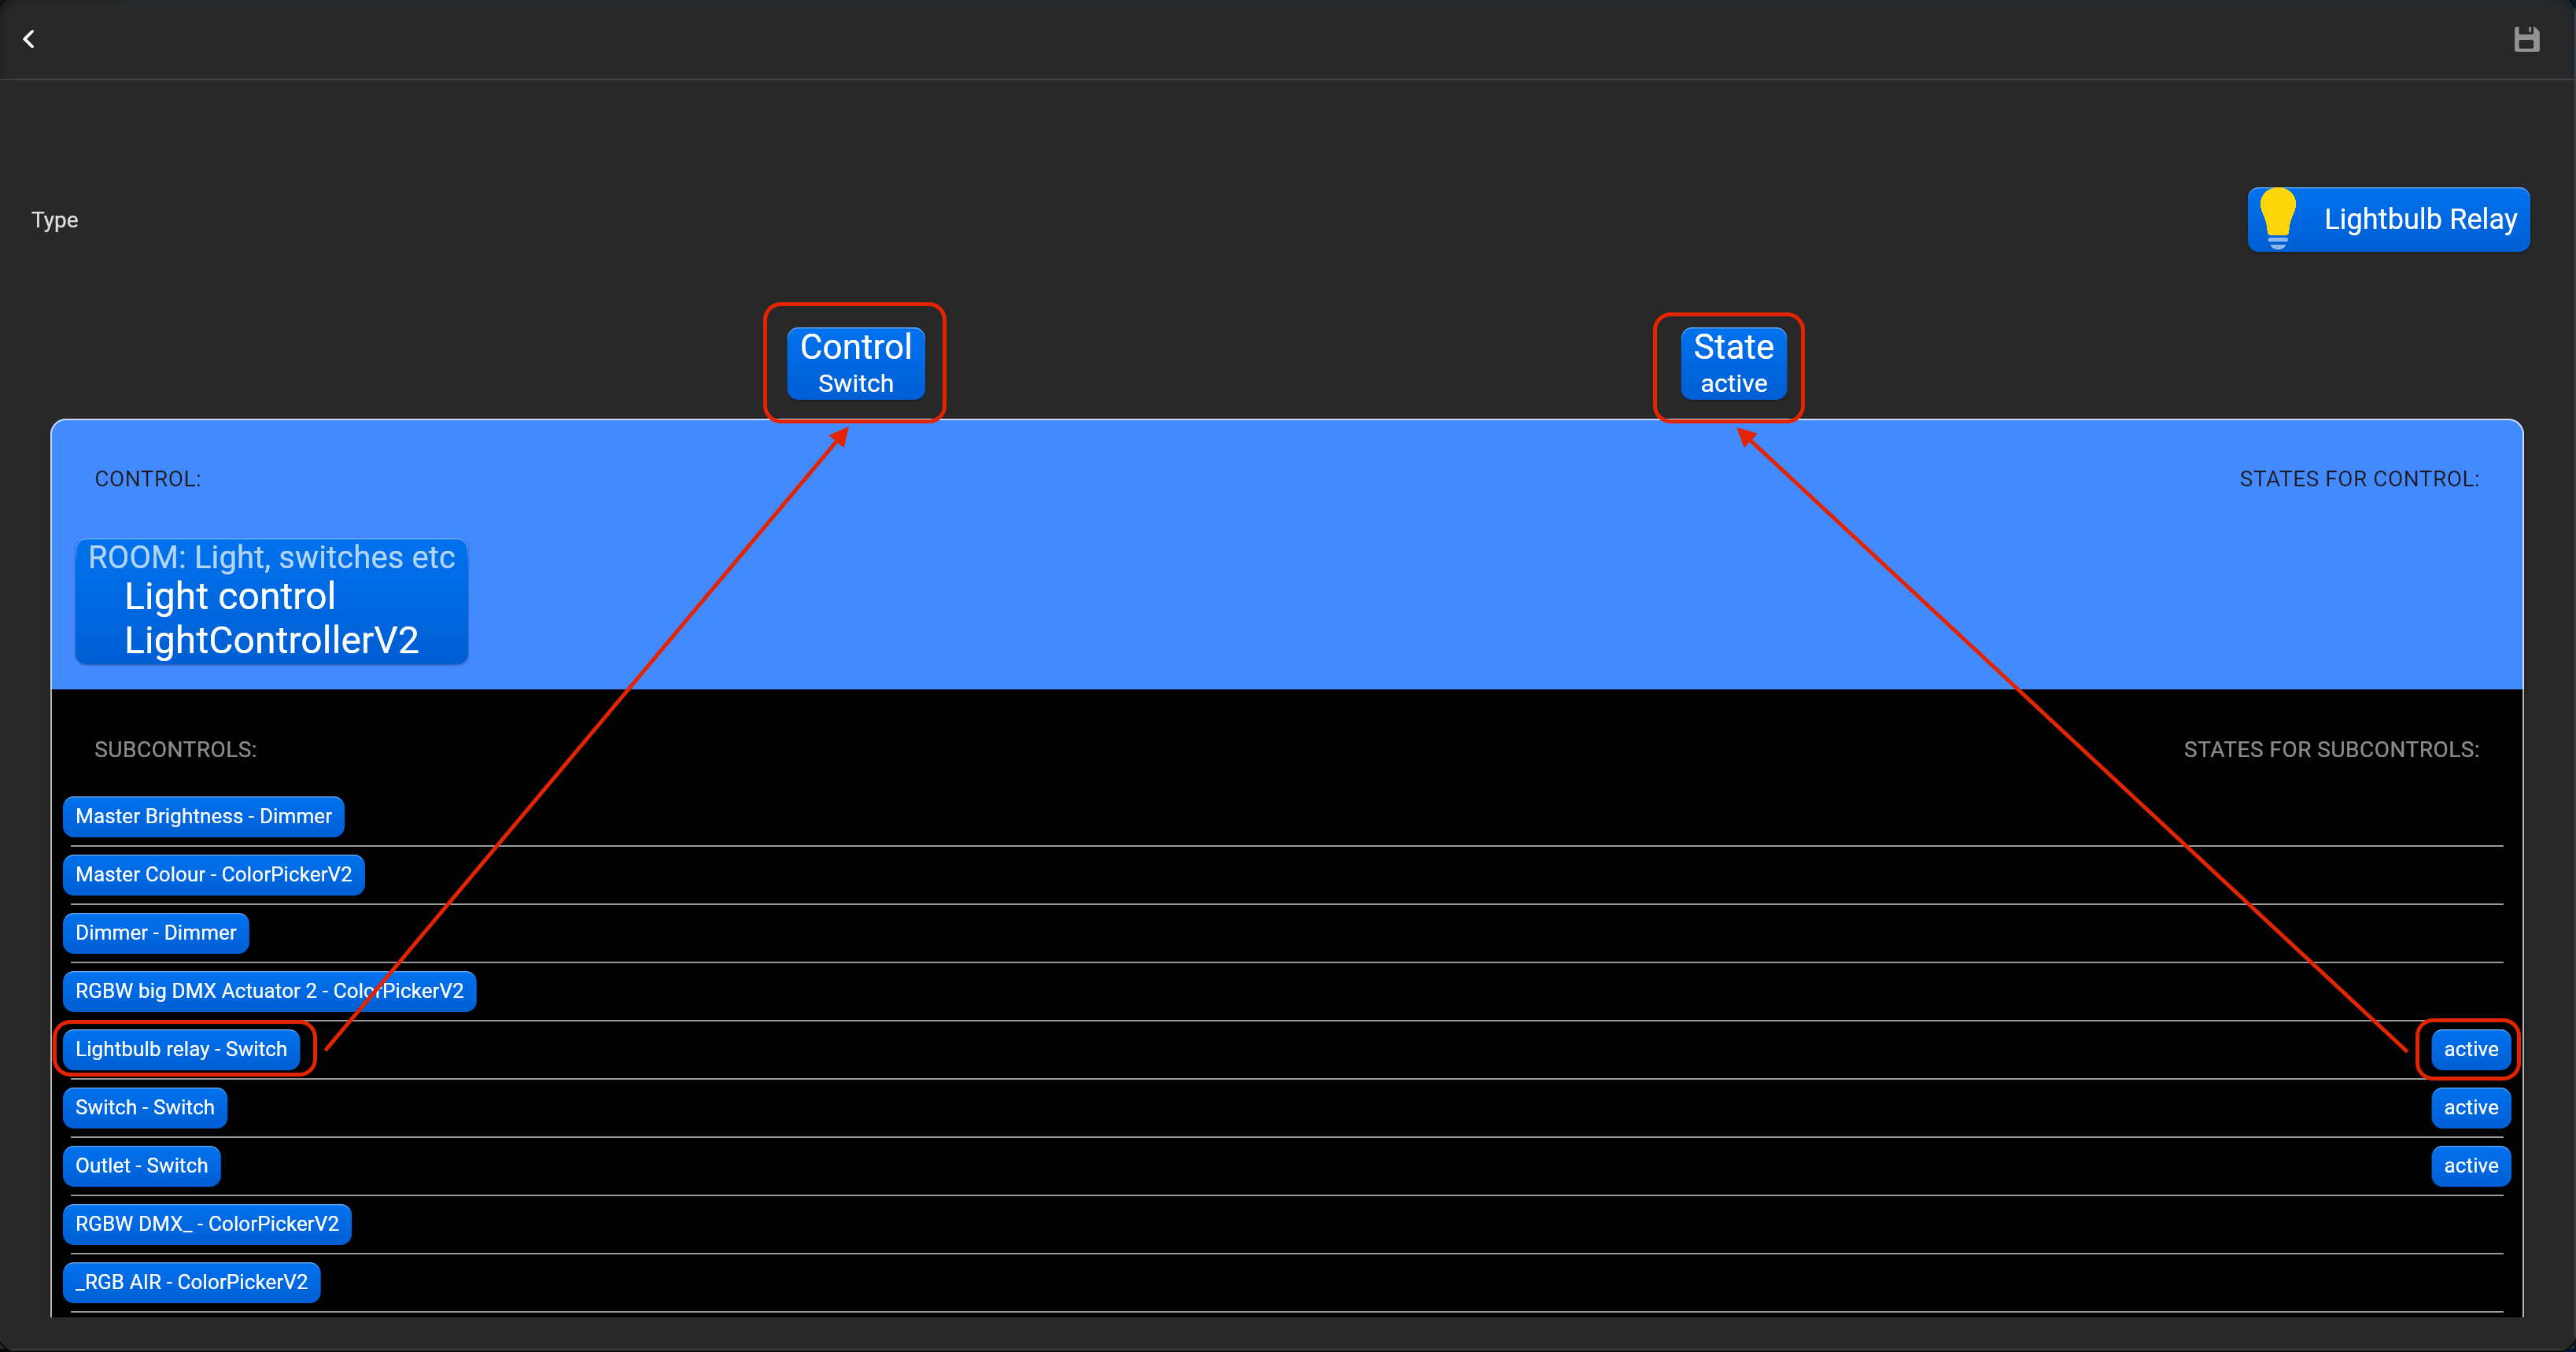
¶ Lightbulb relay
- select the protocol in the drop-down list,
- put the accessory order (affects the location of the accessory in Pyxis app),
- put name of the accessory and for the voice assistants,
- select voice assistants, where the accessory should be displayed,
- select the room, where the accessory will be located,
- select the type of accessory (Lightbulb relay),
- tap on “Bind Loxone device” and adjust accessory by dragging-and-dropping in “Control” and “State” area required Loxone accessory.

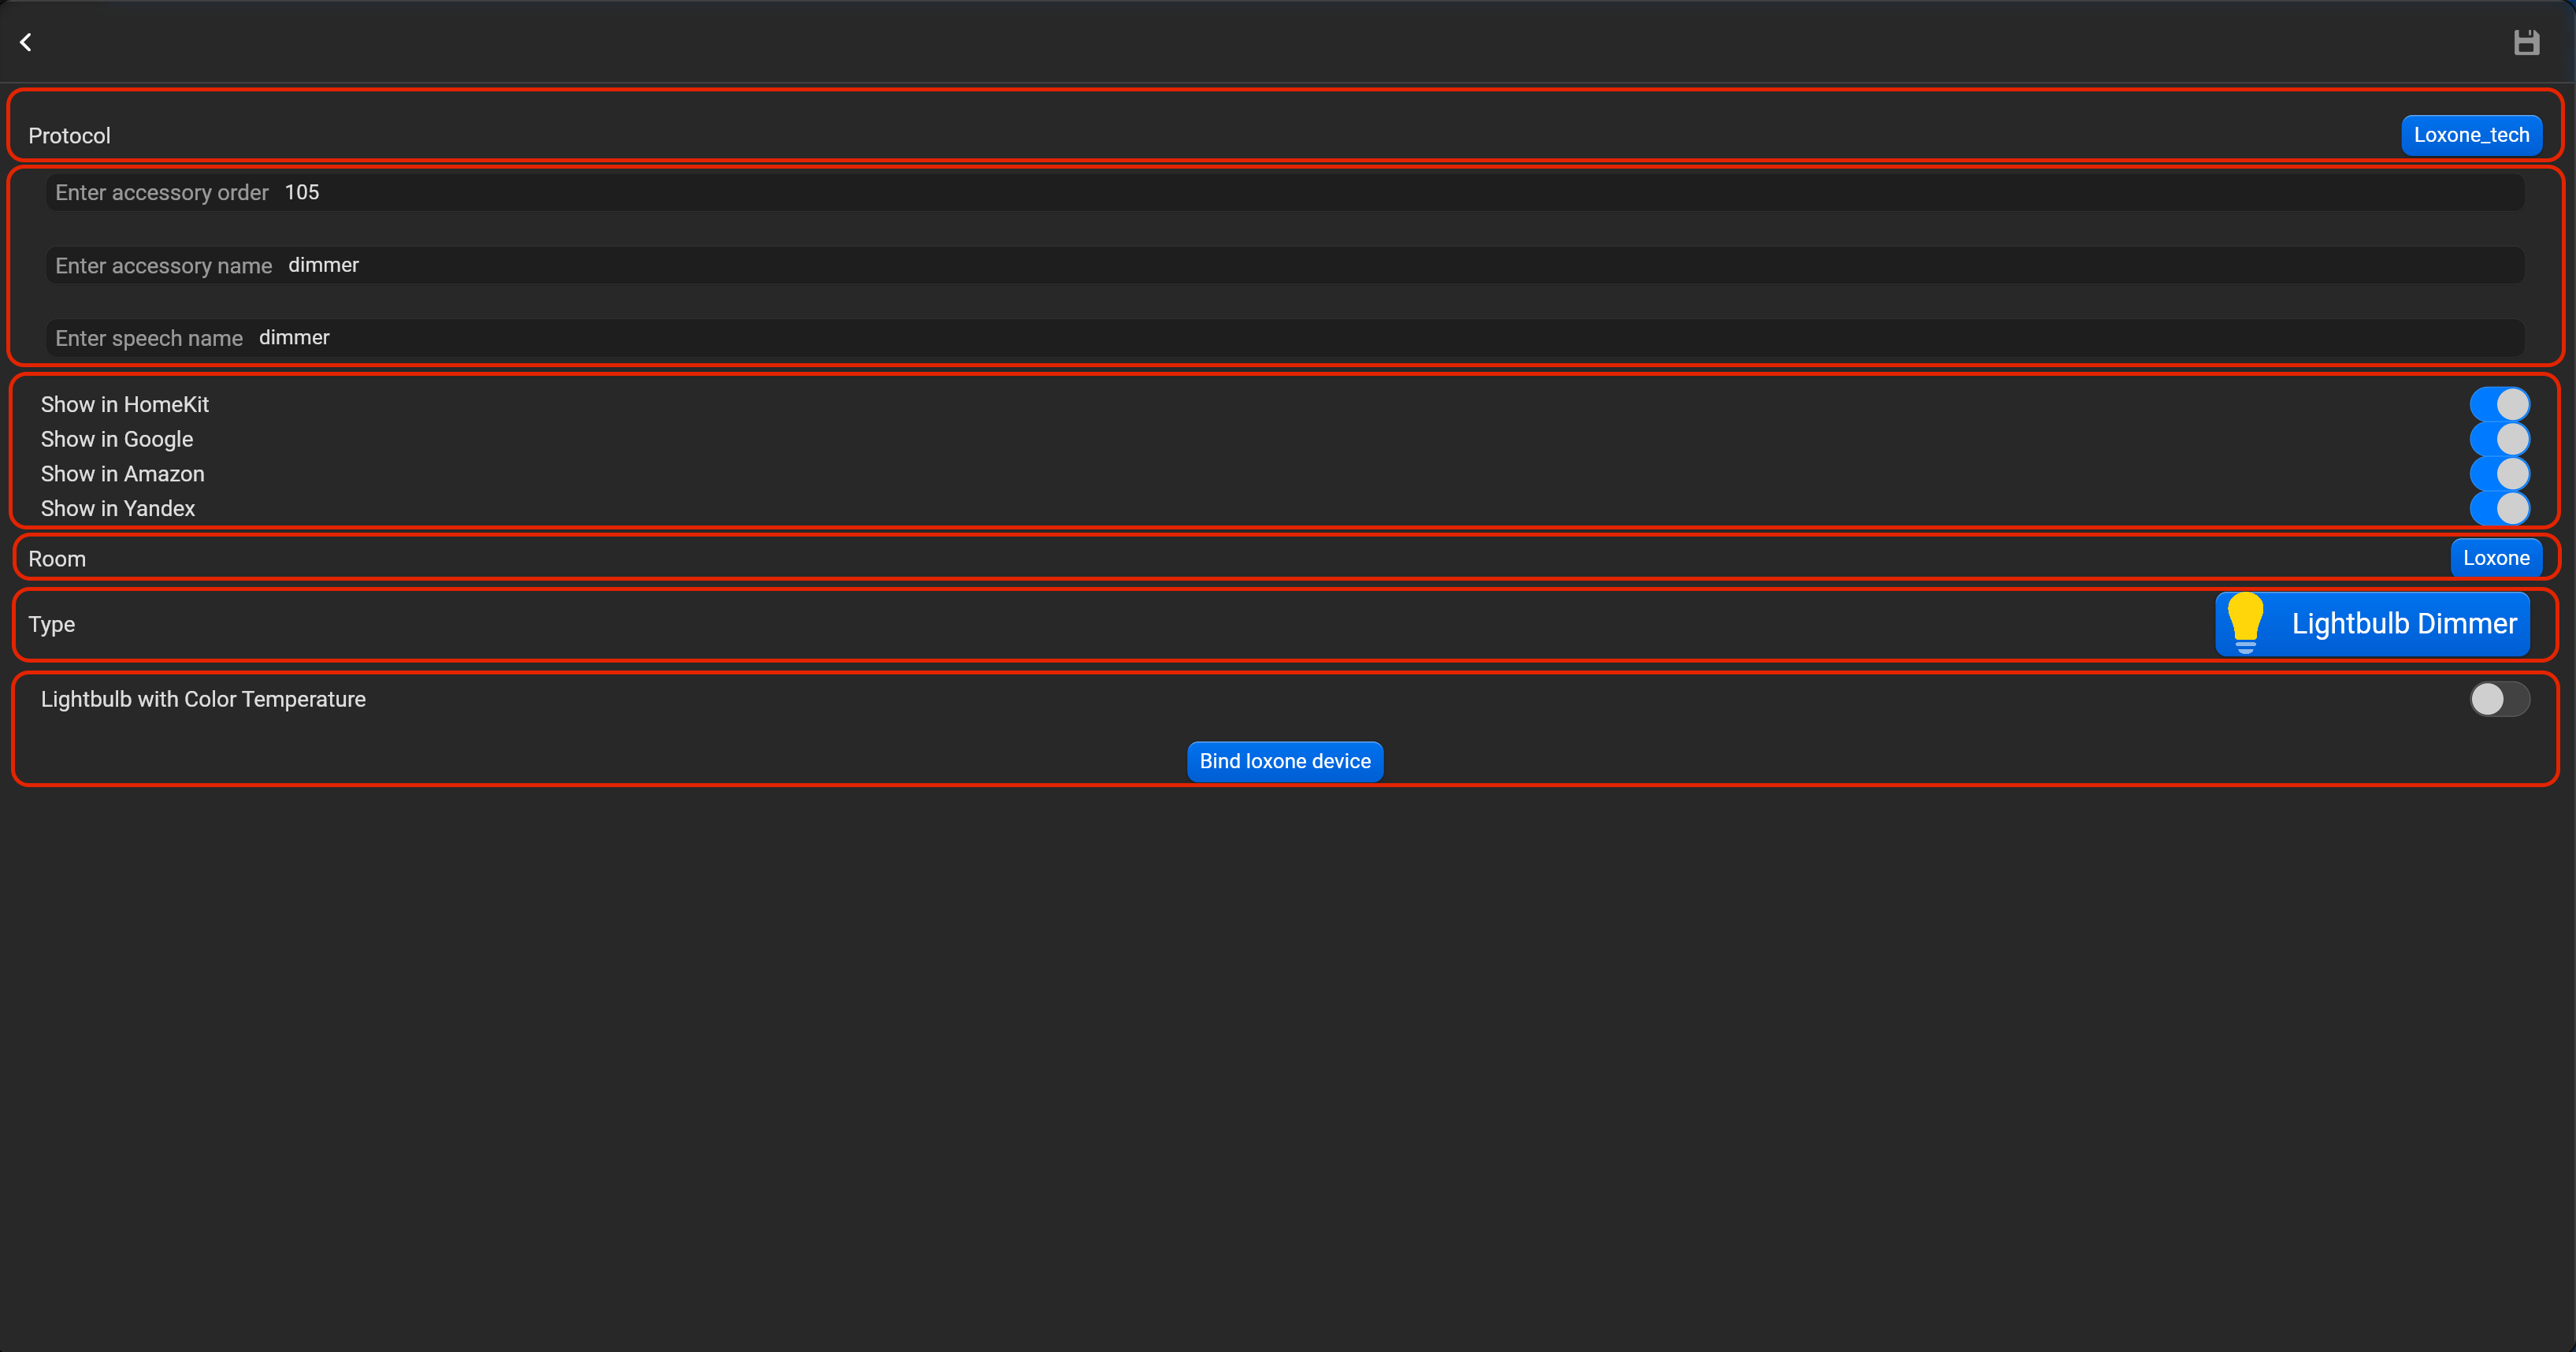
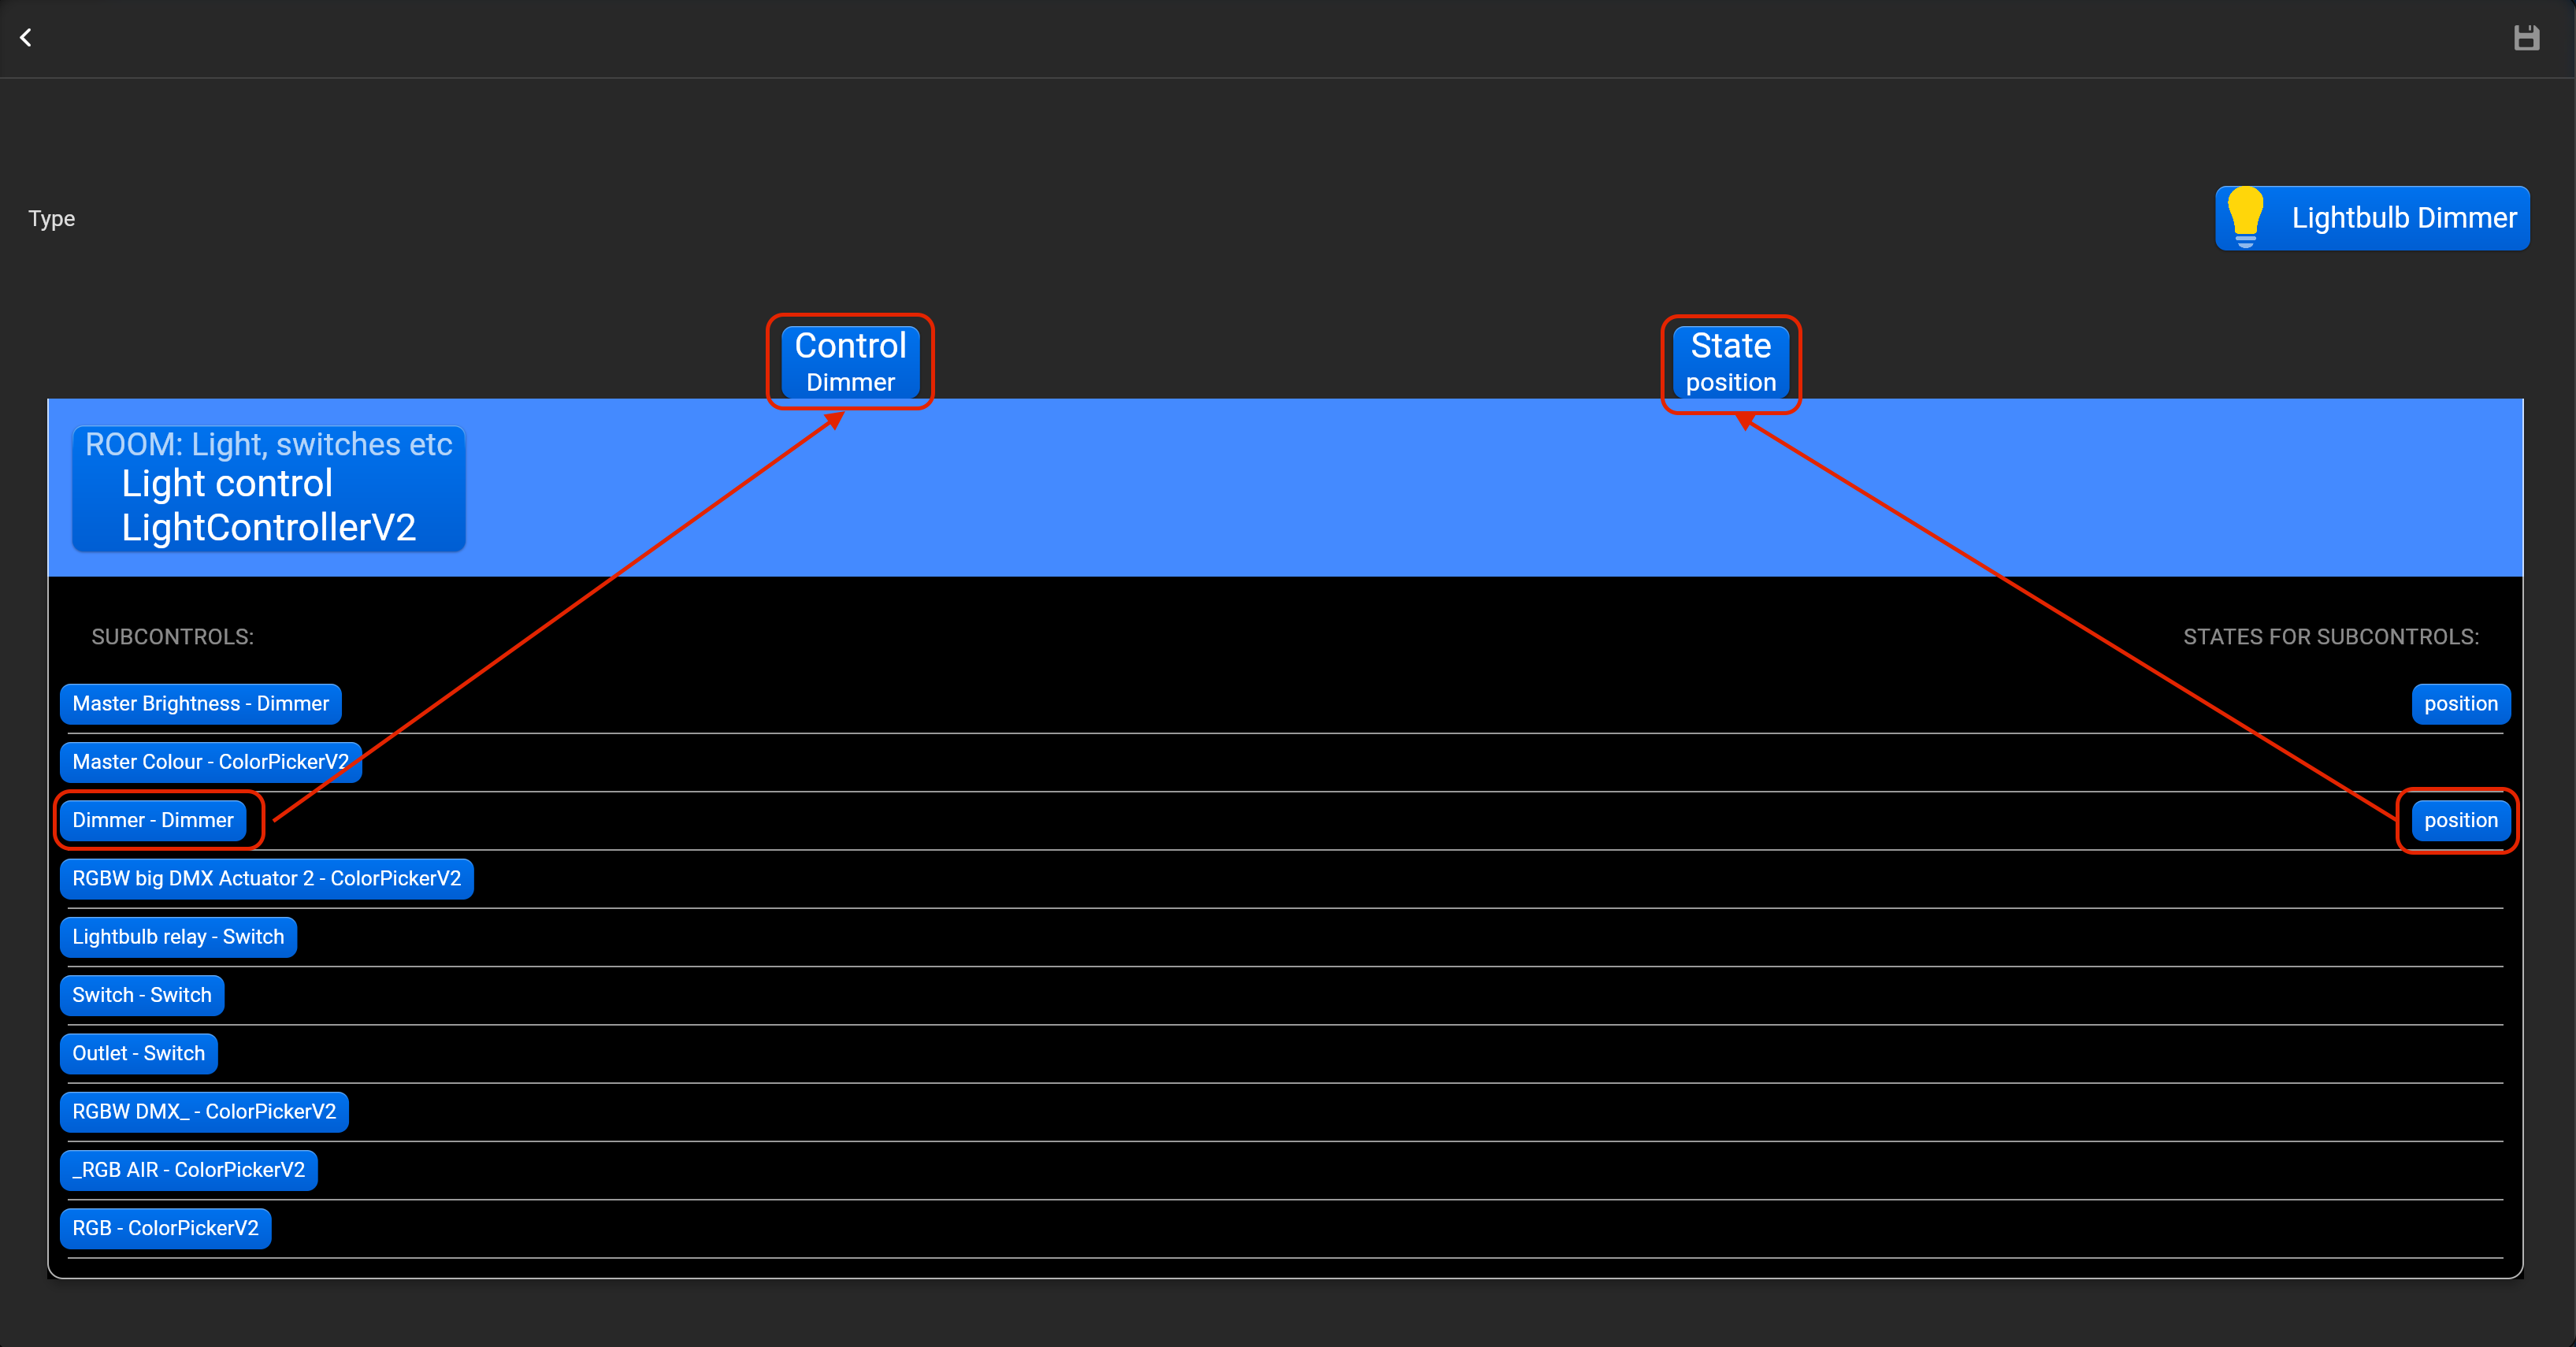
¶ Lightbulb dimmer
- select the protocol in the drop-down list,
- put the accessory order (affects the location of the accessory in Pyxis app),
- put name of the accessory and for the voice assistants,
- select voice assistants, where the accessory should be displayed,
- select the room, where the accessory will be located,
- select the type of accessory (Lightbulb dimmer),
- tap on “Bind Loxone device” and adjust accessory by dragging-and-dropping in “Control” and “State” area required Loxone accessory.
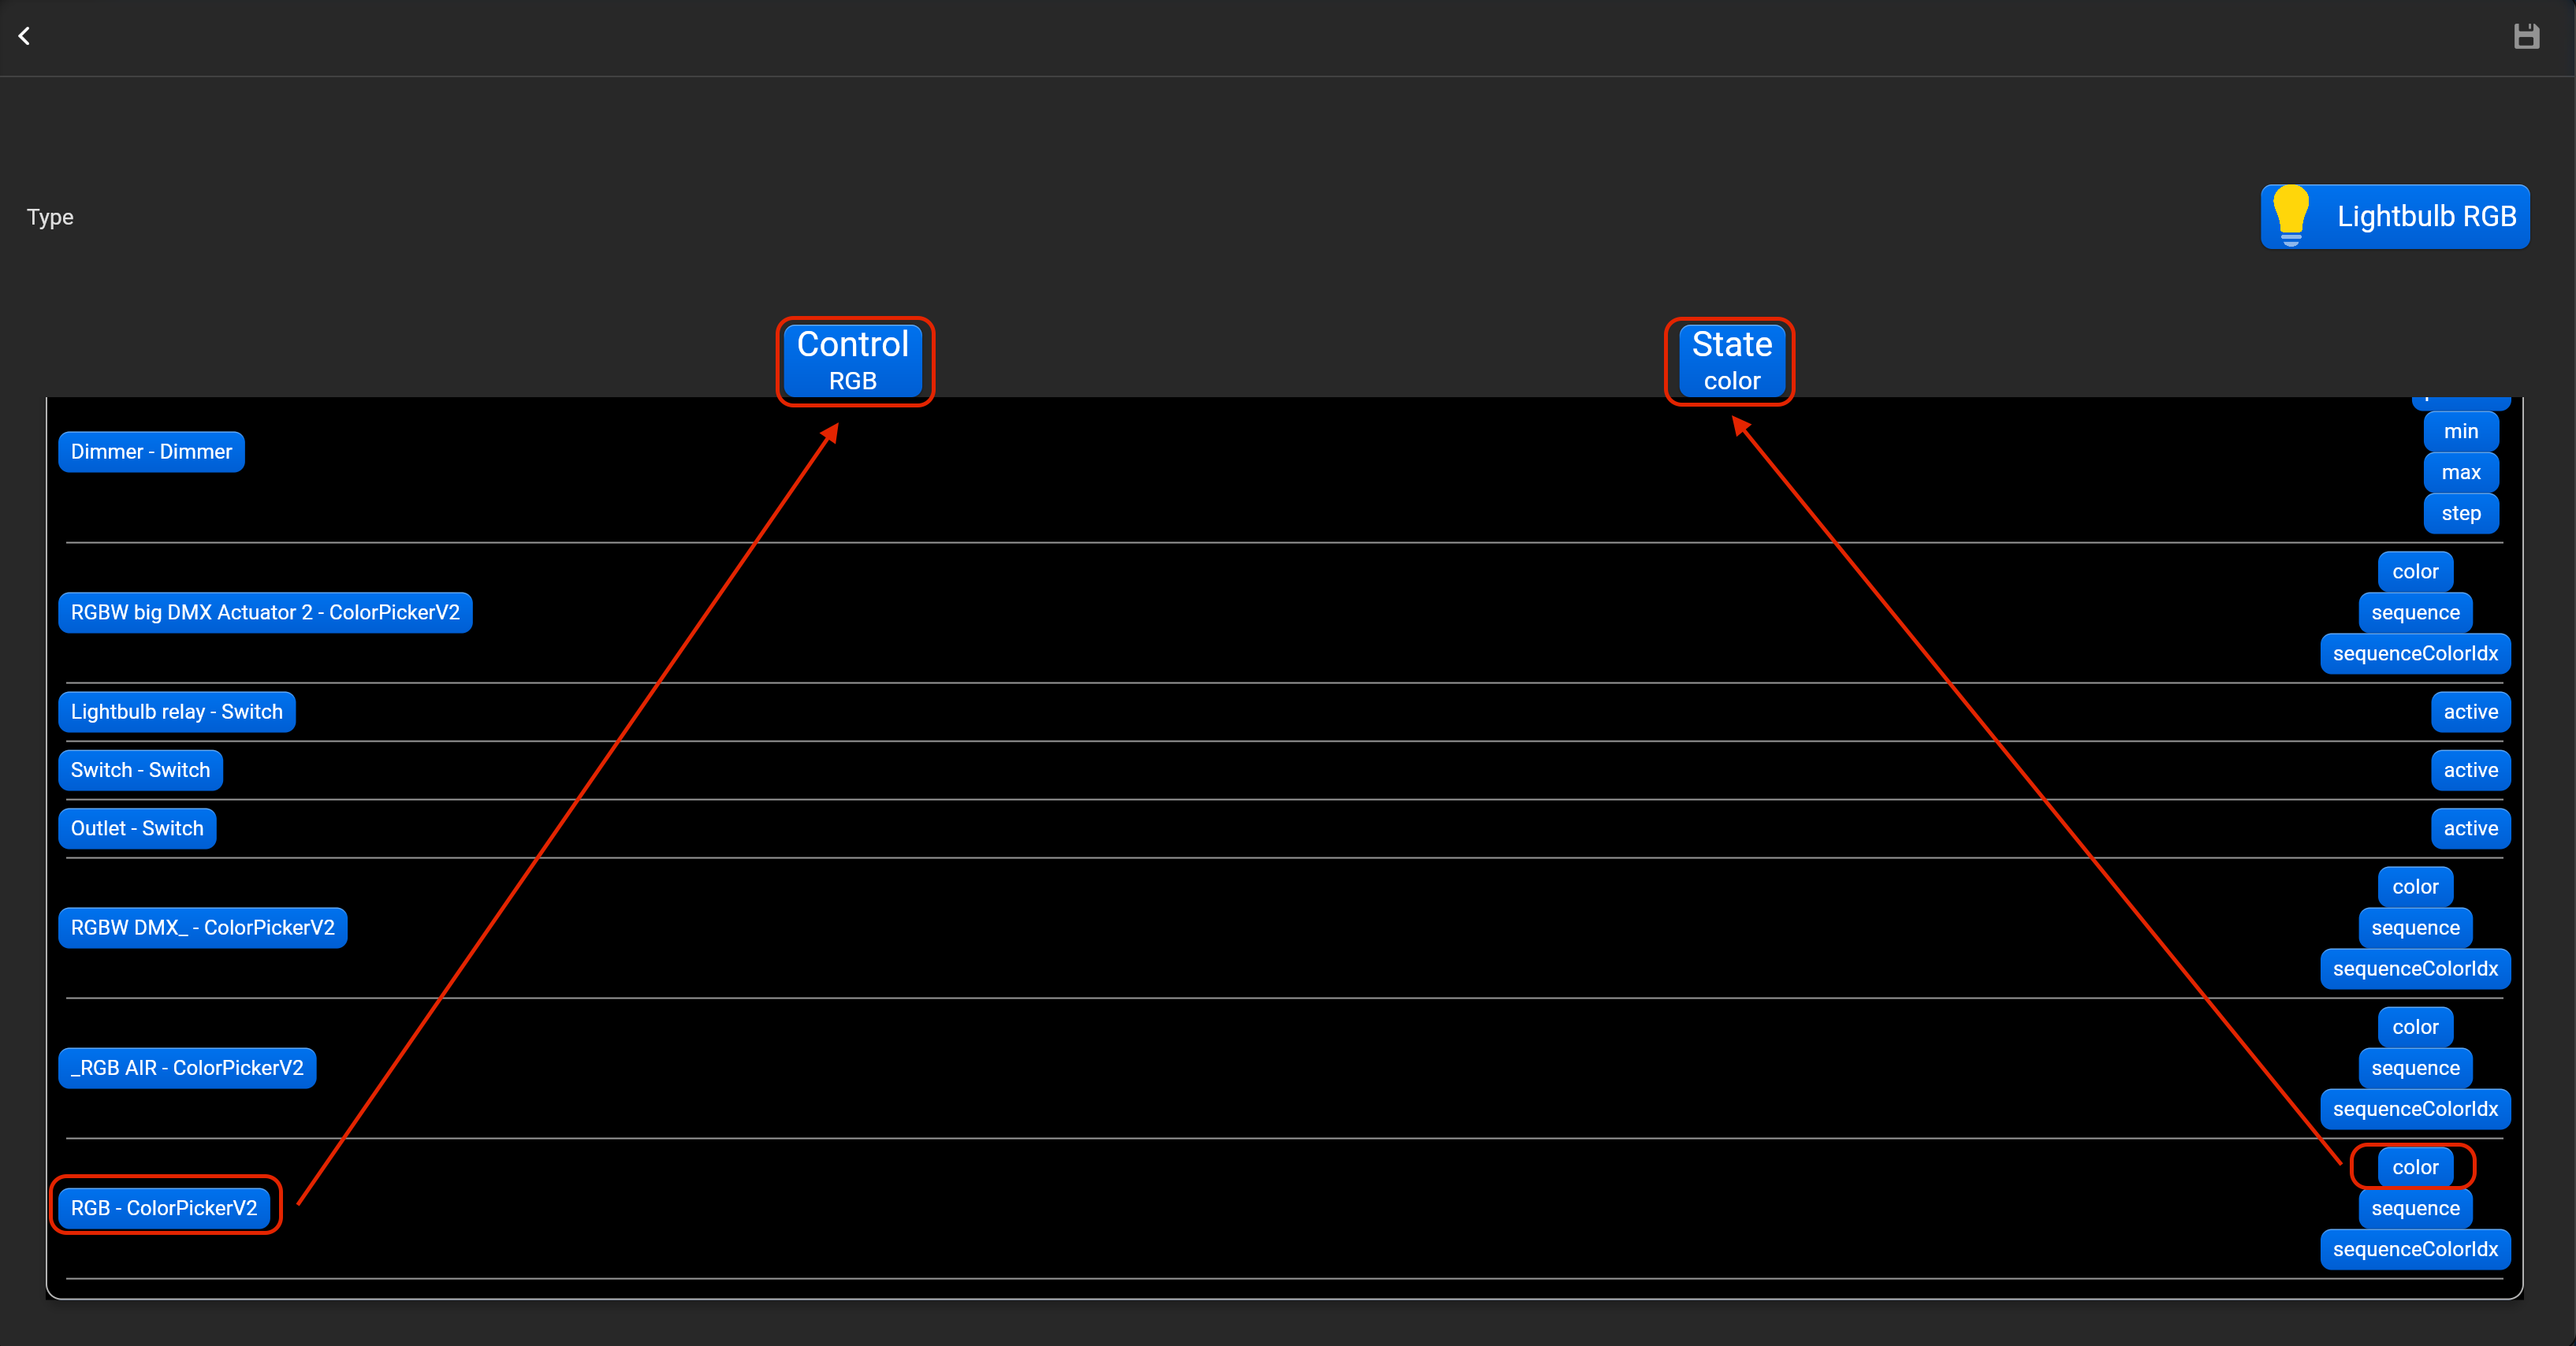
¶ Lightbulb RGB
- select the protocol in the drop-down list,
- put the accessory order (affects the location of the accessory in Pyxis app),
- put name of the accessory and for the voice assistants,
- select voice assistants, where the accessory should be displayed,
- select the room, where the accessory will be located,
- select the type of accessory (Lightbulb RGB),
- tap on “Bind Loxone device” and adjust accessory by dragging-and-dropping in “Control” and “State” area required Loxone accessory.

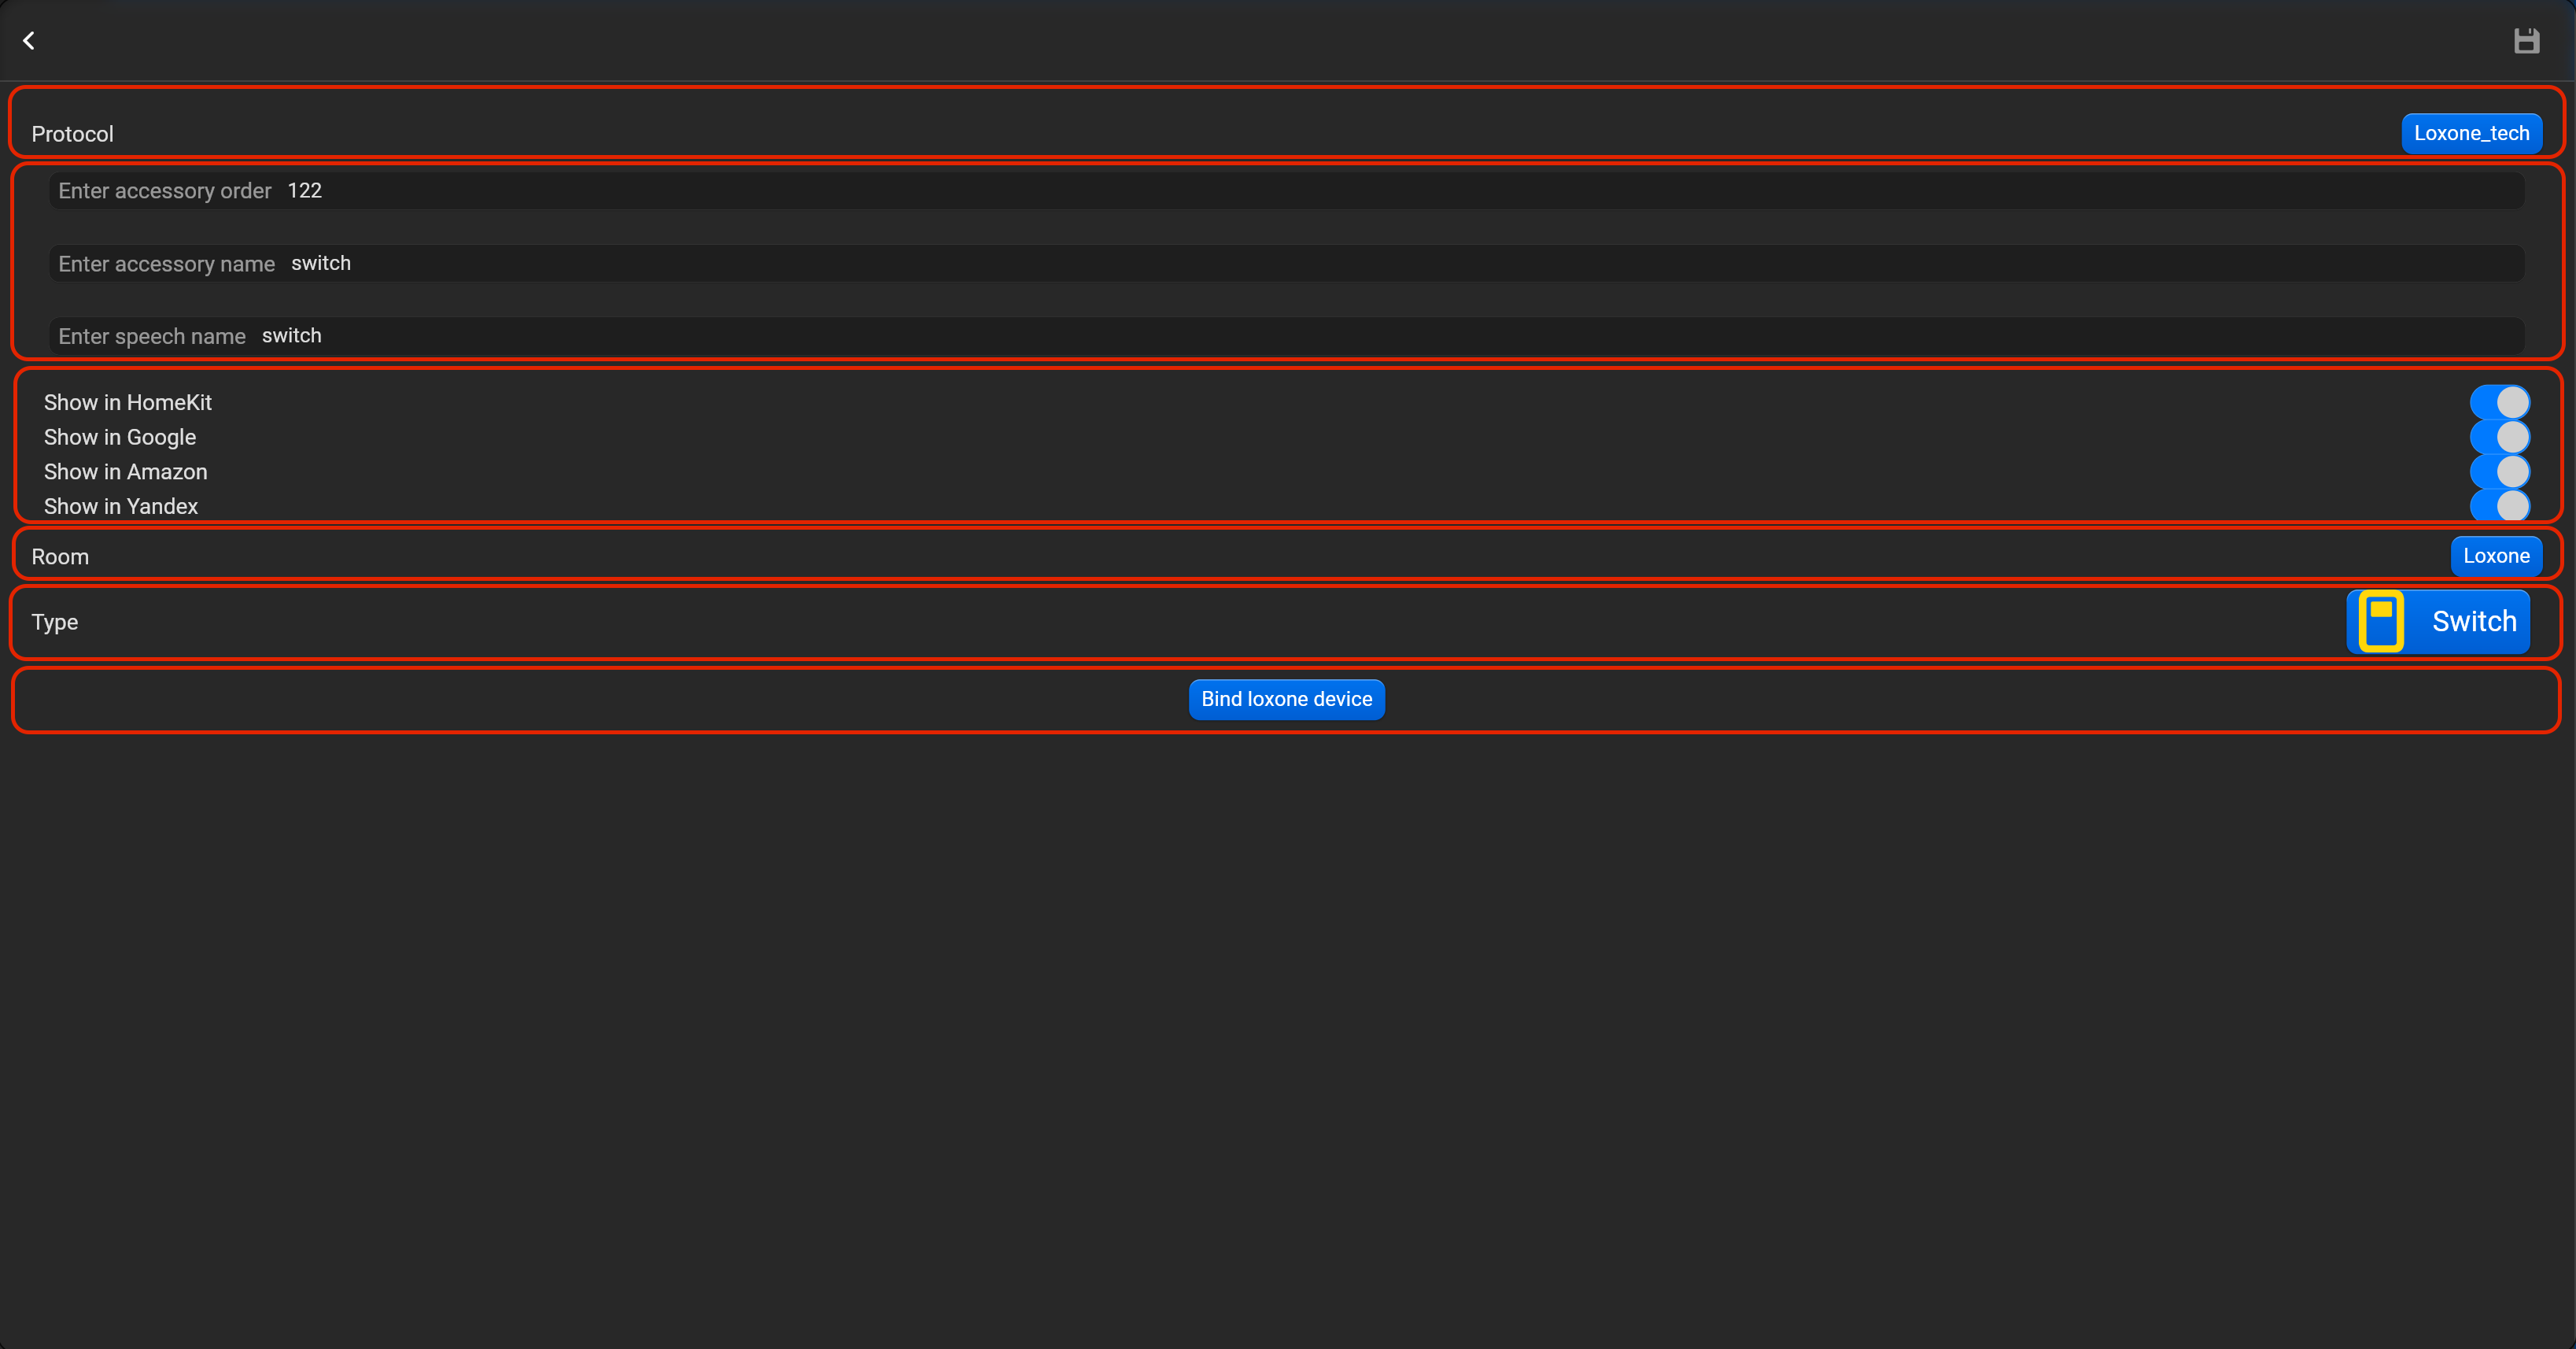
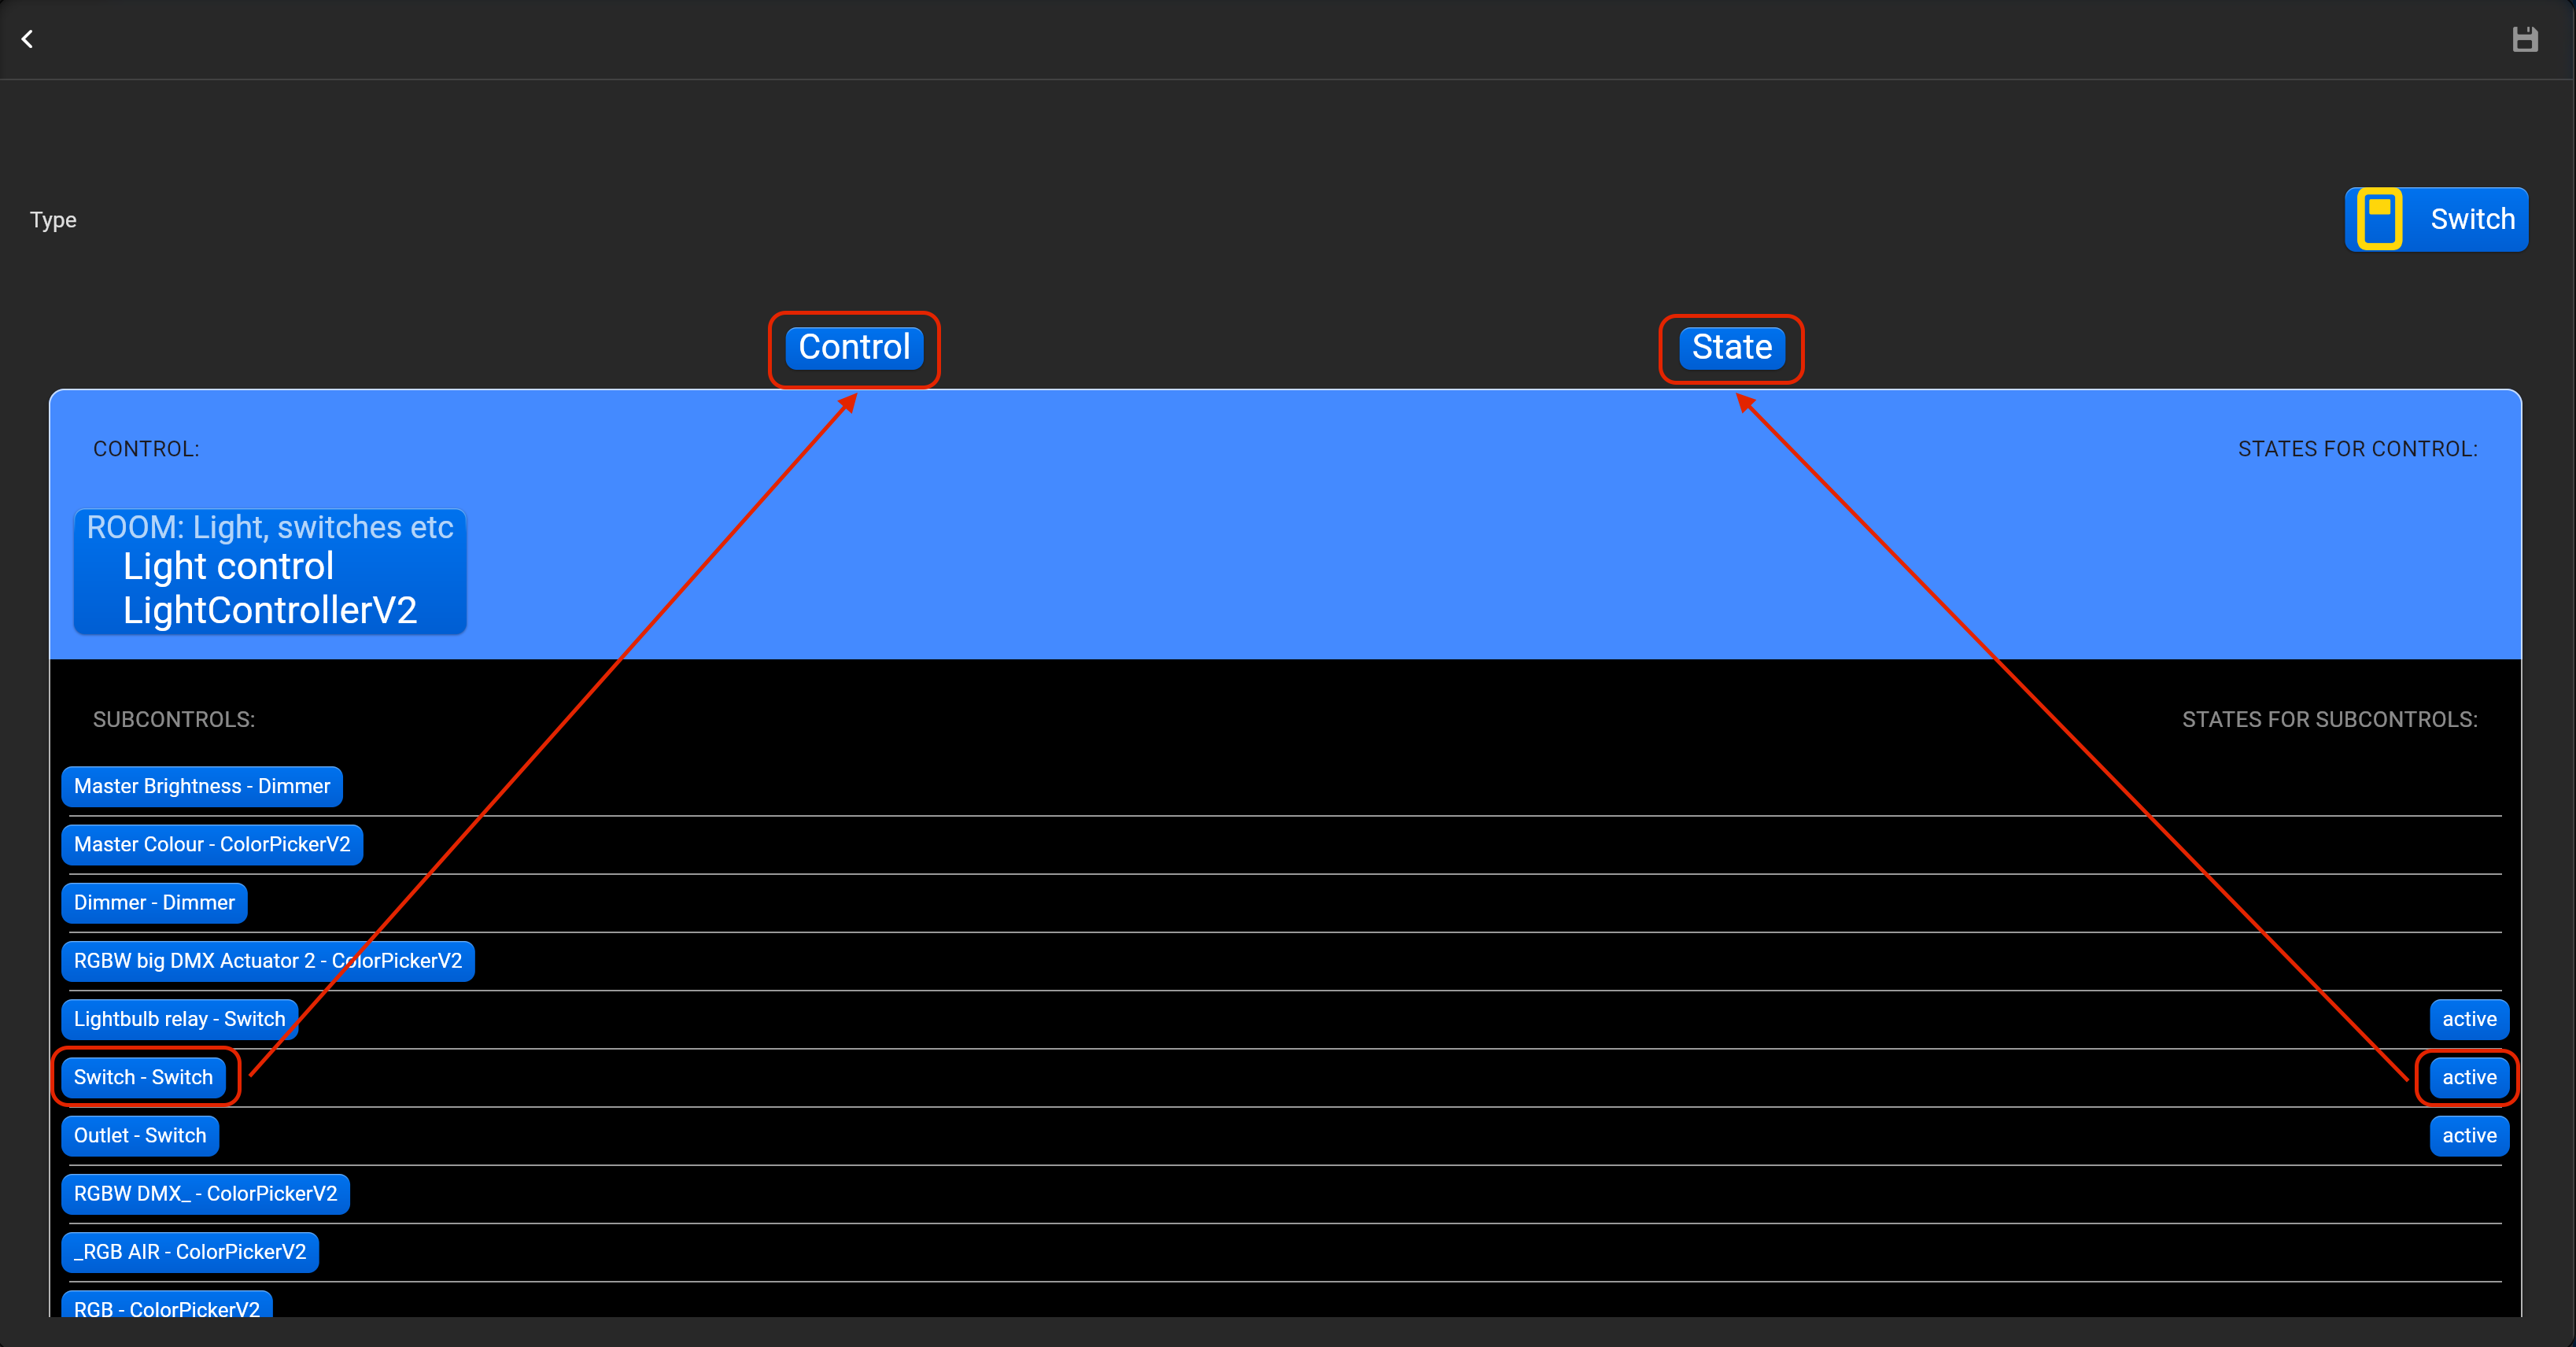
¶ Switch
- select the protocol in the drop-down list,
- put the accessory order (affects the location of the accessory in Pyxis app),
- put name of the accessory and for the voice assistants,
- select voice assistants, where the accessory should be displayed,
- select the room, where the accessory will be located,
- select the type of accessory (Switch),
- tap on “Bind Loxone device” and adjust accessory by dragging-and-dropping in “Control” and “State” area required Loxone accessory.
¶ Outlet
- select the protocol in the drop-down list,
- put the accessory order (affects the location of the accessory in Pyxis app),
- put name of the accessory and for the voice assistants,
- select voice assistants, where the accessory should be displayed,
- select the room, where the accessory will be located,
- select the type of accessory (Outlet),
- tap on “Bind Loxone device” and adjust accessory by dragging-and-dropping in “Control” and “State” area required Loxone accessory.


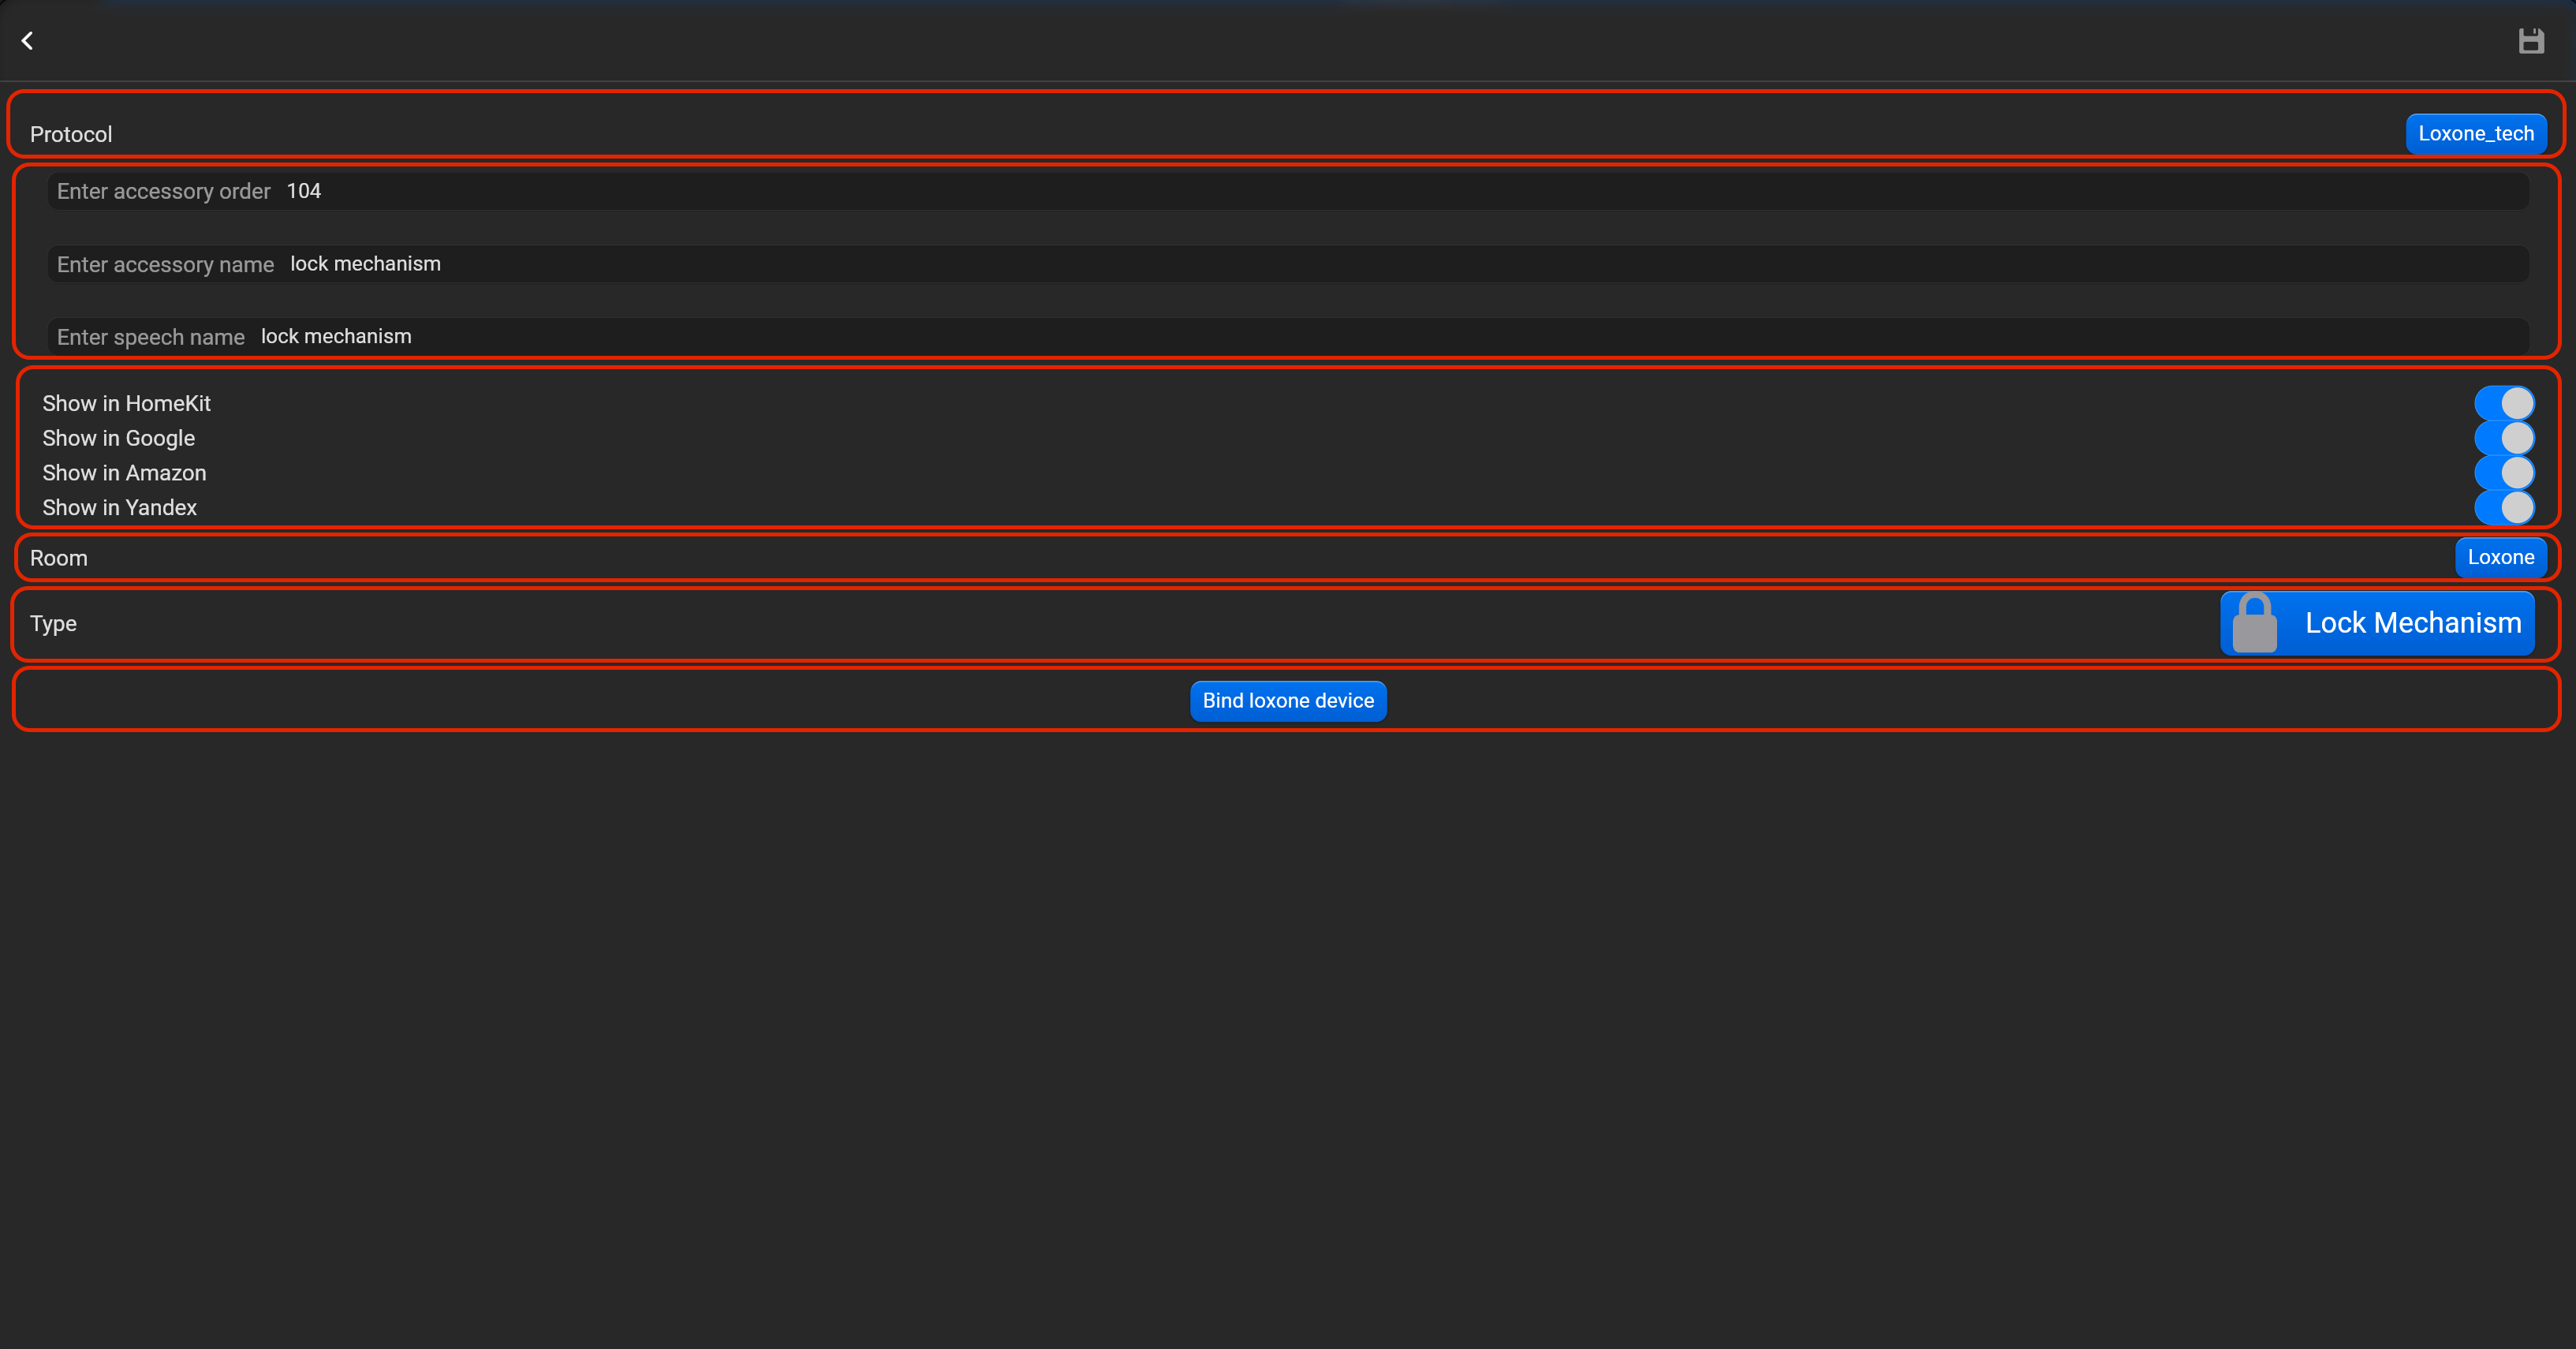
¶ Lock mechanism
- select the protocol in the drop-down list,
- put the accessory order (affects the location of the accessory in Pyxis app),
- put name of the accessory and for the voice assistants,
- select voice assistants, where the accessory should be displayed,
- select the room, where the accessory will be located,
- select the type of accessory (Lock mechanism),
- tap on “Bind Loxone device” and adjust accessory by dragging-and-dropping in “Control” and “State” area required Loxone accessory.

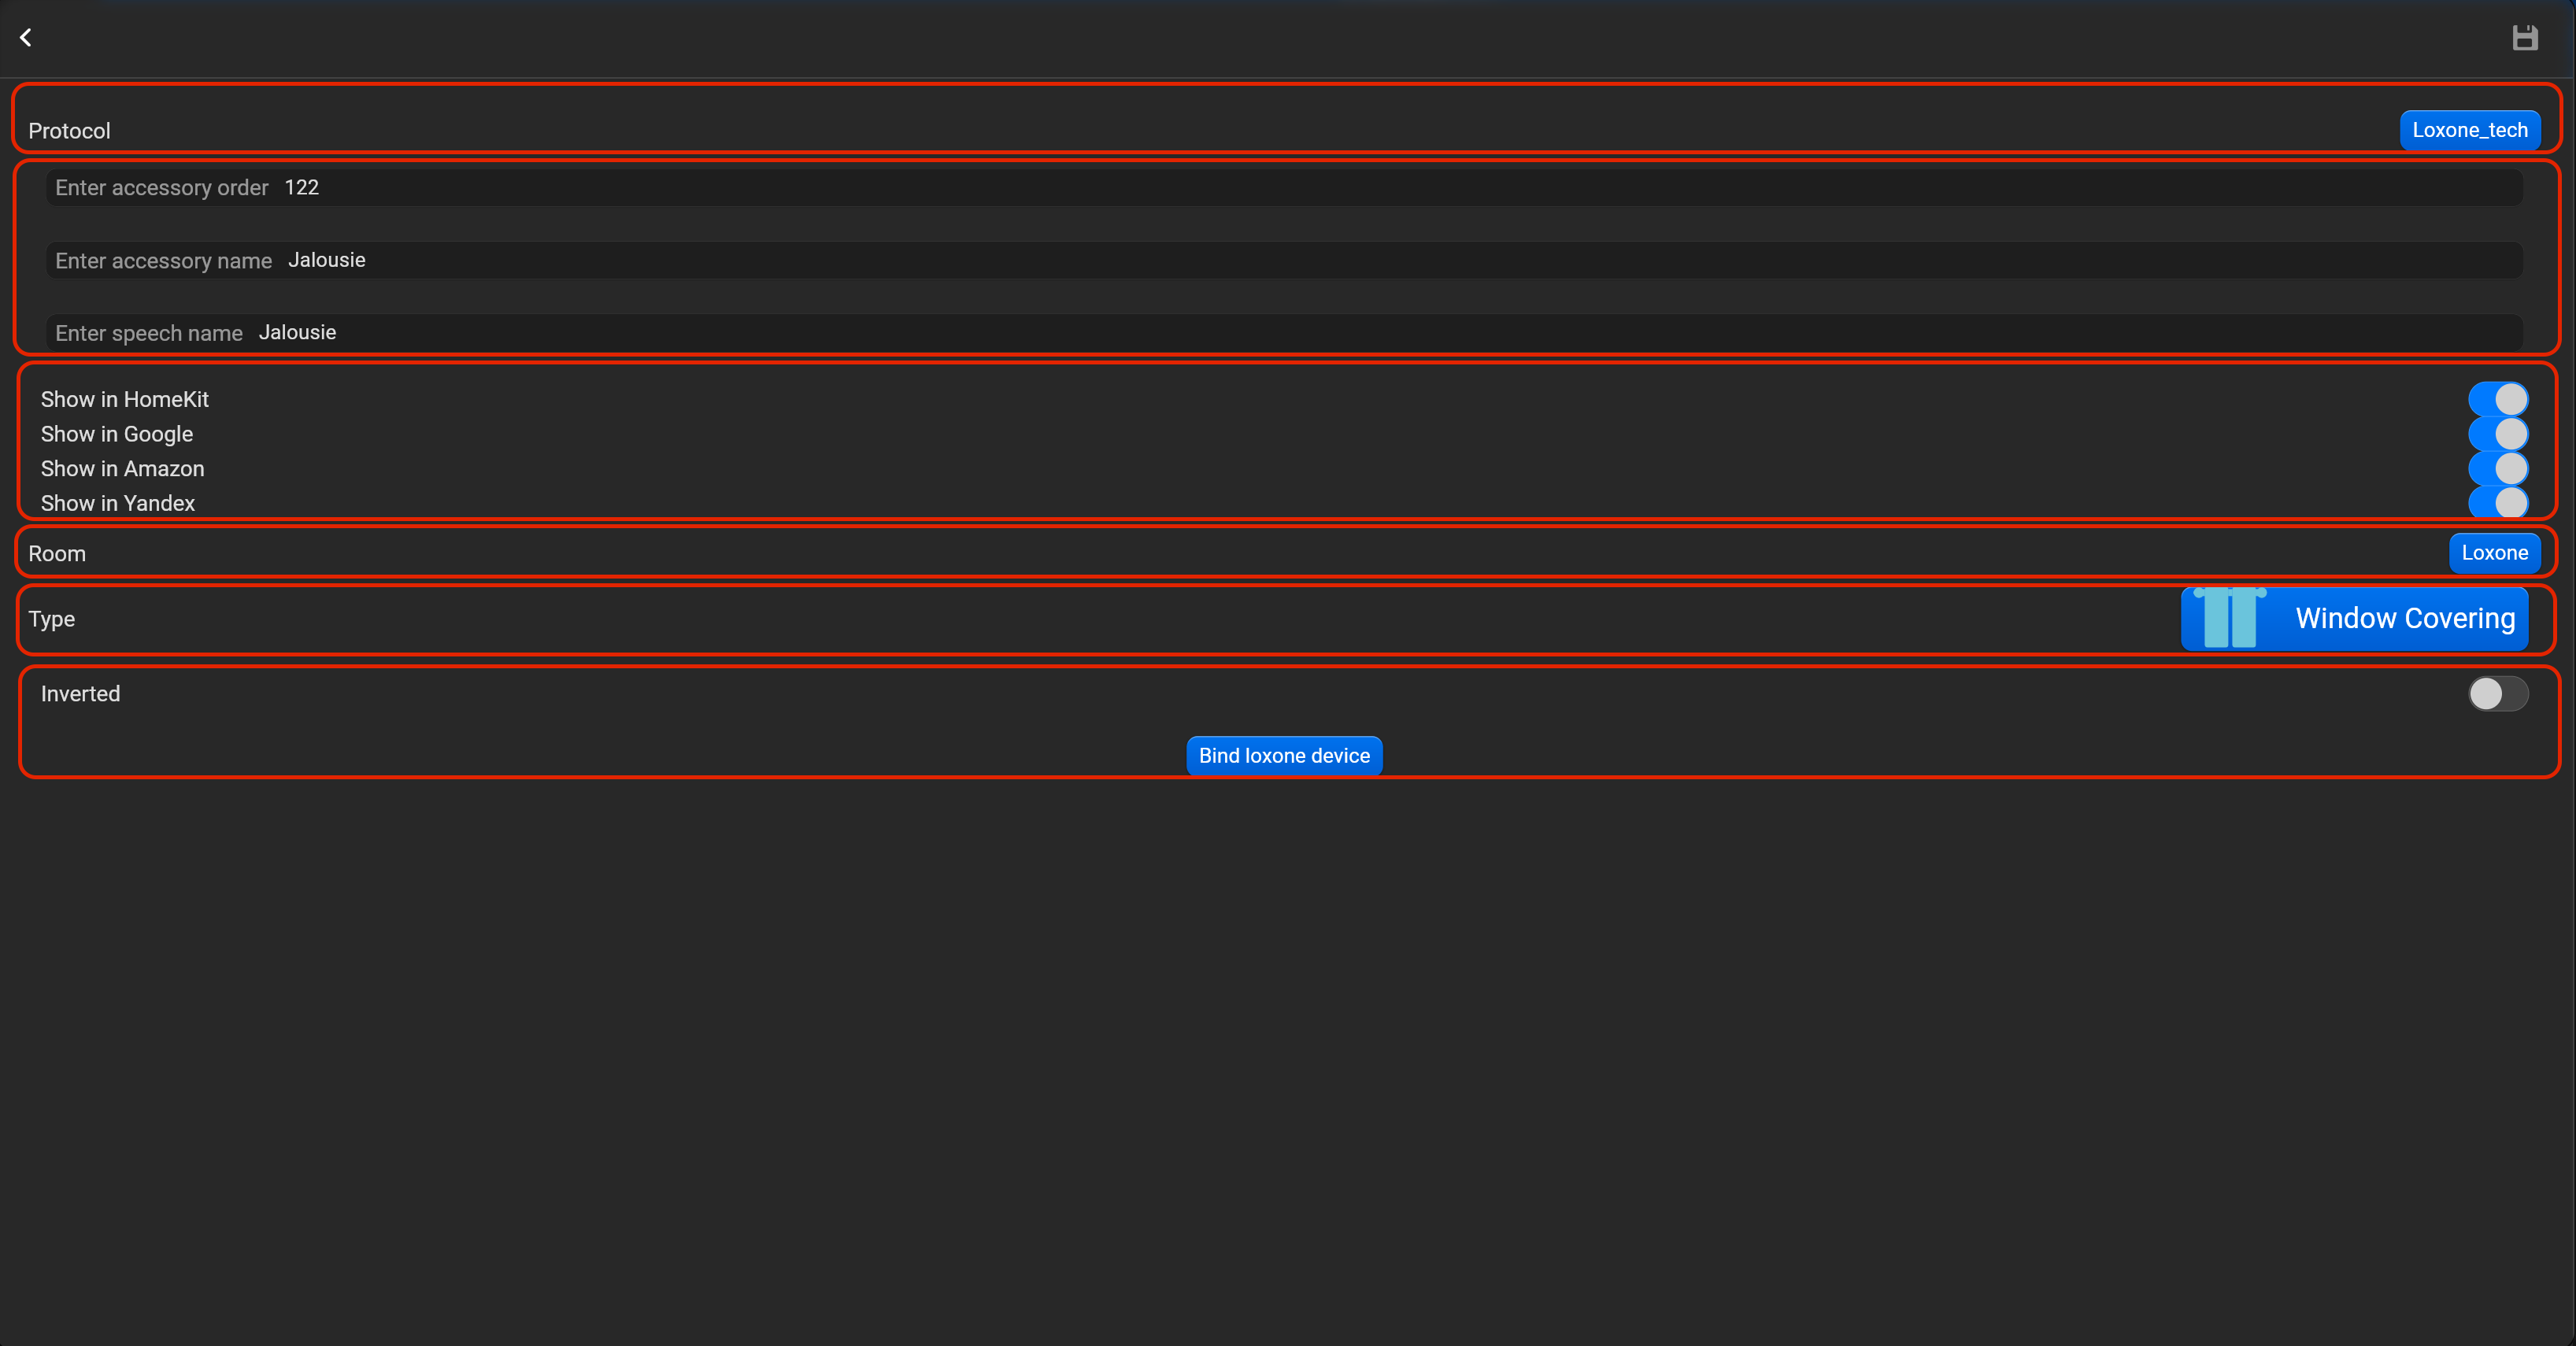
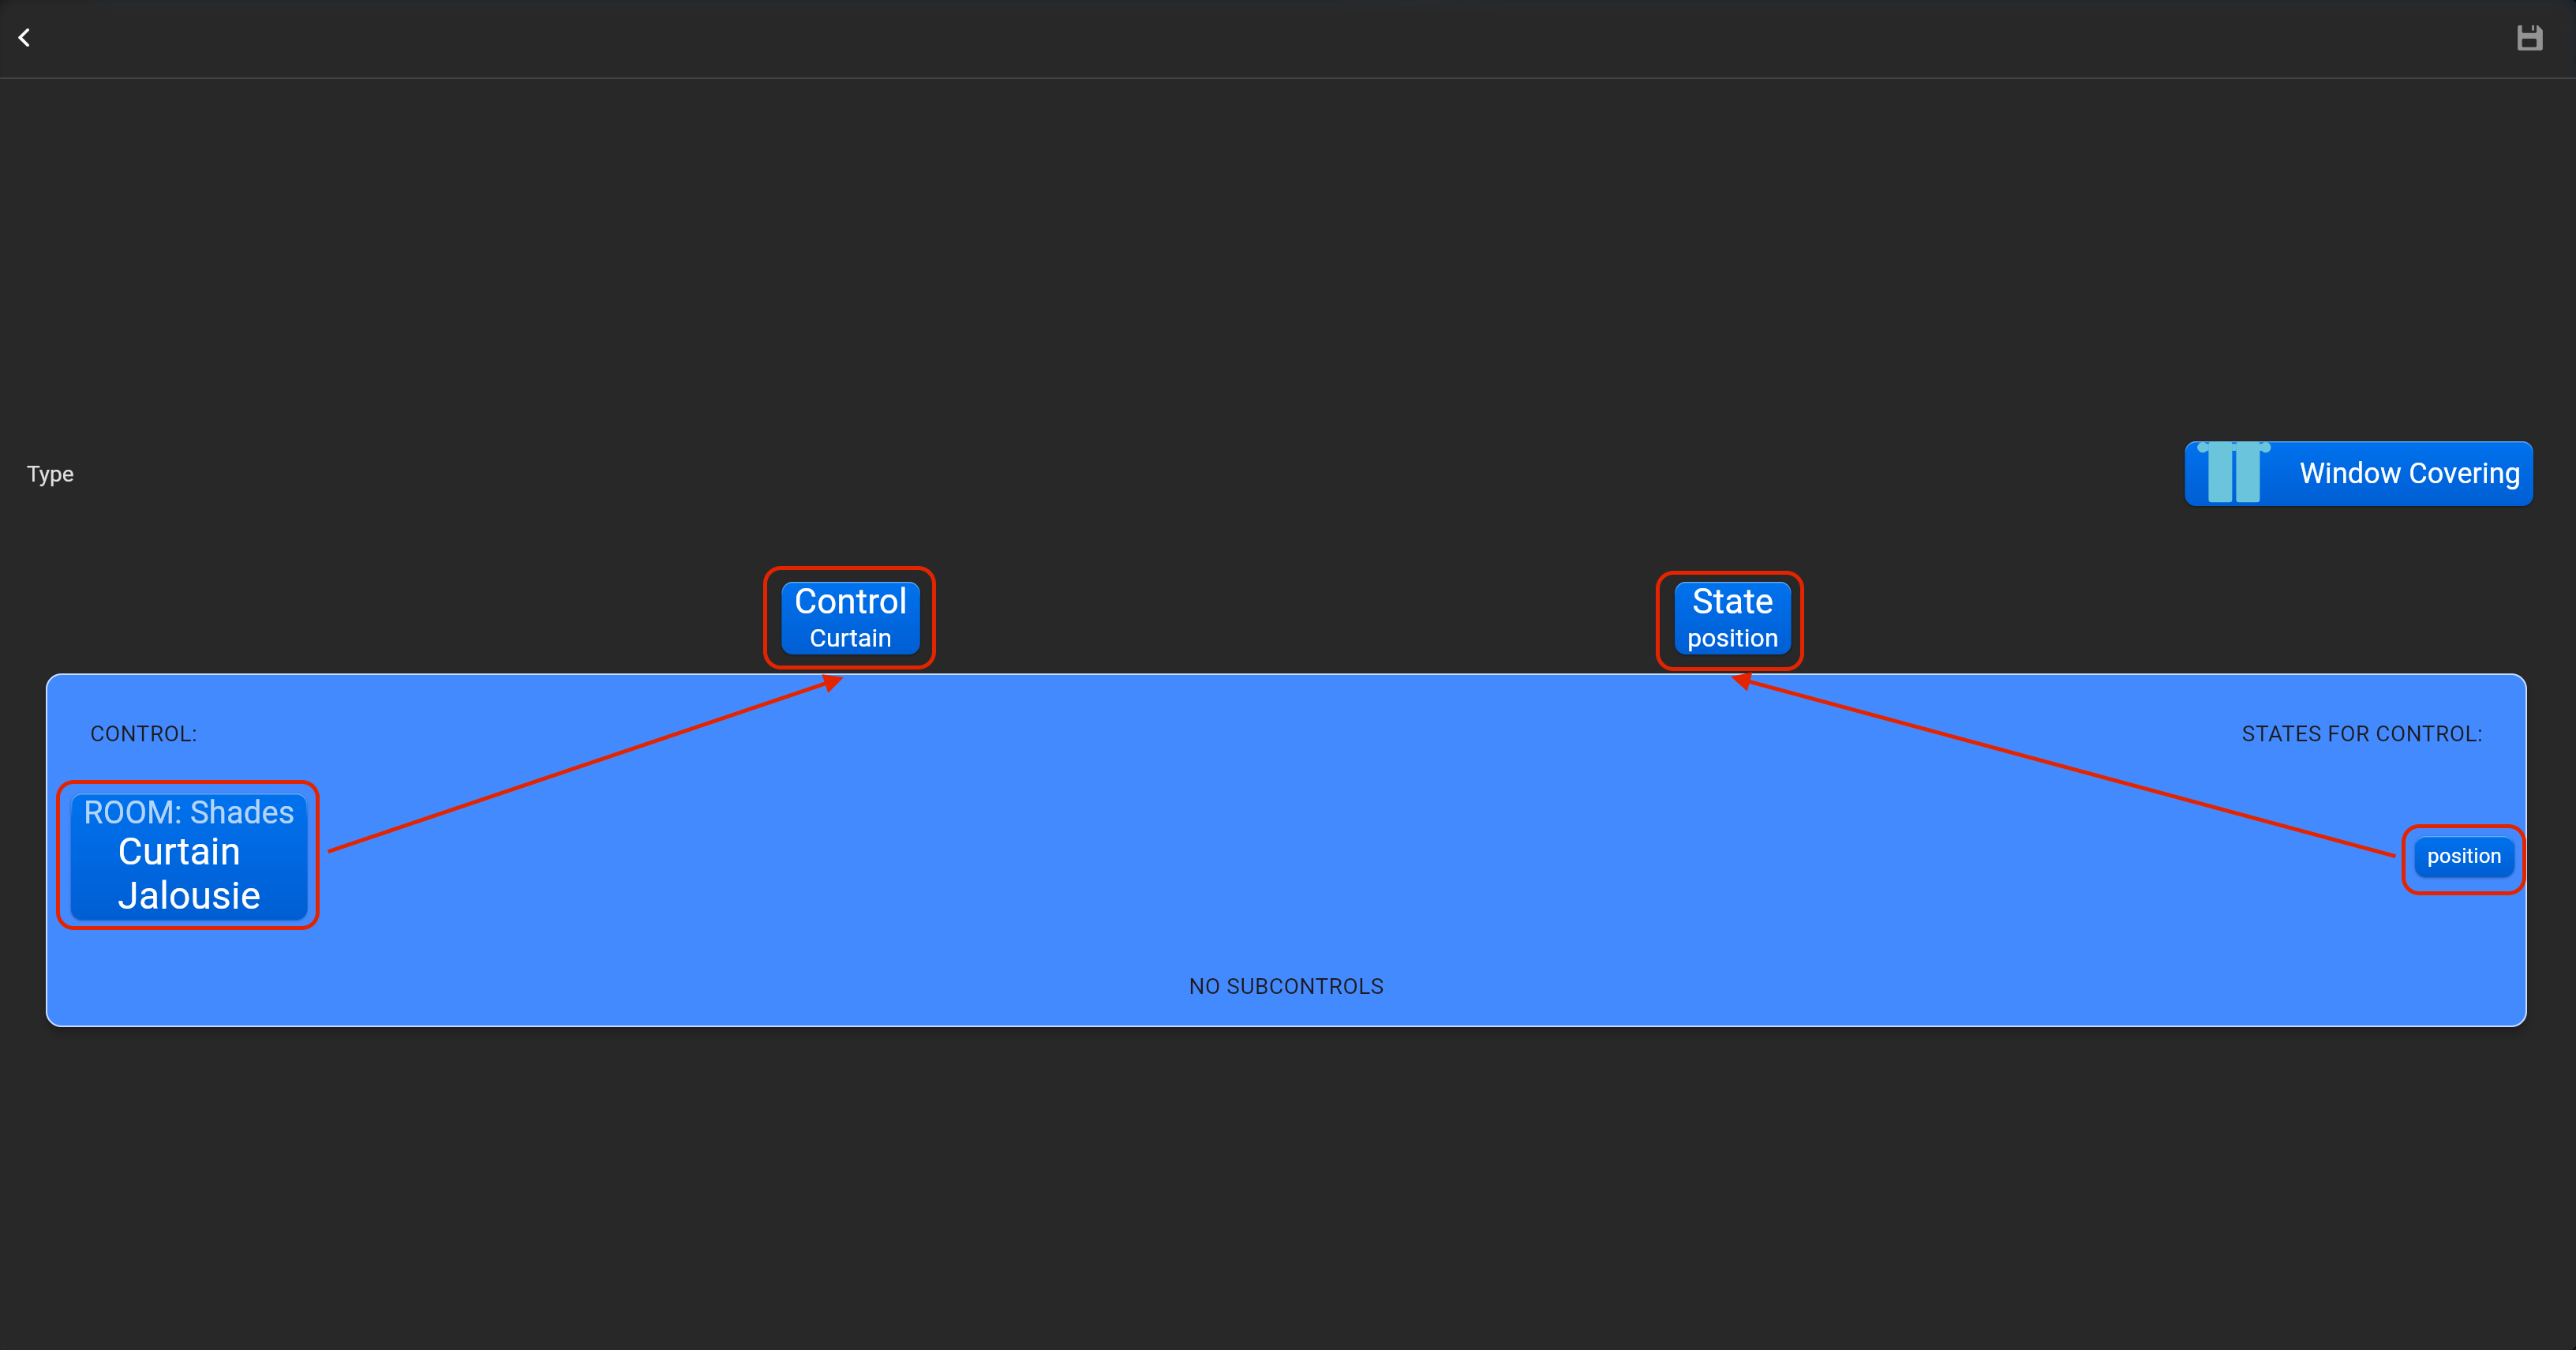
¶ Window covering
- select the protocol in the drop-down list,
- put the accessory order (affects the location of the accessory in Pyxis app),
- put name of the accessory and for the voice assistants,
- select voice assistants, where the accessory should be displayed,
- select the room, where the accessory will be located,
- select the type of accessory (Window covering),
- tap on “Bind Loxone device” and adjust accessory by dragging-and-dropping in “Control” and “State” area required Loxone accessory. You can invert direction for this accessory.
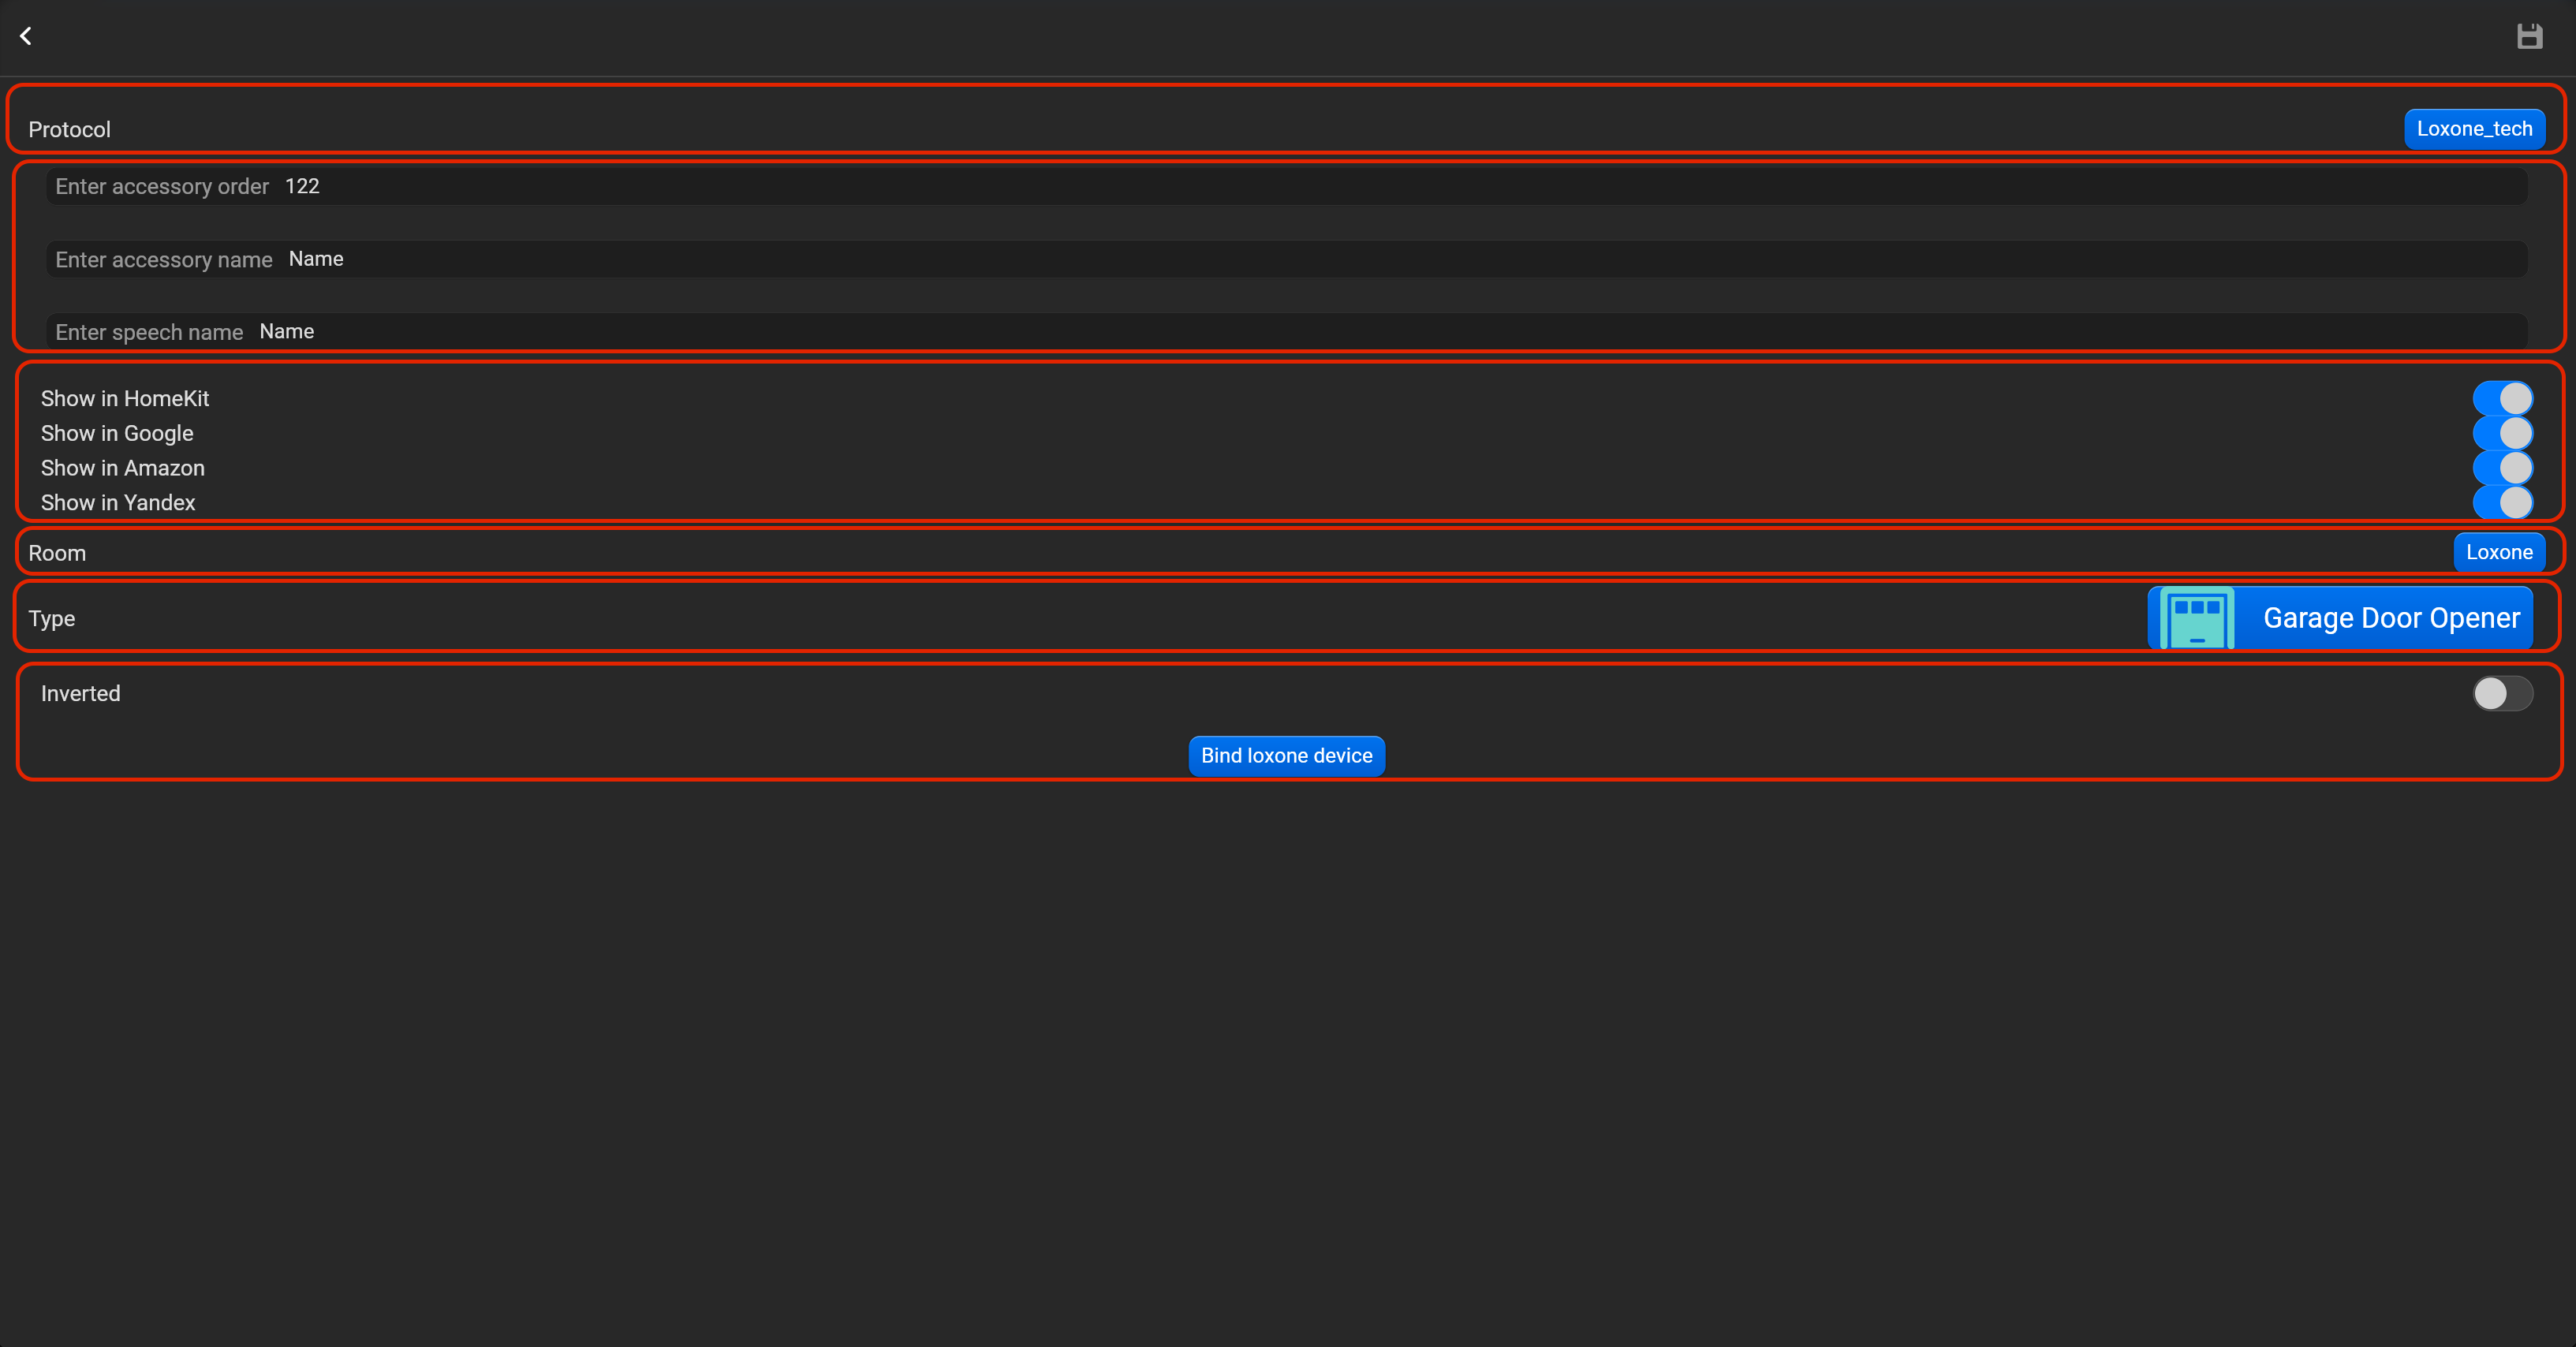
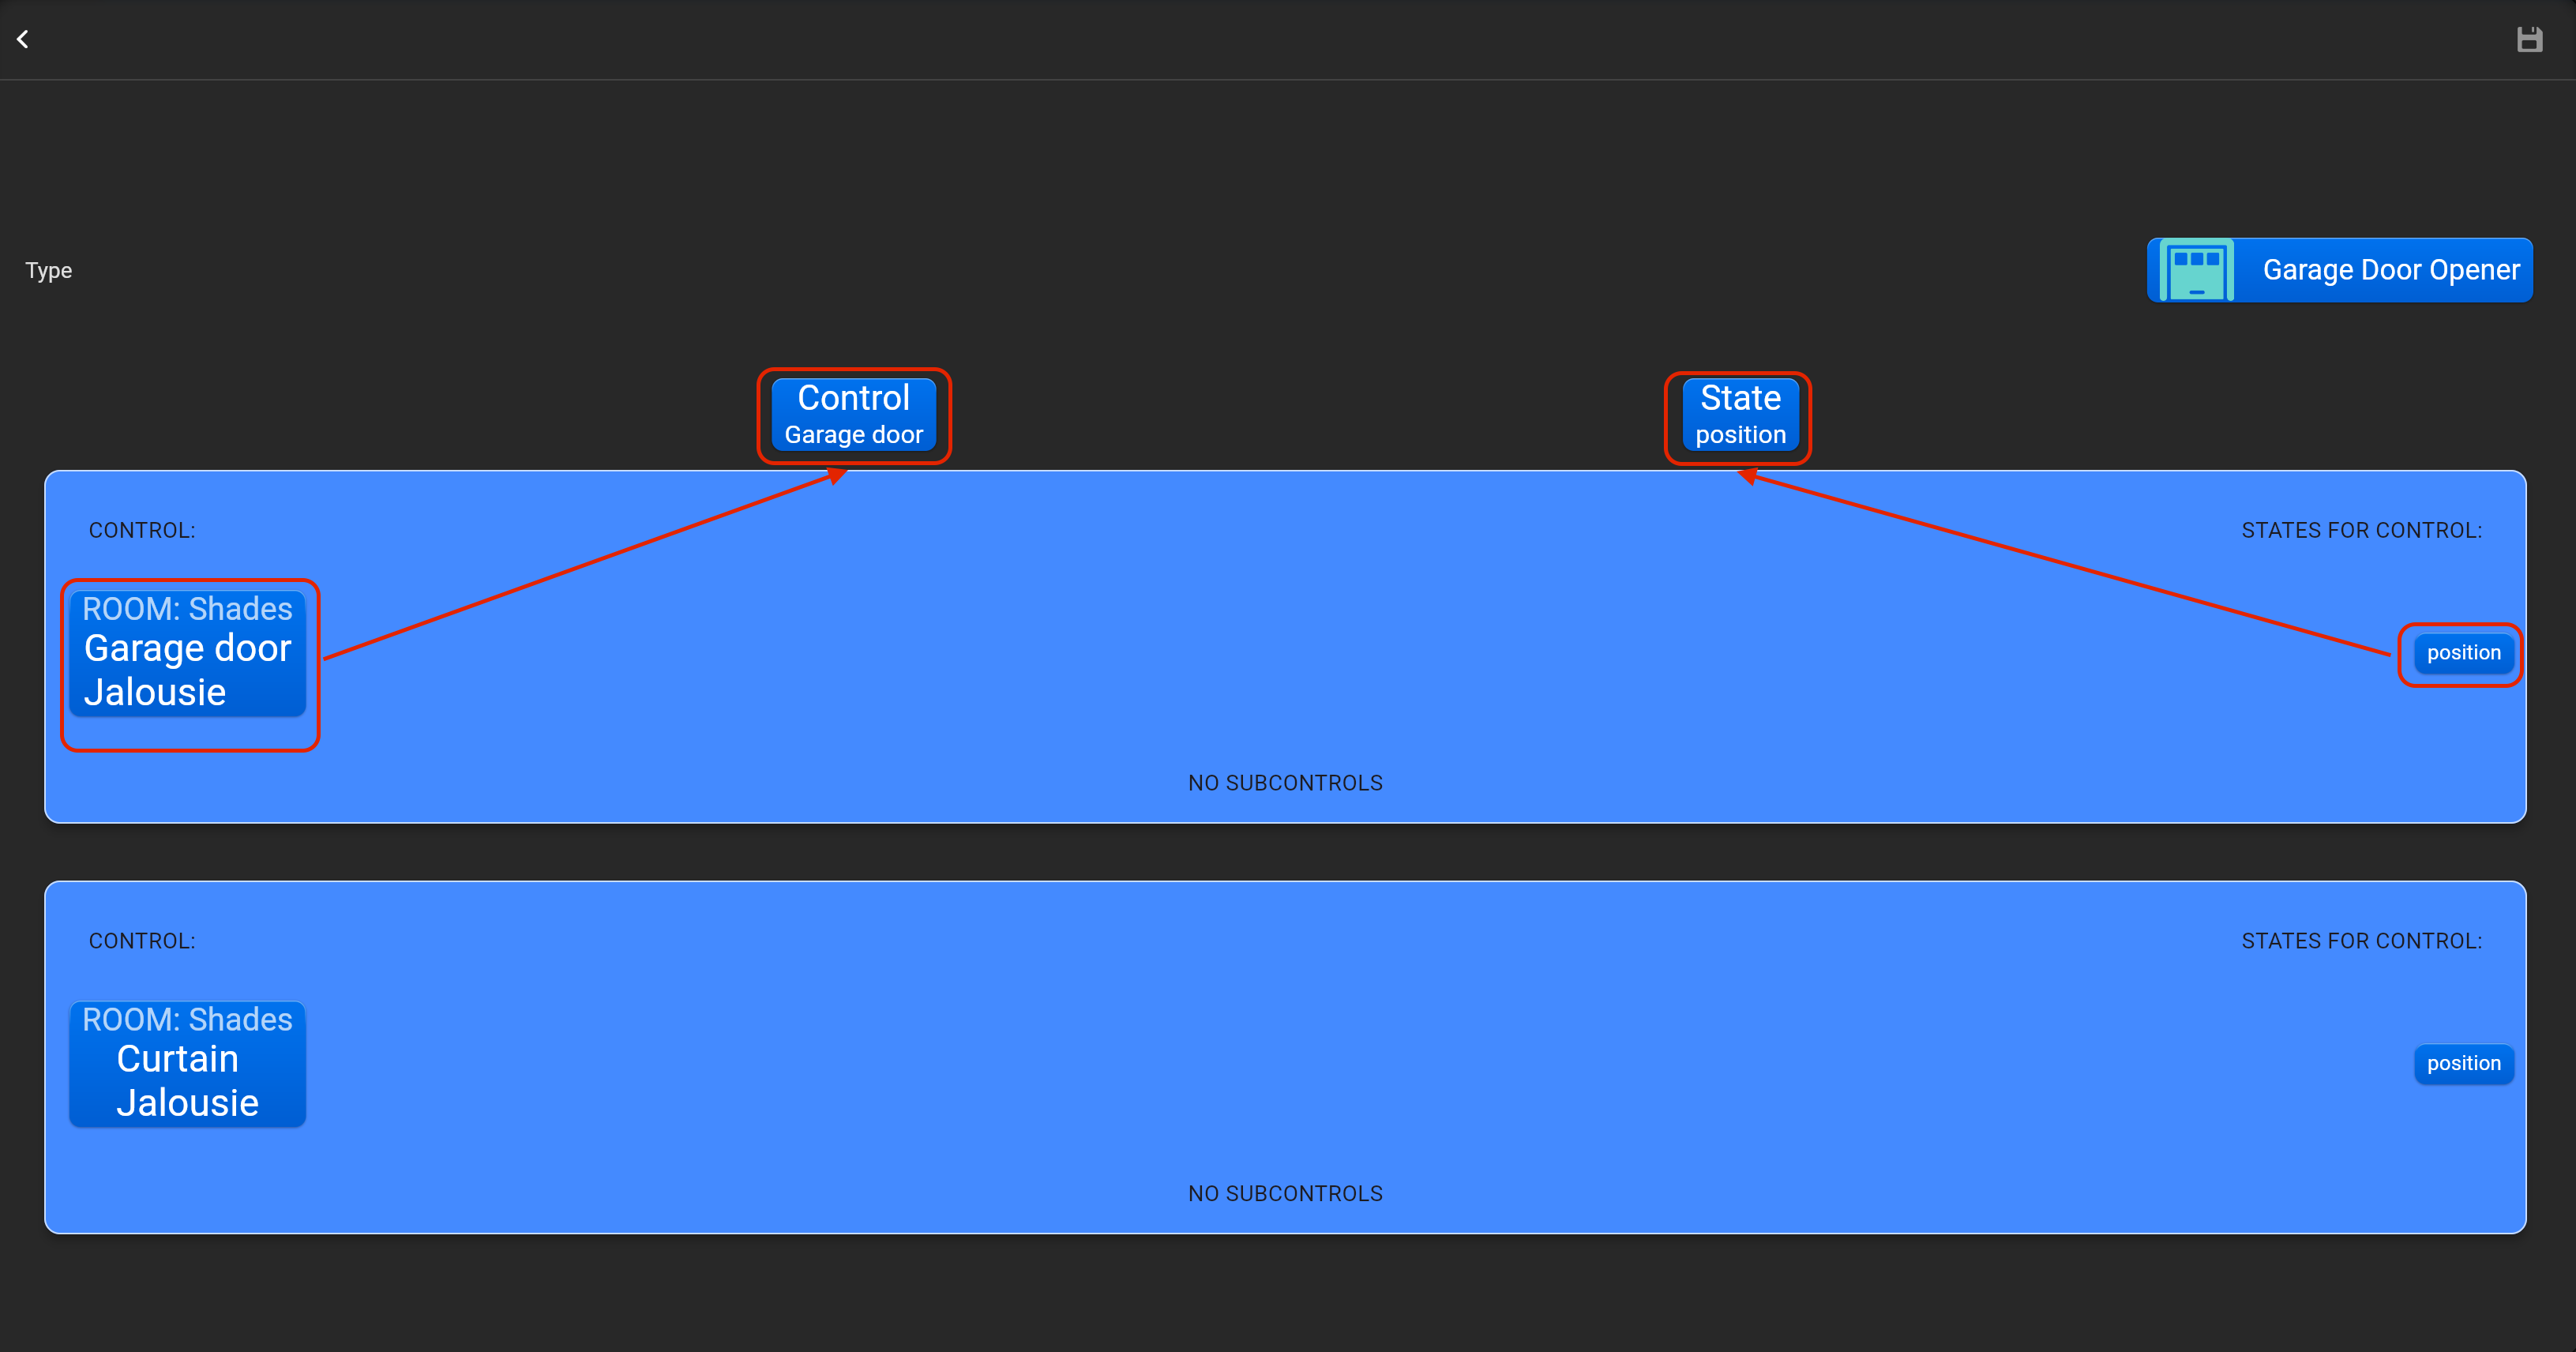
¶ Garage door
- select the protocol in the drop-down list,
- put the accessory order (affects the location of the accessory in Pyxis app),
- put name of the accessory and for the voice assistants,
- select voice assistants, where the accessory should be displayed,
- select the room, where the accessory will be located,
- select the type of accessory (Garage door),
- tap on “Bind Loxone device” and adjust accessory by dragging-and-dropping in “Control” and “State” area required Loxone accessory. You can invert direction for this accessory.
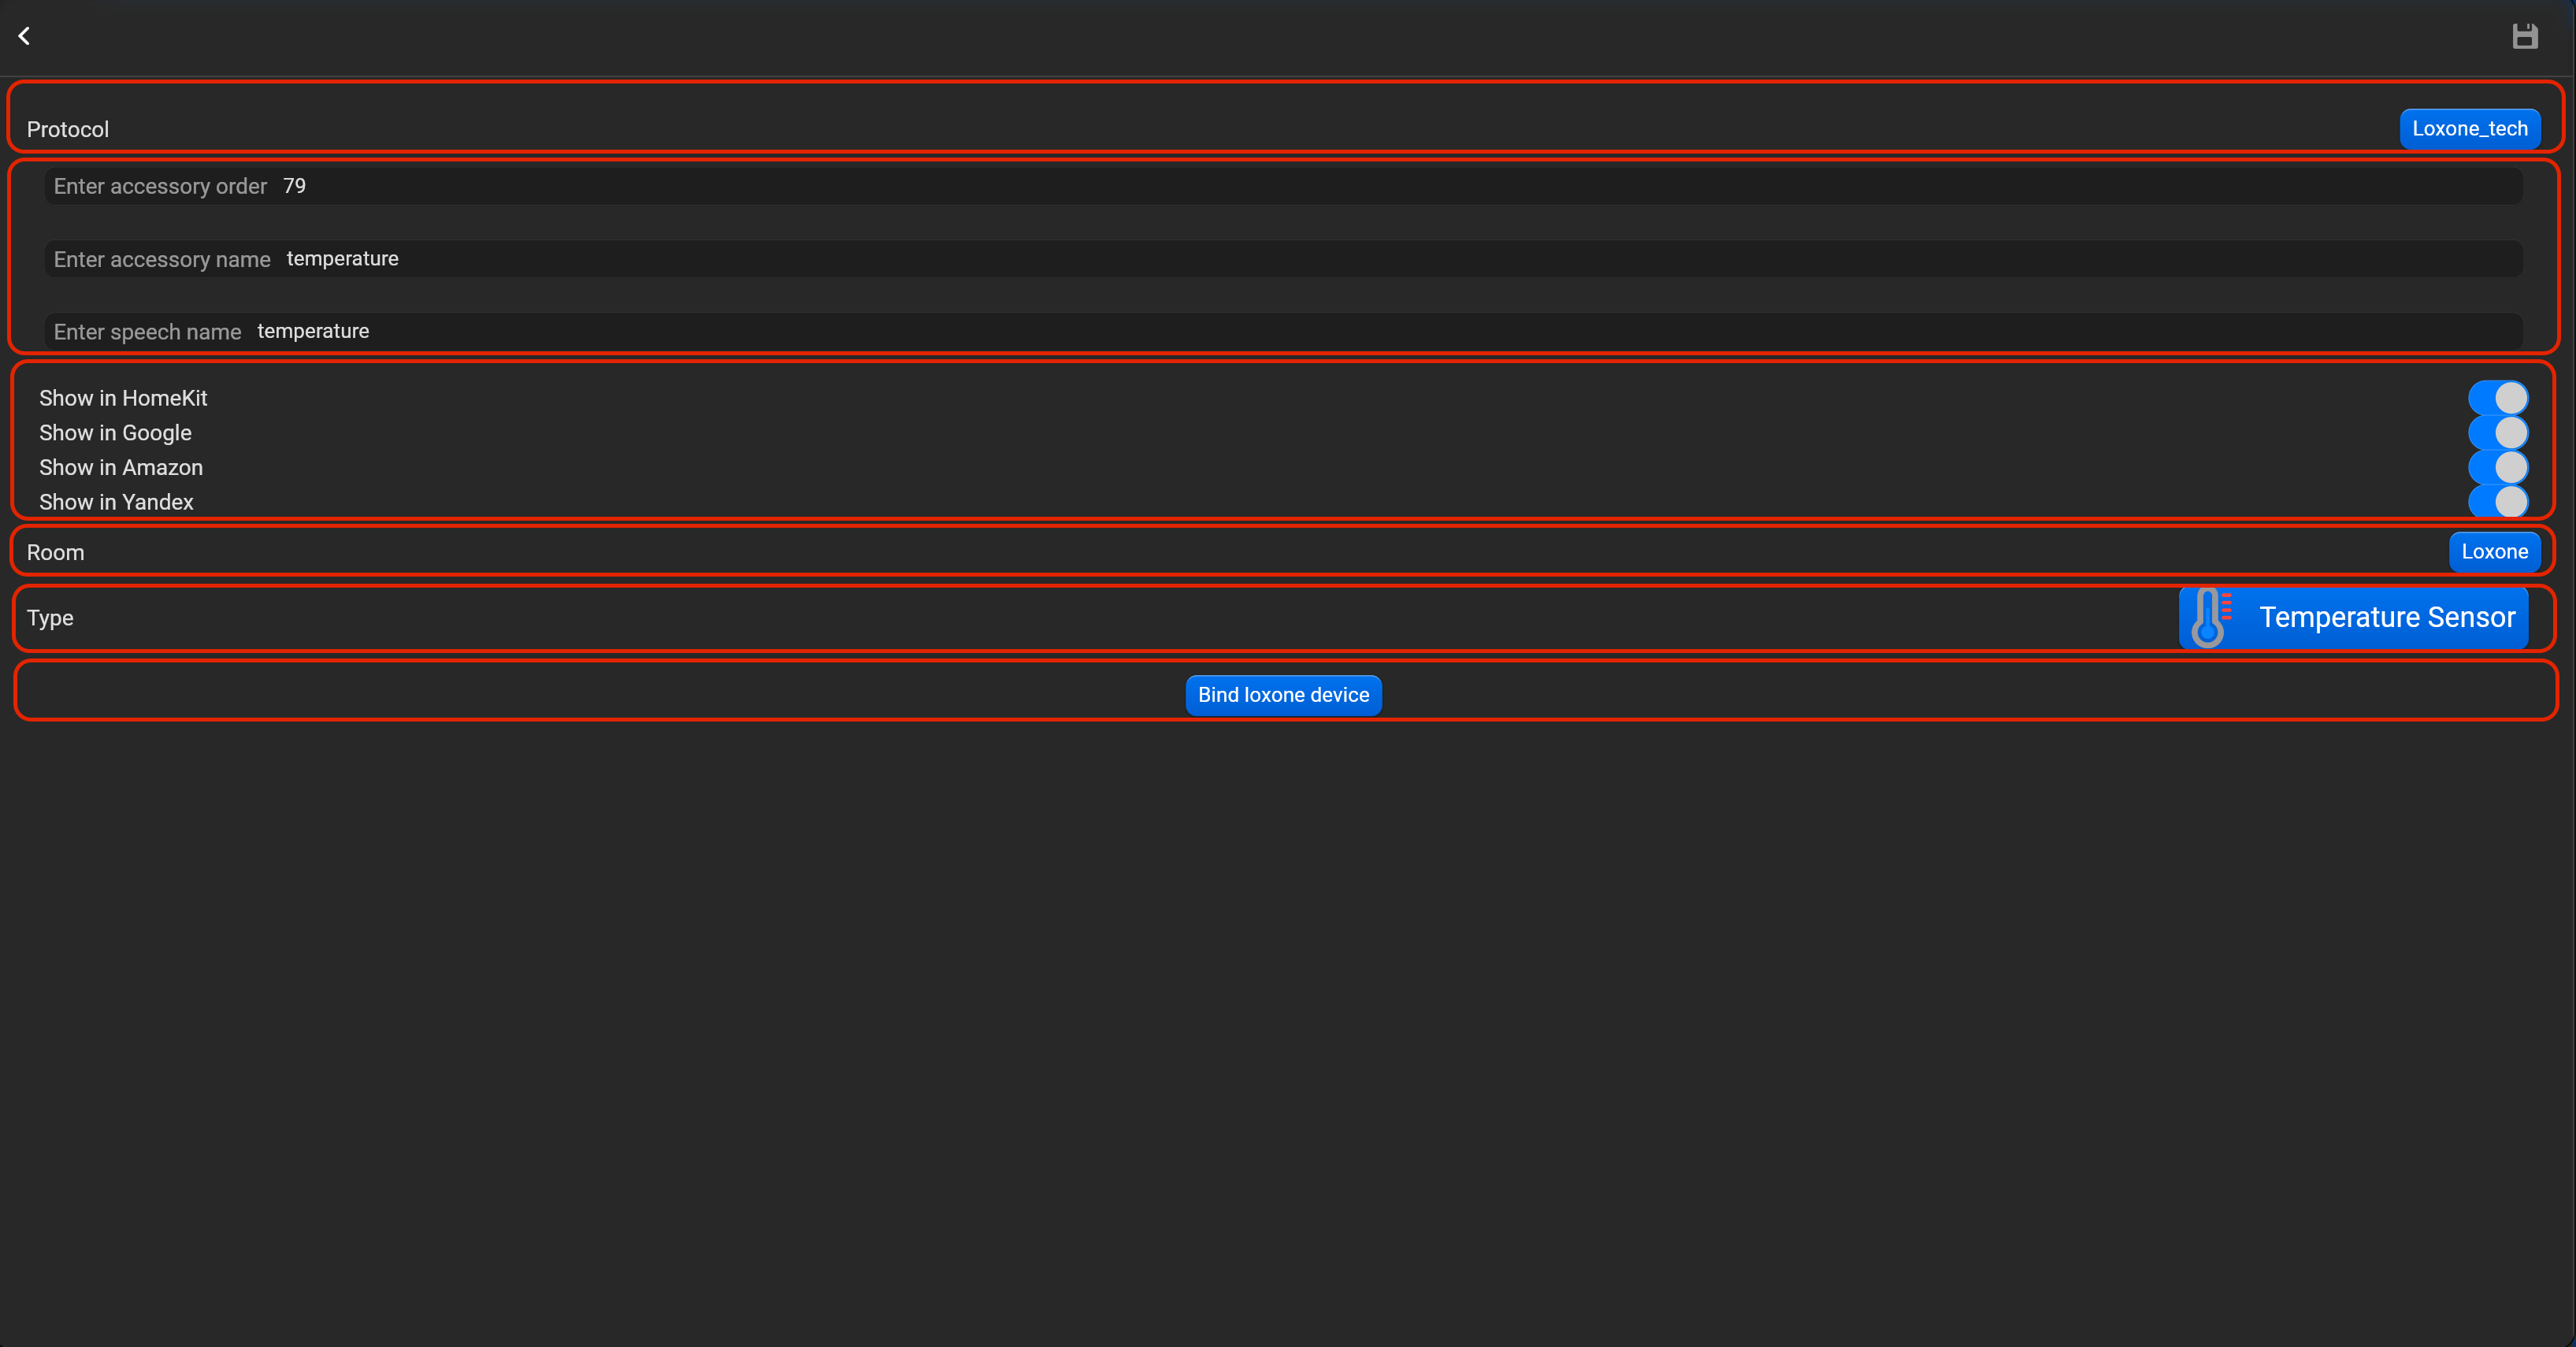
¶ Temperature sensor
- select the protocol in the drop-down list,
- put the accessory order (affects the location of the accessory in Pyxis app),
- put name of the accessory and for the voice assistants,
- select voice assistants, where the accessory should be displayed,
- select the room, where the accessory will be located,
- select the type of accessory (Temperature sensor),
- tap on “Bind Loxone device” and adjust accessory by dragging-and-dropping in “Control” and “State” area required Loxone accessory.

¶ Humidity sensor
- select the protocol in the drop-down list,
- put the accessory order (affects the location of the accessory in Pyxis app),
- put name of the accessory and for the voice assistants,
- select voice assistants, where the accessory should be displayed,
- select the room, where the accessory will be located,
- select the type of accessory (Humidity sensor),
- tap on “Bind Loxone device” and adjust accessory by dragging-and-dropping in “Control” and “State” area required Loxone accessory.


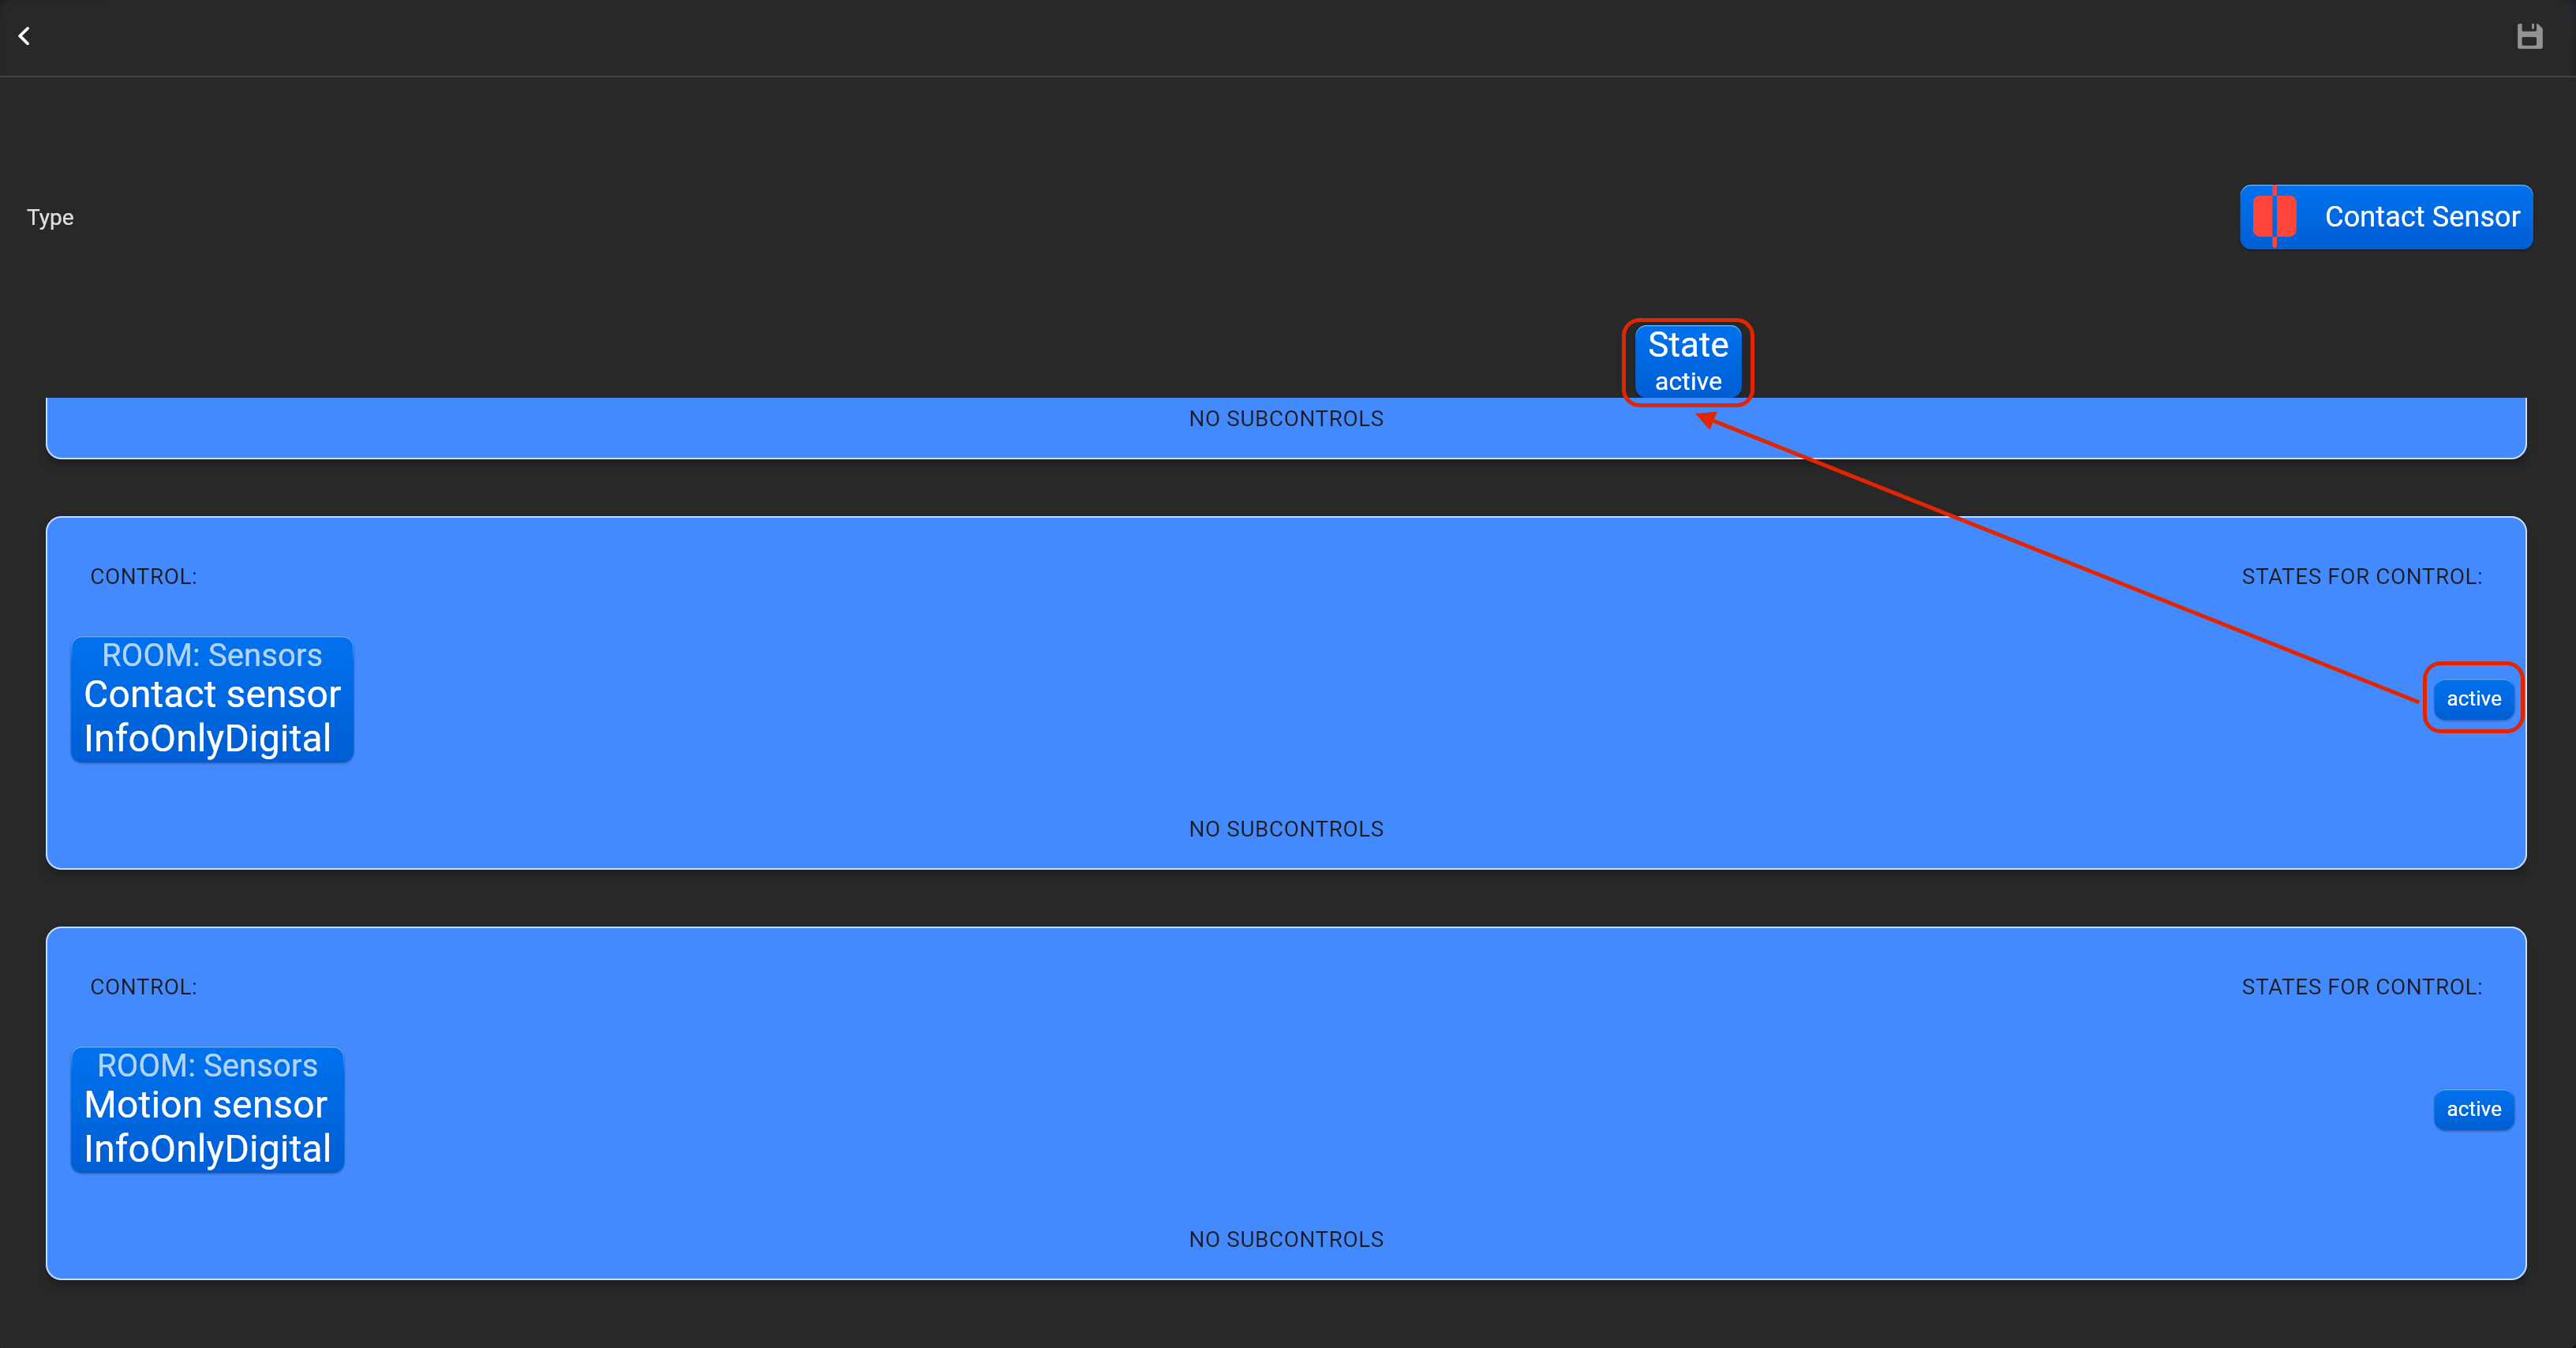
¶ Contact sensor
- select the protocol in the drop-down list,
- put the accessory order (affects the location of the accessory in Pyxis app),
- put name of the accessory and for the voice assistants,
- select voice assistants, where the accessory should be displayed,
- select the room, where the accessory will be located,
- select the type of accessory (Contact sensor),
- tap on “Bind Loxone device” and adjust accessory by dragging-and-dropping in “Control” and “State” area required Loxone accessory. You can invert value of this accessory.

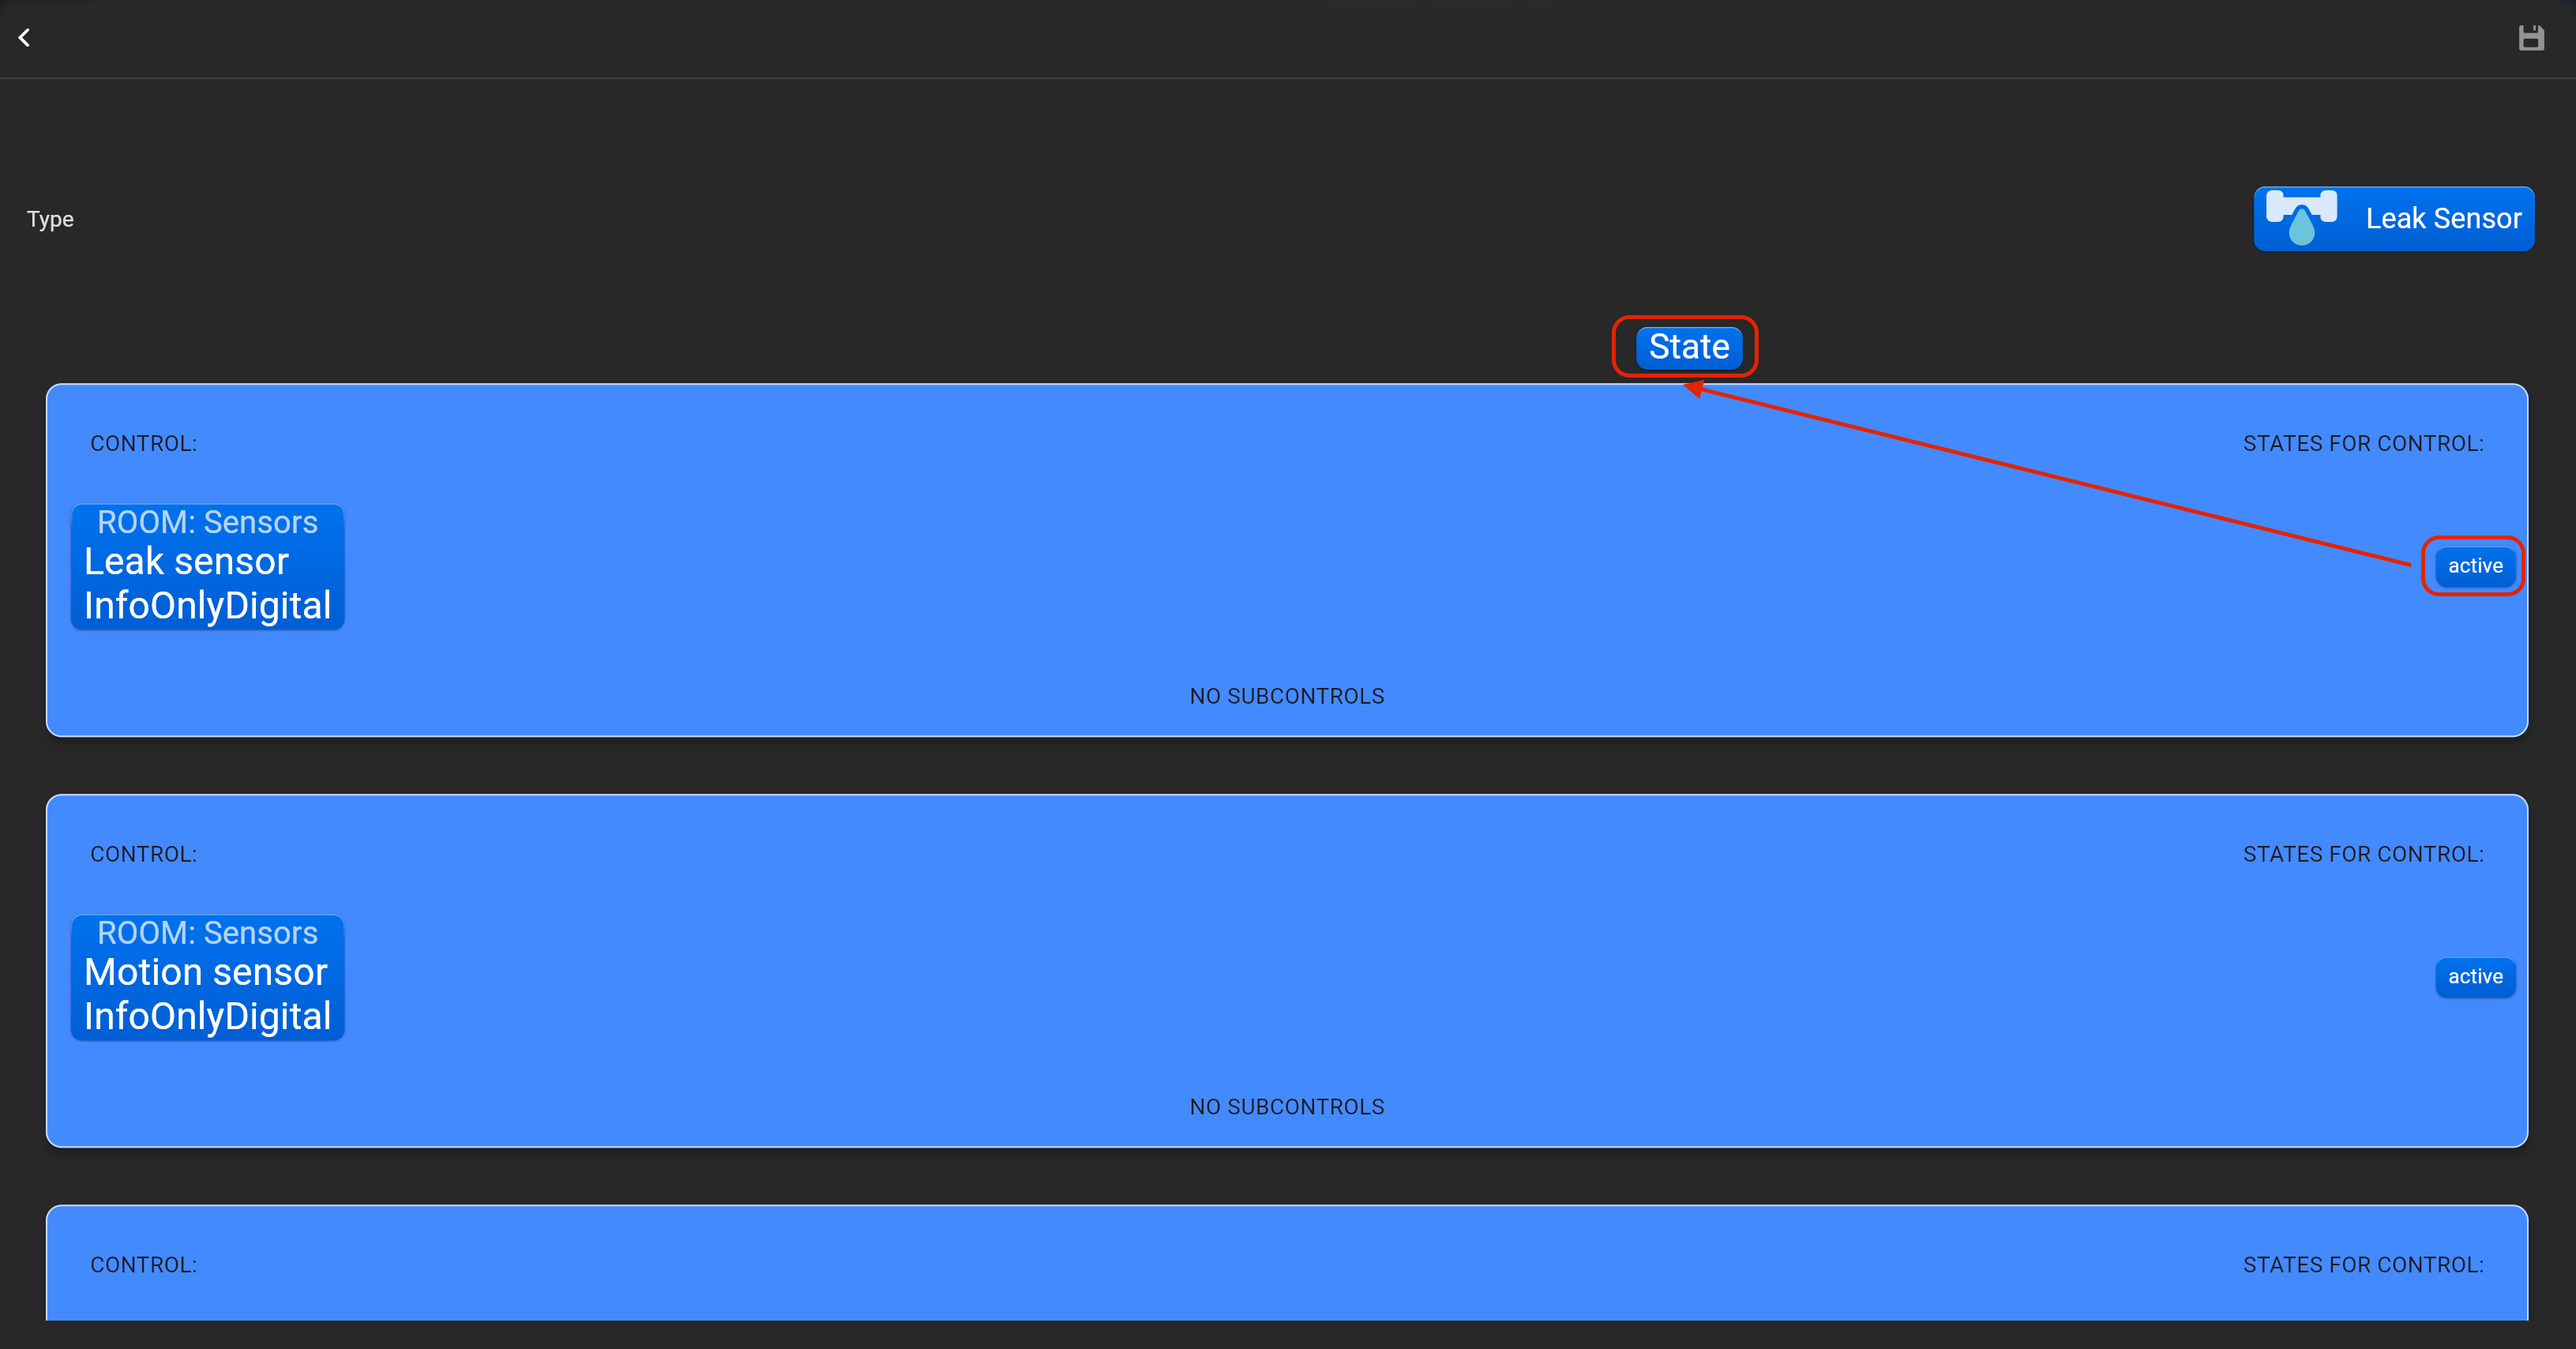
¶ Leak sensor
- select the protocol in the drop-down list,
- put the accessory order (affects the location of the accessory in Pyxis app),
- put name of the accessory and for the voice assistants,
- select voice assistants, where the accessory should be displayed,
- select the room, where the accessory will be located,
- select the type of accessory (Leak sensor),
- tap on “Bind Loxone device” and adjust accessory by dragging-and-dropping in “Control” and “State” area required Loxone accessory. You can invert value of this accessory.

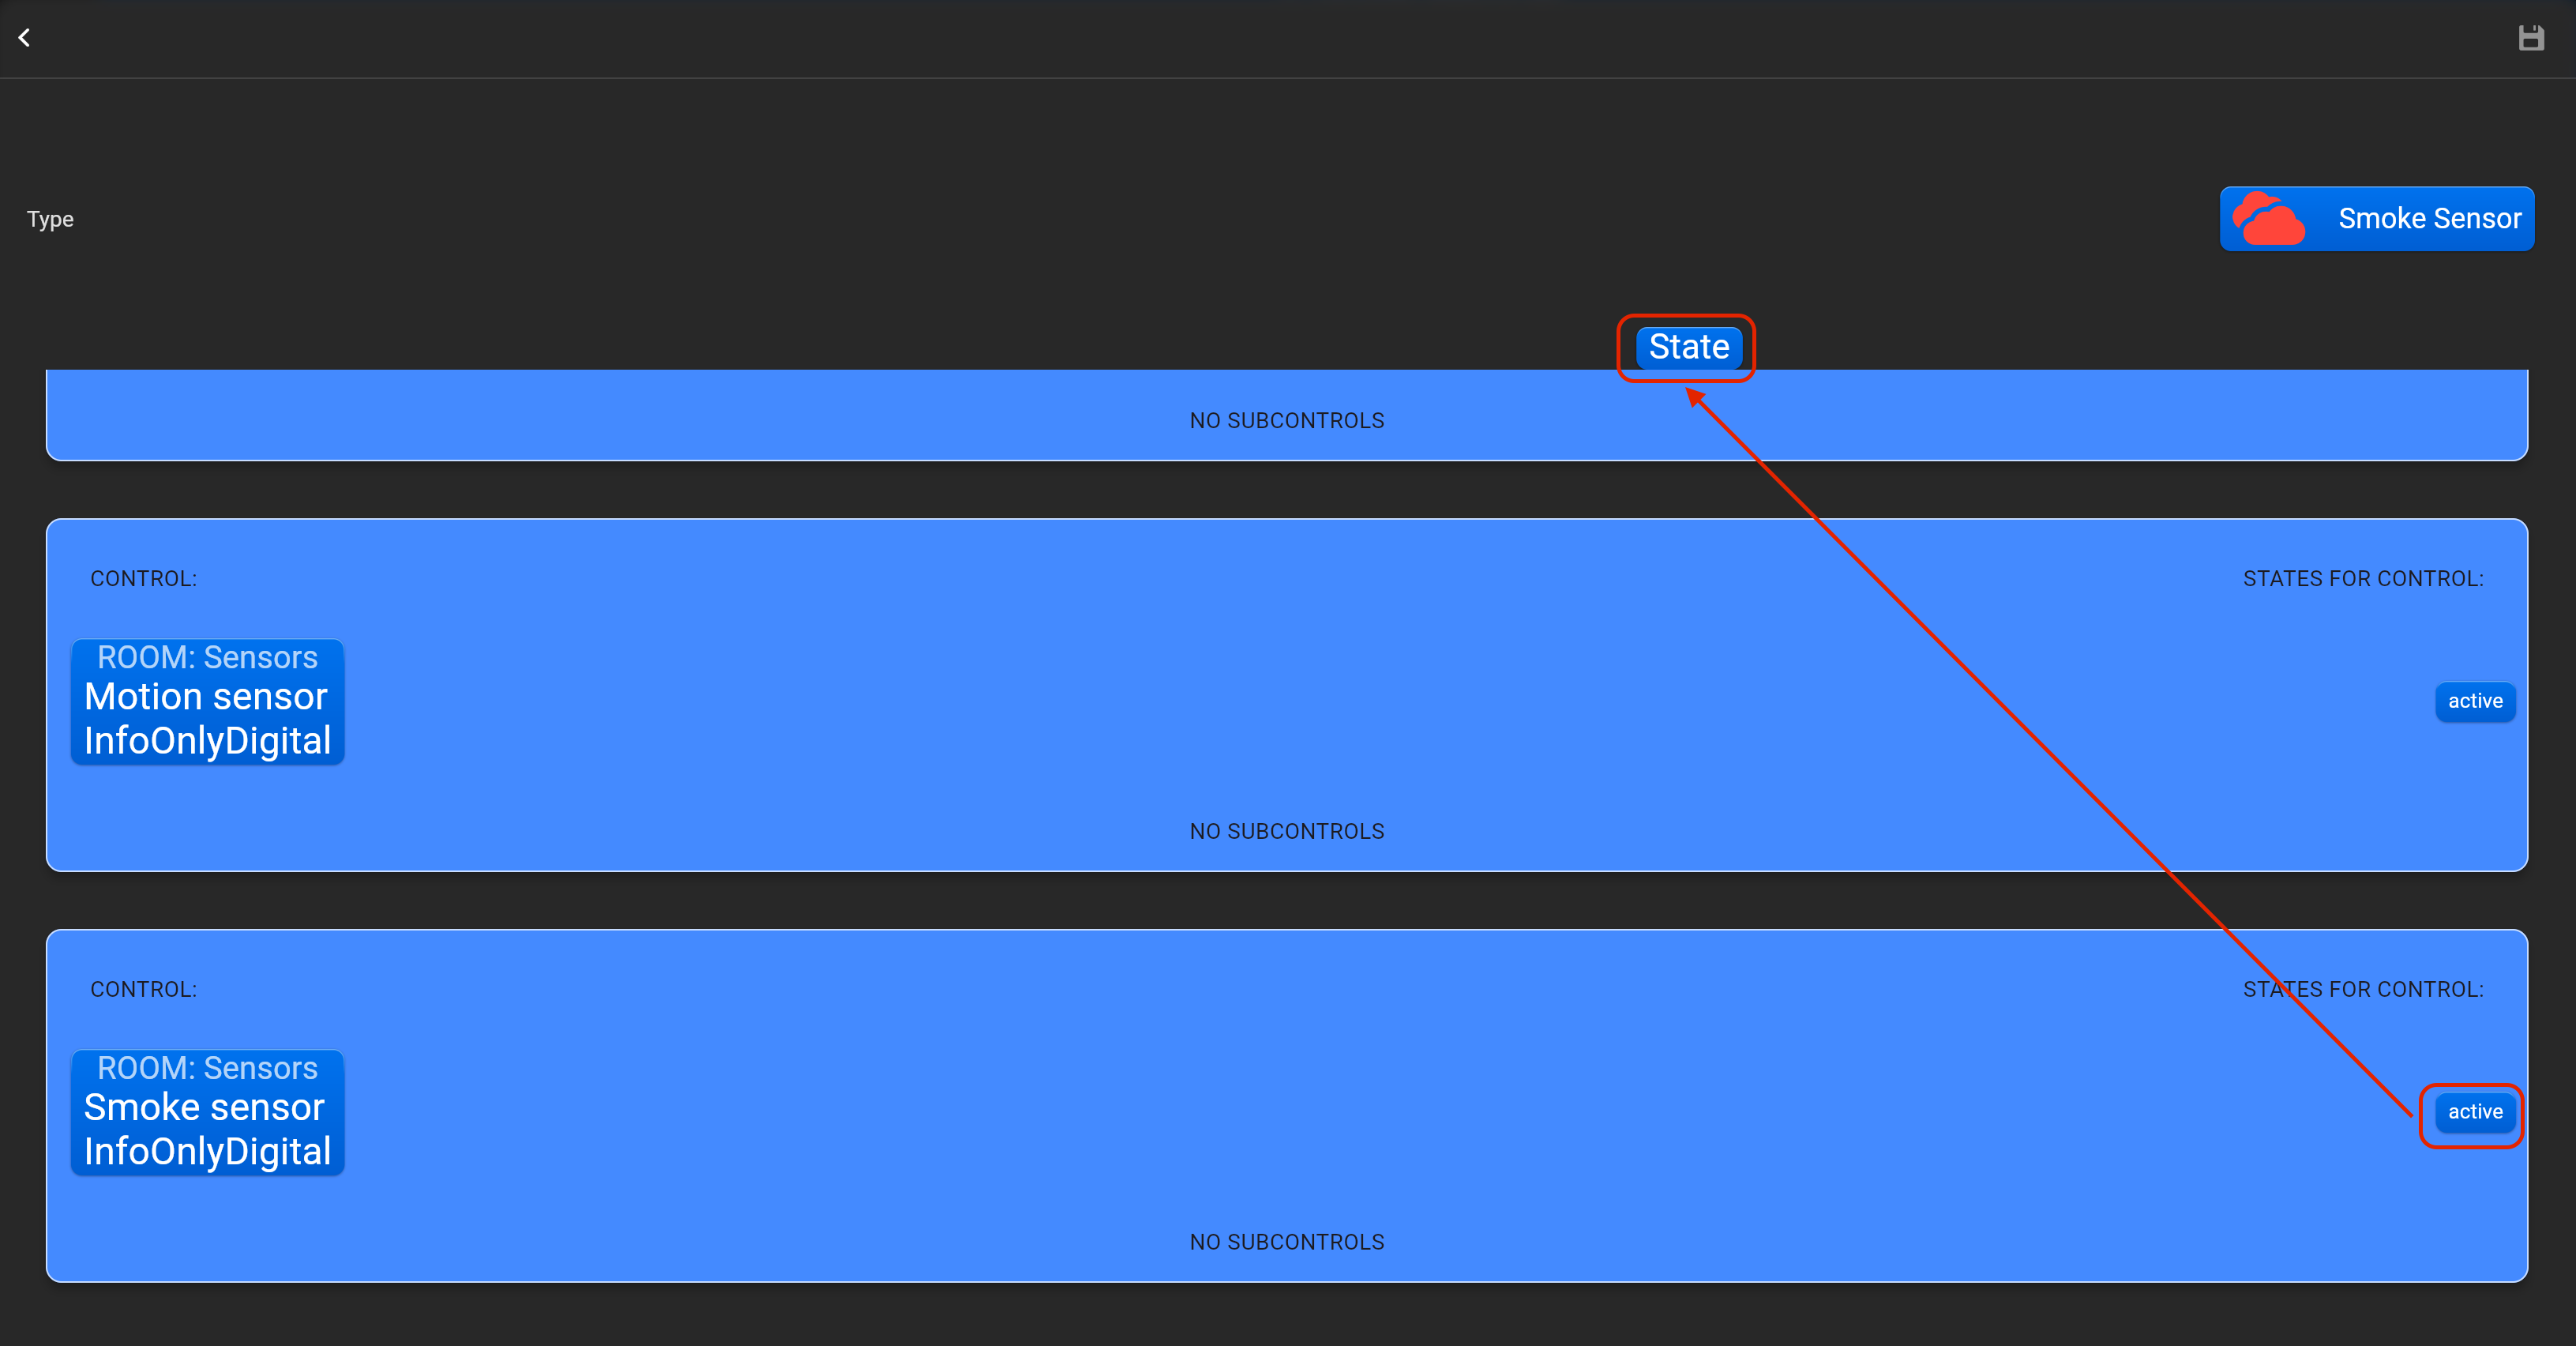
¶ Smoke sensor
- select the protocol in the drop-down list,
- put the accessory order (affects the location of the accessory in Pyxis app),
- put name of the accessory and for the voice assistants,
- select voice assistants, where the accessory should be displayed,
- select the room, where the accessory will be located,
- select the type of accessory (Smoke sensor),
- tap on “Bind Loxone device” and adjust accessory by dragging-and-dropping in “Control” and “State” area required Loxone accessory. You can invert value of this accessory.

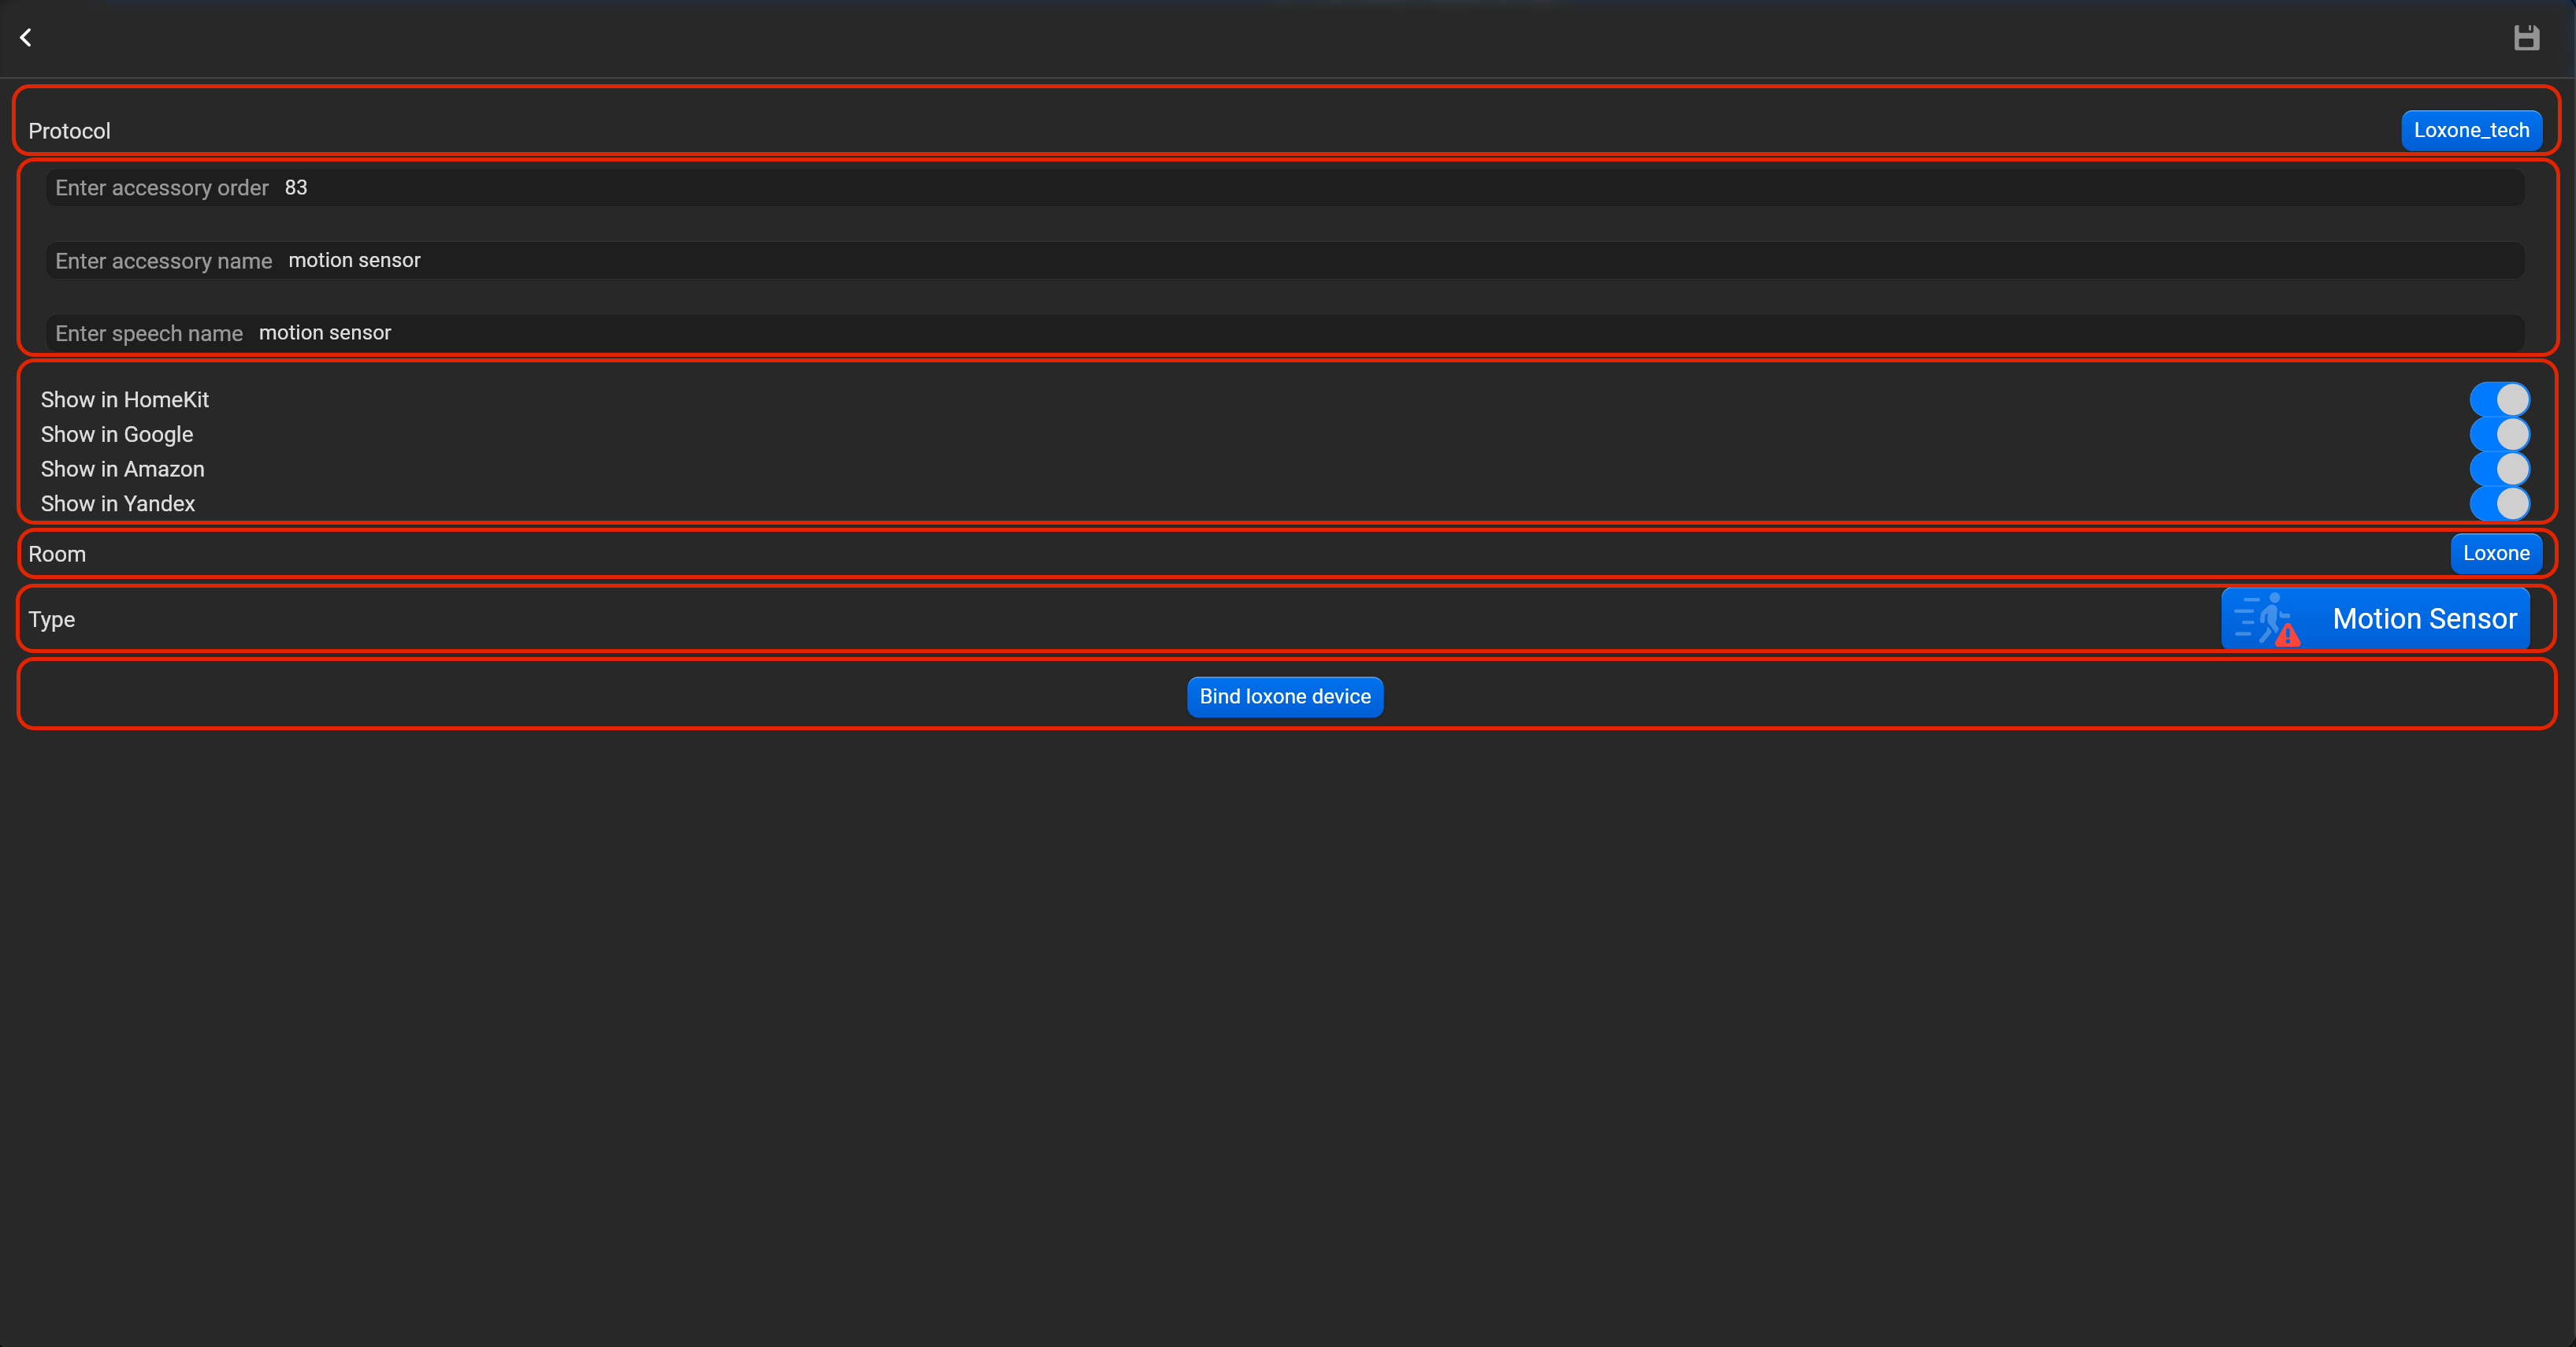
¶ Motion sensor
- select the protocol in the drop-down list,
- put the accessory order (affects the location of the accessory in Pyxis app),
- put name of the accessory and for the voice assistants,
- select voice assistants, where the accessory should be displayed,
- select the room, where the accessory will be located,
- select the type of accessory (Motion sensor),
- tap on “Bind Loxone device” and adjust accessory by dragging-and-dropping in “Control” and “State” area required Loxone accessory.

¶ Light sensor
- select the protocol in the drop-down list,
- put the accessory order (affects the location of the accessory in Pyxis app),
- put name of the accessory and for the voice assistants,
- select voice assistants, where the accessory should be displayed,
- select the room, where the accessory will be located,
- select the type of accessory (Light sensor),
- tap on “Bind Loxone device” and adjust accessory by dragging-and-dropping in “Control” and “State” area required Loxone accessory.
- Thermostat - thermostat,
- FloorHeating - control temperature of floor heating,
- CarbonDioxideSensor - CO2 sensor
¶ MQTT
Supported device types:
- LightbulbRelay - any light device,
- LightbulbDimmer - any dimming device,
- LightbulbRGB - RGB device,
- Switch - any relay loads,
- Outlet - any outlets (relay loads),
- TemperatureSensor - indicate temperature via probe,
- ContactSensor - for indication status of contacts (NO or NC), door and window sensor,
- LeakSensor - indicate status of leakage,
- SmokeSensor - indicate status of smoke,
- LightSensor - indicate luminance value,
- HumiditySensor - indicate humidity value,
- MotionSensor - detecting movement,
- Thermostat - thermostat,
- LockMechanism - lock,
- BridgedControl - bridged Control.
For accessories with a binary state (on-off), you must also enter the value that is used to send the command to turn on and off, for accessories with a floating state (0-100 or 0-255), the default scale will be used.
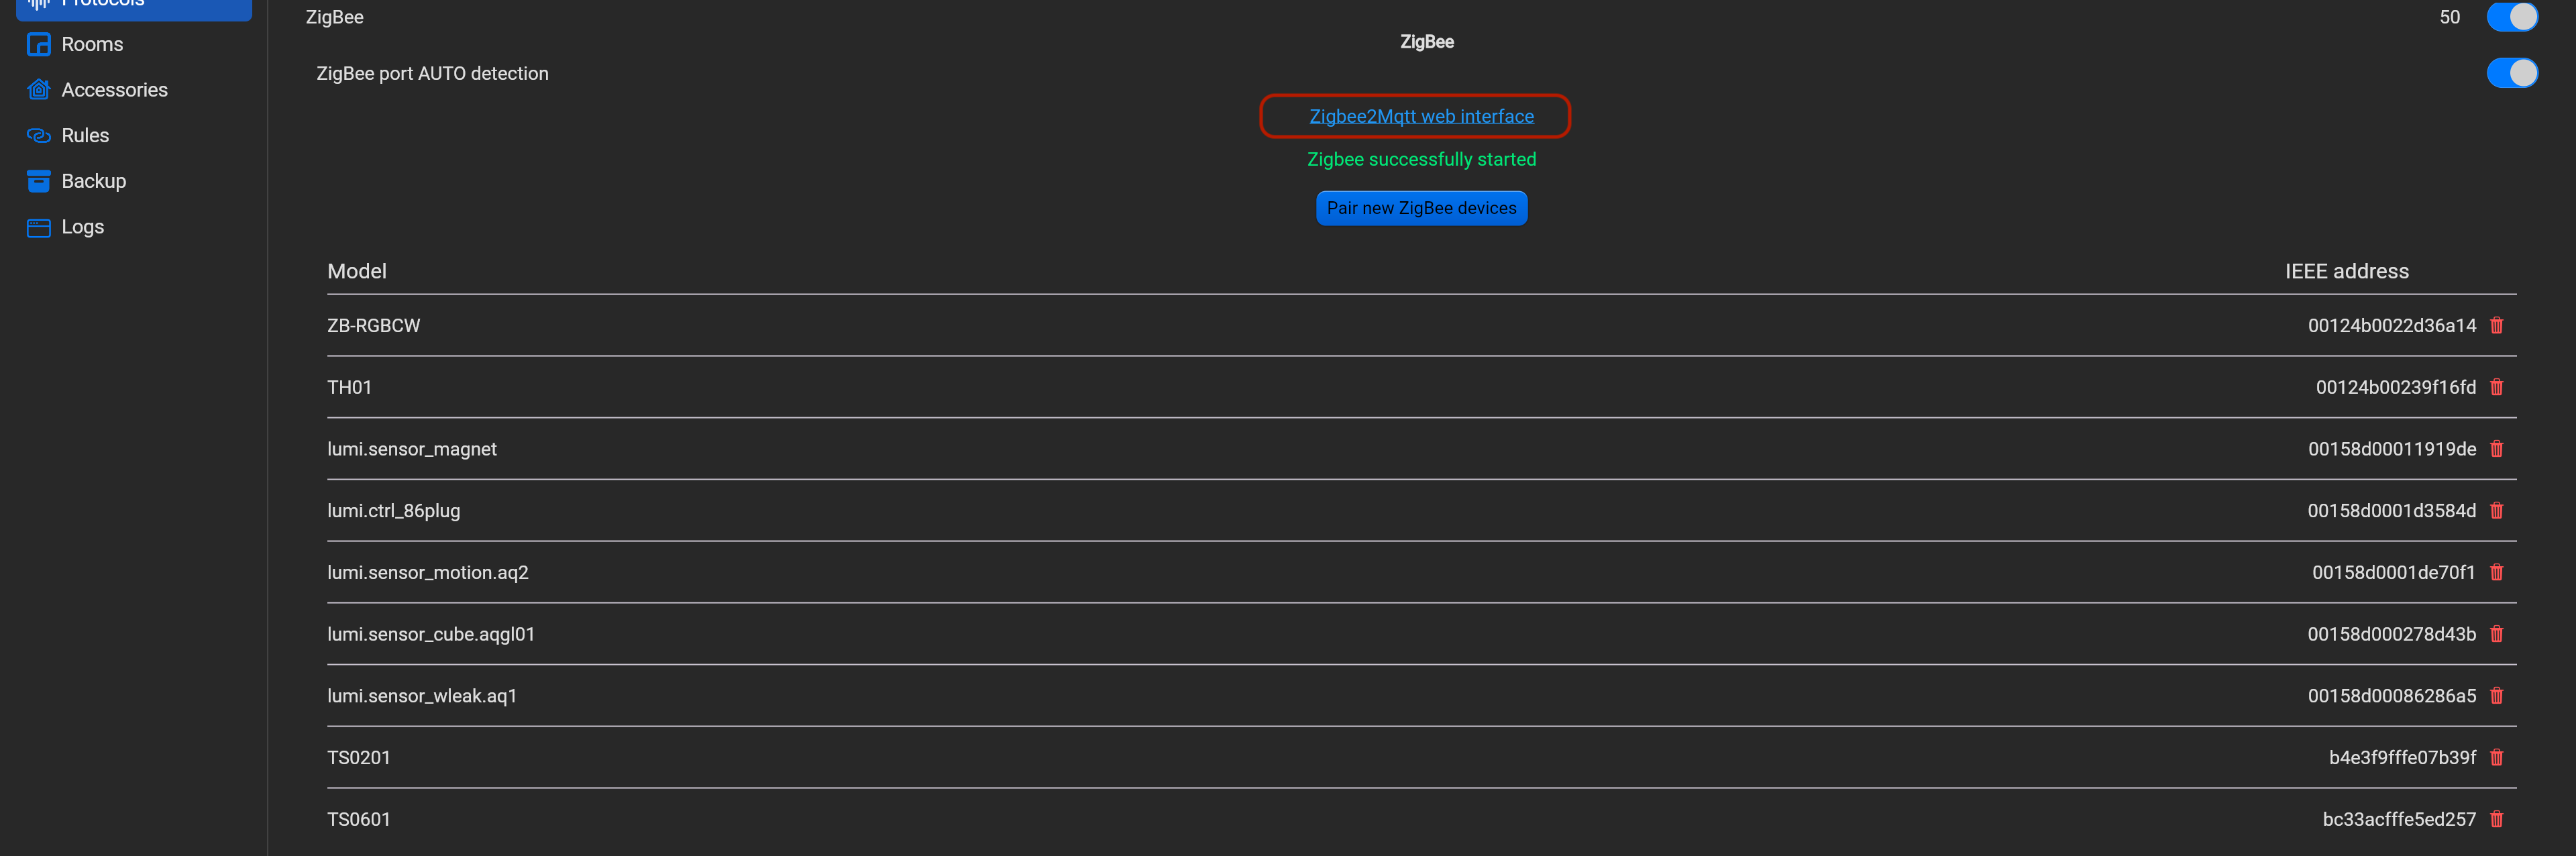
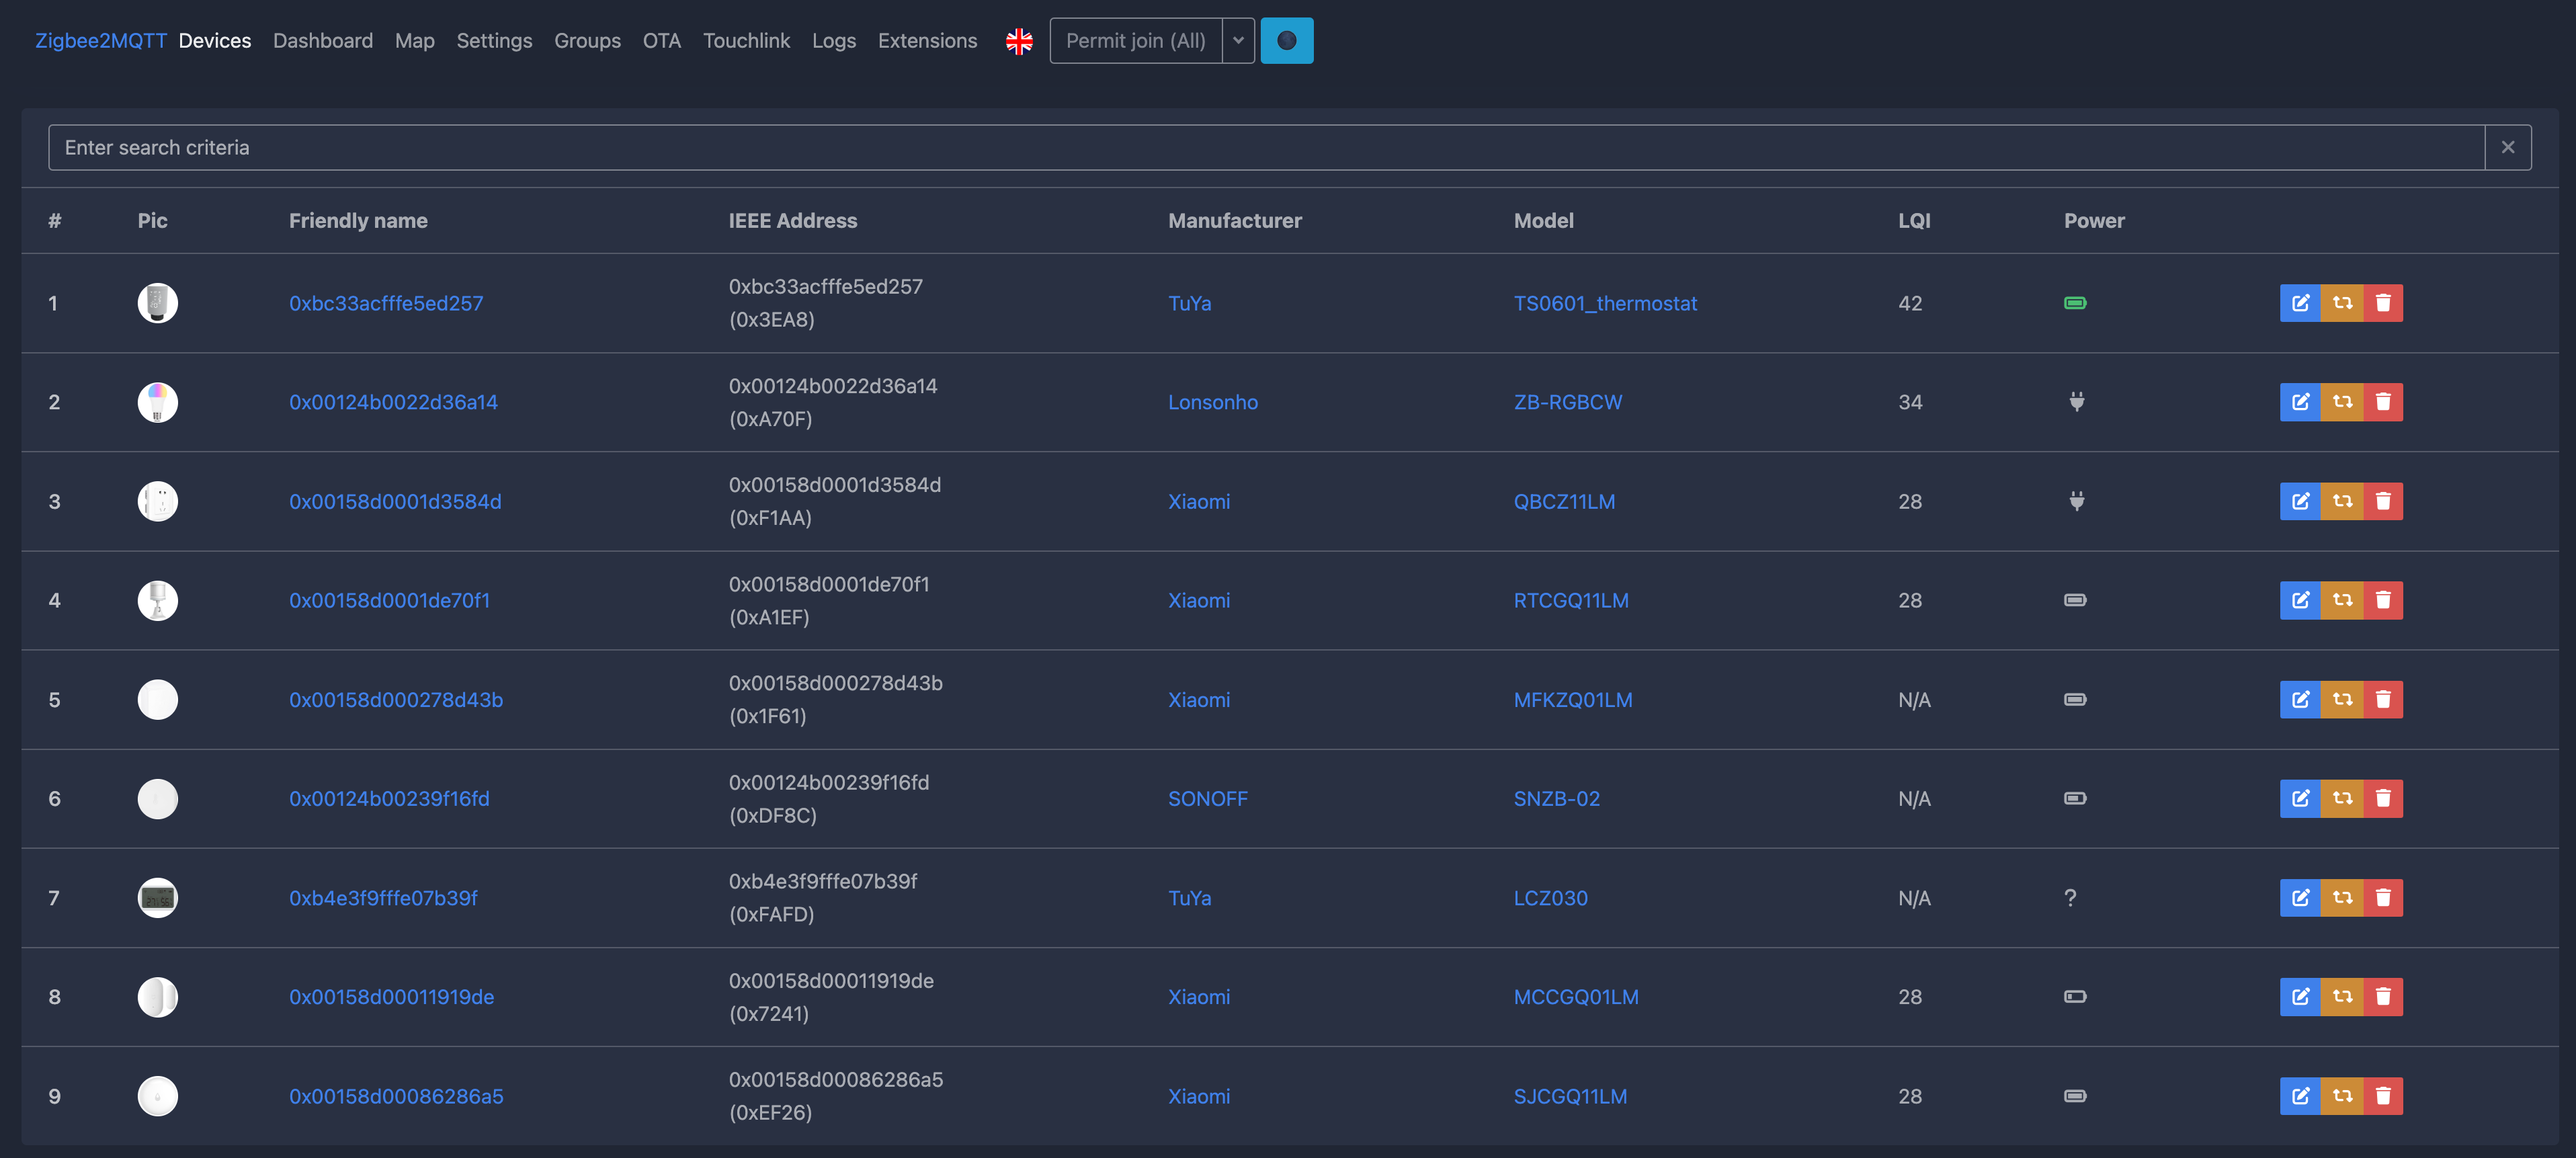
¶ Zigbee
Zigbee integration is embedded zigbee2mqtt solution. You can to customize zigbee devices more precisely in zigbee2mqtt on 8080 port. In this interface you can pair, delete, edit zigbee devices, find info about accessories, map of zigbee connections and many other info. All paired Zigbee devices will be displayed in the dropdown list.
Please, find below, examples for every supported type of accessory. Do not forget save all changes and restart Pyxis.
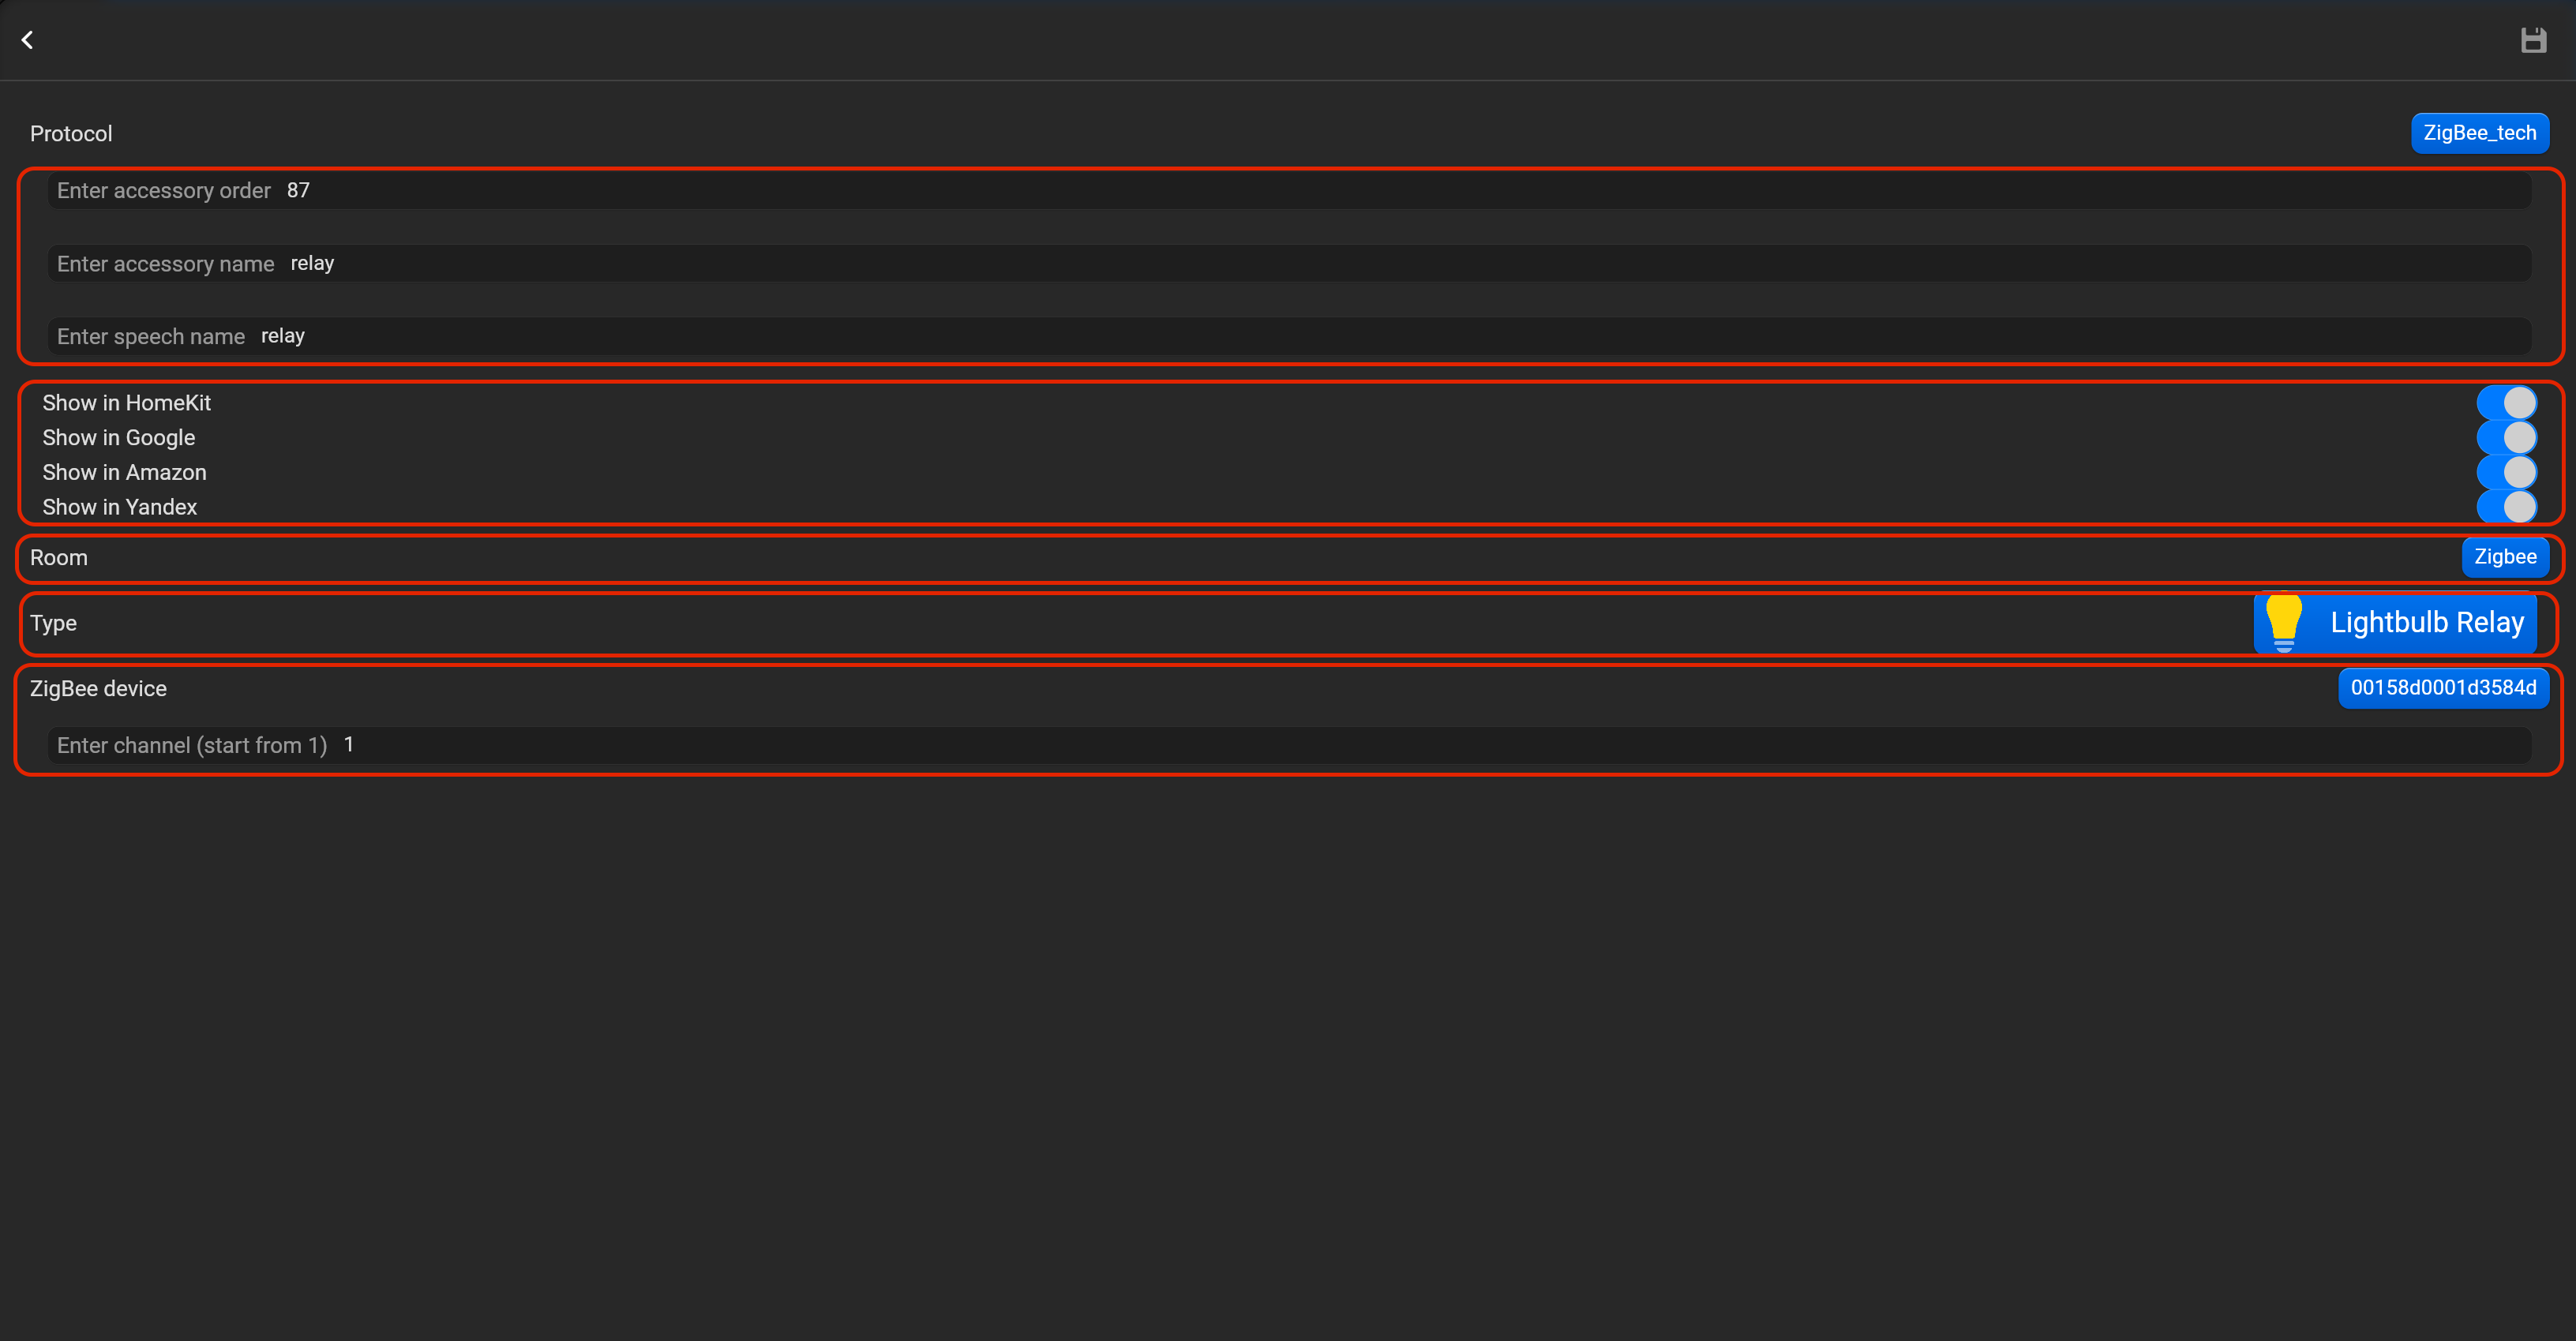
¶ Lightbulb relay
- select the protocol in the drop-down list,
- put the accessory order (affects the location of the accessory in Pyxis app),
- put name of the accessory and for the voice assistants,
- select voice assistants, where the accessory should be displayed,
- select the room, where the accessory will be located,
- select the type of accessory (Lightbulb relay),
- select in drop-down list IEEE address of zigbee device and channel (if you set multi channel device).
¶ Lightbulb dimmer
- select the protocol in the drop-down list,
- put the accessory order (affects the location of the accessory in Pyxis app),
- put name of the accessory and for the voice assistants,
- select voice assistants, where the accessory should be displayed,
- select the room, where the accessory will be located,
- select the type of accessory (Lightbulb dimmer),
- select in drop-down list IEEE address of zigbee device and channel (if you set multi channel device). You can select Color temperature option as well.
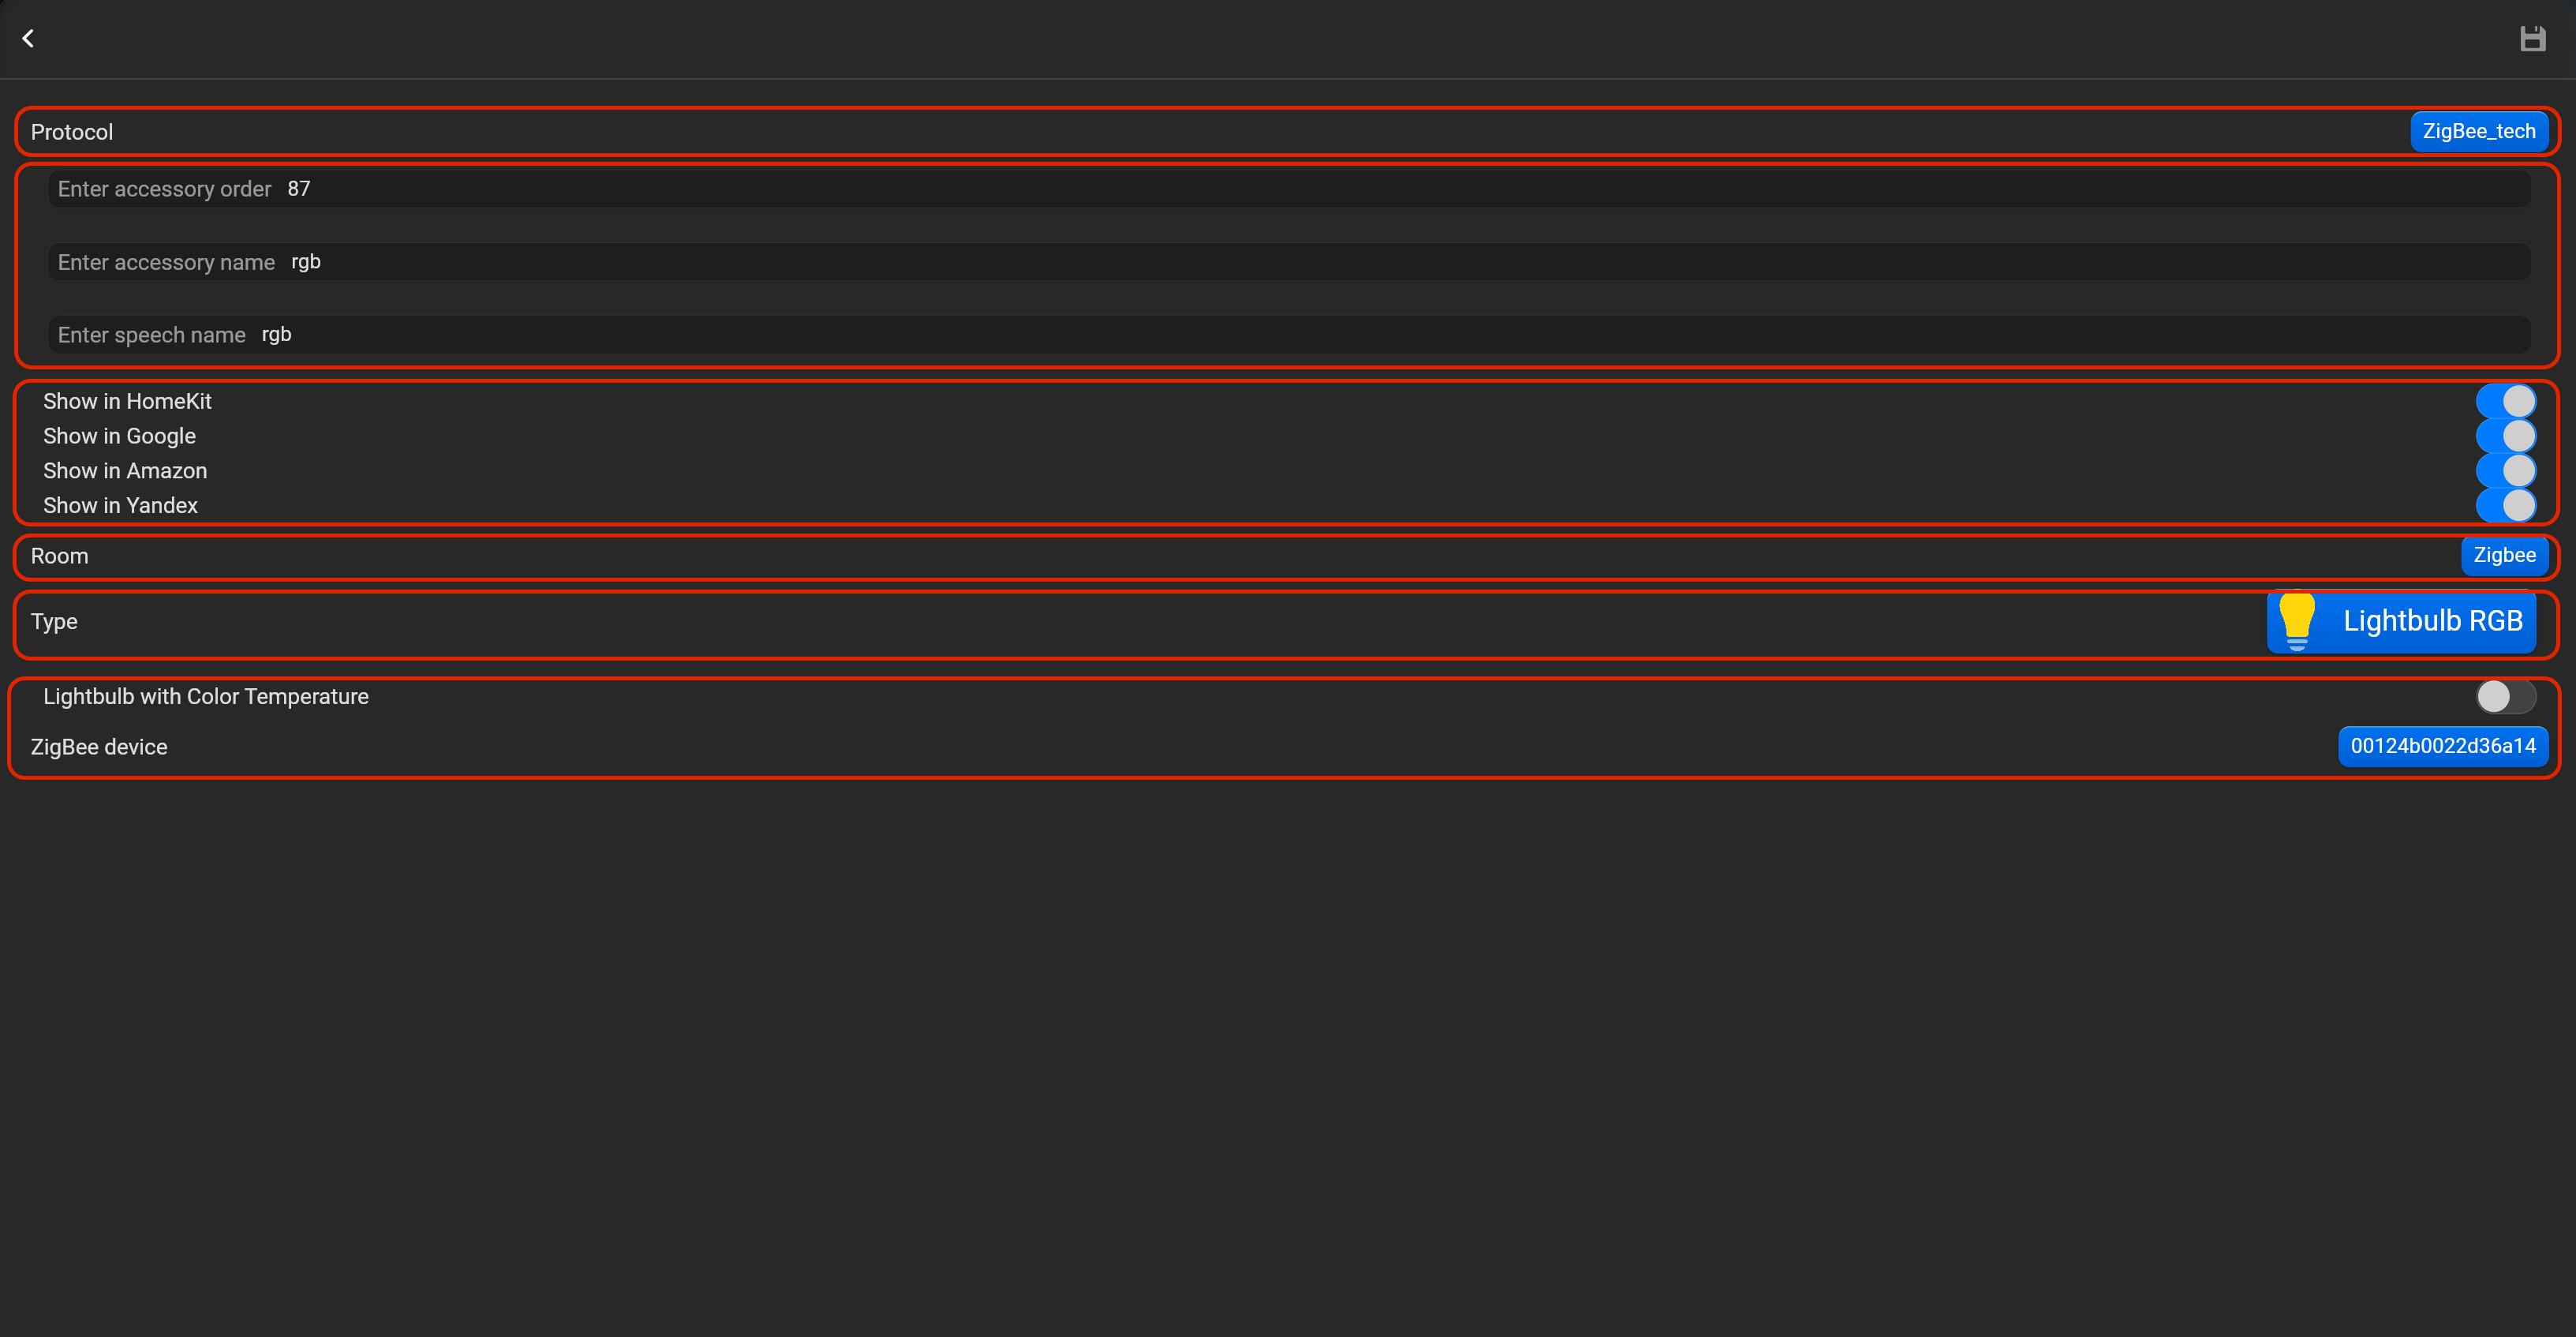
¶ Lightbulb RGB
- select the protocol in the drop-down list,
- put the accessory order (affects the location of the accessory in Pyxis app),
- put name of the accessory and for the voice assistants,
- select voice assistants, where the accessory should be displayed,
- select the room, where the accessory will be located,
- select the type of accessory (Lightbulb RGB),
- select in drop-down list IEEE address of zigbee device and channel (if you set multi channel device). You can select Color temperature option as well.
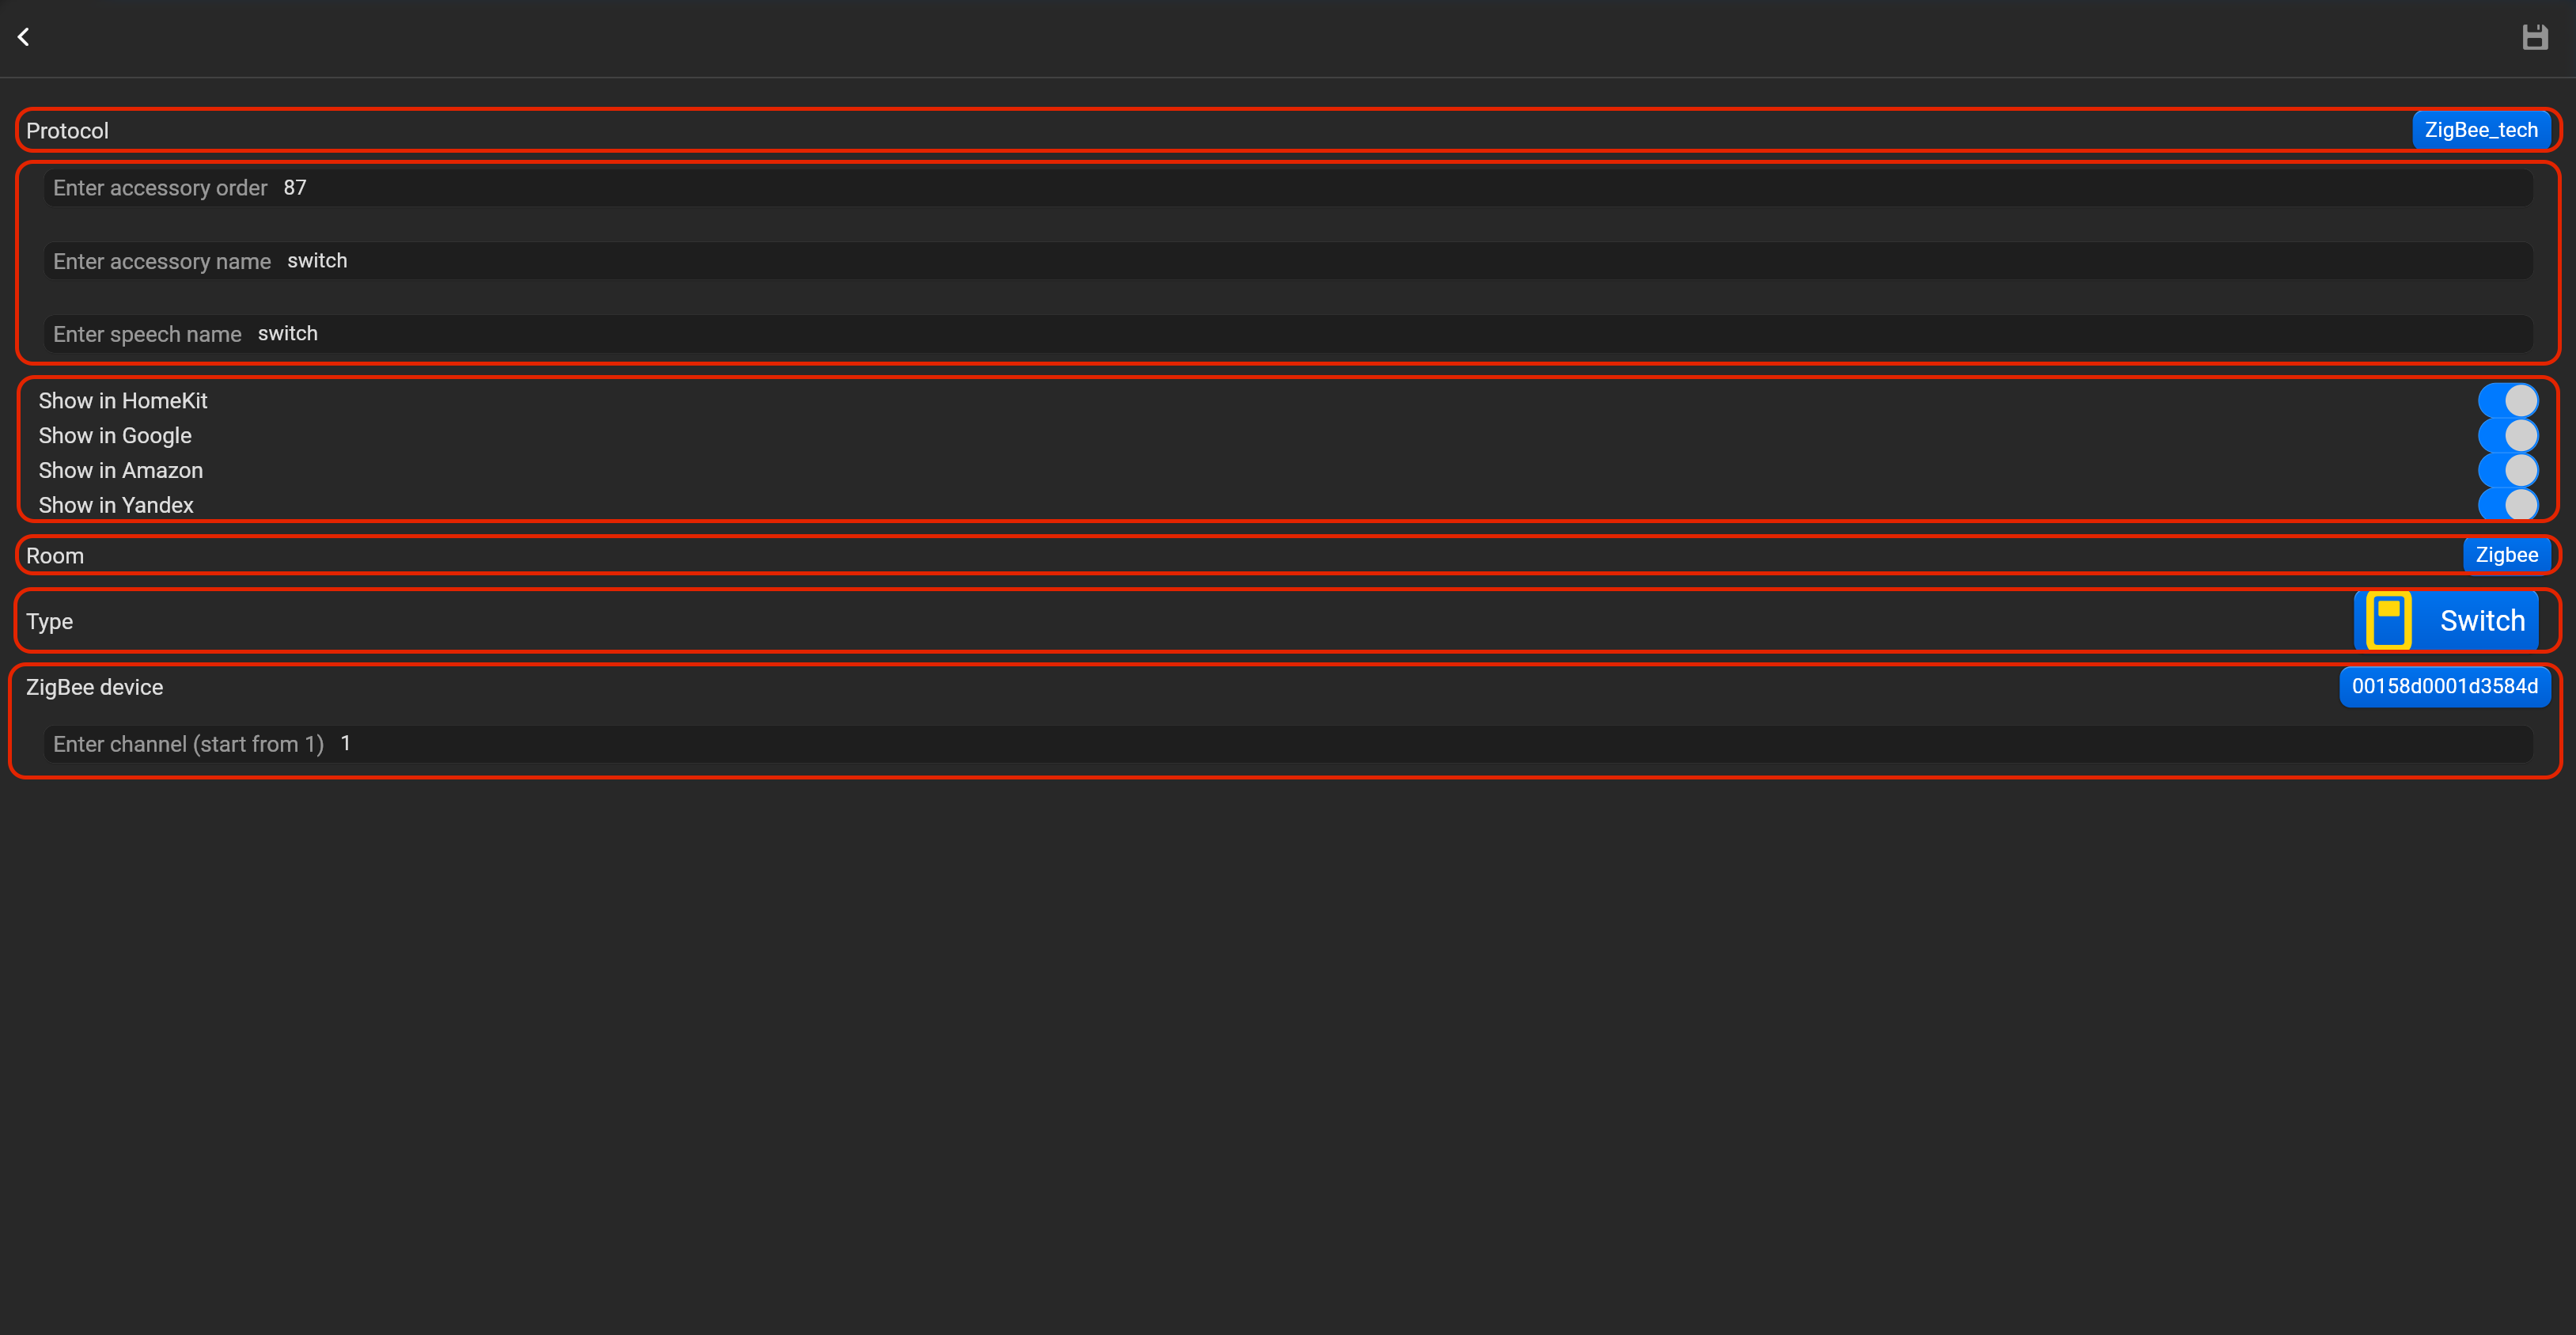
¶ Switch
- select the protocol in the drop-down list,
- put the accessory order (affects the location of the accessory in Pyxis app),
- put name of the accessory and for the voice assistants,
- select voice assistants, where the accessory should be displayed,
- select the room, where the accessory will be located,
- select the type of accessory (Switch),
- select in drop-down list IEEE address of zigbee device and channel (if you set multi channel device).
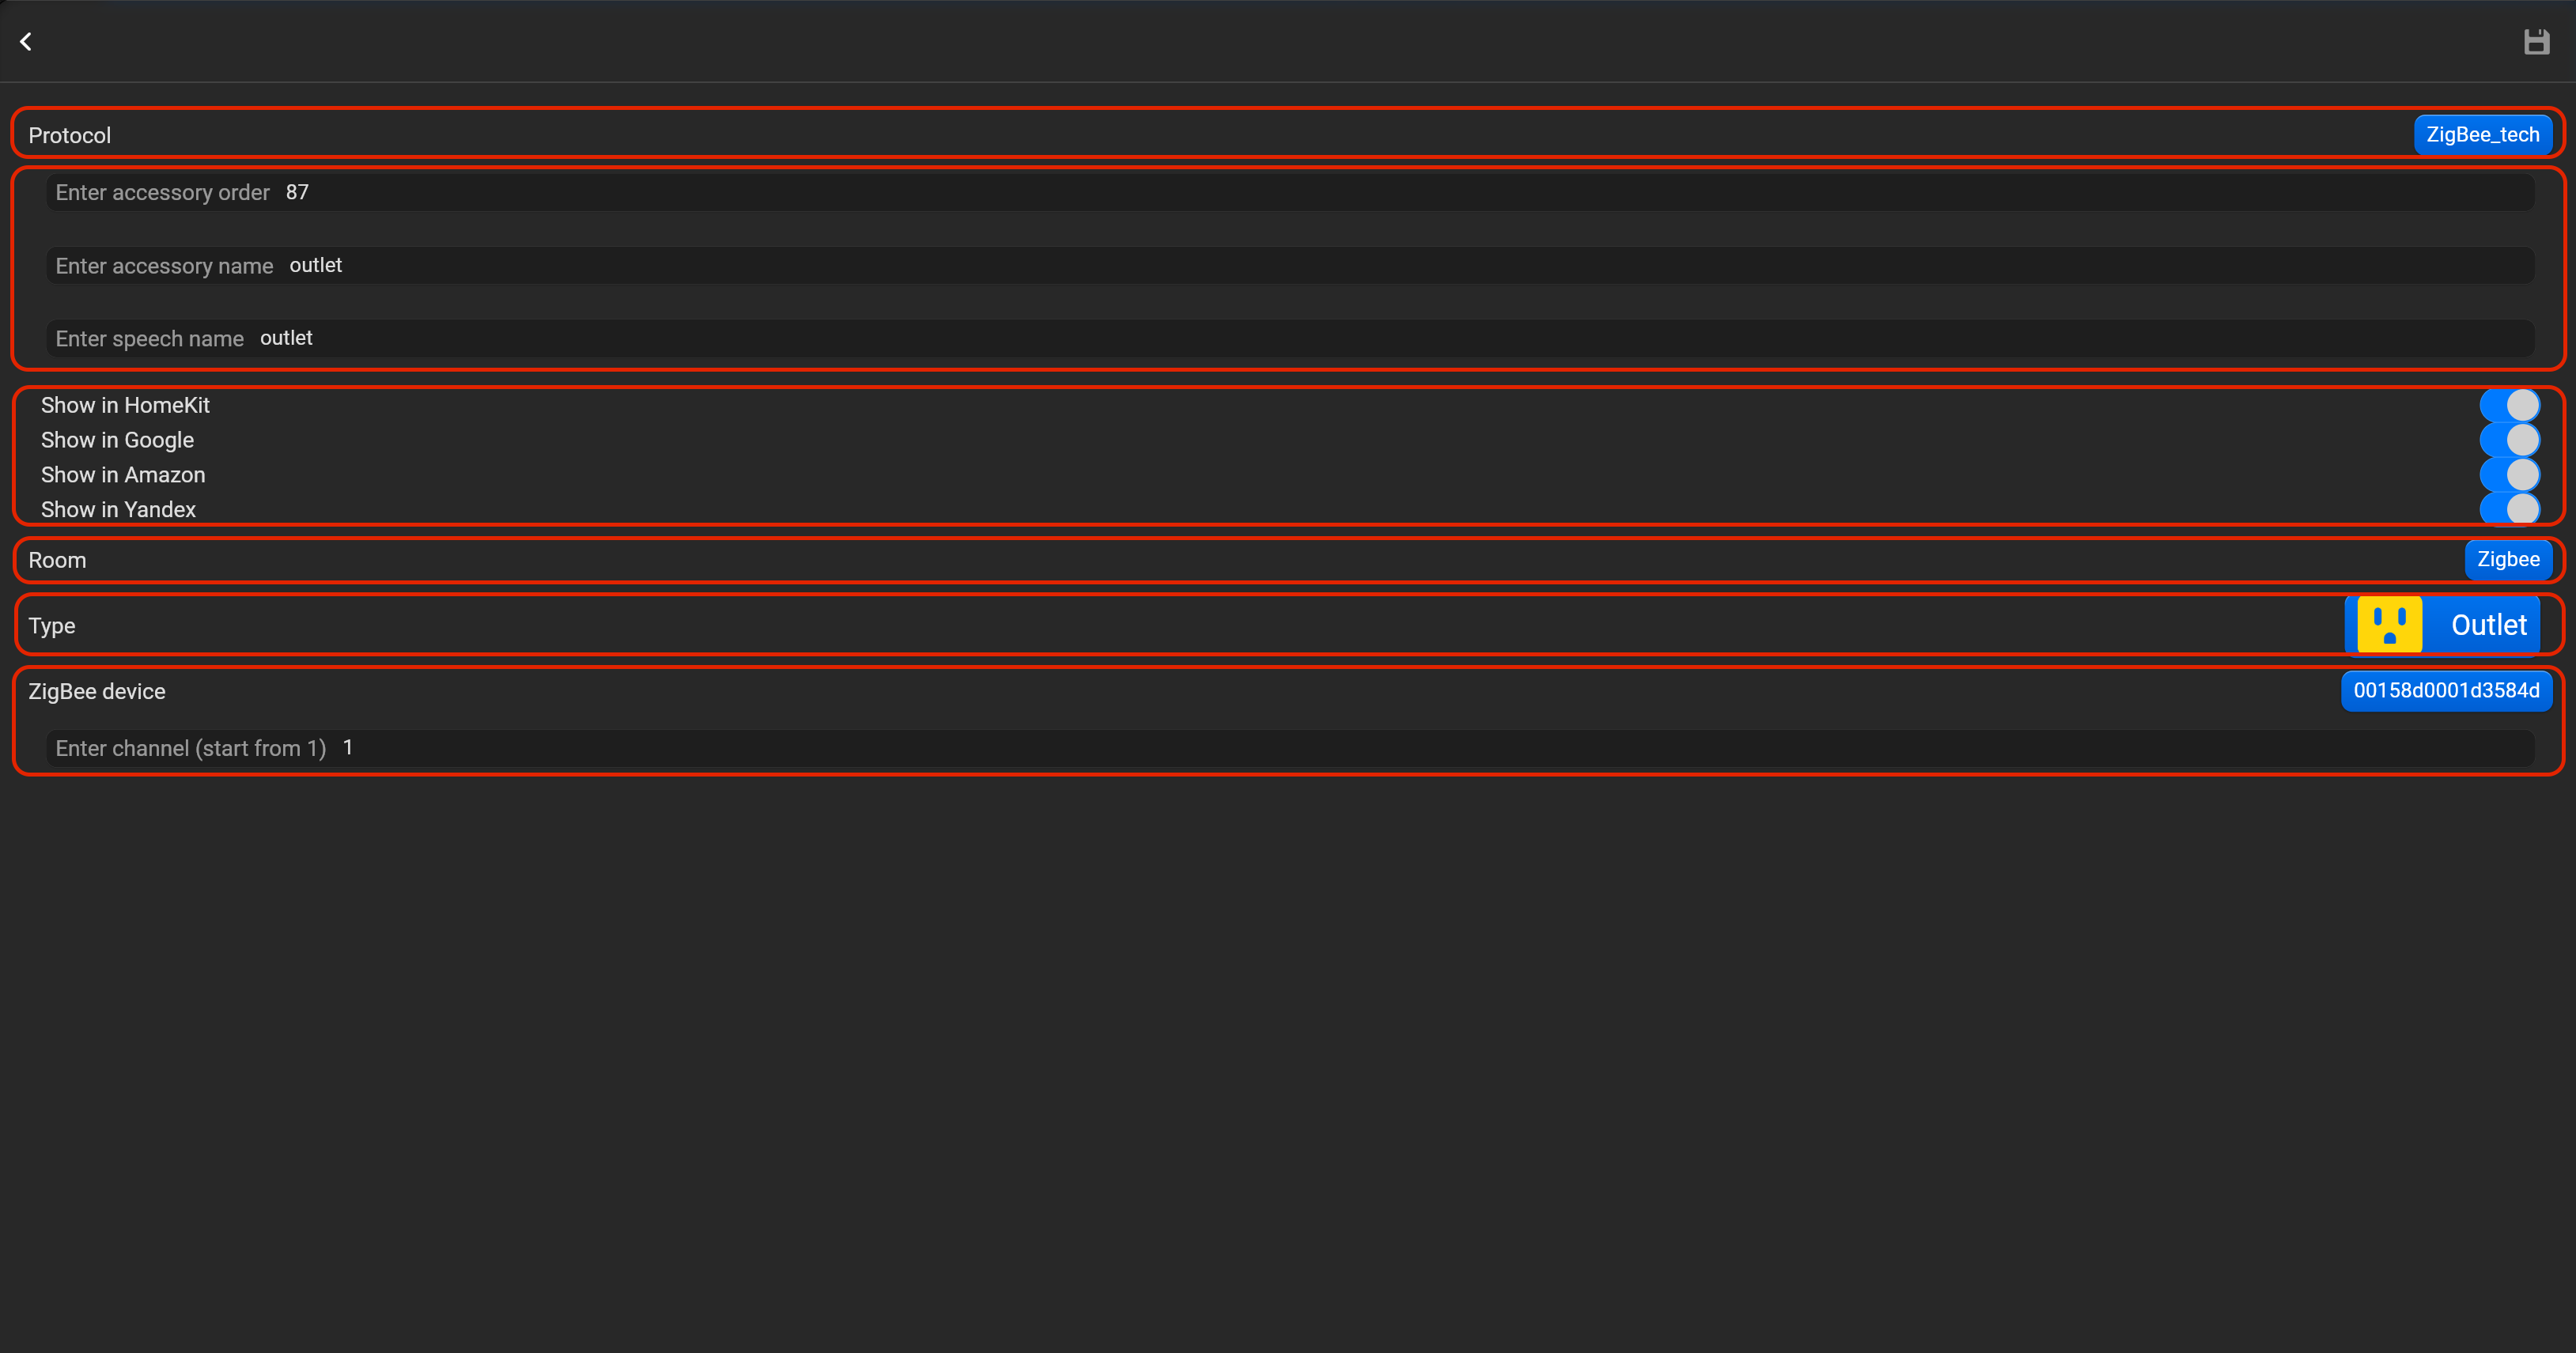
¶ Outlet
- select the protocol in the drop-down list,
- put the accessory order (affects the location of the accessory in Pyxis app),
- put name of the accessory and for the voice assistants,
- select voice assistants, where the accessory should be displayed,
- select the room, where the accessory will be located,
- select the type of accessory (Outlet),
- select in drop-down list IEEE address of zigbee device and channel (if you set multi channel device).
¶ Window covering
- select the protocol in the drop-down list,
- put the accessory order (affects the location of the accessory in Pyxis app),
- put name of the accessory and for the voice assistants,
- select voice assistants, where the accessory should be displayed,
- select the room, where the accessory will be located,
- select the type of accessory (Window covering),
- select in drop-down list IEEE address of zigbee device.
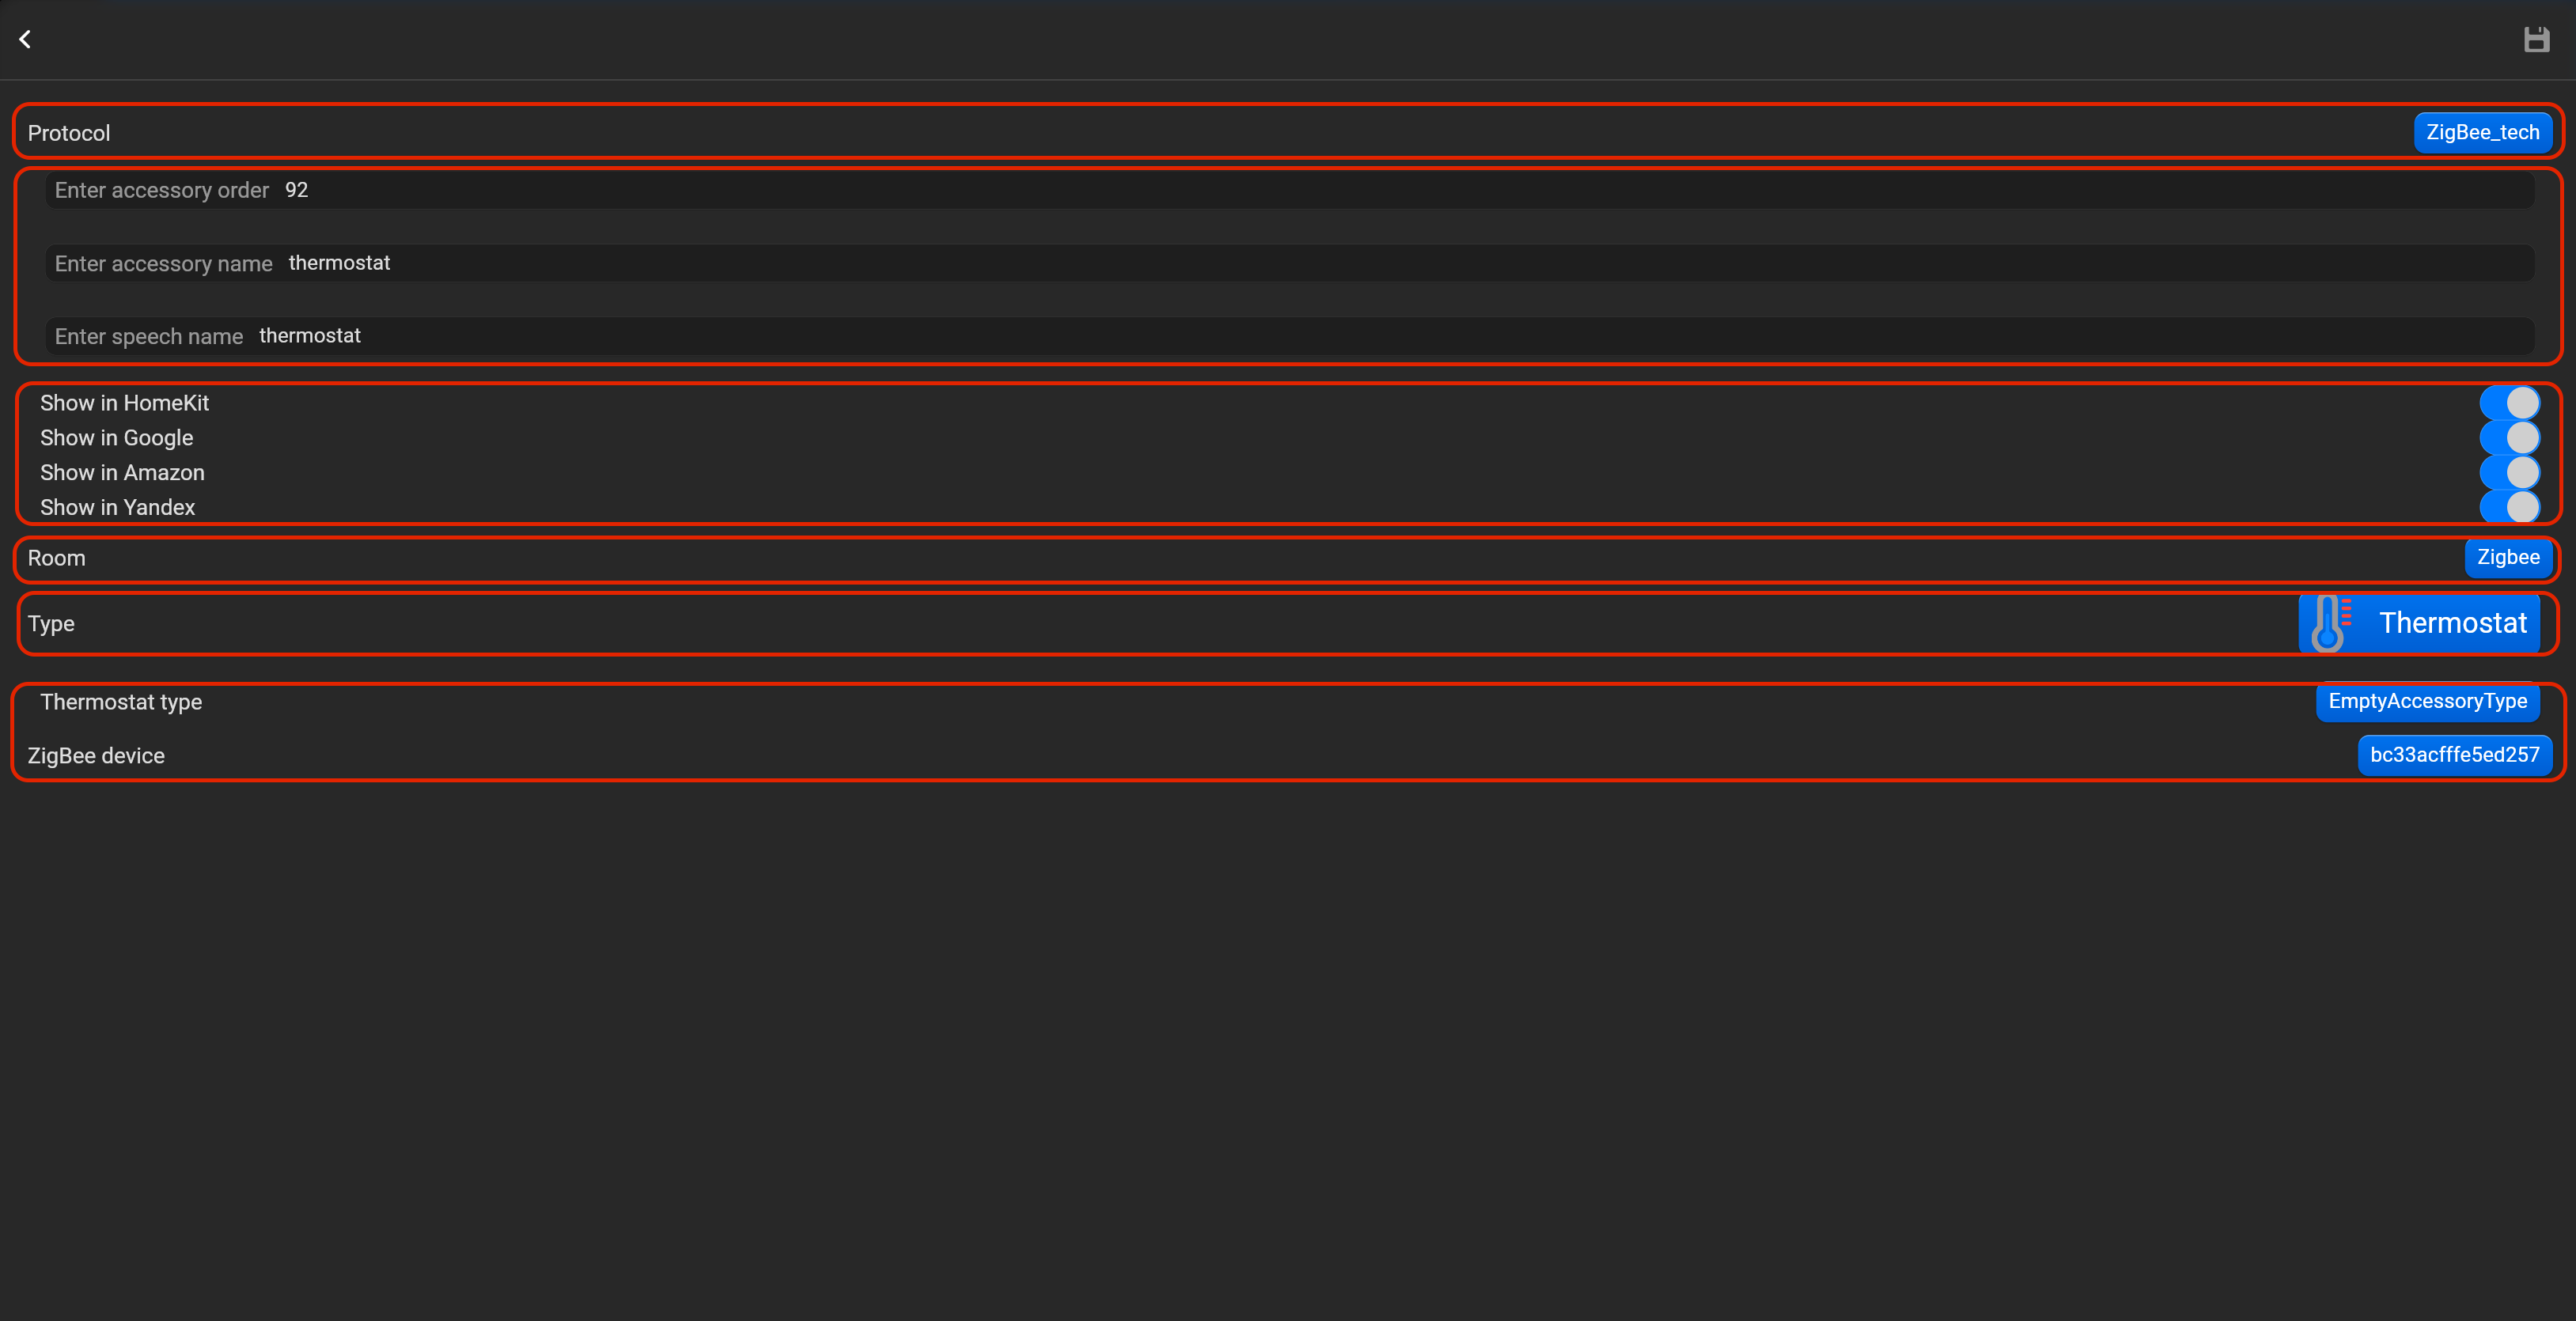
¶ Thermostat
- select the protocol in the drop-down list,
- put the accessory order (affects the location of the accessory in Pyxis app),
- put name of the accessory and for the voice assistants,
- select voice assistants, where the accessory should be displayed,
- select the room, where the accessory will be located,
- select the type of accessory (Thermostat),
- select in drop-down list IEEE address of zigbee device.
¶ Temperature sensor
- select the protocol in the drop-down list,
- put the accessory order (affects the location of the accessory in Pyxis app),
- put name of the accessory and for the voice assistants,
- select voice assistants, where the accessory should be displayed,
- select the room, where the accessory will be located,
- select the type of accessory (Temperature sensor),
- select in drop-down list IEEE address of zigbee device.

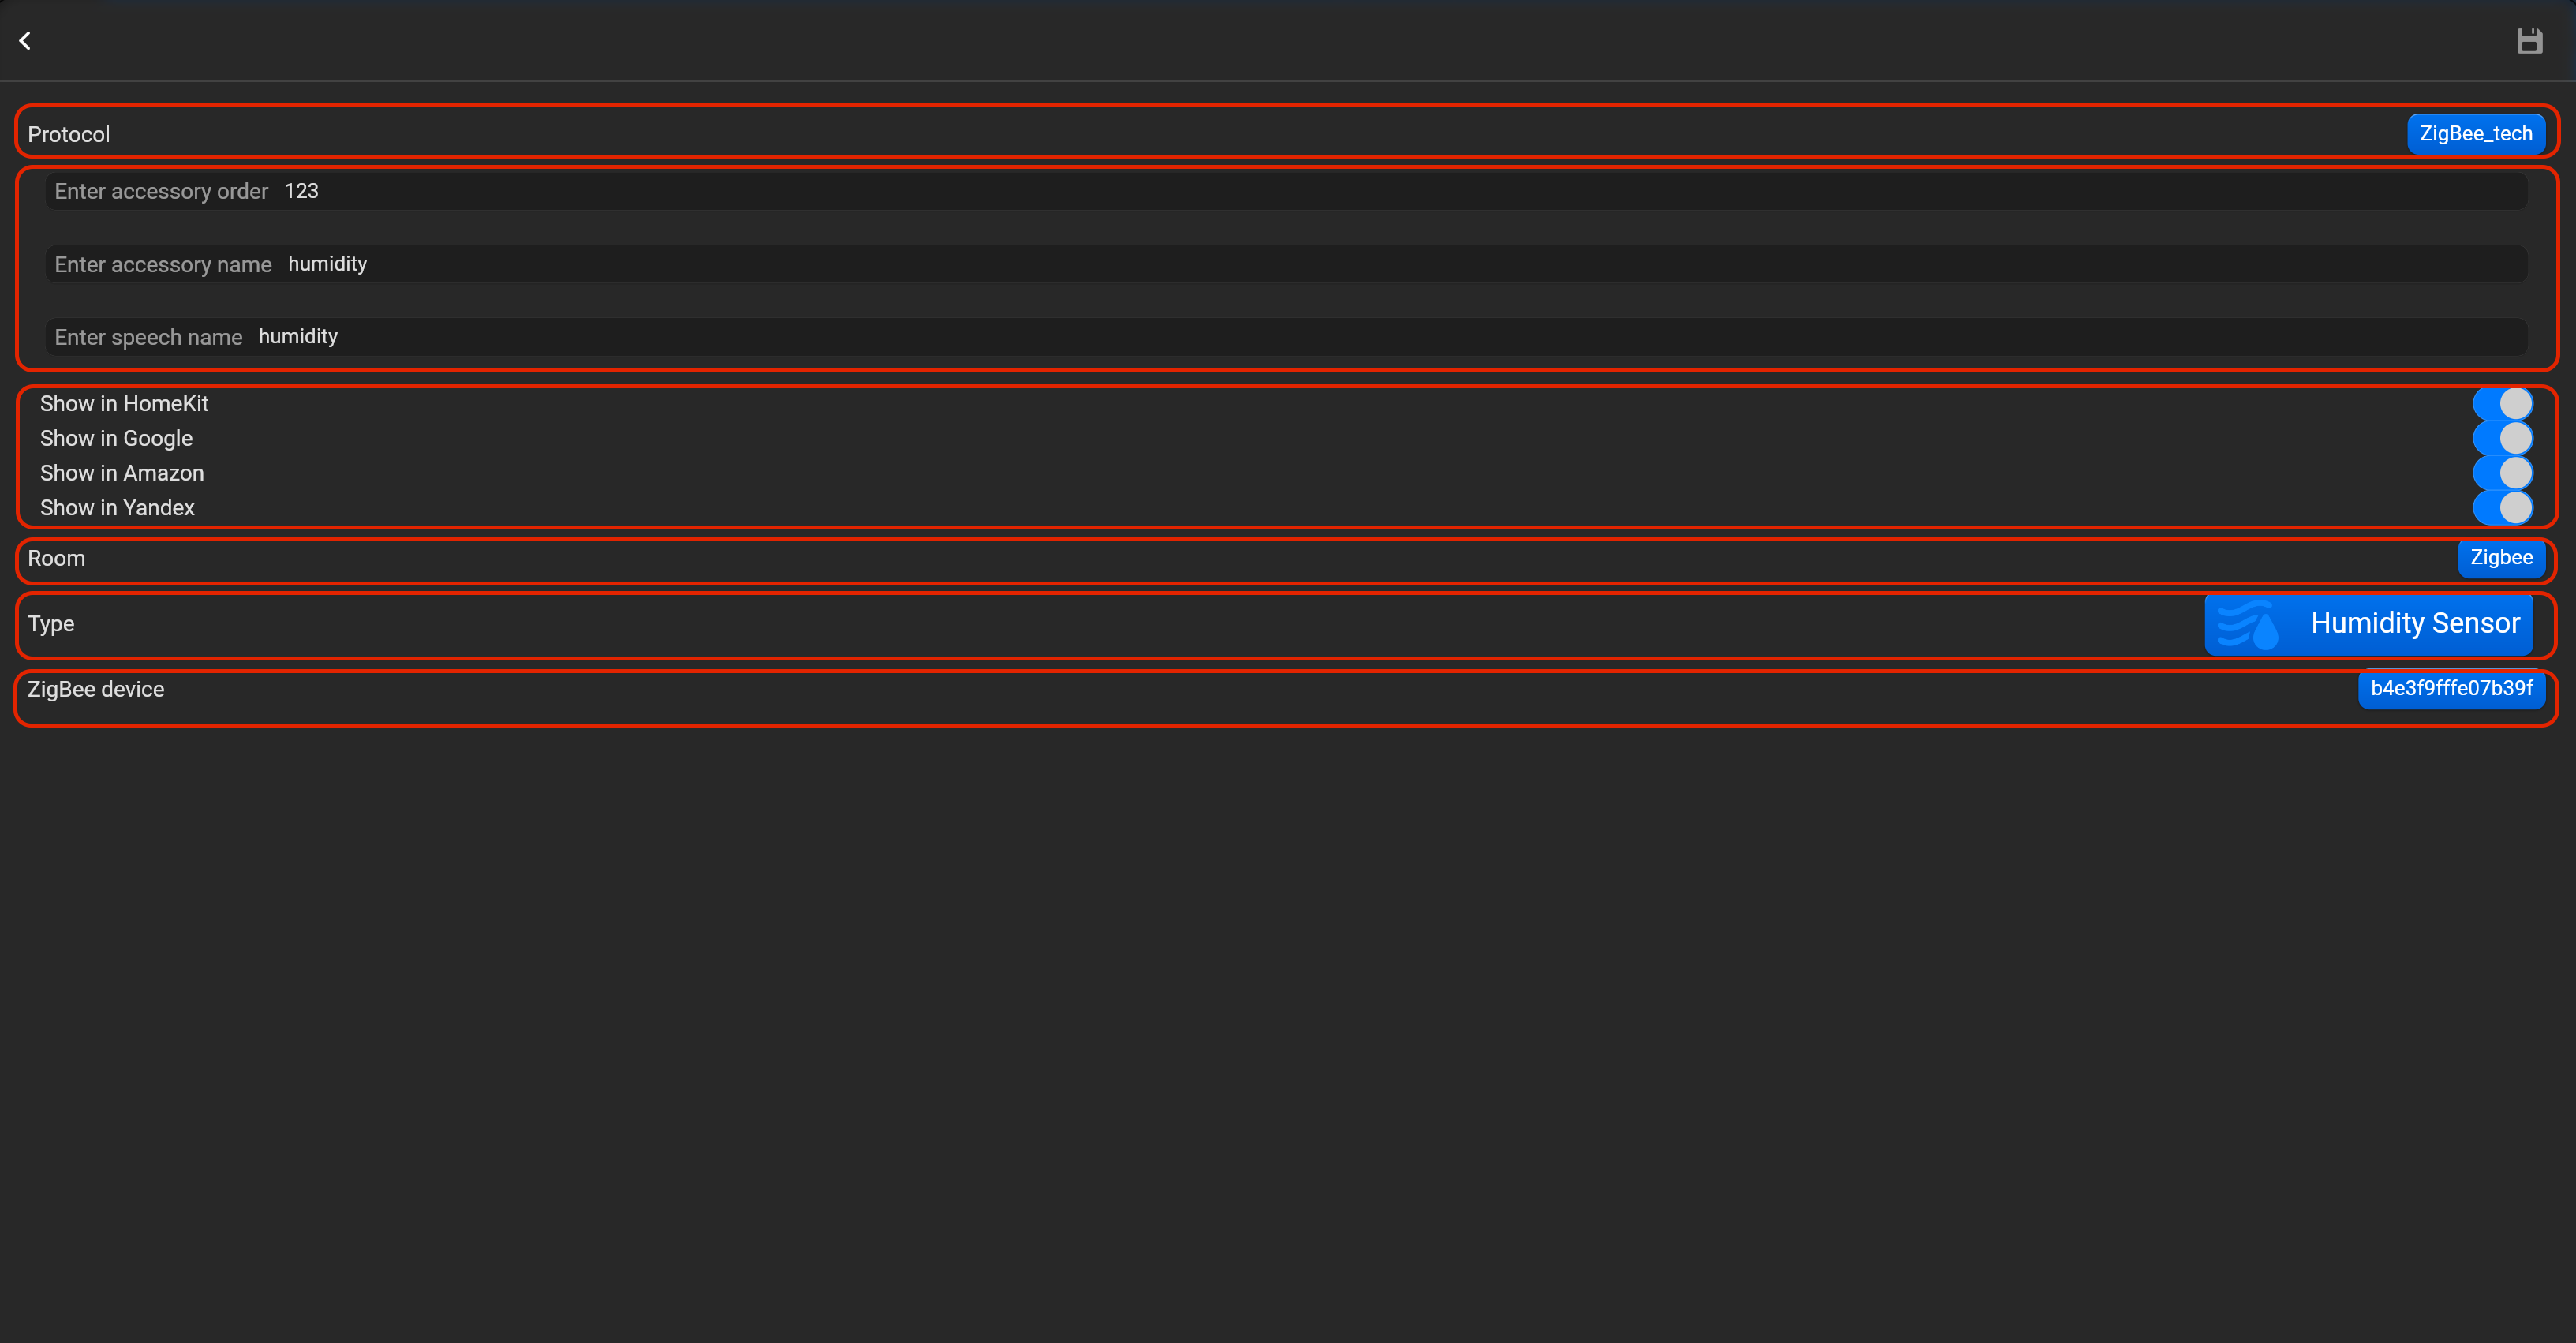
¶ Humidity sensor
- select the protocol in the drop-down list,
- put the accessory order (affects the location of the accessory in Pyxis app),
- put name of the accessory and for the voice assistants,
- select voice assistants, where the accessory should be displayed,
- select the room, where the accessory will be located,
- select the type of accessory (Humidity sensor),
- select in drop-down list IEEE address of zigbee device.
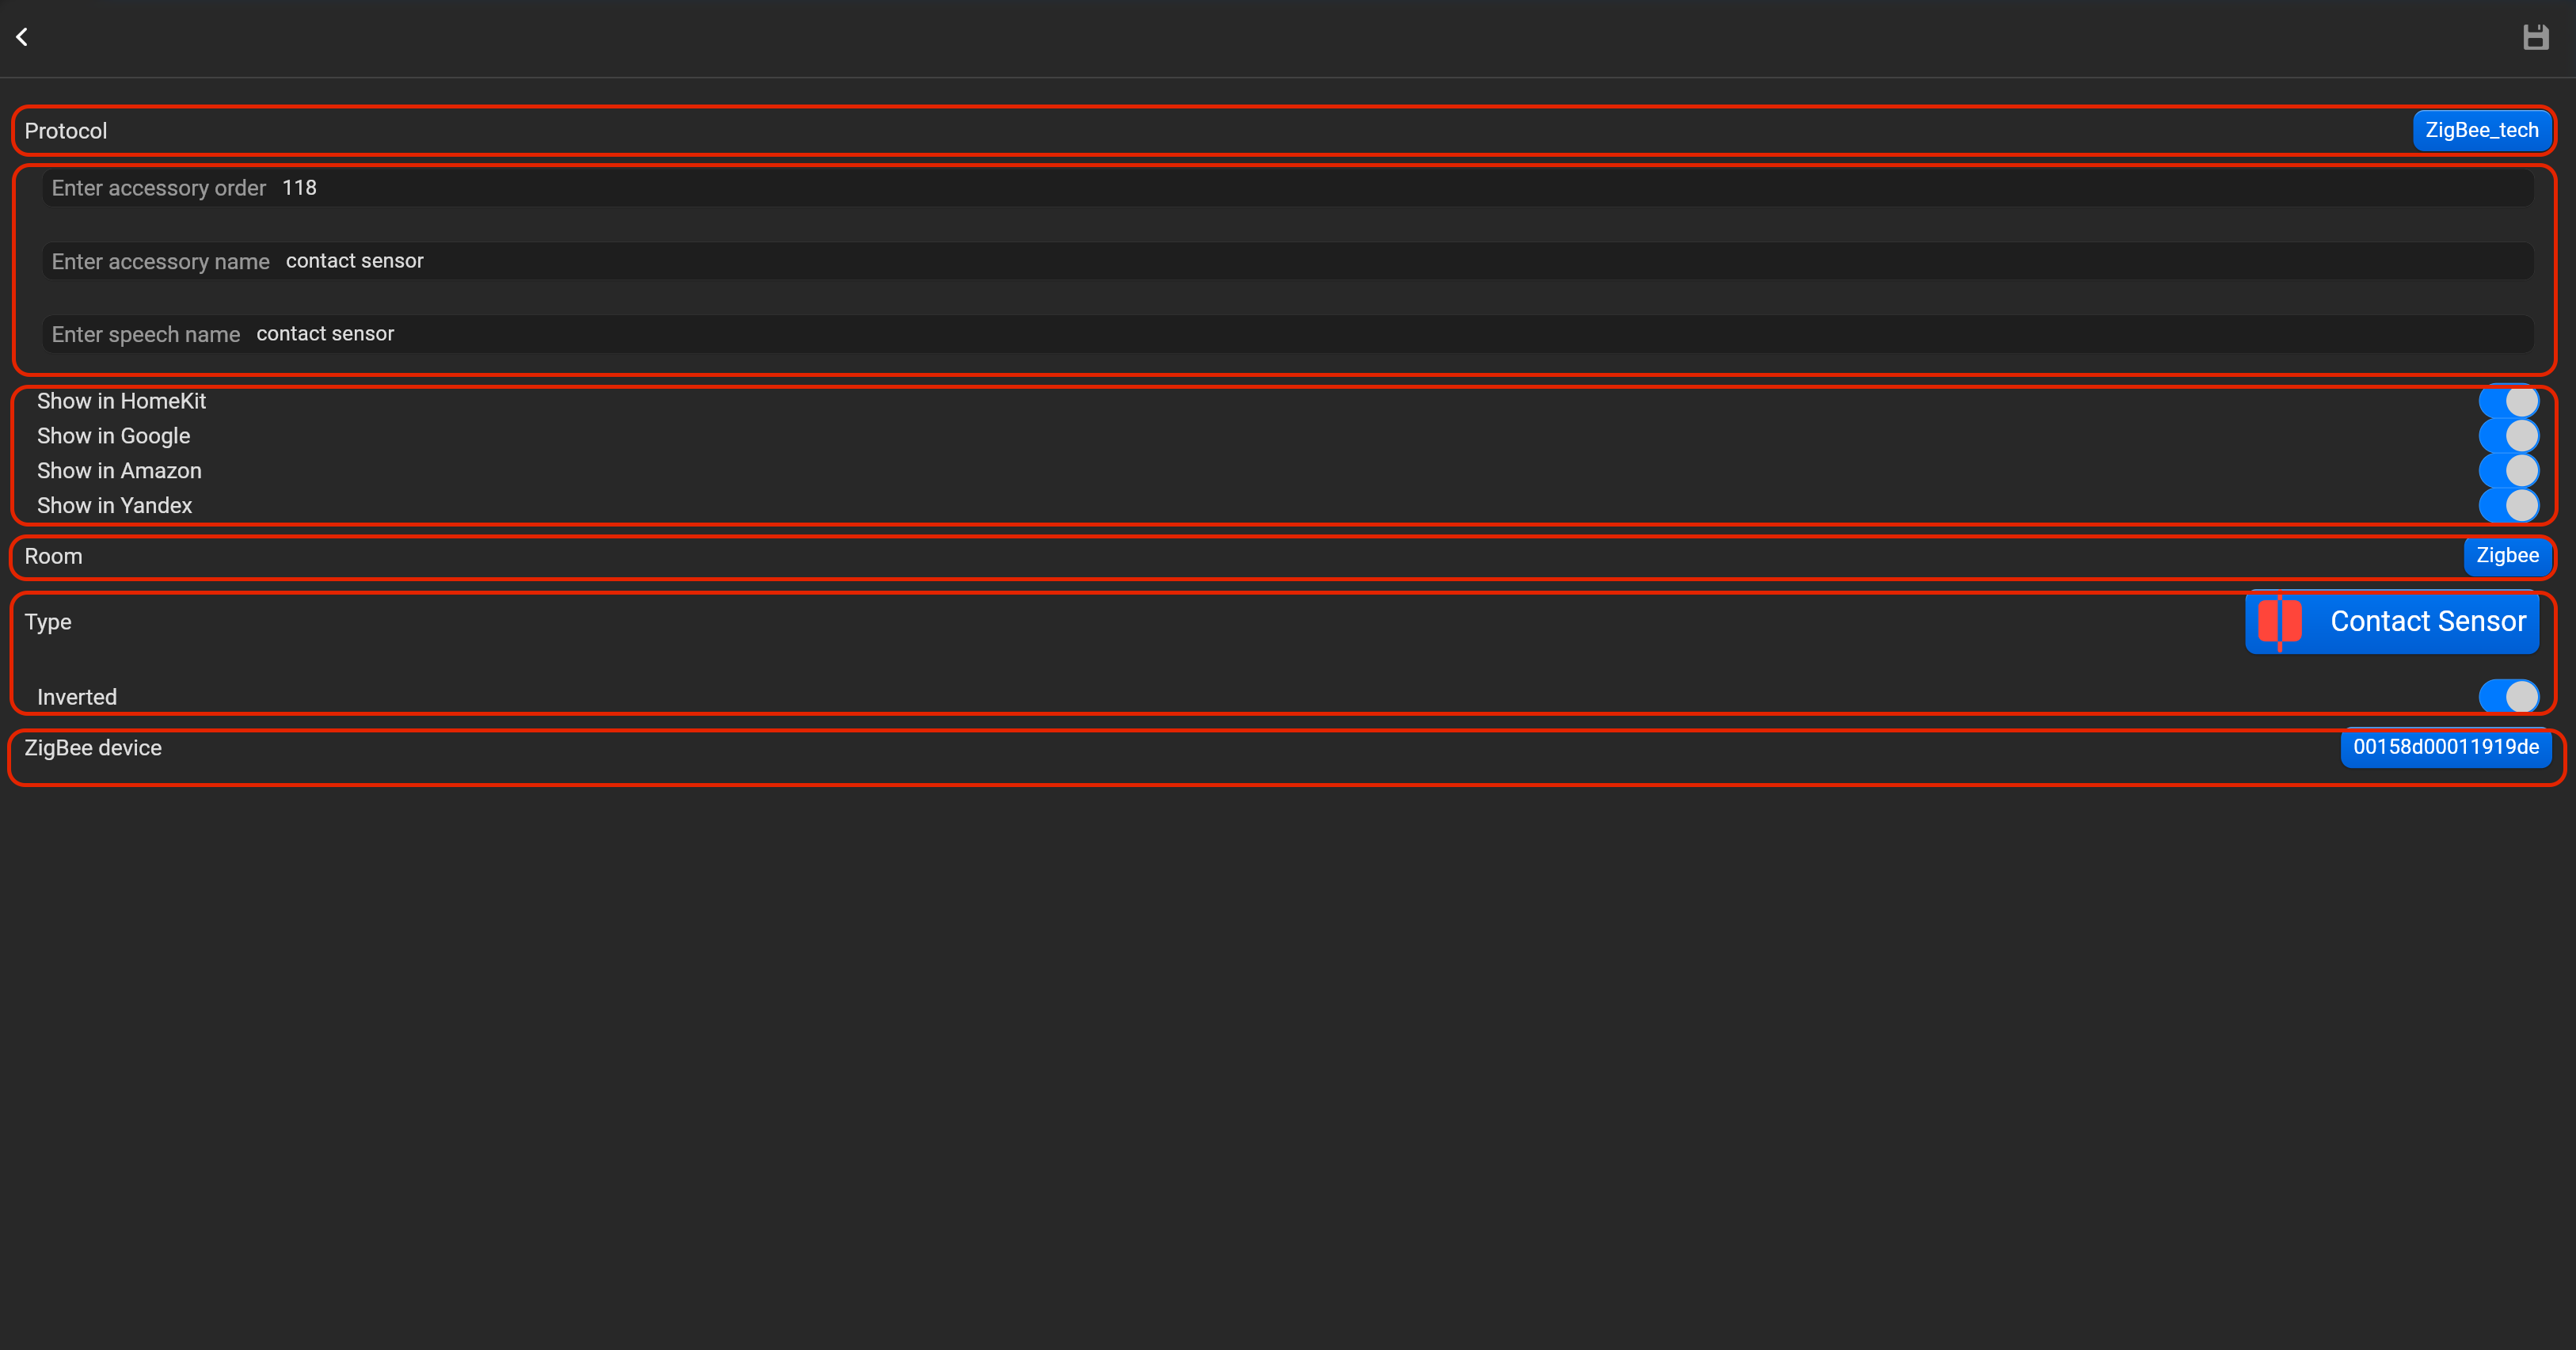
¶ Contact sensor
- select the protocol in the drop-down list,
- put the accessory order (affects the location of the accessory in Pyxis app),
- put name of the accessory and for the voice assistants,
- select voice assistants, where the accessory should be displayed,
- select the room, where the accessory will be located,
- select the type of accessory (Contact sensor),
- select in drop-down list IEEE address of zigbee device. You can invert value of this accessory.
¶ Light sensor
- select the protocol in the drop-down list,
- put the accessory order (affects the location of the accessory in Pyxis app),
- put name of the accessory and for the voice assistants,
- select voice assistants, where the accessory should be displayed,
- select the room, where the accessory will be located,
- select the type of accessory (Lightt sensor),
- select in drop-down list IEEE address of zigbee device.
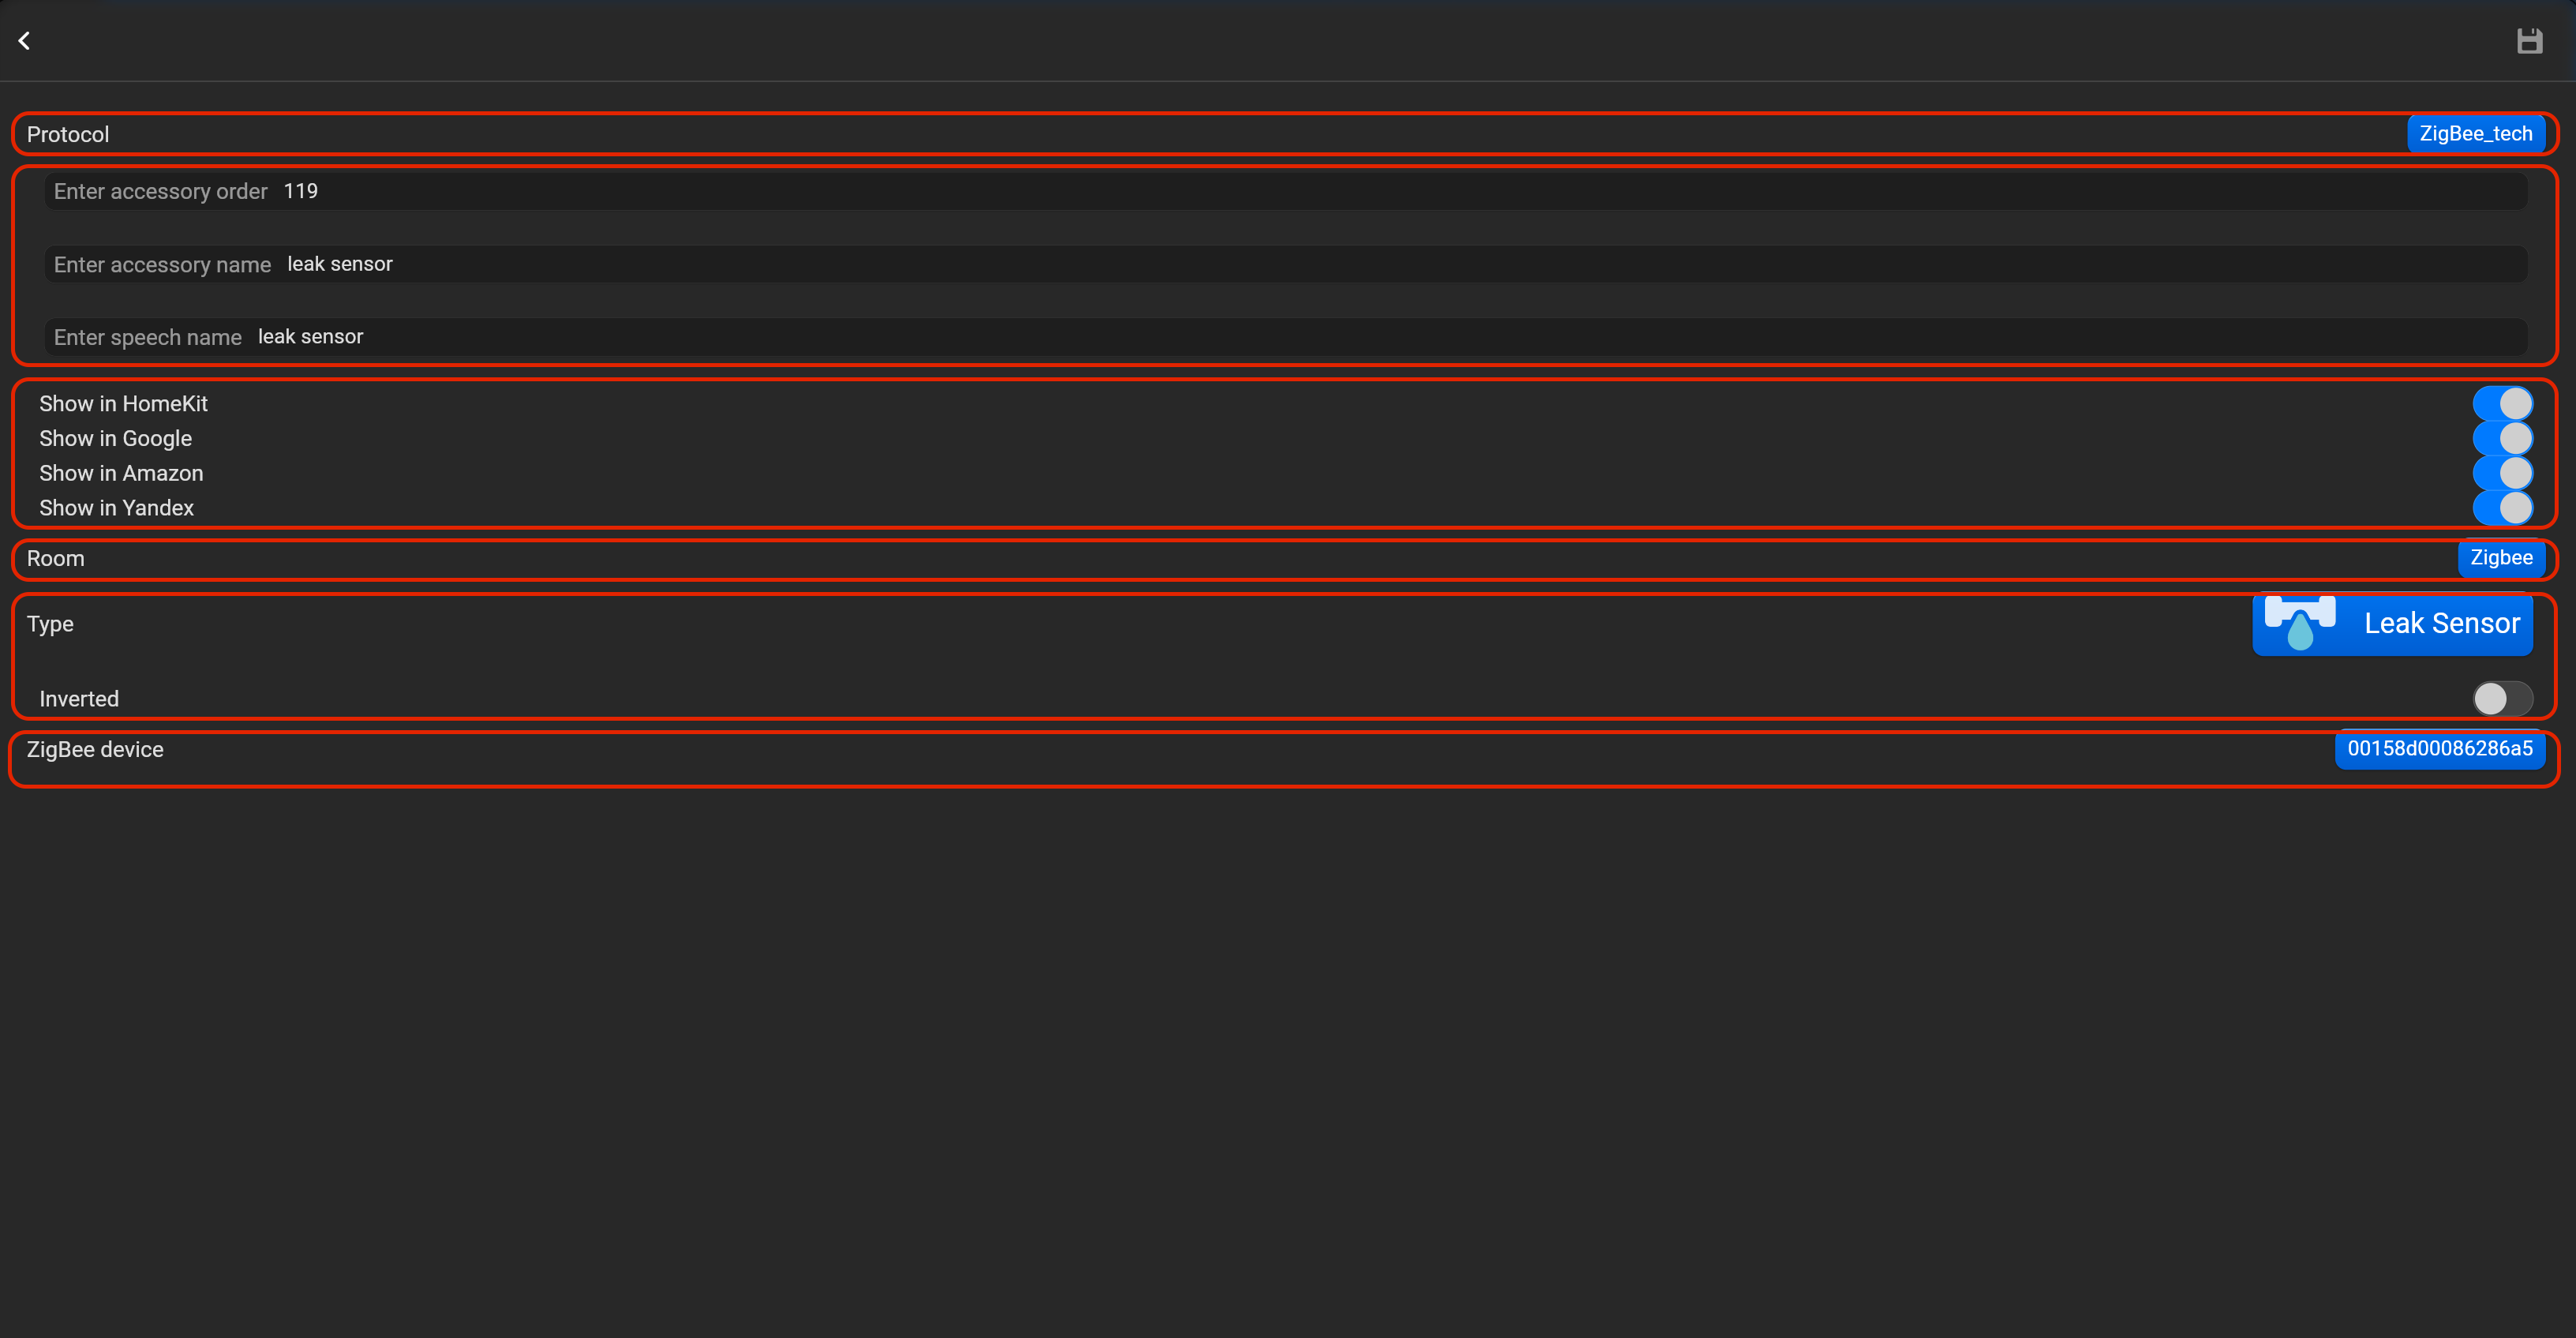
¶ Leak sensor
- select the protocol in the drop-down list,
- put the accessory order (affects the location of the accessory in Pyxis app),
- put name of the accessory and for the voice assistants,
- select voice assistants, where the accessory should be displayed,
- select the room, where the accessory will be located,
- select the type of accessory (Leak sensor),
- select in drop-down list IEEE address of zigbee device. You can invert value of this accessory.

¶ Smoke sensor
- select the protocol in the drop-down list,
- put the accessory order (affects the location of the accessory in Pyxis app),
- put name of the accessory and for the voice assistants,
- select voice assistants, where the accessory should be displayed,
- select the room, where the accessory will be located,
- select the type of accessory (Smoke sensor),
- select in drop-down list IEEE address of zigbee device. You can invert value of this accessory.
¶ Motion sensor
- select the protocol in the drop-down list,
- put the accessory order (affects the location of the accessory in Pyxis app),
- put name of the accessory and for the voice assistants,
- select voice assistants, where the accessory should be displayed,
- select the room, where the accessory will be located,
- select the type of accessory (Motion sensor),
- select in drop-down list IEEE address of zigbee device.

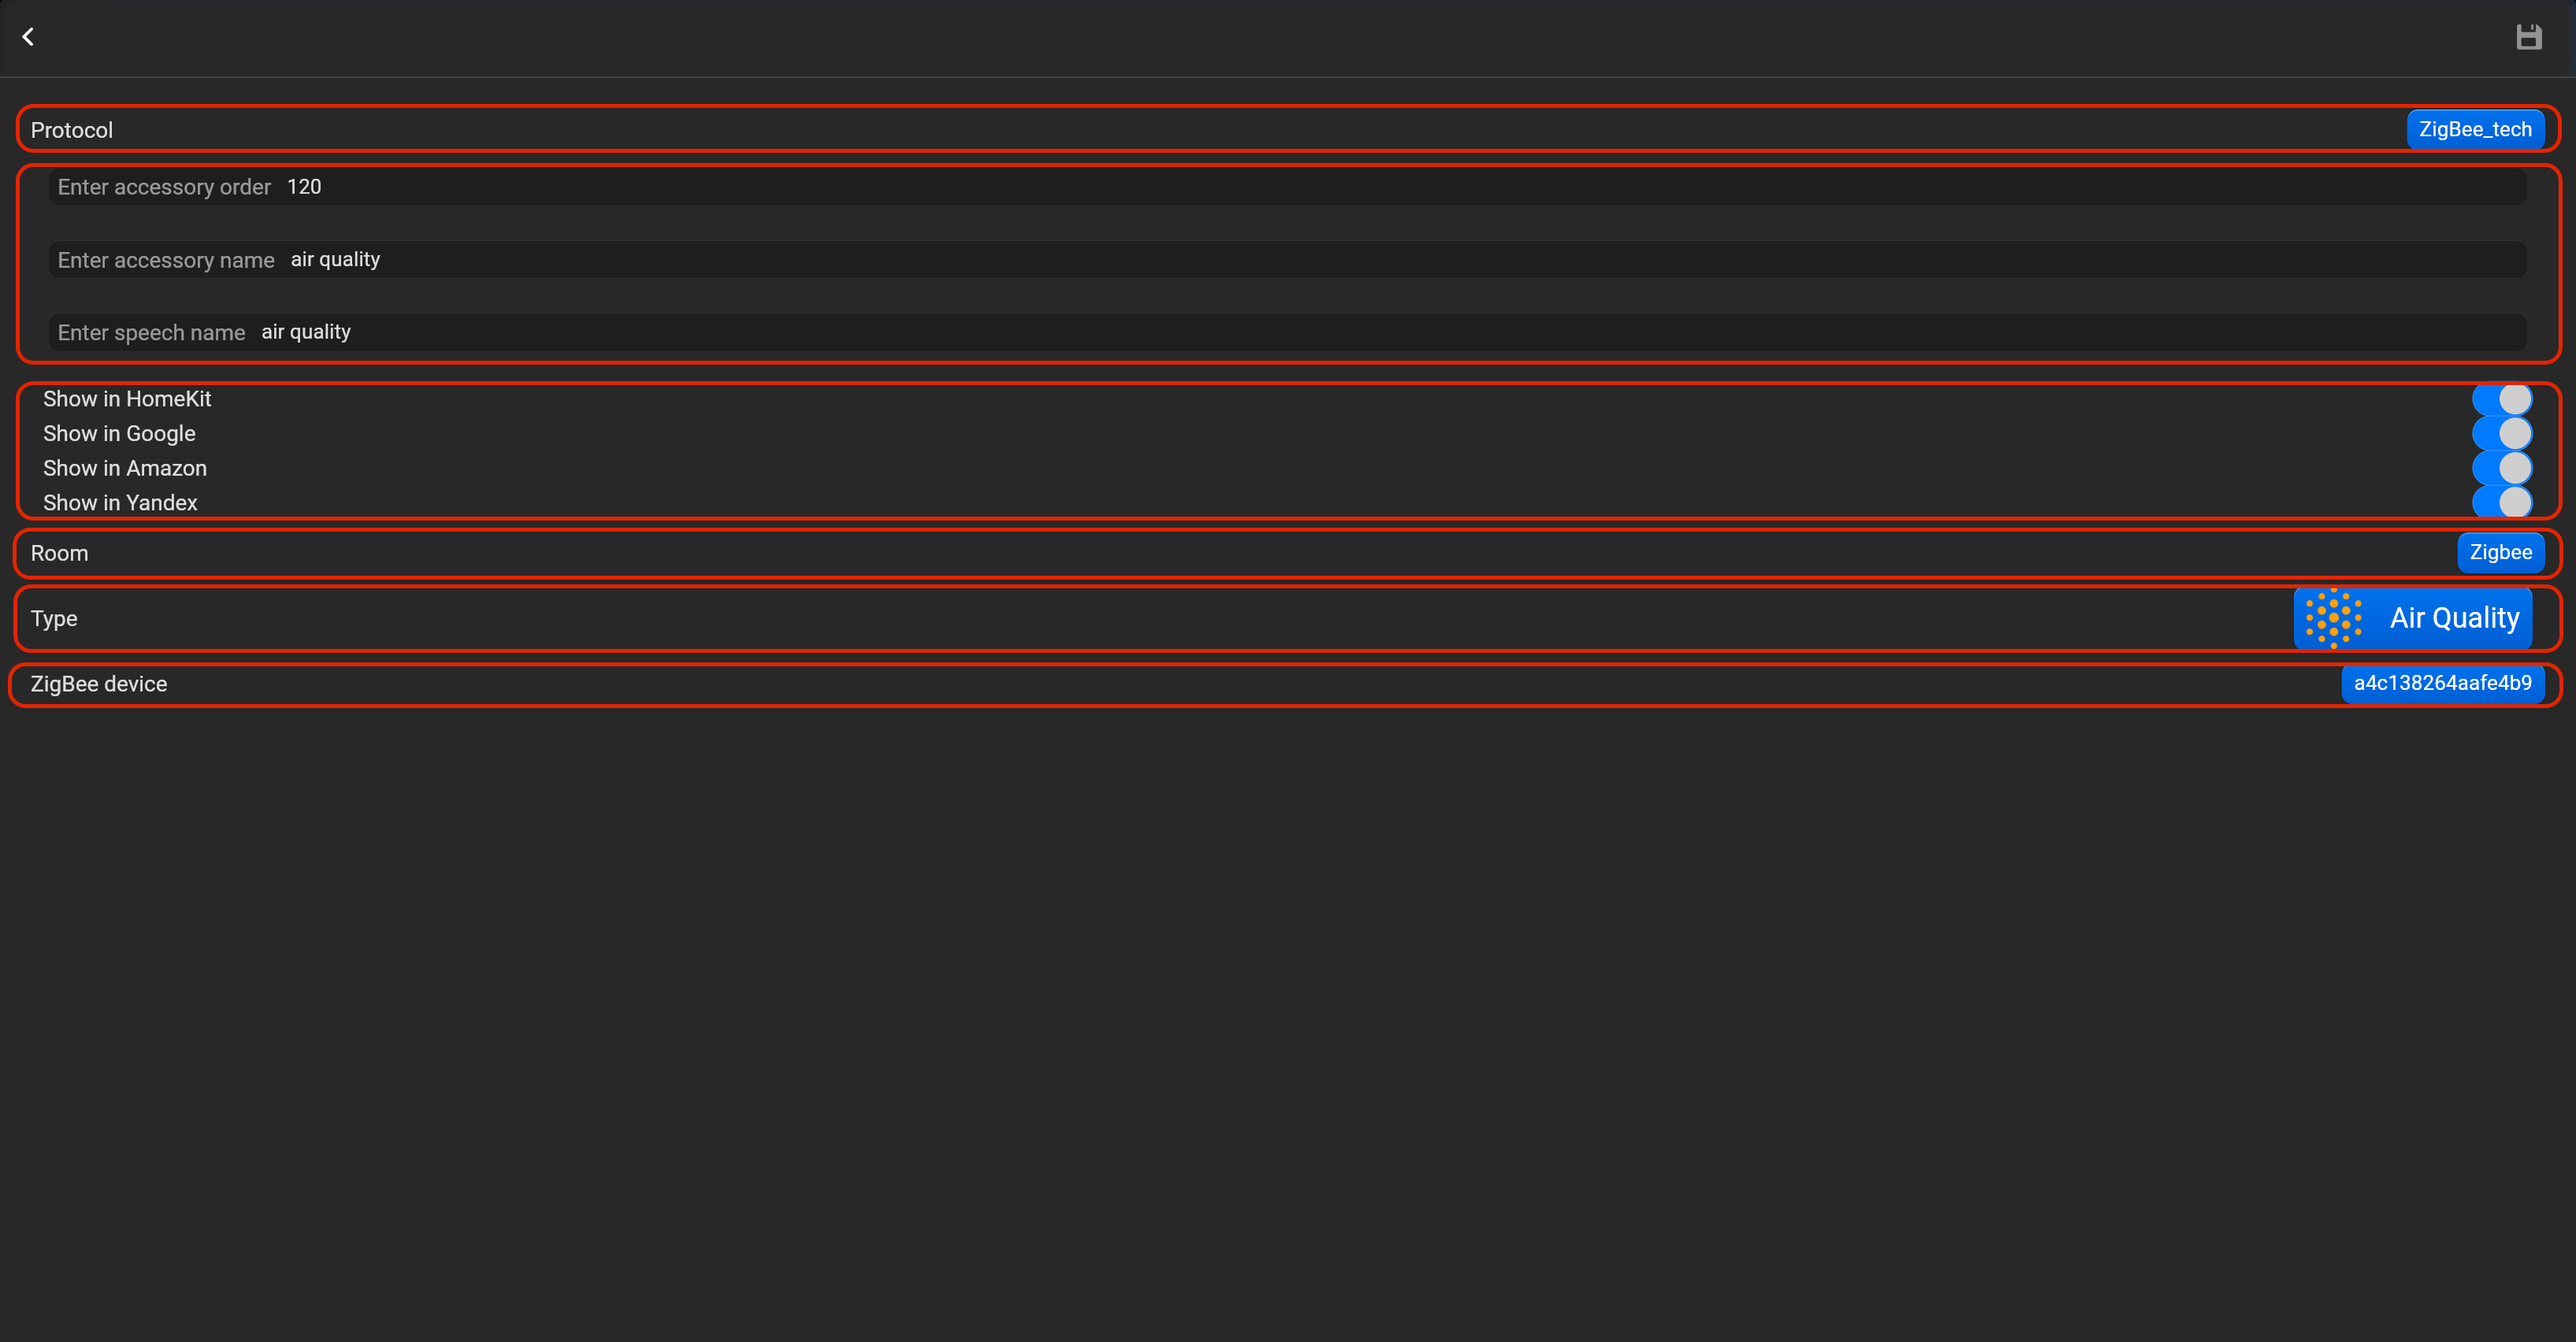
¶ Air quality
- select the protocol in the drop-down list,
- put the accessory order (affects the location of the accessory in Pyxis app),
- put name of the accessory and for the voice assistants,
- select voice assistants, where the accessory should be displayed,
- select the room, where the accessory will be located,
- select the type of accessory (Air quality),
- select in drop-down list IEEE address of zigbee device.
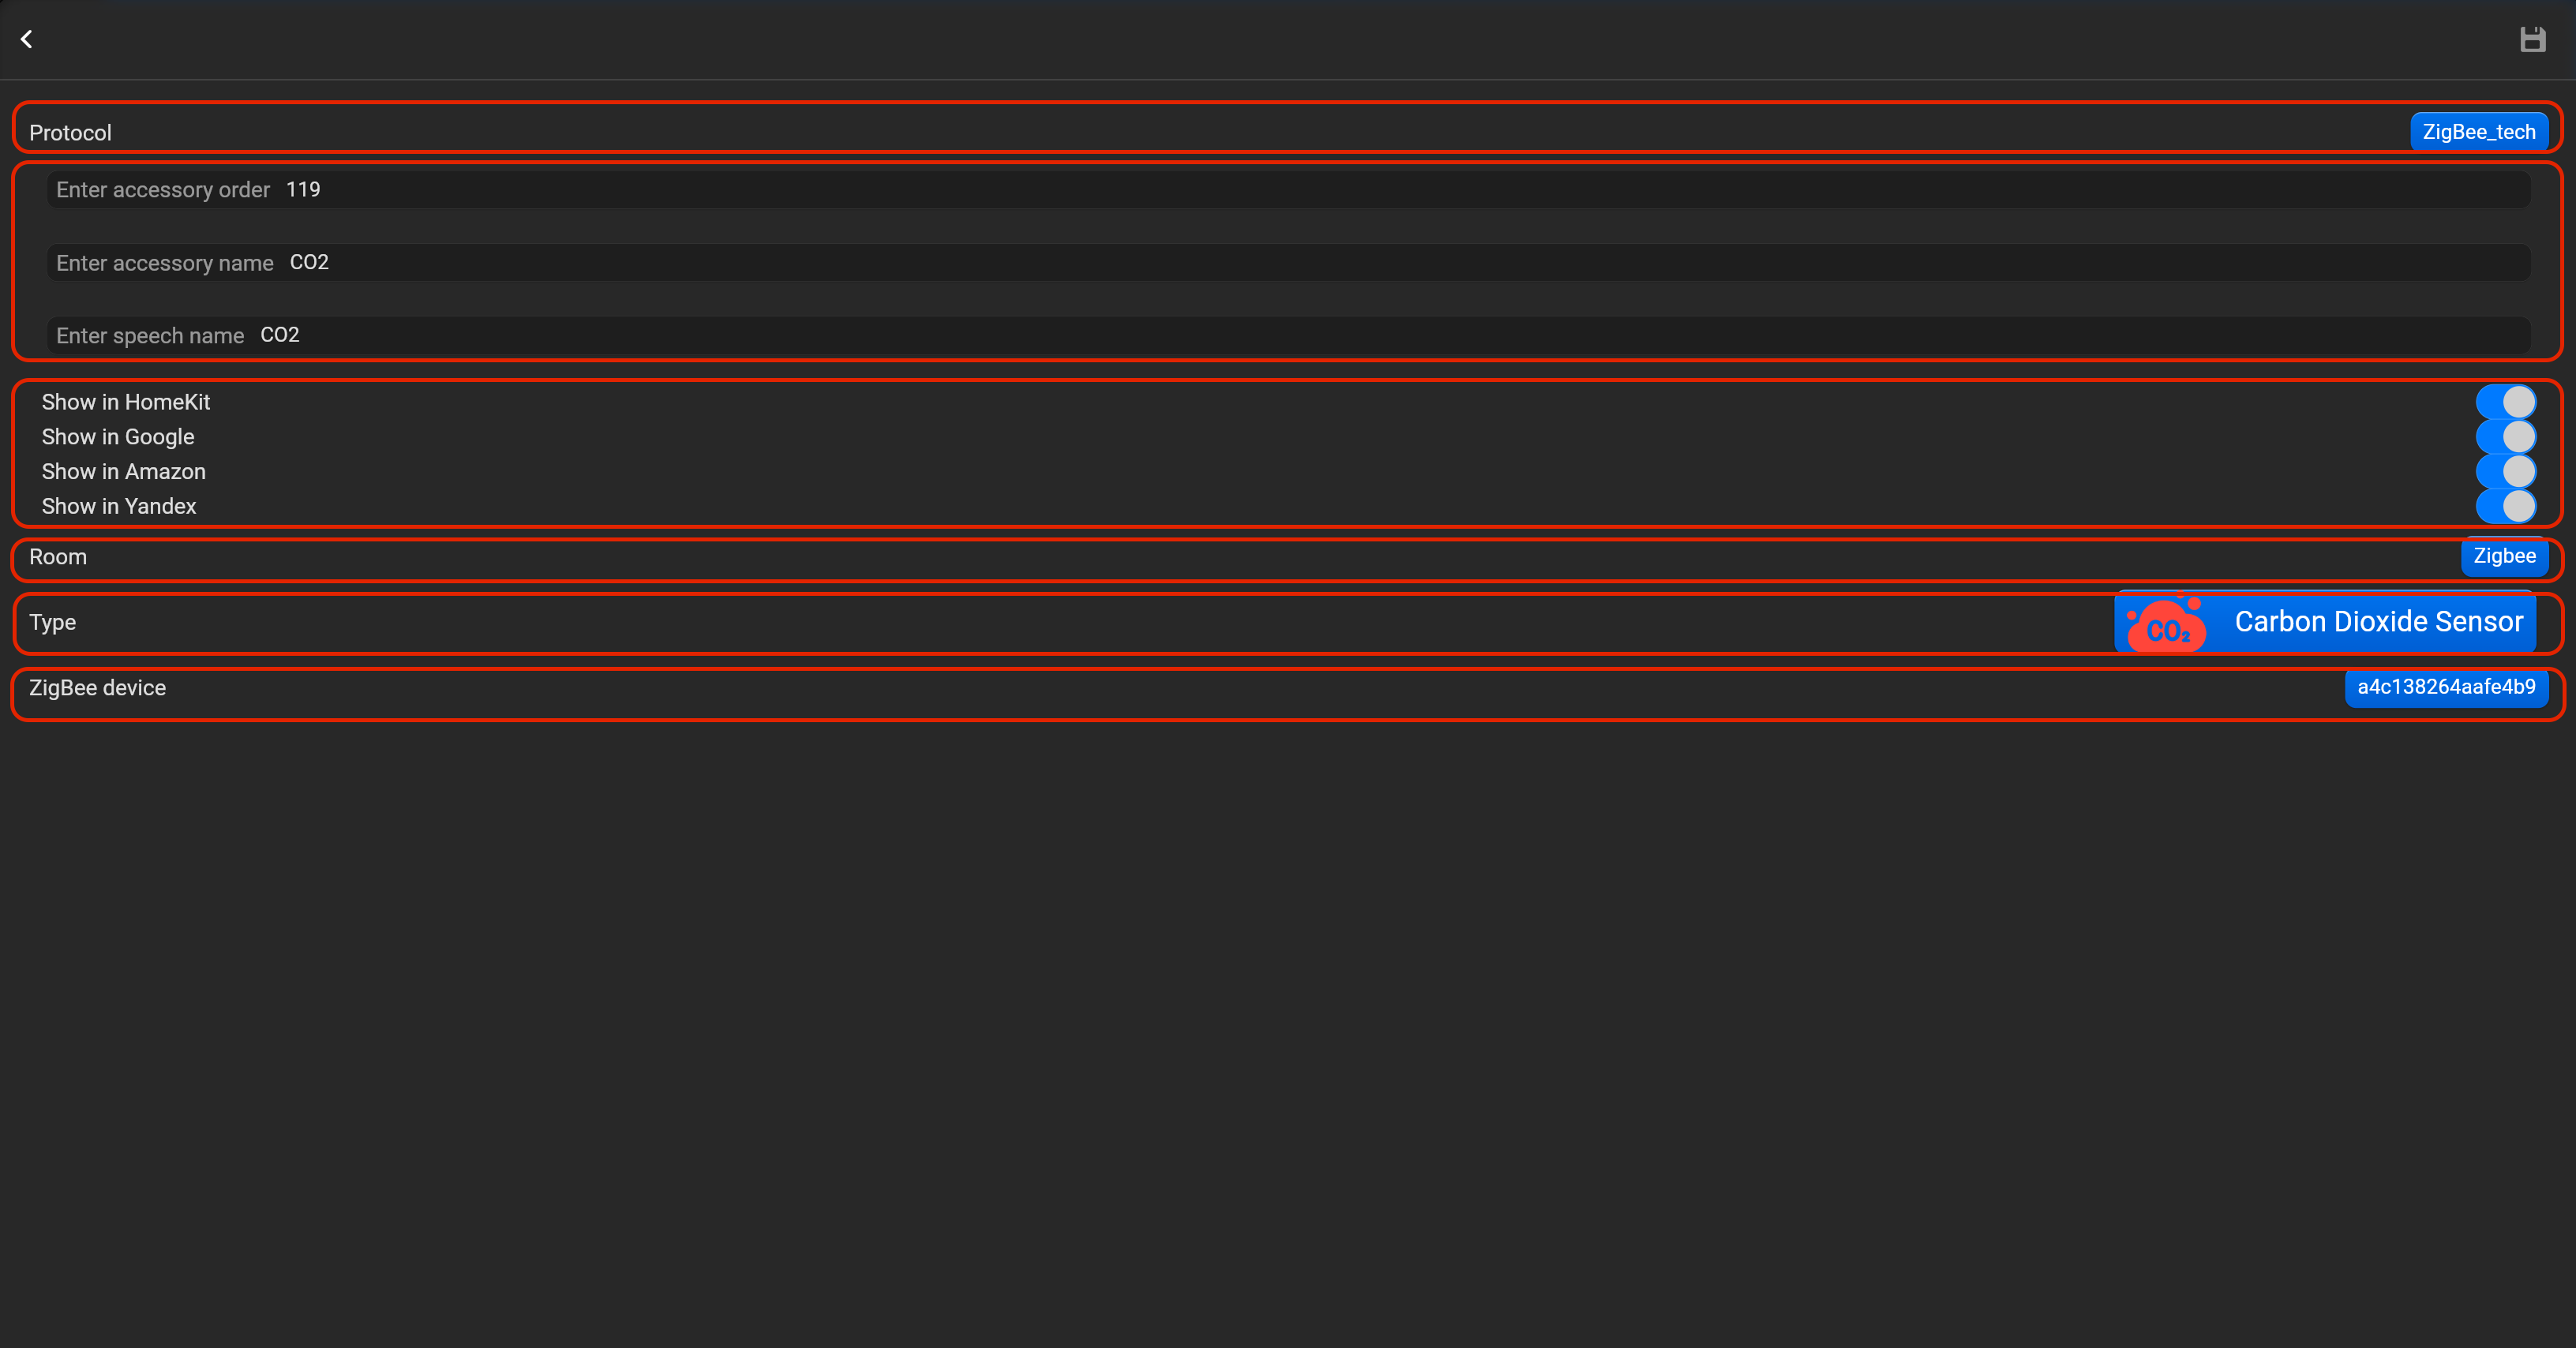
¶ Carbon dioxide sensor
- select the protocol in the drop-down list,
- put the accessory order (affects the location of the accessory in Pyxis app),
- put name of the accessory and for the voice assistants,
- select voice assistants, where the accessory should be displayed,
- select the room, where the accessory will be located,
- select the type of accessory (Carbon dioxide sensor),
- select in drop-down list IEEE address of zigbee device.
¶ GPIO
This option valid only, if you deploy Pyxis on JetHome controller. JetHome controller has GPIO ports - inputs and outputs. Please, find below, examples for every supported type of accessory. Do not forget save all changes and restart Pyxis.
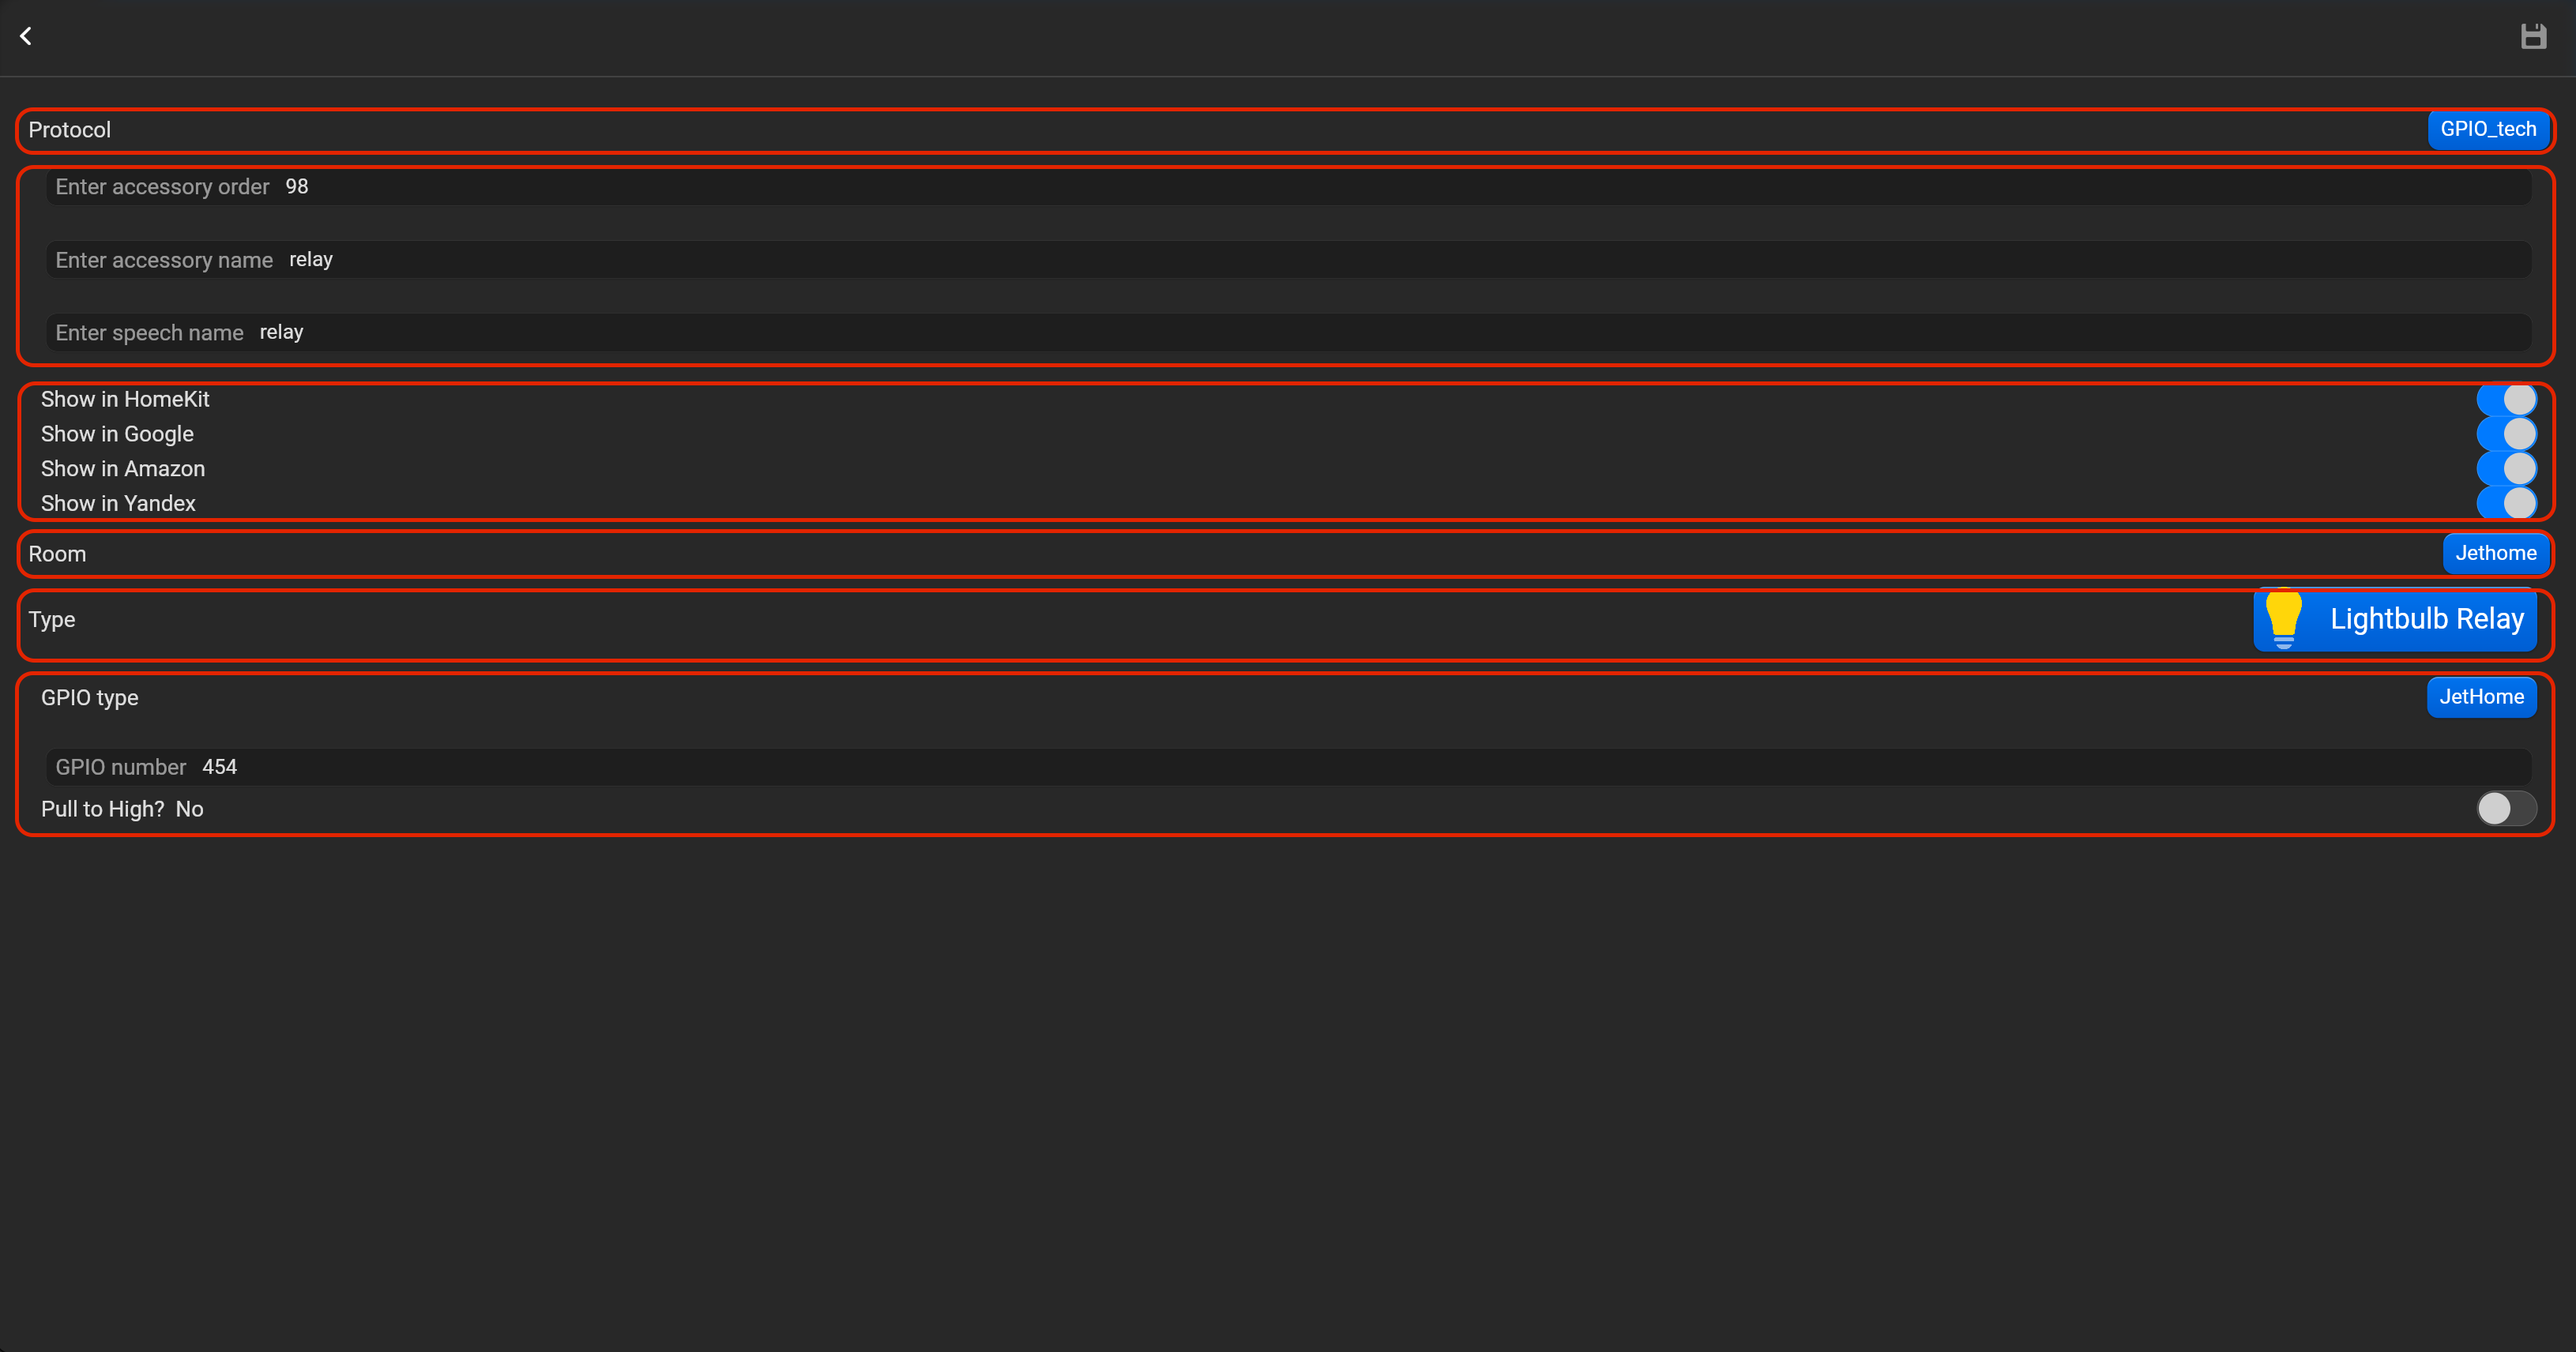
¶ Lightbulb relay
- select the protocol in the drop-down list,
- put the accessory order (affects the location of the accessory in Pyxis app),
- put name of the accessory and for the voice assistants,
- select voice assistants, where the accessory should be displayed,
- select the room, where the accessory will be located,
- select the type of accessory (Lightbulb relay), GPIO type (Empty type or Jethome),
- put GPIO number, select whether you need to bind to a high level. By default, continuous monitoring (polling) of the GPIO status is enabled for sensors.
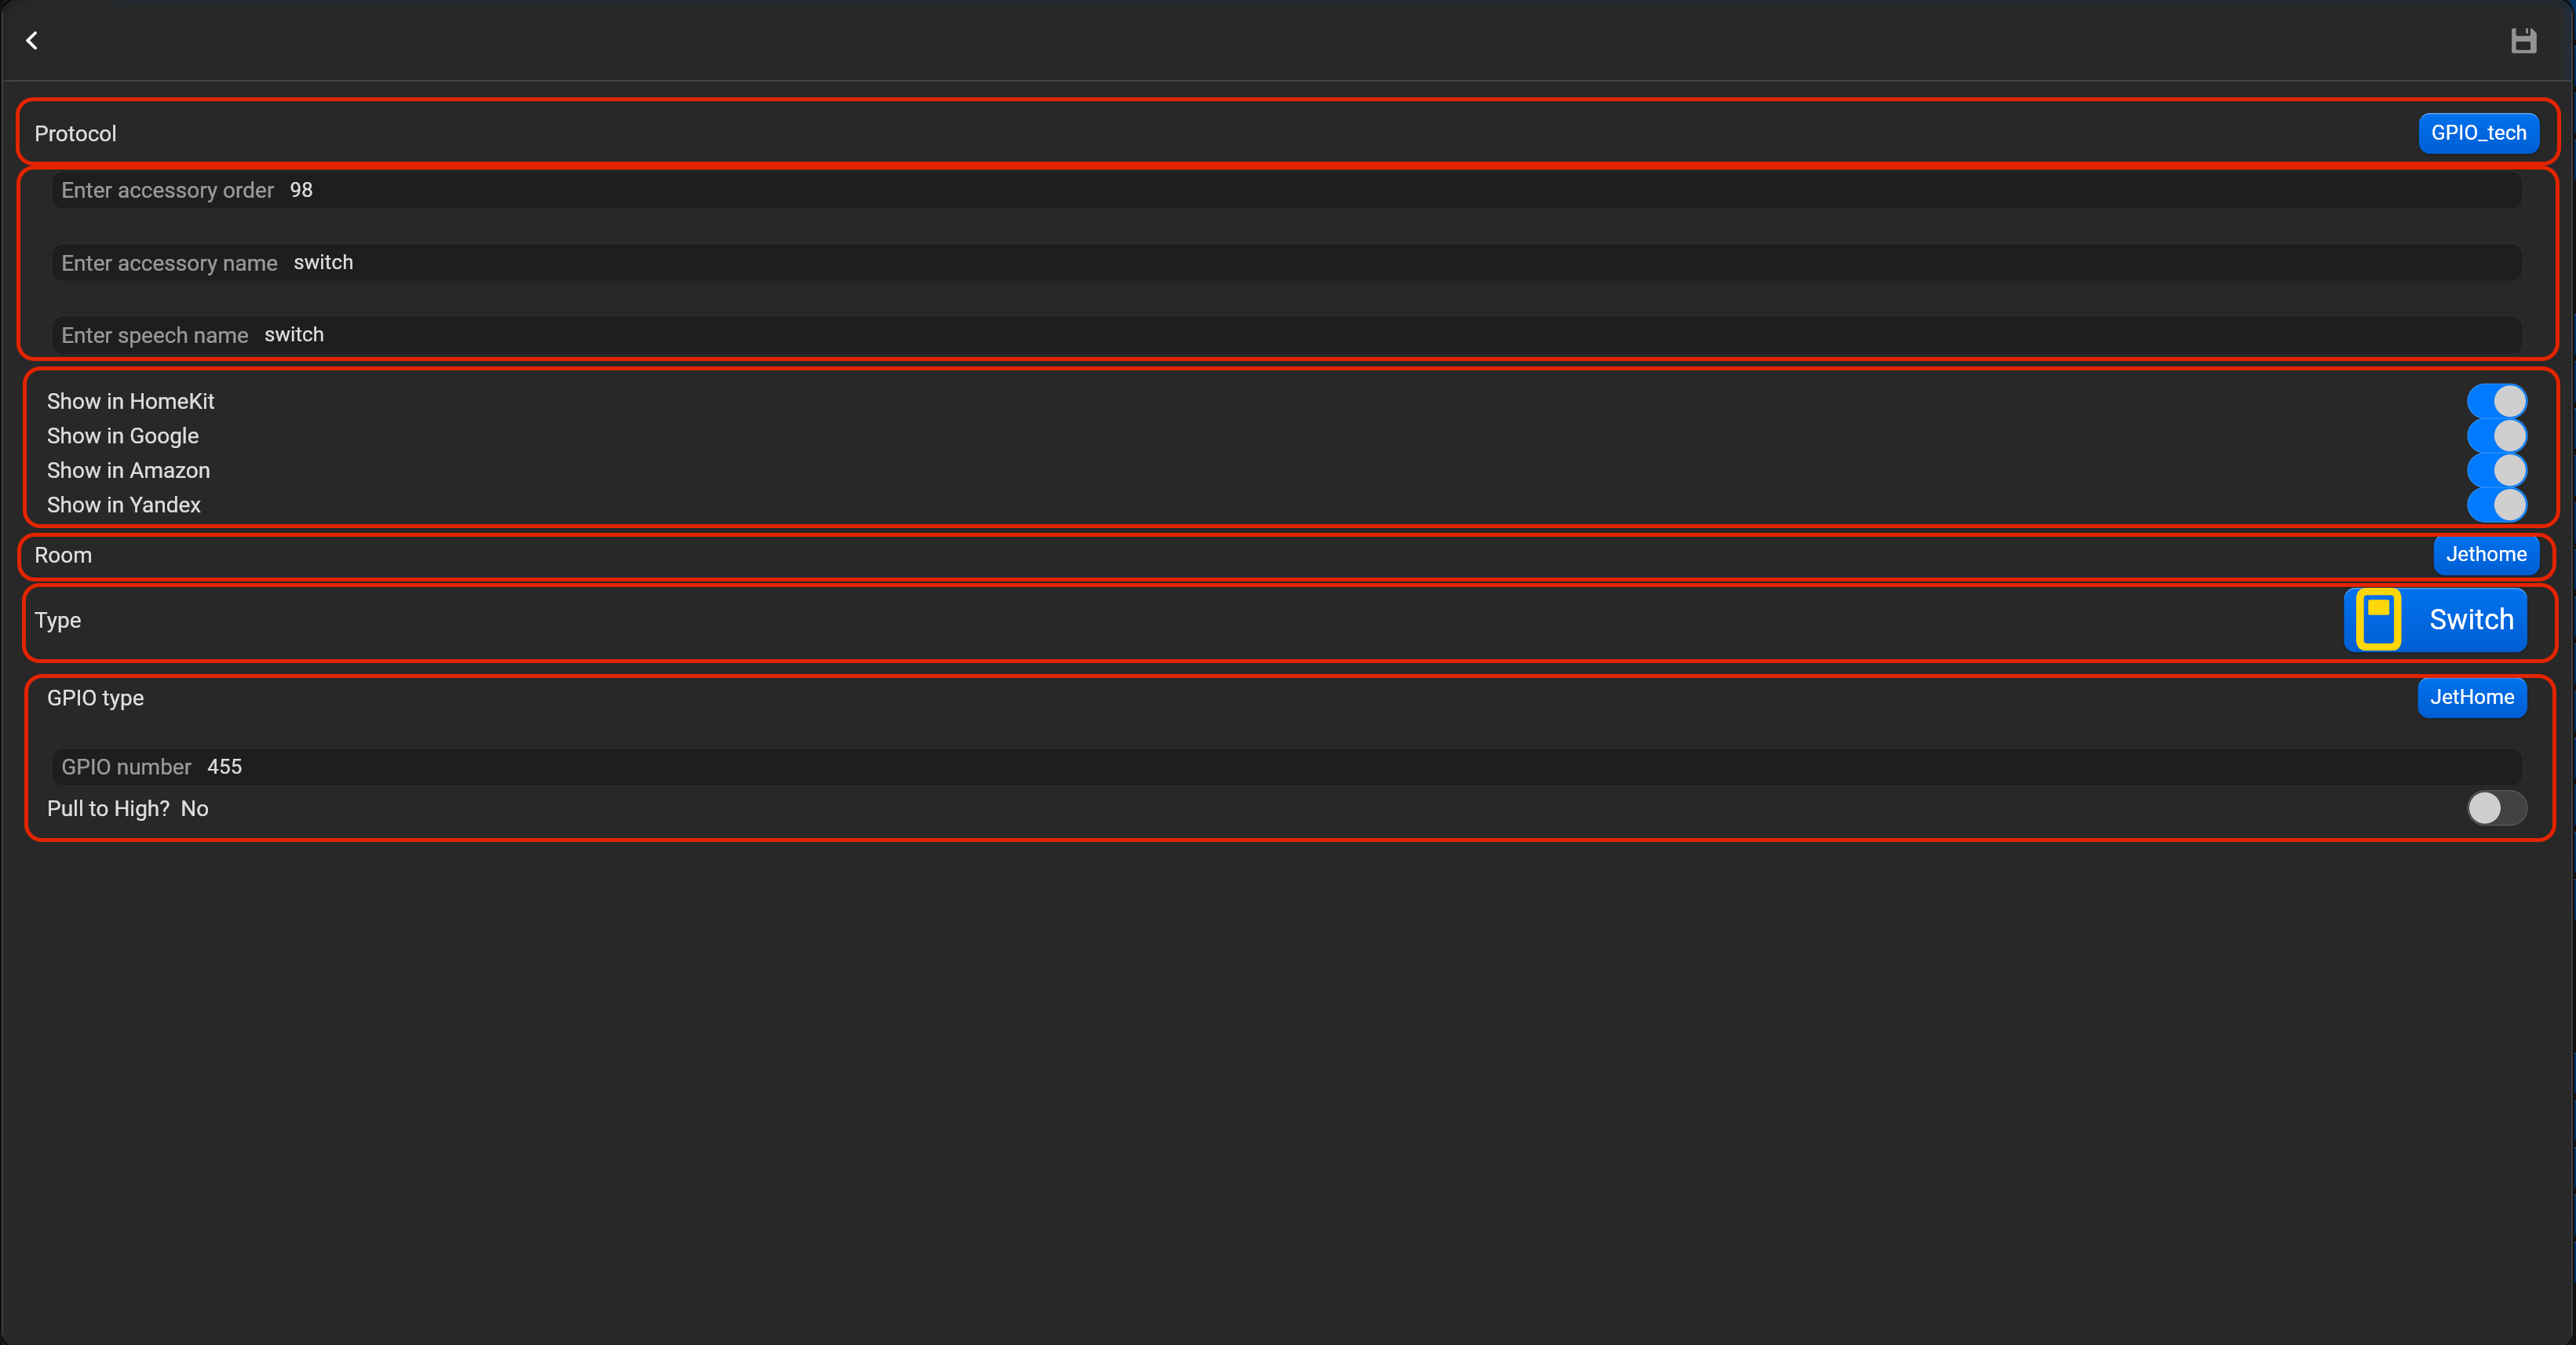
¶ Switch
- select the protocol in the drop-down list,
- put the accessory order (affects the location of the accessory in Pyxis app),
- put name of the accessory and for the voice assistants,
- select voice assistants, where the accessory should be displayed,
- select the room, where the accessory will be located,
- select the type of accessory (Switch), GPIO type (Empty type or Jethome),
- put GPIO number, select whether you need to bind to a high level. By default, continuous monitoring (polling) of the GPIO status is enabled for sensors.
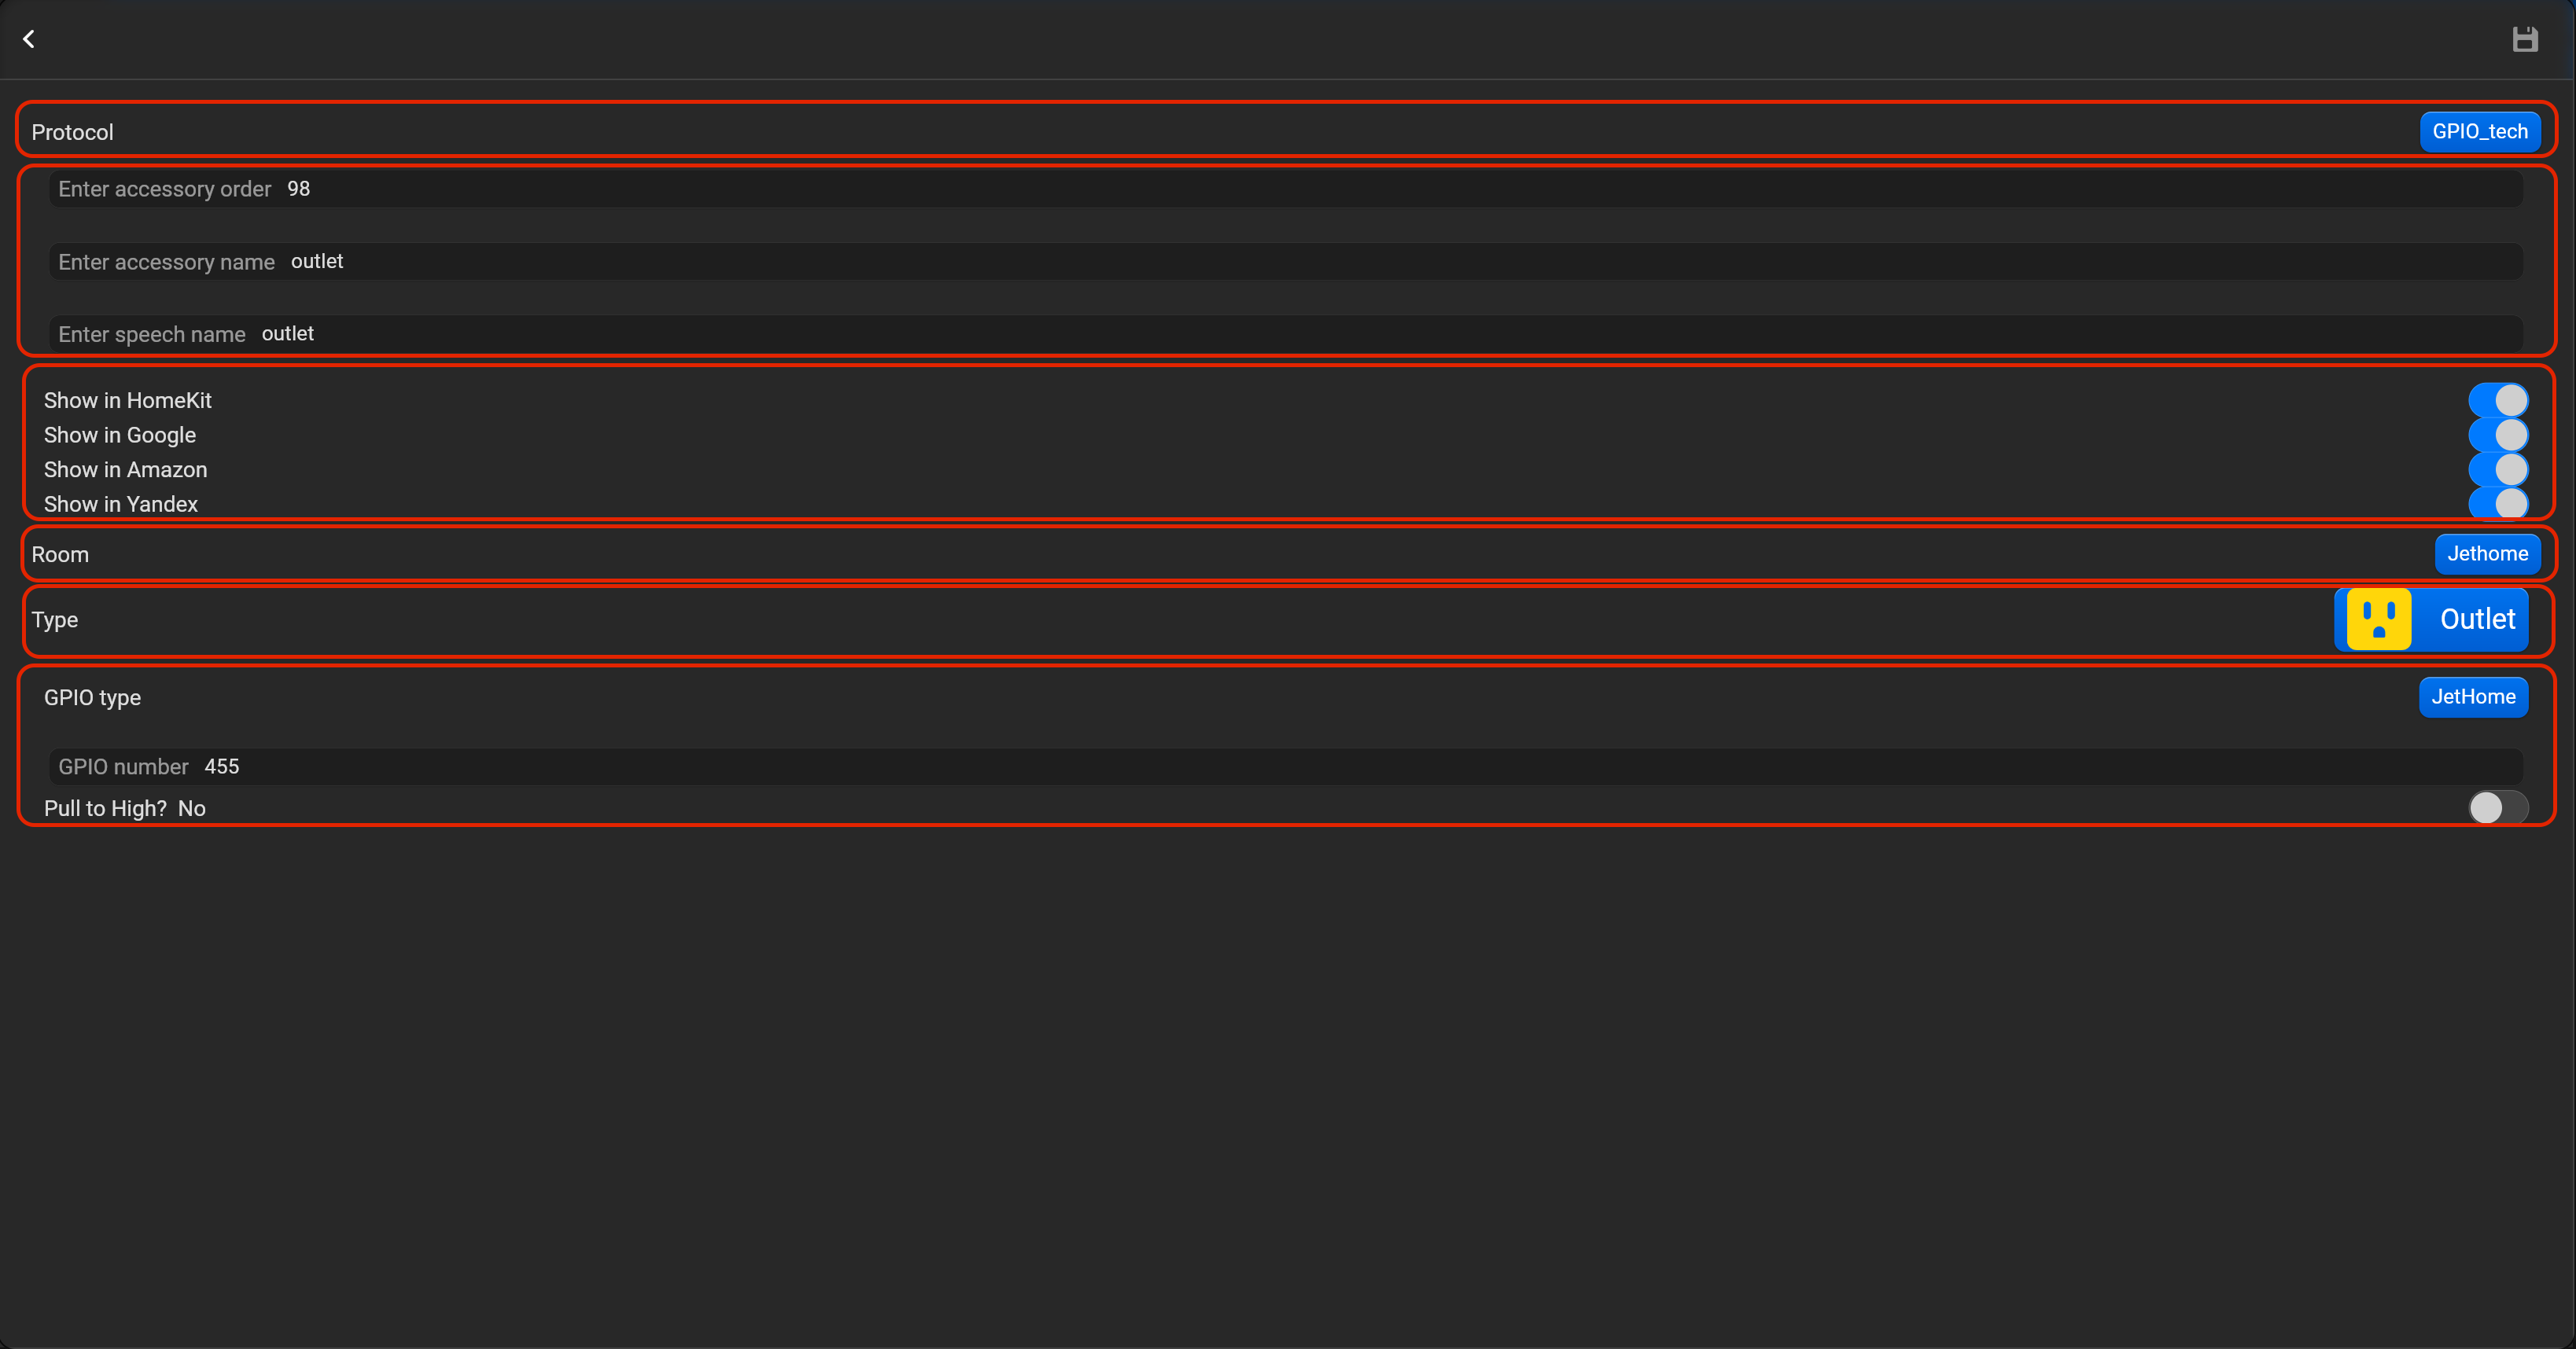
¶ Outlet
- select the protocol in the drop-down list,
- put the accessory order (affects the location of the accessory in Pyxis app),
- put name of the accessory and for the voice assistants,
- select voice assistants, where the accessory should be displayed,
- select the room, where the accessory will be located,
- select the type of accessory (Outlet), GPIO type (Empty type or Jethome),
- put GPIO number, select whether you need to bind to a high level. By default, continuous monitoring (polling) of the GPIO status is enabled for sensors.
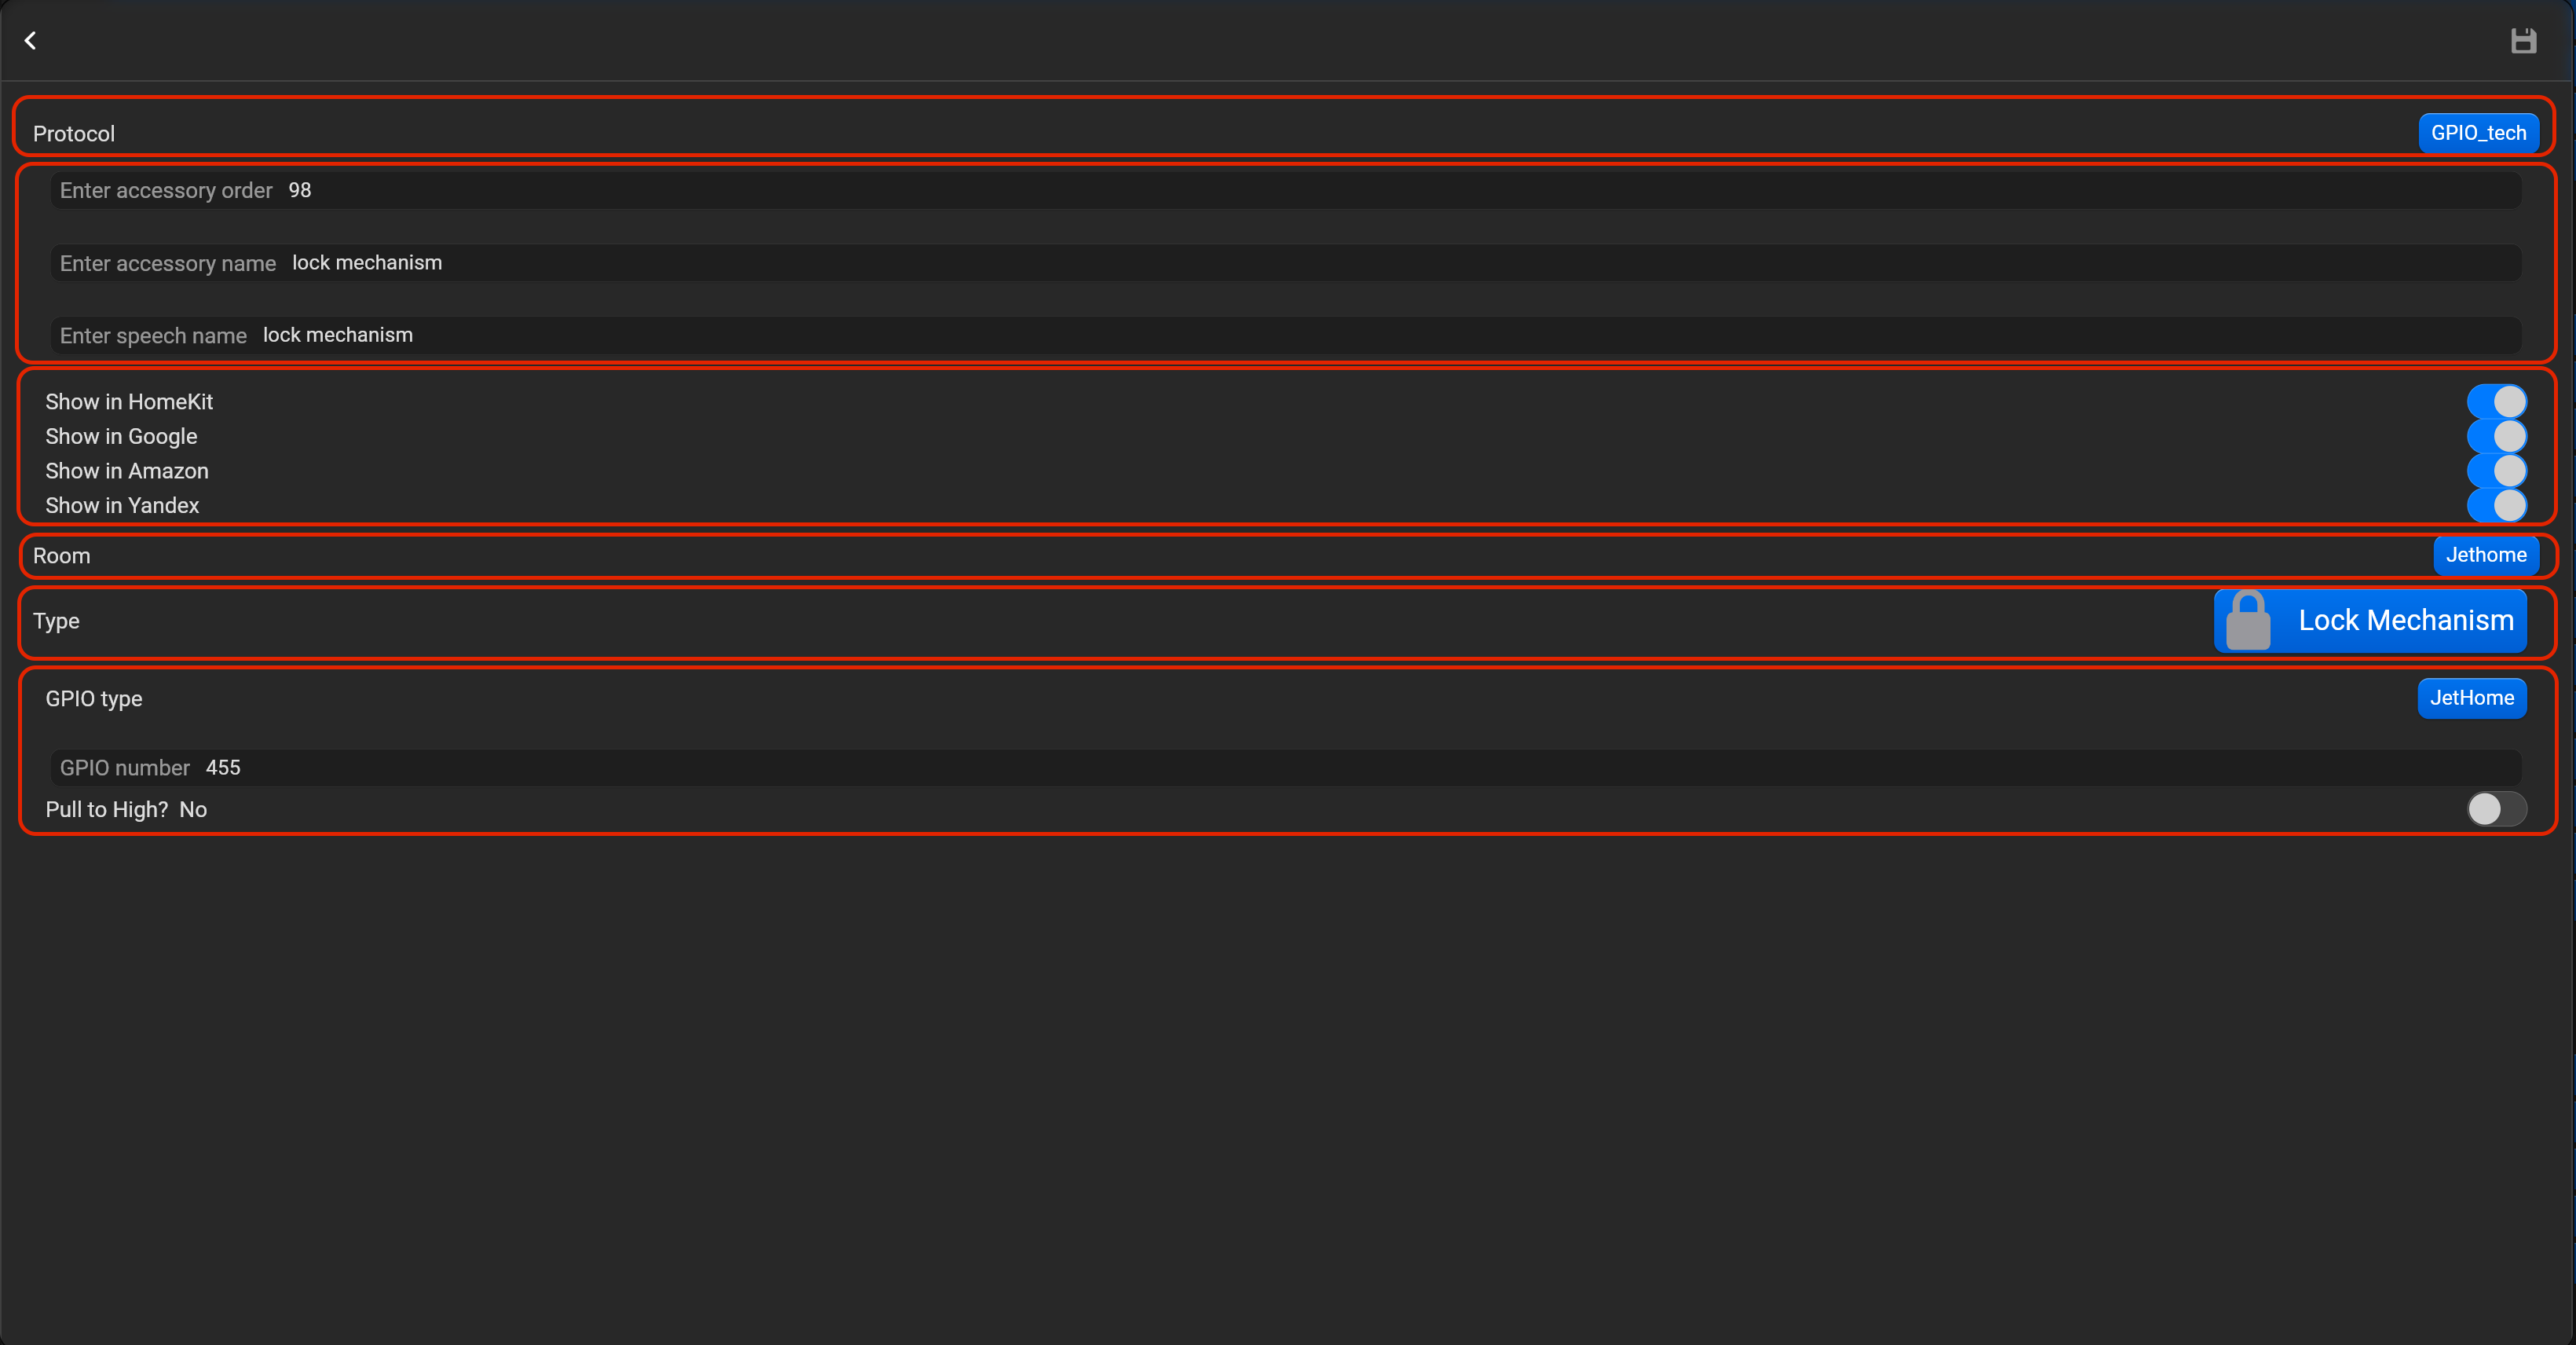
¶ Lock mechanism
- select the protocol in the drop-down list,
- put the accessory order (affects the location of the accessory in Pyxis app),
- put name of the accessory and for the voice assistants,
- select voice assistants, where the accessory should be displayed,
- select the room, where the accessory will be located,
- select the type of accessory (Lock mechanism), GPIO type (Empty type or Jethome),
- put GPIO number, select whether you need to bind to a high level. By default, continuous monitoring (polling) of the GPIO status is enabled for sensors.
¶ Contact sensor
- select the protocol in the drop-down list,
- put the accessory order (affects the location of the accessory in Pyxis app),
- put name of the accessory and for the voice assistants,
- select voice assistants, where the accessory should be displayed,
- select the room, where the accessory will be located,
- select the type of accessory (Contact sensor), GPIO type (Empty type or Jethome),
- put GPIO number, select whether you need to bind to a high level, enable/disable periodical request status, select edge type - Falling or Rising. You can invert value of this accessory.
¶ Leak sensor
- select the protocol in the drop-down list,
- put the accessory order (affects the location of the accessory in Pyxis app),
- put name of the accessory and for the voice assistants,
- select voice assistants, where the accessory should be displayed,
- select the room, where the accessory will be located,
- select the type of accessory (Leak sensor), GPIO type (Empty type or Jethome),
- put GPIO number, select whether you need to bind to a high level, enable/disable periodical request status, select edge type - Falling or Rising. You can invert value of this accessory.
¶ Smoke sensor
- select the protocol in the drop-down list,
- put the accessory order (affects the location of the accessory in Pyxis app),
- put name of the accessory and for the voice assistants,
- select voice assistants, where the accessory should be displayed,
- select the room, where the accessory will be located,
- select the type of accessory (Smoke sensor), GPIO type (Empty type or Jethome),
- put GPIO number, select whether you need to bind to a high level, enable/disable periodical request status, select edge type - Falling or Rising. You can invert value of this accessory.
¶ Motion sensor
- select the protocol in the drop-down list,
- put the accessory order (affects the location of the accessory in Pyxis app),
- put name of the accessory and for the voice assistants,
- select voice assistants, where the accessory should be displayed,
- select the room, where the accessory will be located,
- select the type of accessory (Motion sensor), GPIO type (Empty type or Jethome),
- put GPIO number, select whether you need to bind to a high level, enable/disable periodical request status, select edge type - Falling or Rising.
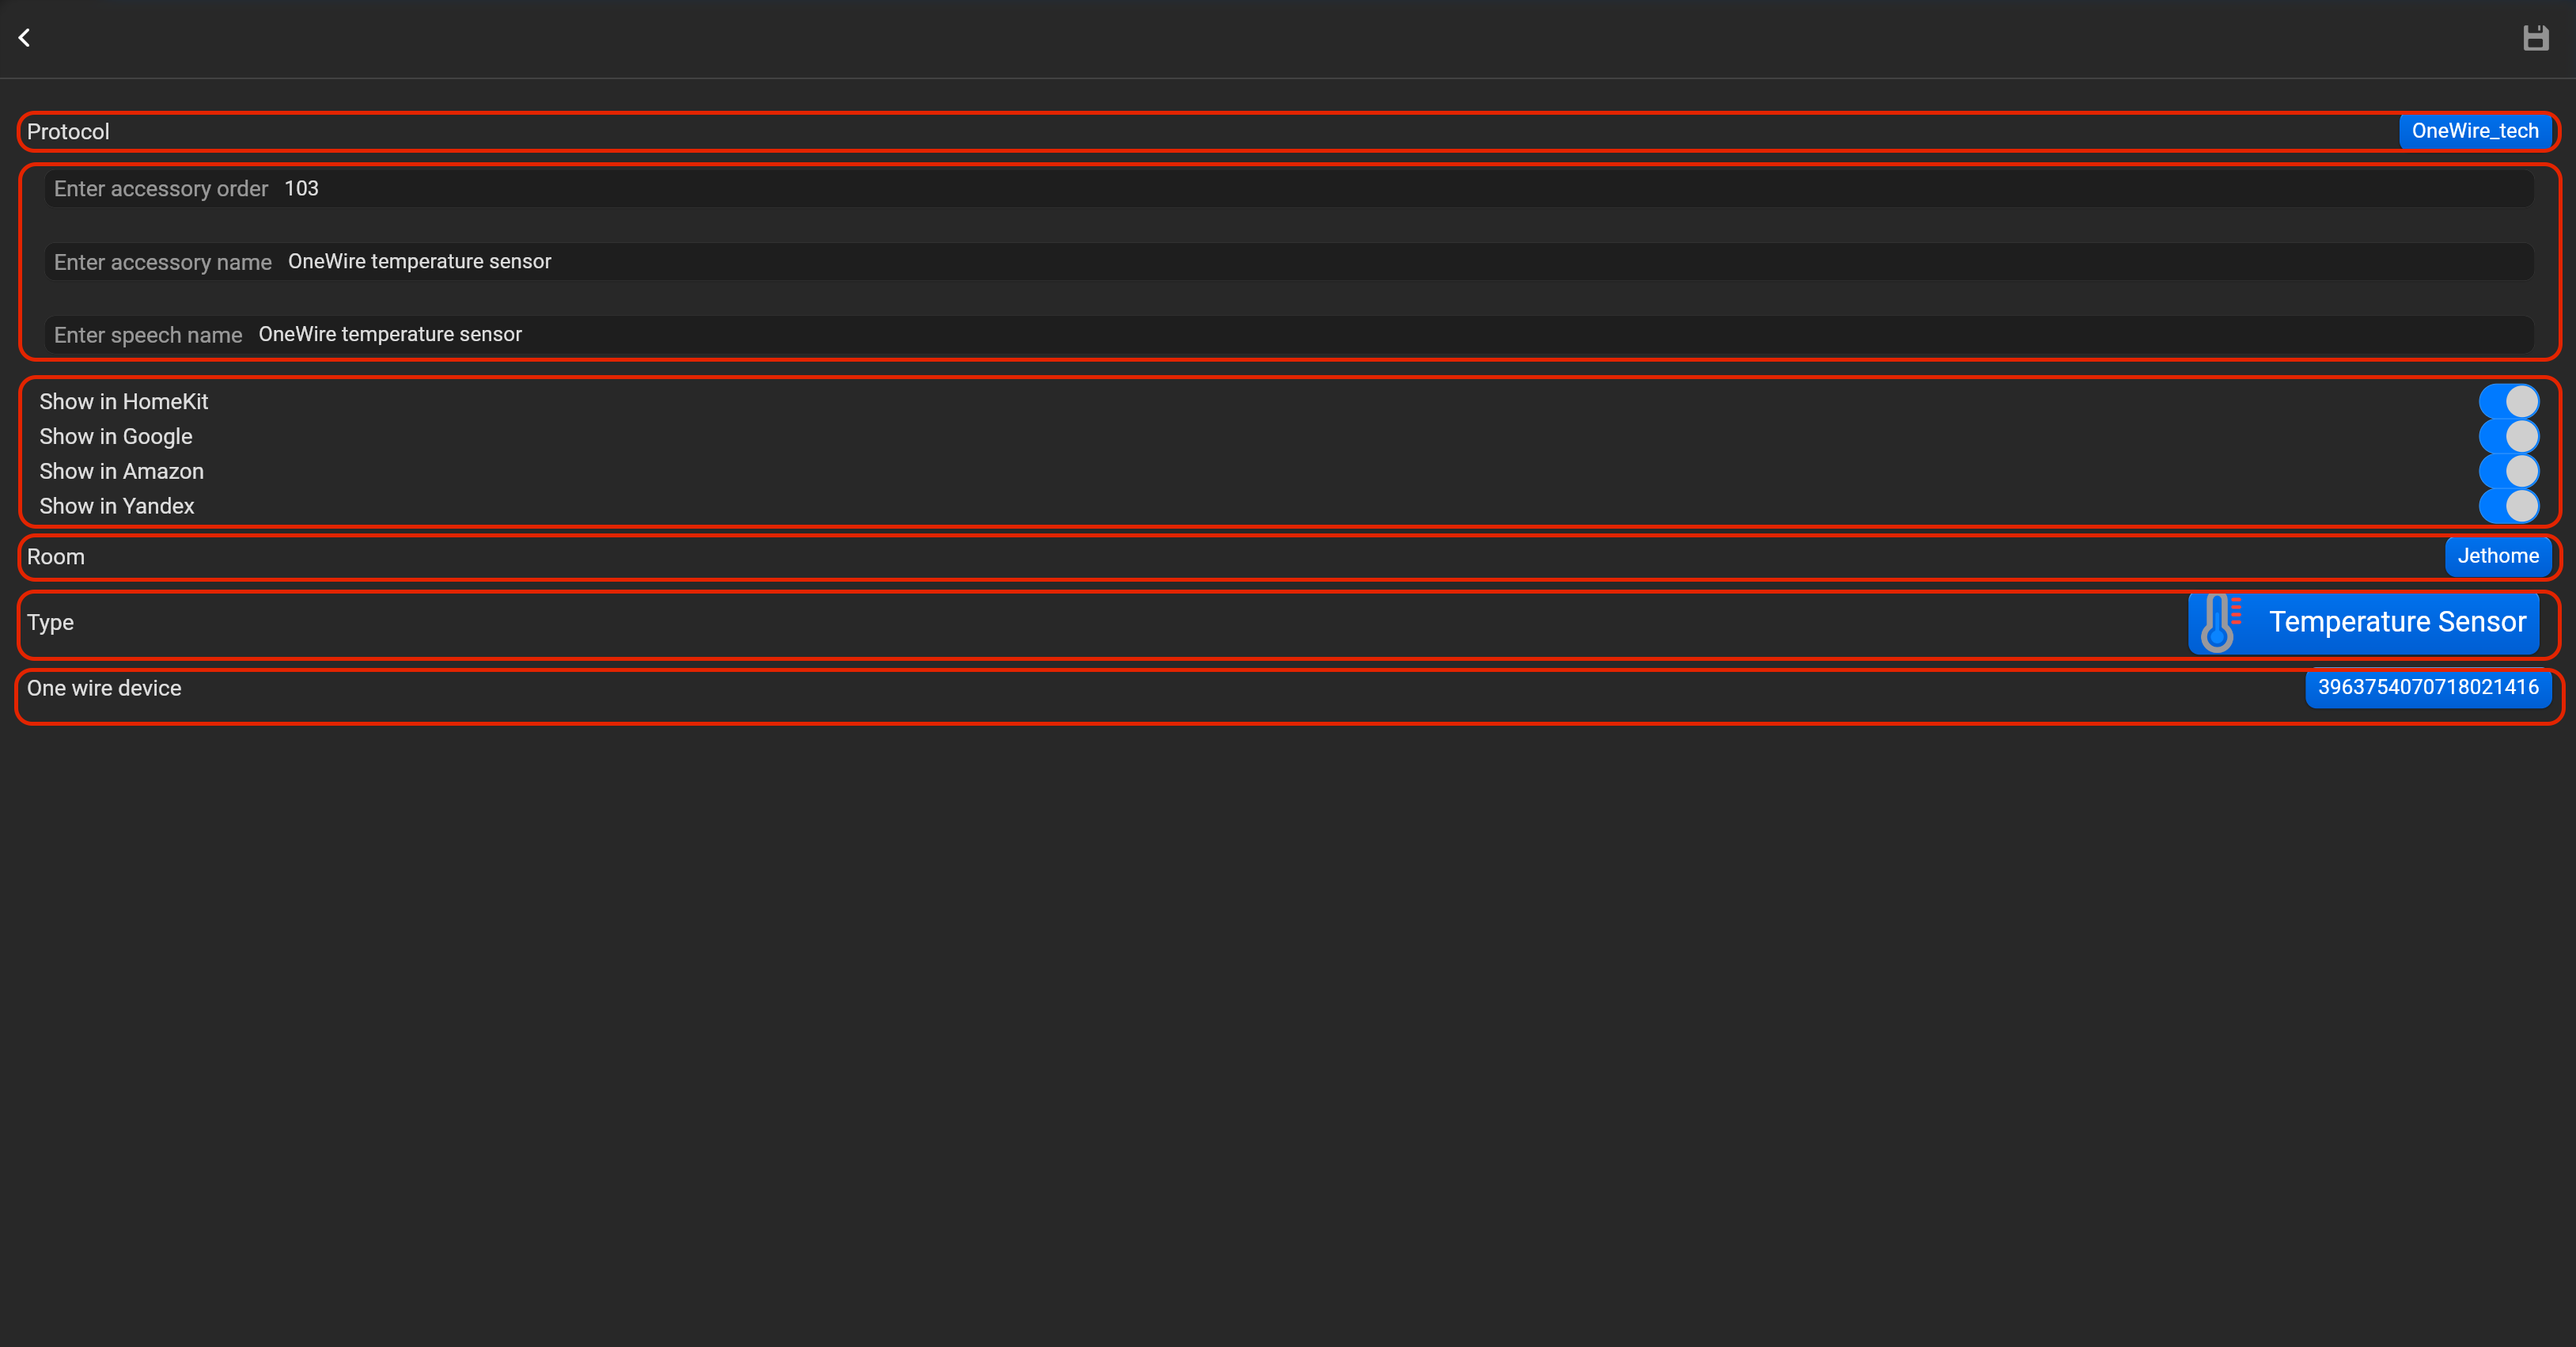
¶ 1Wire
This option valid only, if you deploy Pyxis on JetHome controller. JetHome controller has 1Wire ports. Please, find below, examples for every supported type of accessory. Do not forget save all changes and restart Pyxis.
¶ Temperature sensor
- select the protocol in the drop-down list,
- put the accessory order (affects the location of the accessory in Pyxis app),
- put name of the accessory and for the voice assistants,
- select voice assistants, where the accessory should be displayed,
- select the room, where the accessory will be located,
- select the type of accessory (Temperature sensor),
- select OneWire device in drop-down list.
¶ RS485Curtain Dooya
Pyxis can control Dooya Curtain with RS485. Please, find below, examples for every supported type of accessory. Do not forget save all changes and restart Pyxis.
¶ Window covering
- select the protocol in the drop-down list,
- put the accessory order (affects the location of the accessory in Pyxis app),
- put name of the accessory and for the voice assistants,
- select voice assistants, where the accessory should be displayed,
- select the room, where the accessory will be located,
- select the type of accessory (Window covering),
- register address of RS485 curtain drive (Follow instruction, clicking on “How to setup address” button).